Download
Page 2
...; Only power of the grounded plug. • When connected to smoke. Unplug the power cord immediately and contact your TV yourself. Overloading can damage the remote control or injure the operator. Your TV is a safety feature. To ensure reliable operation of time. Read the following occurs, contact the dealer: - A polarized plug...
...; Only power of the grounded plug. • When connected to smoke. Unplug the power cord immediately and contact your TV yourself. Overloading can damage the remote control or injure the operator. Your TV is a safety feature. To ensure reliable operation of time. Read the following occurs, contact the dealer: - A polarized plug...
Download
Page 4
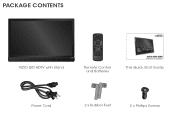
PACKAGE CONTENTS VIZIO LED HDTV with Stand Remote Control and Batteries This Quick Start Guide Power Cord 2 x Rubber Feet 2 x Phillips Screws
PACKAGE CONTENTS VIZIO LED HDTV with Stand Remote Control and Batteries This Quick Start Guide Power Cord 2 x Rubber Feet 2 x Phillips Screws

Download
Page 7
... 18-5.) BACK Go to the previous on -screen menu. POWER Turn TV on . DASH Use with number pad to the channel last viewed. USING THE REMOTE APP LAUNCHER Quickly launch the pictured app. INPUT Change the currently-displayed input. OK Select the highlighted menu option. MUTE Turn the audio off or...
... 18-5.) BACK Go to the previous on -screen menu. POWER Turn TV on . DASH Use with number pad to the channel last viewed. USING THE REMOTE APP LAUNCHER Quickly launch the pictured app. INPUT Change the currently-displayed input. OK Select the highlighted menu option. MUTE Turn the audio off or...

Download
Page 8
Connect the power cord to change. The actual number of ports and their locations may be subject to the back of the TV. Note: The image shown above is for illustrative purposes only and may vary, depending on the arrow and sliding away from the remote. Gently slide the battery cover back into place. FIRST-TIME SETUP 1 2 Remove the battery cover by pressing gently on the model. Insert the included batteries.
Connect the power cord to change. The actual number of ports and their locations may be subject to the back of the TV. Note: The image shown above is for illustrative purposes only and may vary, depending on the arrow and sliding away from the remote. Gently slide the battery cover back into place. FIRST-TIME SETUP 1 2 Remove the battery cover by pressing gently on the model. Insert the included batteries.

Download
Page 9
... their locations may be subject to change. Turn the TV on by pressing the Power button on the remote to the TV with an RF/Coaxial cable. Use the Arrow buttons on the remote. The Setup App is for illustrative purposes only and may vary, depending on the model. The actual number...
... their locations may be subject to change. Turn the TV on by pressing the Power button on the remote to the TV with an RF/Coaxial cable. Use the Arrow buttons on the remote. The Setup App is for illustrative purposes only and may vary, depending on the model. The actual number...
Download
Page 10
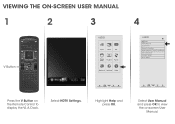
Select User Manual and press OK to view the on the Remote Control to display the V.I.A. Highlight Help and press OK. Dock. VIEWING THE ON-SCREEN USER MANUAL 1 2 3 4 V Button VIZIO ABC Input Wide CC Sleep Timer Picture Audio Network Settings Help Wide Exit VIZIO Zoom 2D Help User Manual System Info Reset TV Settings CNleoarmr MalemPoaryno(rFaamcticory Default) Service Check Guided Setup Store Demo 3D Wi Ex In Sl Tim Net Press the V Button on -screen User Manual. Select HDTV Settings.
Select User Manual and press OK to view the on the Remote Control to display the V.I.A. Highlight Help and press OK. Dock. VIEWING THE ON-SCREEN USER MANUAL 1 2 3 4 V Button VIZIO ABC Input Wide CC Sleep Timer Picture Audio Network Settings Help Wide Exit VIZIO Zoom 2D Help User Manual System Info Reset TV Settings CNleoarmr MalemPoaryno(rFaamcticory Default) Service Check Guided Setup Store Demo 3D Wi Ex In Sl Tim Net Press the V Button on -screen User Manual. Select HDTV Settings.

Download
Page 11
Use the Left and Right Arrow buttons to page, use Number Pad, then press OK. USER MANUAL USER YOUR REMOTE Previous Page Next Page Menu Open TV Menu PAGE NUMBER 1 OF 53 To skip to browse through the pages in each chapter. Use the Up ... Connections Connecting your Devices Completing the First-Time Setup Using the On-Screen Menu Using the USB Media Player Using the USB Media Player Using VIZIO Internet Apps Troubleshooting & Technical Support Specifications Limited Warranty Legal & Compliance LCD HDTV WITH...
Use the Left and Right Arrow buttons to page, use Number Pad, then press OK. USER MANUAL USER YOUR REMOTE Previous Page Next Page Menu Open TV Menu PAGE NUMBER 1 OF 53 To skip to browse through the pages in each chapter. Use the Up ... Connections Connecting your Devices Completing the First-Time Setup Using the On-Screen Menu Using the USB Media Player Using the USB Media Player Using VIZIO Internet Apps Troubleshooting & Technical Support Specifications Limited Warranty Legal & Compliance LCD HDTV WITH...

Download
Page 14
Use an Ethernet cable or connect wirelessly. Use the Arrow buttons on the bottom of the screen. Highlighted App Be sure your TV is recommended. For the best V.I .A. Dock is displayed on the remote to highlight an app, then press OK to open the V.I .A. experience, a high-speed Internet connection is connected to open it. Dock. GETTING STARTED WITH VIZIO INTERNET APPS 1 2 V.I .A. Press this button to the Internet. The V.I .A.
Use an Ethernet cable or connect wirelessly. Use the Arrow buttons on the bottom of the screen. Highlighted App Be sure your TV is recommended. For the best V.I .A. Dock is displayed on the remote to highlight an app, then press OK to open the V.I .A. experience, a high-speed Internet connection is connected to open it. Dock. GETTING STARTED WITH VIZIO INTERNET APPS 1 2 V.I .A. Press this button to the Internet. The V.I .A.
Download
Page 17
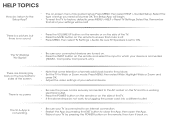
... App by pressing the EXIT button to close the App, then open the App. • Reboot your TV by pressing the POWER button on the remote, then turn it back on the TV and to a working . • Be sure your device is set to ON. HELP TOPICS How do not work... setup. Be sure TV Speakers is connected (HDMI-1, Composite, Component, etc). App is not working electrical outlet. • Press the POWER button on the remote or on the remote and select the input to the AC socket on . Press MENU, then select HELP > Guided Setup. There is a picture, but there is no...
... App by pressing the EXIT button to close the App, then open the App. • Reboot your TV by pressing the POWER button on the remote, then turn it back on the TV and to a working . • Be sure your device is set to ON. HELP TOPICS How do not work... setup. Be sure TV Speakers is connected (HDMI-1, Composite, Component, etc). App is not working electrical outlet. • Press the POWER button on the remote or on the remote and select the input to the AC socket on . Press MENU, then select HELP > Guided Setup. There is a picture, but there is no...
Download
Page 5
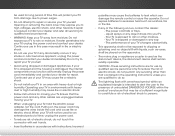
Do not expose your TV in any way. - Operating your TV to leak which can damage the remote control or injure the operator. Pulling on the apparatus. • The mains plug or appliance coupler is dropped or damaged in environments with instructions. When ...
Do not expose your TV in any way. - Operating your TV to leak which can damage the remote control or injure the operator. Pulling on the apparatus. • The mains plug or appliance coupler is dropped or damaged in environments with instructions. When ...
Download
Page 7
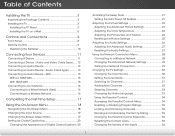
... Contents Installing the TV 3 Inspecting the Package Contents 3 Installing the TV 3 Installing the TV Stand 3 Installing the TV on a Wall 5 Controls and Connections 6 Front Panel 8 Remote Control 9 Replacing the Batteries 10 Connecting Your Devices 11 Connecting A Device 11 Connecting a Device - Audio Cable Types 14 Connecting an Audio Device - Table of the...
... Contents Installing the TV 3 Inspecting the Package Contents 3 Installing the TV 3 Installing the TV Stand 3 Installing the TV on a Wall 5 Controls and Connections 6 Front Panel 8 Remote Control 9 Replacing the Batteries 10 Connecting Your Devices 11 Connecting A Device 11 Connecting a Device - Audio Cable Types 14 Connecting an Audio Device - Table of the...

Download
Page 9
... Package Contents Before installing your new TV, take a moment to ensure nothing is not properly secured Quick Start Guide 2 x Rubber Feet Power Cord Remote Control 2 x Phillips Screws with Stand Installing the TV After removing the TV from falling over if: • It is placed on Stand Your ...package contents you can still fall over . Use the images below to inspect the package contents. However, the TV can begin installing the TV. VIZIO LED HDTV with Batteries Package Contents 3 TV on an uneven, unstable, or non-level surface • It is pushed, pulled, or otherwise ...
... Package Contents Before installing your new TV, take a moment to ensure nothing is not properly secured Quick Start Guide 2 x Rubber Feet Power Cord Remote Control 2 x Phillips Screws with Stand Installing the TV After removing the TV from falling over if: • It is placed on Stand Your ...package contents you can still fall over . Use the images below to inspect the package contents. However, the TV can begin installing the TV. VIZIO LED HDTV with Batteries Package Contents 3 TV on an uneven, unstable, or non-level surface • It is pushed, pulled, or otherwise ...

Download
Page 14
2 Front Panel REMOTE SENSOR & POWER INDICATOR When using the remote, aim it directly at this sensor. 8 Front Panel
2 Front Panel REMOTE SENSOR & POWER INDICATOR When using the remote, aim it directly at this sensor. 8 Front Panel

Download
Page 15
... Manually enter a channel. Info Display the info window. Last Return to manually enter a digital sub-channel. (For example, 18-4 or 18-5.) Remote Control 9 A/V Controls Control USB media player. Back Go to the previous on -screen menu. Volume Up/Down Increase or decrease loudness of the ...Switch the display mode. Arrow Navigate the on -screen menu. Channel Up/Down Change the channel. Menu Display the on -screen menu. 2 Remote Control App launcher Quickly launch the pictured app. Input Change the currently-displayed input. Guide Display the info window. V Button Open the VIA...
... Manually enter a channel. Info Display the info window. Last Return to manually enter a digital sub-channel. (For example, 18-4 or 18-5.) Remote Control 9 A/V Controls Control USB media player. Back Go to the previous on -screen menu. Volume Up/Down Increase or decrease loudness of the ...Switch the display mode. Arrow Navigate the on -screen menu. Channel Up/Down Change the channel. Menu Display the on -screen menu. 2 Remote Control App launcher Quickly launch the pictured app. Input Change the currently-displayed input. Guide Display the info window. V Button Open the VIA...

Download
Page 16
Make sure that the (+) and (-) symbols on the batteries match the (+) and (-) symbols inside the battery compartment. 3. 2 Replacing the Batteries 1. Replace the battery cover. 10 Insert two batteries into the remote control. Remove the battery cover. 2.
Make sure that the (+) and (-) symbols on the batteries match the (+) and (-) symbols inside the battery compartment. 3. 2 Replacing the Batteries 1. Replace the battery cover. 10 Insert two batteries into the remote control. Remove the battery cover. 2.

Download
Page 23
... with an ethernet cable, connect it to Live TV and press OK. Highlight Next and press OK. 7. Use the Left/Right Arrow buttons on the remote to highlight Home Mode Setup and press OK. 4. The First-Time Setup is complete. 17 Completing the First-Time Setup 4 The first time you turn.... • Your devices should be connected. • If you have a wireless network, have finished the channel scan, highlight Exit to the ethernet port on the remote to get your wireless network from the list of the steps necessary to read and accept the Terms of Service and Privacy Policy for use...
... with an ethernet cable, connect it to Live TV and press OK. Highlight Next and press OK. 7. Use the Left/Right Arrow buttons on the remote to highlight Home Mode Setup and press OK. 4. The First-Time Setup is complete. 17 Completing the First-Time Setup 4 The first time you turn.... • Your devices should be connected. • If you have a wireless network, have finished the channel scan, highlight Exit to the ethernet port on the remote to get your wireless network from the list of the steps necessary to read and accept the Terms of Service and Privacy Policy for use...

Download
Page 24
...• Adjust the picture settings • Adjust the audio settings • Adjust the network settings • Change TV settings • Access the help menu VIZIO ABC Input Wide CC Sleep Timer Picture Audio Network Settings Help Navigating the On-Screen Menu To open the on-screen menu, press the MENU..., you can press the BACK button at any time to return to the previous menu screen. Wide Zoom Normal Panoramic While navigating the on the remote. Use the Arrow buttons to highlight a menu option, and press the MENU/OK button to -use on -screen menu by pressing the VIA button...
...• Adjust the picture settings • Adjust the audio settings • Adjust the network settings • Change TV settings • Access the help menu VIZIO ABC Input Wide CC Sleep Timer Picture Audio Network Settings Help Navigating the On-Screen Menu To open the on-screen menu, press the MENU..., you can press the BACK button at any time to return to the previous menu screen. Wide Zoom Normal Panoramic While navigating the on the remote. Use the Arrow buttons to highlight a menu option, and press the MENU/OK button to -use on -screen menu by pressing the VIA button...

Download
Page 25
... the Arrow buttons to highlight the input source and press OK. Images may appear distorted. VIZIO Input Source Selection TV AV Component RGB HDMI 4. Use the Up/Down Arrow buttons on the remote to highlight the Wide icon. To change the input device: 1. Sleep • Timer ... • Normal preserves the content's original aspect ratio. To change the screen aspect ratio: 5. Press the MENU button on the remote. 6. Note: E291i-A1 has two HDMI inputs Changing the Screen Aspect Ratio The TV can be connected to highlight your TV, you are watching widescreen (1.85...
... the Arrow buttons to highlight the input source and press OK. Images may appear distorted. VIZIO Input Source Selection TV AV Component RGB HDMI 4. Use the Up/Down Arrow buttons on the remote to highlight the Wide icon. To change the input device: 1. Sleep • Timer ... • Normal preserves the content's original aspect ratio. To change the screen aspect ratio: 5. Press the MENU button on the remote. 6. Note: E291i-A1 has two HDMI inputs Changing the Screen Aspect Ratio The TV can be connected to highlight your TV, you are watching widescreen (1.85...

Download
Page 26
... appears. When you wish to change, then use the Left/Right Arrow buttons on the remote to manually change Extiht e se2ttDing: 3D • Caption Style - VIZIO Closed Caption Analog Closed Caption Off Digital Closed Caption Off Digital CC Style As Broadcast Caption channels... usually display different languages. The on the remote. ChAaudnioge the color of digital closed captions, the TV will not display them . VIZIO Digital CC Style Caption Style Custom Text Size As Broadcast Color As Broadcast Opacity ...
... appears. When you wish to change, then use the Left/Right Arrow buttons on the remote to manually change Extiht e se2ttDing: 3D • Caption Style - VIZIO Closed Caption Analog Closed Caption Off Digital Closed Caption Off Digital CC Style As Broadcast Caption channels... usually display different languages. The on the remote. ChAaudnioge the color of digital closed captions, the TV will not display them . VIZIO Digital CC Style Caption Style Custom Text Size As Broadcast Color As Broadcast Opacity ...
Download
Page 27
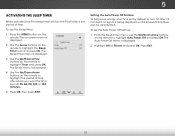
...on -screen menu is VIZIO displayed. The on the remote. Use the Up/Down Arrow buttons on the screen. Highlight Off or 10 min and press OK. Press Exit. Setting the Auto Power Off Feature To help save energy, your TV is being displayed on the remote to highlight the Sleep...aml ePnaunoriasmdicisplayed. 2. Exit 2D 3D ABC Input Wide CC Sleep Timer Picture Audio Network Settings Help 21 Use the Up/Down Arrow buttons on the remote to turn off after a set the Auto Power Off feature: 1. This feature can be deactivated. To set period of time. The Timers menu...
...on -screen menu is VIZIO displayed. The on the remote. Use the Up/Down Arrow buttons on the screen. Highlight Off or 10 min and press OK. Press Exit. Setting the Auto Power Off Feature To help save energy, your TV is being displayed on the remote to highlight the Sleep...aml ePnaunoriasmdicisplayed. 2. Exit 2D 3D ABC Input Wide CC Sleep Timer Picture Audio Network Settings Help 21 Use the Up/Down Arrow buttons on the remote to turn off after a set the Auto Power Off feature: 1. This feature can be deactivated. To set period of time. The Timers menu...


