

E240AR User Manual
Page 1
USER GUIDE MOMDODEELLSS // E3D320VX // E3DE42204VX0AR // E3DE43702VX0AR INSTALLING YOUR new TV CONTROLS & CONNECTIONS CONNECTING YOUR DEVICES USING THE ON-SCREEN MENU USING USB photo slideshow TROUBLESHOOTING & SUPPORT SPECs, warranty & LEGAL
USER GUIDE MOMDODEELLSS // E3D320VX // E3DE42204VX0AR // E3DE43702VX0AR INSTALLING YOUR new TV CONTROLS & CONNECTIONS CONNECTING YOUR DEVICES USING THE ON-SCREEN MENU USING USB photo slideshow TROUBLESHOOTING & SUPPORT SPECs, warranty & LEGAL
E240AR User Manual
Page 3
... important operating instructions. To purchase an extended warranty service plan, visit www.VIZIO.com. It is designed and manufactured to protect your investment beyond the standard warranty, VIZIO offers on your TV. When you see this symbol, please read the accompanying important warning or notice...component damage, switch off the power before operating your new VIZIO HDTV. Install in accordance with a dry cloth. • Do not block any heat sources such as radiators, heat registers, stoves, or other components to your TV. • Read these instructions. • Keep these...
... important operating instructions. To purchase an extended warranty service plan, visit www.VIZIO.com. It is designed and manufactured to protect your investment beyond the standard warranty, VIZIO offers on your TV. When you see this symbol, please read the accompanying important warning or notice...component damage, switch off the power before operating your new VIZIO HDTV. Install in accordance with a dry cloth. • Do not block any heat sources such as radiators, heat registers, stoves, or other components to your TV. • Read these instructions. • Keep these...
E240AR User Manual
Page 4
...moisture, does not operate normally or has been dropped. • Unplug the power cord before turning on the label. Do not install your TV yourself. If you to high voltages, electric shock, and other voltage than the voltage specified. The manufacturer's warranty does not cover user ...• The lightning flash with the apparatus. This will not be used for ventilation. with arrowhead symbol within the inside of your TV that may be of sufficient magnitude to constitute a risk of electric shock to persons. • Do not overload power strips and extension cords. ...
...moisture, does not operate normally or has been dropped. • Unplug the power cord before turning on the label. Do not install your TV yourself. If you to high voltages, electric shock, and other voltage than the voltage specified. The manufacturer's warranty does not cover user ...• The lightning flash with the apparatus. This will not be used for ventilation. with arrowhead symbol within the inside of your TV that may be of sufficient magnitude to constitute a risk of electric shock to persons. • Do not overload power strips and extension cords. ...
E240AR User Manual
Page 5
...contained in the operating instructions unless you are for an extended period of time, unplug the power cord. • To reduce risk of your TV changes substantially. • This apparatus shall not be of sufficient magnitude to constitute a risk of electric shock, do not perform any servicing other .... • CAUTION - Continuous use in this case may result in fire or electric shock. • Do not use your TV. - Your TV is damaged, the internal components may function abnormally. To reduce the risk of electrical shock to leak which can damage the remote control or ...
...contained in the operating instructions unless you are for an extended period of time, unplug the power cord. • To reduce risk of your TV changes substantially. • This apparatus shall not be of sufficient magnitude to constitute a risk of electric shock, do not perform any servicing other .... • CAUTION - Continuous use in this case may result in fire or electric shock. • Do not use your TV. - Your TV is damaged, the internal components may function abnormally. To reduce the risk of electrical shock to leak which can damage the remote control or ...
E240AR User Manual
Page 6
...2009. For additional information, please contact the parties listed below, as before to digital-only broadcasting. No extra converter box is needed. Analog-only TVs should continue to work as appropriate: FCC (US Federal Communications Commission) Web: www.fcc.gov Phone: 1-888-CALL-FCC (1-888-225-5322) TTY...888-DTV-2009 (1-888-388-2009) List of processing digital broadcasts. DTV Transition Advisory The nationwide switch to receive over-the-air TV. Watch your local stations to find out when they will turn off their analog signal and switch to receive low power, Class A or...
...2009. For additional information, please contact the parties listed below, as before to digital-only broadcasting. No extra converter box is needed. Analog-only TVs should continue to work as appropriate: FCC (US Federal Communications Commission) Web: www.fcc.gov Phone: 1-888-CALL-FCC (1-888-225-5322) TTY...888-DTV-2009 (1-888-388-2009) List of processing digital broadcasts. DTV Transition Advisory The nationwide switch to receive over-the-air TV. Watch your local stations to find out when they will turn off their analog signal and switch to receive low power, Class A or...
E240AR User Manual
Page 7
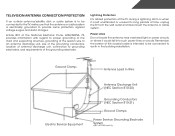
...regard to proper grounding of the mast and supporting structure, grounding of the lead-in the building installation. Lightning Protection For added protection of the TV during a lightning storm or when it could fall into such power lines or circuits. Television Antenna Connection Protection If an outside antenna/...conductors, location of antenna discharge unit, connection to grounding electrodes, and requirements of the coaxial cable is intended to be connected to the TV, make sure that the antenna or cable system is left unattended or unused for long periods of time, unplug the...
...regard to proper grounding of the mast and supporting structure, grounding of the lead-in the building installation. Lightning Protection For added protection of the TV during a lightning storm or when it could fall into such power lines or circuits. Television Antenna Connection Protection If an outside antenna/...conductors, location of antenna discharge unit, connection to grounding electrodes, and requirements of the coaxial cable is intended to be connected to the TV, make sure that the antenna or cable system is left unattended or unused for long periods of time, unplug the...
E240AR User Manual
Page 8
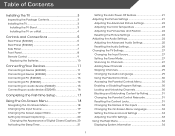
... Contents Installing the TV 3 Inspecting the Package Contents 3 Installing the TV 3 Installing the TV Stand 3 Installing the TV on a Wall 4 Controls and Connections 5 Rear Panel (E240AR 5 Rear Panel (E320AR 6 Side Panel 7 Front Panel 8 Remote Control 9 Replacing the Batteries 10 Connecting Your Devices 11 Connecting A Device (E240AR 11 Connecting A Device (E320AR 12 Connecting A PC (E240AR 13 Connecting A PC...
... Contents Installing the TV 3 Inspecting the Package Contents 3 Installing the TV 3 Installing the TV Stand 3 Installing the TV on a Wall 4 Controls and Connections 5 Rear Panel (E240AR 5 Rear Panel (E320AR 6 Side Panel 7 Front Panel 8 Remote Control 9 Replacing the Batteries 10 Connecting Your Devices 11 Connecting A Device (E240AR 11 Connecting A Device (E320AR 12 Connecting A PC (E240AR 13 Connecting A PC...
E240AR User Manual
Page 9
Resetting the TV Settings 34 Restoring the TV to Factory Default Settings 35 Using Setup Wizard 35 Using the Info Window 36 Using the USB Media Player 37 Using the USB Photo slideshow 37 Connecting a USB Thumb Drive to the TV 37 Playing USB Media 37 Troubleshooting & Technical Support 40 Specifications 43 Limited Warranty 45 Legal & Compliance 46 2
Resetting the TV Settings 34 Restoring the TV to Factory Default Settings 35 Using Setup Wizard 35 Using the Info Window 36 Using the USB Media Player 37 Using the USB Photo slideshow 37 Connecting a USB Thumb Drive to the TV 37 Playing USB Media 37 Troubleshooting & Technical Support 40 Specifications 43 Limited Warranty 45 Legal & Compliance 46 2
E240AR User Manual
Page 10
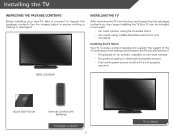
..., or otherwise improperly moved • If an earthquake occurs and the TV is missing or damaged. Your TV can begin installing the TV. Installing the TV Inspecting the Package Contents Before installing your new TV, take a moment to ensure nothing is not properly secured VIZIO LCD HDTV Quick Start Guide Remote Control with Batteries Package Contents...
..., or otherwise improperly moved • If an earthquake occurs and the TV is missing or damaged. Your TV can begin installing the TV. Installing the TV Inspecting the Package Contents Before installing your new TV, take a moment to ensure nothing is not properly secured VIZIO LCD HDTV Quick Start Guide Remote Control with Batteries Package Contents...

E240AR User Manual
Page 11
...level, and stable surface. 5. Move the TV with the TV. 3. Disconnect any other objects (walls, etc). Place the TV face-down on a clean, flat surface. Specifications for your TV model: E240AR E320AR To install the TV stand: 1. Attach the stand to your TV. 2. Remove the stand by inserting and ...Consult the information below to help you will need a wall mount. To prevent injury or damage to the TV, ask someone to find the appropriate mount for the weight of this TV. E240AR E320AR Screw Size: Screw Length: Hole Pattern: M4 12mm 100mm (V) x 100mm (H) M6 12mm 200mm ...
...level, and stable surface. 5. Move the TV with the TV. 3. Disconnect any other objects (walls, etc). Place the TV face-down on a clean, flat surface. Specifications for your TV model: E240AR E320AR To install the TV stand: 1. Attach the stand to your TV. 2. Remove the stand by inserting and ...Consult the information below to help you will need a wall mount. To prevent injury or damage to the TV, ask someone to find the appropriate mount for the weight of this TV. E240AR E320AR Screw Size: Screw Length: Hole Pattern: M4 12mm 100mm (V) x 100mm (H) M6 12mm 200mm ...
E240AR User Manual
Page 14
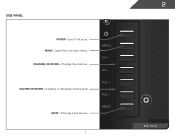
Open the on . Change the channel. Increase or decrease volume level INPUT - Change input source. Turn TV off or on -screen menu. INPUT 7 2 Side Panel Side Panel POWER - VOLUME UP/DOWN - MENU CH + CH - MENU - CHANNEL UP/DOWN -
Open the on . Change the channel. Increase or decrease volume level INPUT - Change input source. Turn TV off or on -screen menu. INPUT 7 2 Side Panel Side Panel POWER - VOLUME UP/DOWN - MENU CH + CH - MENU - CHANNEL UP/DOWN -
E240AR User Manual
Page 16
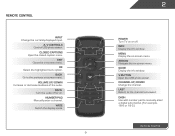
Ok Select the highlighted menu option. Mute Turn the audio off or on or off. WIDE Switch the display mode. 9 2 Power Turn TV on . Arrow Navigate the on -screen menu. Back Go to the previous on -screen menu. Info Display the info window. Last Return to manually enter a ...
Ok Select the highlighted menu option. Mute Turn the audio off or on or off. WIDE Switch the display mode. 9 2 Power Turn TV on . Arrow Navigate the on -screen menu. Back Go to the previous on -screen menu. Info Display the info window. Last Return to manually enter a ...
E240AR User Manual
Page 18
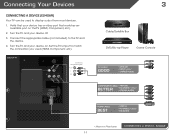
... your device off. 3. Turn the TV and your device on the TV (HDMI, Component, etc). 2. BACK OF TV Connect to the TV and the device. 4. Connecting Your Devices Connecting A Device (E240AR) Your TV can be used (HDMI, Component, etc). Verify that your device has a video port that matches an available port on . ...HD VIDEO (1080i)* • STEREO AUDIO HDMI CABLE BEST • DIGITAL • HD VIDEO (1080p)* • HD AUDIO * Maximum Resolution 11 CONNECTING A DEVICE - E240AR Set the TV's input to match the connection you used to display output from most devices. 1.
... your device off. 3. Turn the TV and your device on the TV (HDMI, Component, etc). 2. BACK OF TV Connect to the TV and the device. 4. Connecting Your Devices Connecting A Device (E240AR) Your TV can be used (HDMI, Component, etc). Verify that your device has a video port that matches an available port on . ...HD VIDEO (1080i)* • STEREO AUDIO HDMI CABLE BEST • DIGITAL • HD VIDEO (1080p)* • HD AUDIO * Maximum Resolution 11 CONNECTING A DEVICE - E240AR Set the TV's input to match the connection you used to display output from most devices. 1.
E240AR User Manual
Page 19
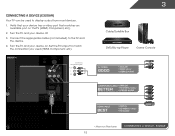
... your device has a video port that matches an available port on . BACK OF TV Connect to display output from most devices. 1. Connecting A Device (E320AR) Your TV can be used (HDMI, Component, etc). Turn the TV and your device on the TV (HDMI, Component, etc). 2. Verify that your device off. 3. Connect the appropriate cable (not...; HD VIDEO (1080i)* • STEREO AUDIO HDMI CABLE BEST • DIGITAL • HD VIDEO (1080p)* • HD AUDIO * Maximum Resolution 12 CONNECTING A DEVICE - Set the TV's input to the TV and the device. 4.
... your device has a video port that matches an available port on . BACK OF TV Connect to display output from most devices. 1. Connecting A Device (E320AR) Your TV can be used (HDMI, Component, etc). Turn the TV and your device on the TV (HDMI, Component, etc). 2. Verify that your device off. 3. Connect the appropriate cable (not...; HD VIDEO (1080i)* • STEREO AUDIO HDMI CABLE BEST • DIGITAL • HD VIDEO (1080p)* • HD AUDIO * Maximum Resolution 12 CONNECTING A DEVICE - Set the TV's input to the TV and the device. 4.
E240AR User Manual
Page 20
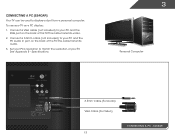
Connect a 3.5mm cable (not included) to your PC and the RGB port on the back of the TV. This cable transmits audio. 3. Specifications. 3 Personal Computer 3.5mm Cable (For Audio) VGA Cable (For Video) CONNECTING A PC - This cable transmits video. 2. Connect a VGA cable (not included) to your PC and the PC Audio In port on the back of the TV. E240AR 13 To use your TV as a PC display: 1. See Appendix B - Set your PC's resolution to display output from a personal computer. Connecting A PC (E240AR) Your TV can be used to match the resolution of your TV.
Connect a 3.5mm cable (not included) to your PC and the RGB port on the back of the TV. This cable transmits audio. 3. Specifications. 3 Personal Computer 3.5mm Cable (For Audio) VGA Cable (For Video) CONNECTING A PC - This cable transmits video. 2. Connect a VGA cable (not included) to your PC and the PC Audio In port on the back of the TV. E240AR 13 To use your TV as a PC display: 1. See Appendix B - Set your PC's resolution to display output from a personal computer. Connecting A PC (E240AR) Your TV can be used to match the resolution of your TV.
E240AR User Manual
Page 21
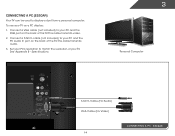
This cable transmits video. 2. Connect a 3.5mm cable (not included) to your PC and the PC Audio In port on the back of the TV. See Appendix B - E320AR Specifications. 3 Personal Computer 3.5mm Cable (For Audio) VGA Cable (For Video) 14 CONNECTING A PC - Connecting A PC (E320AR) Your TV can be used to match the resolution of the TV. Connect a VGA cable (not included) to your PC and the RGB port on the back of your TV as a PC display: 1. This cable transmits audio. 3. To use your TV. Set your PC's resolution to display output from a personal computer.
This cable transmits video. 2. Connect a 3.5mm cable (not included) to your PC and the PC Audio In port on the back of the TV. See Appendix B - E320AR Specifications. 3 Personal Computer 3.5mm Cable (For Audio) VGA Cable (For Video) 14 CONNECTING A PC - Connecting A PC (E320AR) Your TV can be used to match the resolution of the TV. Connect a VGA cable (not included) to your PC and the RGB port on the back of your TV as a PC display: 1. This cable transmits audio. 3. To use your TV. Set your PC's resolution to display output from a personal computer.
E240AR User Manual
Page 22
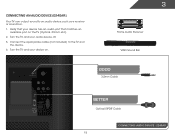
Turn the TV and your device on the TV (Optical, 3.5mm, etc). 2. Connect the appropriate cable (not included) to an audio device, such as a receiver or sound bar. 1. Connecting an audio device (E240AR) Your TV can output sound to the TV and the device. 4. Verify that your audio device off. 3. Turn the TV and your device has an audio port that matches an available port on . 3 Home Audio Receiver VIZIO Sound Bar GOOD 3.5mm Cable BETTER Optical/SPDIF Cable CONNECTING AUDIO DEVICE - E240AR 15
Turn the TV and your device on the TV (Optical, 3.5mm, etc). 2. Connect the appropriate cable (not included) to an audio device, such as a receiver or sound bar. 1. Connecting an audio device (E240AR) Your TV can output sound to the TV and the device. 4. Verify that your audio device off. 3. Turn the TV and your device has an audio port that matches an available port on . 3 Home Audio Receiver VIZIO Sound Bar GOOD 3.5mm Cable BETTER Optical/SPDIF Cable CONNECTING AUDIO DEVICE - E240AR 15
E240AR User Manual
Page 23
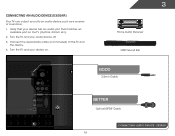
Connecting an audio device (E320AR) Your TV can output sound to the TV and the device. 4. E320AR 16 Connect the appropriate cable (not included) to an audio device, such as a receiver or sound bar. 1. Turn the TV and your device on the TV (Optical, 3.5mm, etc). 2. Verify that your device has an audio port that matches an available port on . 3 Home Audio Receiver VIZIO Sound Bar GOOD 3.5mm Cable BETTER Optical/SPDIF Cable CONNECTING AUDIO DEVICE - Turn the TV and your audio device off. 3.
Connecting an audio device (E320AR) Your TV can output sound to the TV and the device. 4. E320AR 16 Connect the appropriate cable (not included) to an audio device, such as a receiver or sound bar. 1. Turn the TV and your device on the TV (Optical, 3.5mm, etc). 2. Verify that your device has an audio port that matches an available port on . 3 Home Audio Receiver VIZIO Sound Bar GOOD 3.5mm Cable BETTER Optical/SPDIF Cable CONNECTING AUDIO DEVICE - Turn the TV and your audio device off. 3.
E240AR User Manual
Page 24
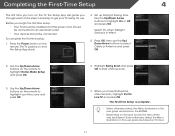
...source, the menu items may be connected. The First-Time Setup is in effect. 5. Before you begin the first-time setup: • Your TV should be installed and the power cord should be connected to an electrical outlet. • Your devices should be different. Highlight Being Scan and ...OK. Unless otherwise stated, the Menu illustrations in this user guide are based on the E240AR. • Depending on the remote to highlight Home Mode Setup and press OK. 3. Press the Power button on TV input. 17 Completing the First-Time Setup 4 The first time you turn on the remote...
...source, the menu items may be connected. The First-Time Setup is in effect. 5. Before you begin the first-time setup: • Your TV should be installed and the power cord should be connected to an electrical outlet. • Your devices should be different. Highlight Being Scan and ...OK. Unless otherwise stated, the Menu illustrations in this user guide are based on the E240AR. • Depending on the remote to highlight Home Mode Setup and press OK. 3. Press the Power button on TV input. 17 Completing the First-Time Setup 4 The first time you turn on the remote...
E240AR User Manual
Page 25
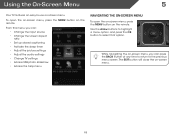
Using the On-Screen Menu I 5 Your TV features an easy-to select that option. BACK OK INFO MENU GUIDE While navigating the on-screen menu, you can press the BACK button at ... screen aspect ratio • Set up closed captioning • Activate the sleep timer • Adjust the picture settings • Adjust the audio settings • Change TV settings • Access USB photo slideshow • Access the help menu Navigating the On-Screen Menu CC To open the on-screen menu, press the...
Using the On-Screen Menu I 5 Your TV features an easy-to select that option. BACK OK INFO MENU GUIDE While navigating the on-screen menu, you can press the BACK button at ... screen aspect ratio • Set up closed captioning • Activate the sleep timer • Adjust the picture settings • Adjust the audio settings • Change TV settings • Access USB photo slideshow • Access the help menu Navigating the On-Screen Menu CC To open the on-screen menu, press the...


