
User Guide
Page 1
USER GUIDE MOMDODEELLSS // E3D320VX // E3DE41209VX1VA // E3DE42702VX1VA E261VA INSTALLING YOUR new TV CONTROLS & CONNECTIONS CONNECTING YOUR DEVICES USING THE ON-SCREEN MENU USING THE USB MEDIA PLAYER TROUBLESHOOTING & SUPPORT SPECIFICATIONS, SAFETY & LEGAL
USER GUIDE MOMDODEELLSS // E3D320VX // E3DE41209VX1VA // E3DE42702VX1VA E261VA INSTALLING YOUR new TV CONTROLS & CONNECTIONS CONNECTING YOUR DEVICES USING THE ON-SCREEN MENU USING THE USB MEDIA PLAYER TROUBLESHOOTING & SUPPORT SPECIFICATIONS, SAFETY & LEGAL

User Guide
Page 9
... System Information 35 Restoring the TV to the Factory Default Settingss 36 Restarting the Setup App 36 Using the USB Media Player 37 Using the USB Media Player 37 Connecting a USB Thumb Drive to the TV 37 Viewing a USB Photo Slideshow 37 Troubleshooting & Technical Support 39 Specifications 43 Limited Warranty 44 Legal & Compliance 45 2
... System Information 35 Restoring the TV to the Factory Default Settingss 36 Restarting the Setup App 36 Using the USB Media Player 37 Using the USB Media Player 37 Connecting a USB Thumb Drive to the TV 37 Viewing a USB Photo Slideshow 37 Troubleshooting & Technical Support 39 Specifications 43 Limited Warranty 44 Legal & Compliance 45 2

User Guide
Page 13
Component/Composite - Rear Panel - Connect 3.5mm PC audio cable. Connect RGB cable to update firmware. Connect USB thumb drive to play photo slideshow or to PC. Connect HDMI device. USB 2.0 - PC Audio In - E191VA & E221VA 6 Connect headphones powered speakers, or other 3.5mm audio device. Connect component or composite device. Controls and Connections 2 Rear Panel (E191VA & E221VA) HDMI - RGB - Coaxial - Connect coaxial cable from cable, satellite, or antenna. 3.5mm Audio -
Component/Composite - Rear Panel - Connect 3.5mm PC audio cable. Connect RGB cable to update firmware. Connect USB thumb drive to play photo slideshow or to PC. Connect HDMI device. USB 2.0 - PC Audio In - E191VA & E221VA 6 Connect headphones powered speakers, or other 3.5mm audio device. Connect component or composite device. Controls and Connections 2 Rear Panel (E191VA & E221VA) HDMI - RGB - Coaxial - Connect coaxial cable from cable, satellite, or antenna. 3.5mm Audio -
User Guide
Page 14
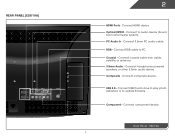
PC Audio In - E261VA Connect coaxial cable from cable, satellite, or antenna. 3.5mm Audio - Connect headphones powered speakers, or other 3.5mm audio device. Optical/SPDIF - USB 2.0 - Component - RGB - Connect RGB cable to update firmware. Connect USB thumb drive to play photo slideshow or to PC. Connect to audio device (Sound bar, home theater system). Controls and Connections Rear Panel (E261VA) 7 2 HDMI Ports - Connect component device. Connect HDMI device. Connect 3.5mm PC audio cable. Coaxial - Composite - Connect composite device. Rear Panel -
PC Audio In - E261VA Connect coaxial cable from cable, satellite, or antenna. 3.5mm Audio - Connect headphones powered speakers, or other 3.5mm audio device. Optical/SPDIF - USB 2.0 - Component - RGB - Connect RGB cable to update firmware. Connect USB thumb drive to play photo slideshow or to PC. Connect to audio device (Sound bar, home theater system). Controls and Connections Rear Panel (E261VA) 7 2 HDMI Ports - Connect component device. Connect HDMI device. Connect 3.5mm PC audio cable. Coaxial - Composite - Connect composite device. Rear Panel -
User Guide
Page 17
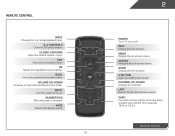
... enter a channel. Info Display the info window. Guide Display the info window. Dash Use with number pad to the previous on -screen menu. A/V Controls Control USB photo viewer. Mute Turn the audio off . Menu Display the on . Channel Up/Down Change the channel. Back Go to manually enter a digital sub-channel... to the channel last viewed. Volume Up/Down Increase or decrease loudness of the audio. Closed Captions Open the closed caption menu. V Button Open the USB photo viewer.
... enter a channel. Info Display the info window. Guide Display the info window. Dash Use with number pad to the previous on -screen menu. A/V Controls Control USB photo viewer. Mute Turn the audio off . Menu Display the on . Channel Up/Down Change the channel. Back Go to manually enter a digital sub-channel... to the channel last viewed. Volume Up/Down Increase or decrease loudness of the audio. Closed Captions Open the closed caption menu. V Button Open the USB photo viewer.

User Guide
Page 44
... exit the slideshow, press the EXIT button. 37 Connect your thumb drive is already inserted, continue with step 3. 3. Insert the USB thumb drive into the USB port on the left side of the TV to the previous photo, press the Stop button. 8. Press the MENU button on -screen...2. The Photo screen is displayed. 4. The slideshow begins. 6. To pause the slideshow, press the Pause button. 7. Using the USB Media Player 6 Using the USB Media Player The USB Media Player allows you must have a minimum 1GB memory • The TV will be displayed automatically. Use the Arrow buttons on ...
... exit the slideshow, press the EXIT button. 37 Connect your thumb drive is already inserted, continue with step 3. 3. Insert the USB thumb drive into the USB port on the left side of the TV to the previous photo, press the Stop button. 8. Press the MENU button on -screen...2. The Photo screen is displayed. 4. The slideshow begins. 6. To pause the slideshow, press the Pause button. 7. Using the USB Media Player 6 Using the USB Media Player The USB Media Player allows you must have a minimum 1GB memory • The TV will be displayed automatically. Use the Arrow buttons on ...

User Guide
Page 49
Specifications Screen Size: Viewable Area: Dimensions w/ Stand: w/o Stand: Weight w/ Stand: w/o Stand: TV Type: Refresh Rate: Maximum Resolution: Colors: Response Time: Brightness: Viewing Angle: HDMI Inputs: Component Video Inputs: Composite Inputs: RF Antenna Input: USB 2.0 Ports: USB Photo Slideshow: USB Individual Photo: E191VA 19" Class 18.5" 18.01 x 12.54 x 4.28" 18.01 x 12.54 x 1.54" 8.09 lbs 7.32 lbs Edge-lit Razor LED™ 60 Hz 1366 x 768 16.7 Million
Specifications Screen Size: Viewable Area: Dimensions w/ Stand: w/o Stand: Weight w/ Stand: w/o Stand: TV Type: Refresh Rate: Maximum Resolution: Colors: Response Time: Brightness: Viewing Angle: HDMI Inputs: Component Video Inputs: Composite Inputs: RF Antenna Input: USB 2.0 Ports: USB Photo Slideshow: USB Individual Photo: E191VA 19" Class 18.5" 18.01 x 12.54 x 4.28" 18.01 x 12.54 x 1.54" 8.09 lbs 7.32 lbs Edge-lit Razor LED™ 60 Hz 1366 x 768 16.7 Million

Quick Start Guide
Page 5
VOLUME UP/DOWN Increase or decrease loudness of the audio. POWER Turn TV on -screen menu. A/V CONTROLS Control USB media player. WIDE Switch the display mode. GUIDE Display the info window. LAST Return to manually enter a digital sub-channel. (For example, 18-4 or 18-5.) ... -screen menu. MENU Display the on . DASH Use with number pad to the channel last viewed. OK Select the highlighted menu option. V BUTTON Open the USB photo viewer. MUTE Turn the audio off . USING THE REMOTE INPUT Change the currently-displayed input.
VOLUME UP/DOWN Increase or decrease loudness of the audio. POWER Turn TV on -screen menu. A/V CONTROLS Control USB media player. WIDE Switch the display mode. GUIDE Display the info window. LAST Return to manually enter a digital sub-channel. (For example, 18-4 or 18-5.) ... -screen menu. MENU Display the on . DASH Use with number pad to the channel last viewed. OK Select the highlighted menu option. V BUTTON Open the USB photo viewer. MUTE Turn the audio off . USING THE REMOTE INPUT Change the currently-displayed input.


