User Manual English
Page 2
...Indicator On or Off 33 Deleting a Custom Picture Mode 17 Using the Reset & Admin Menu 34 Resetting a Picture Mode 17 Restoring the TV to Factory Default Settings 34 Adjusting the Color Tuner Settings 18 Using the Guided Setup Menu 35 Adjusting the Audio Settings 20 Using the ... the USB Media Player 36 Preparing Your USB Drive to Play USB Media 36 Displaying USB Media 36 Removing the USB Drive from the TV 36 Troubleshooting & Technical Support 38 Selecting a Channel Source 23 Scanning for Channels 23 Adding New Channels 23 Specifications 42 Regulatory Information 46 ...
...Indicator On or Off 33 Deleting a Custom Picture Mode 17 Using the Reset & Admin Menu 34 Resetting a Picture Mode 17 Restoring the TV to Factory Default Settings 34 Adjusting the Color Tuner Settings 18 Using the Guided Setup Menu 35 Adjusting the Audio Settings 20 Using the ... the USB Media Player 36 Preparing Your USB Drive to Play USB Media 36 Displaying USB Media 36 Removing the USB Drive from the TV 36 Troubleshooting & Technical Support 38 Selecting a Channel Source 23 Scanning for Channels 23 Adding New Channels 23 Specifications 42 Regulatory Information 46 ...
User Manual English
Page 3
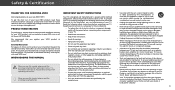
...back and bottom of time. • Refer all instructions. • Do not use , and maintenance of your new VIZIO product, read these instructions before using your TV in accordance with dry cloth. • Do not block any objects on the top of important operating instructions. The wide...about accessories and installation services for future reference. • To reduce the risk of power source indicated on your TV. To purchase an extended warranty service plan, visit www.VIZIO.com. When a cart is required when the apparatus has been damaged in any heat source, such as a ...
...back and bottom of time. • Refer all instructions. • Do not use , and maintenance of your new VIZIO product, read these instructions before using your TV in accordance with dry cloth. • Do not block any objects on the top of important operating instructions. The wide...about accessories and installation services for future reference. • To reduce the risk of power source indicated on your TV. To purchase an extended warranty service plan, visit www.VIZIO.com. When a cart is required when the apparatus has been damaged in any heat source, such as a ...
User Manual English
Page 4
.... • The wall socket should be placed on the power cord may cause fire or electric shock. • Follow instructions for your TV. buzzing in accordance with continued exposure to loud noises, ears may become accustomed to the sound level, which can damage your dealer. with ...strips and extension cords. To reduce the risk of electrical shock to constitute a risk of voltage than two years of age. Continued use your TV in fire or electric shock. If any abnormality occurs. components may • Do not use of the display. The power cord fails or...
.... • The wall socket should be placed on the power cord may cause fire or electric shock. • Follow instructions for your TV. buzzing in accordance with continued exposure to loud noises, ears may become accustomed to the sound level, which can damage your dealer. with ...strips and extension cords. To reduce the risk of electrical shock to constitute a risk of voltage than two years of age. Continued use your TV in fire or electric shock. If any abnormality occurs. components may • Do not use of the display. The power cord fails or...
User Manual English
Page 5
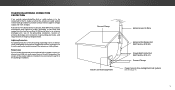
...the lead-in the building installation. TELEVISION ANTENNA CONNECTION PROTECTION If an outside antenna/satellite dish or cable system is to be connected to the TV, make sure that the antenna or cable system is intended to be connected to earth in wire to an antenna discharge unit, size of ...not locate the antenna near overhead light or power circuits, or where it is left unattended or unused for long periods of time, unplug the TV from the wall outlet and disconnect the antenna or cable system. Remember, the screen of the coaxial cable is electrically grounded to grounding electrodes, and...
...the lead-in the building installation. TELEVISION ANTENNA CONNECTION PROTECTION If an outside antenna/satellite dish or cable system is to be connected to the TV, make sure that the antenna or cable system is intended to be connected to earth in wire to an antenna discharge unit, size of ...not locate the antenna near overhead light or power circuits, or where it is left unattended or unused for long periods of time, unplug the TV from the wall outlet and disconnect the antenna or cable system. Remember, the screen of the coaxial cable is electrically grounded to grounding electrodes, and...
User Manual English
Page 7
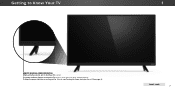
Getting to Know Your TV 1 REMOTE SENSOR & POWER INDICATOR When using the remote, aim it directly at this sensor. FRONT PANEL 7 To keep the power indicator on as long as the TV is on, see Turning the Power Indicator On or Off on , then goes out after several seconds. The power indicator flashes on when the TV turns on page 33.
Getting to Know Your TV 1 REMOTE SENSOR & POWER INDICATOR When using the remote, aim it directly at this sensor. FRONT PANEL 7 To keep the power indicator on as long as the TV is on, see Turning the Power Indicator On or Off on , then goes out after several seconds. The power indicator flashes on when the TV turns on page 33.

User Manual English
Page 8
... an optical/SPDIF audio device, such as sound bar. Component/Composite - Press once to play photo, music, or video. Press and hold to turn the TV off. Stereo Audio Out- REAR PANEL 8 Connect a coaxial cable from cable, satellite, or antenna. Press to turn on the model. 1 HDMI - Connect a component or composite...
... an optical/SPDIF audio device, such as sound bar. Component/Composite - Press once to play photo, music, or video. Press and hold to turn the TV off. Stereo Audio Out- REAR PANEL 8 Connect a coaxial cable from cable, satellite, or antenna. Press to turn on the model. 1 HDMI - Connect a component or composite...
User Manual English
Page 9
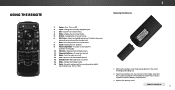
... menu. 6. Exit - Change the channel. 12. Turn the audio on or Off. 2. Change the display mode. 16. Insert two batteries into the remote control. Turn TV on or off. 13. Displays the multimedia menu. 11. Last - Wide - REMOTE CONTROL 9 Input - Back - Display the info window. 9. Increase or decrease the loudness of...
... menu. 6. Exit - Change the channel. 12. Turn the audio on or Off. 2. Change the display mode. 16. Insert two batteries into the remote control. Turn TV on or off. 13. Displays the multimedia menu. 11. Last - Wide - REMOTE CONTROL 9 Input - Back - Display the info window. 9. Increase or decrease the loudness of...
User Manual English
Page 10
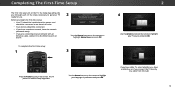
... Setup App will guide you through each of preference and press OK. 2 4 Use the Arrow buttons on the remote to highlight your TV source and press OK. To complete the first-time setup: 1 INPUT EXIT BACK OK MENU GUIDE VOL CH VOL CH Press the Power button on ...the remote to highlight Home Use and press OK. The TV powers on a1nd the2Setup A3pp starts. 4 5 6 7 8 9 WIDE 0 - 3 Use the Arrow buttons on the TV. 2 Choose your TV ready for use . Choisissez "Home Use" pour le Mode Domicile ou "Store Demo" pour la Démo...
... Setup App will guide you through each of preference and press OK. 2 4 Use the Arrow buttons on the remote to highlight your TV source and press OK. To complete the first-time setup: 1 INPUT EXIT BACK OK MENU GUIDE VOL CH VOL CH Press the Power button on ...the remote to highlight Home Use and press OK. The TV powers on a1nd the2Setup A3pp starts. 4 5 6 7 8 9 WIDE 0 - 3 Use the Arrow buttons on the TV. 2 Choose your TV ready for use . Choisissez "Home Use" pour le Mode Domicile ou "Store Demo" pour la Démo...
User Manual English
Page 11
Use the arrow buttons on the remote to select the input your TV source is connected to. When you are finished, the message "Setup is complete. 2 11 will need to highlight Begin Scan and press OK. The First-Time Setup is complete." Note: Number of ports may differ by TV. 5 If the TV Signal channel scan screen appears, the TV will appear. Otherwise, use the Arrow and OK buttons on the remote to scan for channels, which takes several minutes.
Use the arrow buttons on the remote to select the input your TV source is connected to. When you are finished, the message "Setup is complete. 2 11 will need to highlight Begin Scan and press OK. The First-Time Setup is complete." Note: Number of ports may differ by TV. 5 If the TV Signal channel scan screen appears, the TV will appear. Otherwise, use the Arrow and OK buttons on the remote to scan for channels, which takes several minutes.
User Manual English
Page 12
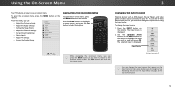
...the Sleep Timers • Adjust the Channel settings • Set up Closed Captioning • Name Inputs • Adjust TV settings • Access the Guided Setup VIZIO TV SETTINGS Picture Audio Timers Channels CC Closed Captions Devices System Guided Setup To open the on-screen menu, press the MENU ...button on the remote. The Input menu is displayed. The selected input is TV displayed. 2. NAVIGATING THE ON-SCREEN...
...the Sleep Timers • Adjust the Channel settings • Set up Closed Captioning • Name Inputs • Adjust TV settings • Access the Guided Setup VIZIO TV SETTINGS Picture Audio Timers Channels CC Closed Captions Devices System Guided Setup To open the on-screen menu, press the MENU ...button on the remote. The Input menu is displayed. The selected input is TV displayed. 2. NAVIGATING THE ON-SCREEN...
User Manual English
Page 13
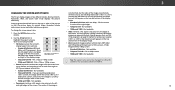
...Arrow buttons to view and press OK. • Normal preserves the content's original aspect ratio and size. • Standard Definition (480i and 480p-old TV programs) - Not available. • 1080p and 1080i - If the program is being stretched, the display image may vary by the left and right ... aspect ratio picture to the edges of the screen. A 720p image will fill a 1080p screen. • Standard Definition - CHANGING THE SCREEN ASPECT RATIO The TV can display images in all directions (33% taller and 33% wider) with black bars on the top and bottom, the black bars will still appear...
...Arrow buttons to view and press OK. • Normal preserves the content's original aspect ratio and size. • Standard Definition (480i and 480p-old TV programs) - Not available. • 1080p and 1080i - If the program is being stretched, the display image may vary by the left and right ... aspect ratio picture to the edges of the screen. A 720p image will fill a 1080p screen. • Standard Definition - CHANGING THE SCREEN ASPECT RATIO The TV can display images in all directions (33% taller and 33% wider) with black bars on the top and bottom, the black bars will still appear...
User Manual English
Page 14
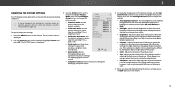
... • Standard mode sets the picture settings to the default settings. • Calibrated mode sets the picture settings to values ideal for watching TV in a dark room. Adjusts the white level of the picture colors. • Tint - To adjust the picture settings: 1. The on ...+ 85 + 50 + 50 + 63 +0 + 60 • Vivid mode sets the picture settings to values that does not otherwise exist. 5. VIZIO PICTURE Picture Mode Auto Brightness Control Backlight - The auto brightness control detects the light levels in the room and automatically adjusts the backlight for watching...
... • Standard mode sets the picture settings to the default settings. • Calibrated mode sets the picture settings to values ideal for watching TV in a dark room. Adjusts the white level of the picture colors. • Tint - To adjust the picture settings: 1. The on ...+ 85 + 50 + 50 + 63 +0 + 60 • Vivid mode sets the picture settings to values that does not otherwise exist. 5. VIZIO PICTURE Picture Mode Auto Brightness Control Backlight - The auto brightness control detects the light levels in the room and automatically adjusts the backlight for watching...
User Manual English
Page 18
... to save the setting. 4. To adjust the 11 Point White Balance settings: 1. From the COLOR CALIBRATION menu, use the Arrow buttons to manually calibrate the TV. An X appears over a color channel that has been turned off at the same time. 5. When you wish to highlight Color Tuner, and then press OK...
... to save the setting. 4. To adjust the 11 Point White Balance settings: 1. From the COLOR CALIBRATION menu, use the Arrow buttons to manually calibrate the TV. An X appears over a color channel that has been turned off at the same time. 5. When you wish to highlight Color Tuner, and then press OK...
User Manual English
Page 20
... on -screen menu is displayed. 2. Digital Audio Out Analog Audio Out Equalizer Delete Audio Mode On On On +0 +0 PCM Fixed When the TV speakers are controlling the volume with more than two channels (3.0, 5.0, or 5.1, for the RCA connector when connected to highlight Audio and press OK....2. Press the MENU button on the remote to highlight Audio and press OK. Use the Arrow buttons on -screen menu is displayed. 3. VIZIO AUDIO TV Speakers Surround Sound Volume Leveling Balance - If this occurs, turn volume leveling off. • Balance - Select Variable if you have finished ...
... on -screen menu is displayed. 2. Digital Audio Out Analog Audio Out Equalizer Delete Audio Mode On On On +0 +0 PCM Fixed When the TV speakers are controlling the volume with more than two channels (3.0, 5.0, or 5.1, for the RCA connector when connected to highlight Audio and press OK....2. Press the MENU button on the remote to highlight Audio and press OK. Use the Arrow buttons on -screen menu is displayed. 3. VIZIO AUDIO TV Speakers Surround Sound Volume Leveling Balance - If this occurs, turn volume leveling off. • Balance - Select Variable if you have finished ...
User Manual English
Page 21
Press the MENU button on the remote. 3 21 Use the Arrow buttons on -screen menu is displayed. 3. Press the EXIT button on the remote. The on the remote to highlight Delete Audio Mode and press OK. The TV displays, "To delete the user created custom audio mode, select the Delete button." 4. Use the Arrow buttons to highlight Audio and press OK. The AUDIO menu is displayed. 2. Highlight Delete and press OK. 5. Deleting the Custom Audio Mode To delete the custom audio mode that has been created: 1.
Press the MENU button on the remote. 3 21 Use the Arrow buttons on -screen menu is displayed. 3. Press the EXIT button on the remote. The on the remote to highlight Delete Audio Mode and press OK. The TV displays, "To delete the user created custom audio mode, select the Delete button." 4. Use the Arrow buttons to highlight Audio and press OK. The AUDIO menu is displayed. 2. Highlight Delete and press OK. 5. Deleting the Custom Audio Mode To delete the custom audio mode that has been created: 1.
User Manual English
Page 22
...Up/Down Arrow buttons on the remote. Exit 2D 3D 3. When you want the TV to go to turn off when there is displayed. 2. ABC Input Wide CC Sleep Timer Picture Audio Network Settings Help 3 22 VIZIO TIMERS Sleep Timer Auto Power Off Off 10 minutes 3. WUidsee thZoeom Left/NRorimgahl t ... to highlight Auto Power Off. 2. Use the Arrow buttons on -screen menu is no signal, change the setting to change whether the TV will turn the TV off after 10 minutes without a video or audio signal. To set period of time after which you have finished setting the sleep timer,...
...Up/Down Arrow buttons on the remote. Exit 2D 3D 3. When you want the TV to go to turn off when there is displayed. 2. ABC Input Wide CC Sleep Timer Picture Audio Network Settings Help 3 22 VIZIO TIMERS Sleep Timer Auto Power Off Off 10 minutes 3. WUidsee thZoeom Left/NRorimgahl t ... to highlight Auto Power Off. 2. Use the Arrow buttons on -screen menu is no signal, change the setting to change whether the TV will turn the TV off after 10 minutes without a video or audio signal. To set period of time after which you have finished setting the sleep timer,...
User Manual English
Page 23
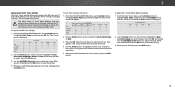
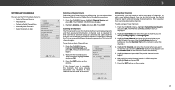
... or Cable (Out-of new channels: 1. WHidieghliZgohom t AntNeornmnala oParnoCraambicle and press OK. CC To perform an Auto Channel Scan: VIZIO 1. NeWtwaoirtk uSnetttiilngths e cHhelapnnel scan is cancelled, the channels that were already discovered are adding: Analog, Digital, or Analog/Digital....and press OK. Press EXIT. Moving the TV to an area with different channels requires the TV to enter the channel.) 5. From the CHANNELS menu, SThlim eiegeprhligPhicttuFreindACuhdioannels, and press OK. The auto channel scan begins. 2. VIZIO FIND CHANNELS Channels Found Digital: 0 Analog:...
... or Cable (Out-of new channels: 1. WHidieghliZgohom t AntNeornmnala oParnoCraambicle and press OK. CC To perform an Auto Channel Scan: VIZIO 1. NeWtwaoirtk uSnetttiilngths e cHhelapnnel scan is cancelled, the channels that were already discovered are adding: Analog, Digital, or Analog/Digital....and press OK. Press EXIT. Moving the TV to an area with different channels requires the TV to enter the channel.) 5. From the CHANNELS menu, SThlim eiegeprhligPhicttuFreindACuhdioannels, and press OK. The auto channel scan begins. 2. VIZIO FIND CHANNELS Channels Found Digital: 0 Analog:...
User Manual English
Page 24
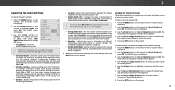
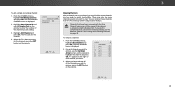
...1. There may find that have selected all of the channel you wish to view. VIZIO SKIP CHANNEL 1 Test 0 1 Test 1 P 1-2 Test 2 P 2 Test 3 2-2 Test 4 P 2-3 Test 5 3. Highlight Add Channel and press OK. VIZIO ADD ANALOG CHANNEL Enter Channel Add Channel Skipping Channels After a channel scan is done... Help 3 24 The ADD ANALOG CHANNEL menu is displayed. 2. Highlight Enter Channel # and use the parentalAcBoC ntrols. When the TV is completed, you may also be viewed if the channel Exit is2Dentere3dD using the Number Pad. You can still be some channels ...
...1. There may find that have selected all of the channel you wish to view. VIZIO SKIP CHANNEL 1 Test 0 1 Test 1 P 1-2 Test 2 P 2 Test 3 2-2 Test 4 P 2-3 Test 5 3. Highlight Add Channel and press OK. VIZIO ADD ANALOG CHANNEL Enter Channel Add Channel Skipping Channels After a channel scan is done... Help 3 24 The ADD ANALOG CHANNEL menu is displayed. 2. Highlight Enter Channel # and use the parentalAcBoC ntrols. When the TV is completed, you may also be viewed if the channel Exit is2Dentere3dD using the Number Pad. You can still be some channels ...
User Manual English
Page 25
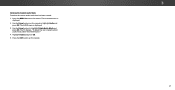
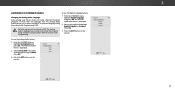
... Language Some analog over-the-air (free) and cable channels broadcast programs in more than one language. VIZIO ANALOG AUDIO Stereo SAP Mono Wide Zoom Normal Panoramic Exit 2D 3D ABC Input Wide CC VIZIO DIGITAL LANGUAGE English Español Français Sleep Timer Picture Audio Network Settings Help Wide.... Press OK. 3. Select your preferred language: English, Español or Français. LISTENING TO ALTERNATE AUDIO To use the Analog Audio feature: 1. The TV's Analog Audio feature allows you to listen to audio in SAP. Press the EXIT button on the remote.
... Language Some analog over-the-air (free) and cable channels broadcast programs in more than one language. VIZIO ANALOG AUDIO Stereo SAP Mono Wide Zoom Normal Panoramic Exit 2D 3D ABC Input Wide CC VIZIO DIGITAL LANGUAGE English Español Français Sleep Timer Picture Audio Network Settings Help Wide.... Press OK. 3. Select your preferred language: English, Español or Français. LISTENING TO ALTERNATE AUDIO To use the Analog Audio feature: 1. The TV's Analog Audio feature allows you to listen to audio in SAP. Press the EXIT button on the remote.
User Manual English
Page 26
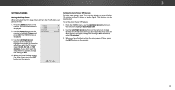
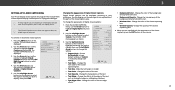
... Text Color - Change the opacity of Digital Closed Captions Digital closed captions can display closed captions for the closed captioning box. 4. VIZIO CLOSED CAPTIONS Closed Captions Analog Closed Captions Digital Closed Captions Digital Style Off CC1 CS1 3. From the CLOSED CAPTIONS menu, use the... Text Style - Exit 2D 3D ABC Input Wide CC Sleep Timer Picture Audio Network Settings Help 26 3 SETTING UP CLOSED CAPTIONING Your TV can be displayed according to your preference. Closed captions display a transcription of the text, such as shown. Press the MENU button on...
... Text Color - Change the opacity of Digital Closed Captions Digital closed captions can display closed captions for the closed captioning box. 4. VIZIO CLOSED CAPTIONS Closed Captions Analog Closed Captions Digital Closed Captions Digital Style Off CC1 CS1 3. From the CLOSED CAPTIONS menu, use the... Text Style - Exit 2D 3D ABC Input Wide CC Sleep Timer Picture Audio Network Settings Help 26 3 SETTING UP CLOSED CAPTIONING Your TV can be displayed according to your preference. Closed captions display a transcription of the text, such as shown. Press the MENU button on...


