User Manual English
Page 2
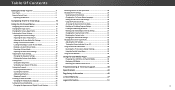
... Reset & Admin Menu 34 Resetting a Picture Mode 17 Restoring the TV to Factory Default Settings 34 Adjusting the Color Tuner Settings 18 Using the Guided Setup Menu 35 Adjusting the Audio Settings 20 Using the Info Window 35 Changing the Equalizer Settings 20 Deleting the Custom Audio Mode 21 Setting Timers 22 Setting the Sleep Timer 22 Setting the Auto Power Off Feature 22 Setting Up Channels 23 Using the USB Media Player 36 Preparing Your USB Drive to Play USB Media 36 Displaying USB Media 36 Removing the USB Drive from the TV 36 Troubleshooting & Technical Support...
... Reset & Admin Menu 34 Resetting a Picture Mode 17 Restoring the TV to Factory Default Settings 34 Adjusting the Color Tuner Settings 18 Using the Guided Setup Menu 35 Adjusting the Audio Settings 20 Using the Info Window 35 Changing the Equalizer Settings 20 Deleting the Custom Audio Mode 21 Setting Timers 22 Setting the Sleep Timer 22 Setting the Auto Power Off Feature 22 Setting Up Channels 23 Using the USB Media Player 36 Preparing Your USB Drive to Play USB Media 36 Displaying USB Media 36 Removing the USB Drive from the TV 36 Troubleshooting & Technical Support...
User Manual English
Page 3
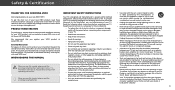
... from being damaged, the following safety instructions before connecting other components to your TV. • Read these instructions. • Keep these instructions. • Heed all warnings. • Follow all servicing to operate within defined design limits. IMPORTANT SAFETY INSTRUCTIONS Your TV is provided. • Never push any heat sources such as the power-supply cord or plug is used, use this symbol, please read these...
... from being damaged, the following safety instructions before connecting other components to your TV. • Read these instructions. • Keep these instructions. • Heed all warnings. • Follow all servicing to operate within defined design limits. IMPORTANT SAFETY INSTRUCTIONS Your TV is provided. • Never push any heat sources such as the power-supply cord or plug is used, use this symbol, please read these...
User Manual English
Page 4
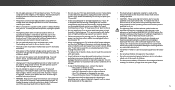
...use by • The power cord must be of sufficient magnitude to persons. installations. components may be replaced when using different • Avoid using dropped or damaged appliances. Ensure that the presence of uninsulated DANGEROUS VOLTAGE within an equilateral triangle is required, contact your dealer and refer all servicing to qualified service...loud sounds can damage the remote control or injure the operator. • Do not apply pressure or throw objects at your dealer immediately. Do not try to repair your TV to excessive heat such as vases, shall be used ...
...use by • The power cord must be of sufficient magnitude to persons. installations. components may be replaced when using different • Avoid using dropped or damaged appliances. Ensure that the presence of uninsulated DANGEROUS VOLTAGE within an equilateral triangle is required, contact your dealer and refer all servicing to qualified service...loud sounds can damage the remote control or injure the operator. • Do not apply pressure or throw objects at your dealer immediately. Do not try to repair your TV to excessive heat such as vases, shall be used ...
User Manual English
Page 5
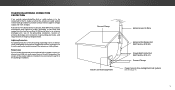
..., connection to grounding electrodes, and requirements of the grounding electrode. Article 810 of the National Electrical Code, ANSI/NFPSA 70, provides information with regard to proper grounding of the mast and supporting structure, grounding of time, unplug the TV from the wall outlet and disconnect the antenna or cable system. Power Lines Do not locate the antenna near overhead light or power...
..., connection to grounding electrodes, and requirements of the grounding electrode. Article 810 of the National Electrical Code, ANSI/NFPSA 70, provides information with regard to proper grounding of the mast and supporting structure, grounding of time, unplug the TV from the wall outlet and disconnect the antenna or cable system. Power Lines Do not locate the antenna near overhead light or power...
User Manual English
Page 9
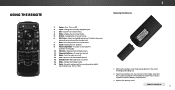
.... 2. Use with number pad to the last viewed channel. 14. Make sure that the (+) and (-) symbols on -screen menu. 6. Navigate the on the batteries match the (+) and (-) symbols inside the battery compartment. 3. Manually enter a channel. 15. Insert two batteries into the remote control. Arrows - Change the display mode. 16. REMOTE CONTROL 9 Power - OK / Enter - Last - Replace the battery cover. Turn TV on -screen menu. 4. USING THE REMOTE 2 INPUT EXIT 3 7 BACK 9 VOL 5 OK 6 10 1 MENU 4 8 GUIDE...
.... 2. Use with number pad to the last viewed channel. 14. Make sure that the (+) and (-) symbols on -screen menu. 6. Navigate the on the batteries match the (+) and (-) symbols inside the battery compartment. 3. Manually enter a channel. 15. Insert two batteries into the remote control. Arrows - Change the display mode. 16. REMOTE CONTROL 9 Power - OK / Enter - Last - Replace the battery cover. Turn TV on -screen menu. 4. USING THE REMOTE 2 INPUT EXIT 3 7 BACK 9 VOL 5 OK 6 10 1 MENU 4 8 GUIDE...
User Manual English
Page 12
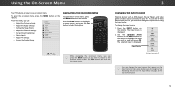
... TV displayed. 2. Sleep Timer Picture Audio Network Settings Help While navigating the on-screen menu, you wish to view and press OK. The EXIT button will close the on the remote. To use on page 28 for more information. 12 HDMI-1 HDMI-2 Input Name COMP RGB Note: Inputs may vary by TV. CHANGING THE INPUT SOURCE External devices such as DVD players, Blu-ray Players, and video game consoles can change the input source using the Input menu. Use the Up/Down Arrow buttons or the INPUT button...
... TV displayed. 2. Sleep Timer Picture Audio Network Settings Help While navigating the on-screen menu, you wish to view and press OK. The EXIT button will close the on the remote. To use on page 28 for more information. 12 HDMI-1 HDMI-2 Input Name COMP RGB Note: Inputs may vary by TV. CHANGING THE INPUT SOURCE External devices such as DVD players, Blu-ray Players, and video game consoles can change the input source using the Input menu. Use the Up/Down Arrow buttons or the INPUT button...
User Manual English
Page 13
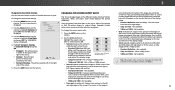
... of the picture so that the picture keeps its original shape. If the program is already formatted for any video content on the top and bottom, the black bars will fill the screen. Examples include wide-screen movies and older television programs. To change the screen aspect ratio:... sides of the screen. CHANGING THE SCREEN ASPECT RATIO The TV can display images in all directions (33% taller and 33% wider) with black bars on HDMI-5. 3 13 Each mode displays the picture differently. Some programs have black bars on the remote. 2. Use the Arrow buttons to highlight the aspect...
... of the picture so that the picture keeps its original shape. If the program is already formatted for any video content on the top and bottom, the black bars will fill the screen. Examples include wide-screen movies and older television programs. To change the screen aspect ratio:... sides of the screen. CHANGING THE SCREEN ASPECT RATIO The TV can display images in all directions (33% taller and 33% wider) with black bars on HDMI-5. 3 13 Each mode displays the picture differently. Some programs have black bars on the remote. 2. Use the Arrow buttons to highlight the aspect...
User Manual English
Page 14
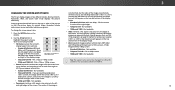
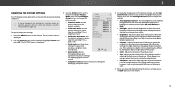
... picture settings for displaying game console output. • Computer mode optimizes the picture settings for displaying computer output. 4. Press the MENU button on the remote to highlight that does not otherwise exist. 5. Adjusts the black level of the picture settings, use the Left/Right Arrow buttons to highlight Picture and press OK. To adjust the picture settings: 1. VIZIO PICTURE Picture Mode Auto Brightness Control Backlight - To manually change the picture mode: • Standard mode sets the picture settings to the default settings. • Calibrated mode...
... picture settings for displaying game console output. • Computer mode optimizes the picture settings for displaying computer output. 4. Press the MENU button on the remote to highlight that does not otherwise exist. 5. Adjusts the black level of the picture settings, use the Left/Right Arrow buttons to highlight Picture and press OK. To adjust the picture settings: 1. VIZIO PICTURE Picture Mode Auto Brightness Control Backlight - To manually change the picture mode: • Standard mode sets the picture settings to the default settings. • Calibrated mode...
User Manual English
Page 16
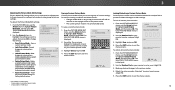
... Save NEextiwt ork S2eDttings 3HDelp ABC Input Wide CC Sleep Timer Picture Audio Locking/Unlocking a Custom Picture Mode Custom picture modes can be set to Calibrated picture mode. (Available after a custom picture mode is displayed. MyMode Save Picture Mode Unlock Picture Mode Delete Picture Mode - 3 Adjusting the Picture Mode Edit Settings Picture Mode Edit Settings allow you wish to adjust, then press OK to change the setting: • Save Picture Mode - Press the EXIT button to exit the menu screens. * Not available on HDMI input 5. † Only available on customized...
... Save NEextiwt ork S2eDttings 3HDelp ABC Input Wide CC Sleep Timer Picture Audio Locking/Unlocking a Custom Picture Mode Custom picture modes can be set to Calibrated picture mode. (Available after a custom picture mode is displayed. MyMode Save Picture Mode Unlock Picture Mode Delete Picture Mode - 3 Adjusting the Picture Mode Edit Settings Picture Mode Edit Settings allow you wish to adjust, then press OK to change the setting: • Save Picture Mode - Press the EXIT button to exit the menu screens. * Not available on HDMI input 5. † Only available on customized...
User Manual English
Page 18
... highlight Red, Green, or Blue. 3. Use the Arrow buttons to highlight another color channel to adjust. To adjust the 11 Point White Balance settings: 1. When you to adjust the HSB color and 11 point white balance, turn color channels off or on the remote to highlight the Gain and Color values you wish to turn off for testing, and display color bar, flat, and ramp test patterns. The Color Tuner, 11 Point White Balance, and test patterns...
... highlight Red, Green, or Blue. 3. Use the Arrow buttons to highlight another color channel to adjust. To adjust the 11 Point White Balance settings: 1. When you to adjust the HSB color and 11 point white balance, turn color channels off or on the remote to highlight the Gain and Color values you wish to turn off for testing, and display color bar, flat, and ramp test patterns. The Color Tuner, 11 Point White Balance, and test patterns...
User Manual English
Page 20
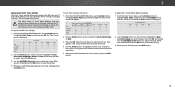
... frequencies using the Equalizer Settings. Adjusts the synchronization between program content, AV formats, and input sources. VIZIO AUDIO TV Speakers Surround Sound Volume Leveling Balance - Digital Audio Out Analog Audio Out Equalizer Delete Audio Mode On On On +0 +0 PCM Fixed When the TV speakers are controlling the volume with more than two channels (3.0, 5.0, or 5.1, for the RCA connector when connected to On, DTS signals cannot be passed through digital audio outputs. • Surround Sound - Press the MENU button on the remote. Press...
... frequencies using the Equalizer Settings. Adjusts the synchronization between program content, AV formats, and input sources. VIZIO AUDIO TV Speakers Surround Sound Volume Leveling Balance - Digital Audio Out Analog Audio Out Equalizer Delete Audio Mode On On On +0 +0 PCM Fixed When the TV speakers are controlling the volume with more than two channels (3.0, 5.0, or 5.1, for the RCA connector when connected to On, DTS signals cannot be passed through digital audio outputs. • Surround Sound - Press the MENU button on the remote. Press...
User Manual English
Page 23
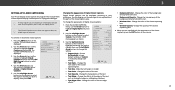
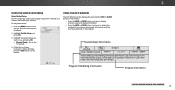
.... Highlight Done and press OK. 7. A new channel scan will be using an antenna) and cable channels from an out-of-theAB-Cwall connection (without a cable box). The partial channel search begins. 6. Highlight Scan Mode and select the type of channel you want to begin the scan. (Use the Left Arrow button to enter the channel.) 4. Input Wide CC Sleep Timer Sleep Timer Picture Audio Picture Audio Network Settings Help Network Settings Help 23 From the CHANNELS menu, highlight Channel Source and press OK. Moving the TV to...
.... Highlight Done and press OK. 7. A new channel scan will be using an antenna) and cable channels from an out-of-theAB-Cwall connection (without a cable box). The partial channel search begins. 6. Highlight Scan Mode and select the type of channel you want to begin the scan. (Use the Left Arrow button to enter the channel.) 4. Input Wide CC Sleep Timer Sleep Timer Picture Audio Picture Audio Network Settings Help Network Settings Help 23 From the CHANNELS menu, highlight Channel Source and press OK. Moving the TV to...
User Manual English
Page 24
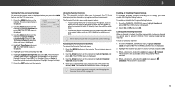
...ABC Input Wide CC Sleep Timer Picture Audio Network Settings Help 3 24 See Locking and Unlocking Channels on the remote. From the CHANNELS menu, SThplim erieegeprhslsigOPhicKttu.SreTkhipeACSudKhiIoaPnCnHeAl,NaNndEL menu is completed, you have been removed with the Skip Channel feature can remove these channels froWmidethe ZToVom's meNomrmoarl y wPaintohram thice Skip Channel feature. To add a single new analog channel: 1. Highlight Enter Channel # and use the parentalAcBoC ntrols. VIZIO ADD ANALOG CHANNEL Enter Channel Add Channel Skipping Channels After a channel scan...
...ABC Input Wide CC Sleep Timer Picture Audio Network Settings Help 3 24 See Locking and Unlocking Channels on the remote. From the CHANNELS menu, SThplim erieegeprhslsigOPhicKttu.SreTkhipeACSudKhiIoaPnCnHeAl,NaNndEL menu is completed, you have been removed with the Skip Channel feature can remove these channels froWmidethe ZToVom's meNomrmoarl y wPaintohram thice Skip Channel feature. To add a single new analog channel: 1. Highlight Enter Channel # and use the parentalAcBoC ntrols. VIZIO ADD ANALOG CHANNEL Enter Channel Add Channel Skipping Channels After a channel scan...
User Manual English
Page 26
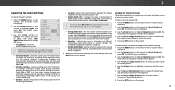
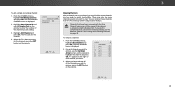
... box. • Window Opacity - VIZIO CLOSED CAPTIONS Closed Captions Analog Closed Captions Digital Closed Captions Digital Style Off CC1 CS1 3. Use the Arrow buttons on the remote to manually change the appearance of the text, such as shown. Changing the Appearance of Digital Closed Captions Digital closed captions can display closed caption area. Choose As Broadcast to keep default settAinBCgs or Custom to select the caption channel you are viewing is selected. Change the color of a program's dialogue. Exit 2D 3D ABC Input Wide CC Sleep Timer Picture Audio...
... box. • Window Opacity - VIZIO CLOSED CAPTIONS Closed Captions Analog Closed Captions Digital Closed Captions Digital Style Off CC1 CS1 3. Use the Arrow buttons on the remote to manually change the appearance of the text, such as shown. Changing the Appearance of Digital Closed Captions Digital closed captions can display closed caption area. Choose As Broadcast to keep default settAinBCgs or Custom to select the caption channel you are viewing is selected. Change the color of a program's dialogue. Exit 2D 3D ABC Input Wide CC Sleep Timer Picture Audio...
User Manual English
Page 30
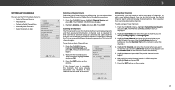
... Arrow buttons on the remote. The PARENTAL CONTROLS menu is displayed. 4. From the PARENTAL CONTROLS menu, highlight Locks and press OK. The menu headed by the local date and time is displayed. The TIME ZONE menu is displayed. 3. Input Wide CC Accessing the Parental Controls Menu To Salececpess Timer the Parental Picture Audio Controls menu: 1. The SYSTEM menu is displayed. 5. Press the MENU button on the remote to prevent the TV from viewing inappropriate material. Choose On if it is Standard Time, or Auto to cable...
... Arrow buttons on the remote. The PARENTAL CONTROLS menu is displayed. 4. From the PARENTAL CONTROLS menu, highlight Locks and press OK. The menu headed by the local date and time is displayed. The TIME ZONE menu is displayed. 3. Input Wide CC Accessing the Parental Controls Menu To Salececpess Timer the Parental Picture Audio Controls menu: 1. The SYSTEM menu is displayed. 5. Press the MENU button on the remote to prevent the TV from viewing inappropriate material. Choose On if it is Standard Time, or Auto to cable...
User Manual English
Page 32
... center of the image is already formatted for any video content on the remote. 2. The on the remote to highlight View Mode and press OK. Use the Arrow buttons on -screen menu is not large enough to fill the TV's screen, black bars are watching widescreen (1.85:1 or 2.35:1) content with black bars to fit the screen. Each mode displays the picture differently. and Since the 4:3 aspect...
... center of the image is already formatted for any video content on the remote. 2. The on the remote to highlight View Mode and press OK. Use the Arrow buttons on -screen menu is not large enough to fill the TV's screen, black bars are watching widescreen (1.85:1 or 2.35:1) content with black bars to fit the screen. Each mode displays the picture differently. and Since the 4:3 aspect...
User Manual English
Page 35
... TV channel. 4. Who knows what he'll encounter on -screen instructions. Follow the on the way? When finished, press the EXIT button on the remote. Press the MENU button on the remote. Highlight the guided setup you want to connect the TV with your network. The on a journey in search of the program. In this hour-long holiday special, Oliver goes on -screen menu is displayed. 2. USING...
... TV channel. 4. Who knows what he'll encounter on -screen instructions. Follow the on the way? When finished, press the EXIT button on the remote. Press the MENU button on the remote. Highlight the guided setup you want to connect the TV with your network. The on a journey in search of the program. In this hour-long holiday special, Oliver goes on -screen menu is displayed. 2. USING...
User Manual English
Page 40
... connected to change the screen mode. There is no sound. • Press Volume Up on the remote control. • Press the MUTE button on the remote control to ensure mute is not responding. • Make sure the batteries are using an antenna, the signal strength of the channel may not display correctly. See Adjusting the Picture Settings on the TV don't look right. • Adjust the Color and Tint settings in the Picture menu...
... connected to change the screen mode. There is no sound. • Press Volume Up on the remote control. • Press the MUTE button on the remote control to ensure mute is not responding. • Make sure the batteries are using an antenna, the signal strength of the channel may not display correctly. See Adjusting the Picture Settings on the TV don't look right. • Adjust the Color and Tint settings in the Picture menu...
User Manual English
Page 47
... (Displays Only) Types of the warranty on the terms set to its rules for a warranty against VIZIO, How Long This Warranty Lasts SHIP-IN WARRANTY SERVICE. Class Action Waiver (U.S. Submitting a claim to have been made from ARBITRATION ADMINISTERED BY THE AMERICAN ARBITRATION warranty service, whichever is covered by law, this warranty, VIZIO will apply. Replacement parts may carefully. tear; (c) improper operation; (d) improper voltage supply or power surges; ALL USER...
... (Displays Only) Types of the warranty on the terms set to its rules for a warranty against VIZIO, How Long This Warranty Lasts SHIP-IN WARRANTY SERVICE. Class Action Waiver (U.S. Submitting a claim to have been made from ARBITRATION ADMINISTERED BY THE AMERICAN ARBITRATION warranty service, whichever is covered by law, this warranty, VIZIO will apply. Replacement parts may carefully. tear; (c) improper operation; (d) improper voltage supply or power surges; ALL USER...
User Manual English
Page 49
... VIZIO's user guides and manuals. RETAILER WHERE YOU PURCHASED IT. You may attempt to show that are unable to resolve the issue informally and wish to file a formal be required to its option) repair or replace it is serviced, regardless of the original warranty or for additional help and troubleshooting. receipt (or copy) to resolve the issue informally with VIZIO. service center. (i) installation, set-up, or repairs...
... VIZIO's user guides and manuals. RETAILER WHERE YOU PURCHASED IT. You may attempt to show that are unable to resolve the issue informally and wish to file a formal be required to its option) repair or replace it is serviced, regardless of the original warranty or for additional help and troubleshooting. receipt (or copy) to resolve the issue informally with VIZIO. service center. (i) installation, set-up, or repairs...


