User Manual English
Page 2
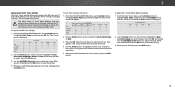
Table Of Contents Getting to Know Your TV 7 Renaming Devices on the Input Menu 28 Rear Panel 8 Remote Control Front 9 Replacing the Batteries 9 Completing The First-Time Setup 10 Changing the TV Settings 29 Viewing System Information 29 Changing the On-Screen Menu ...
Table Of Contents Getting to Know Your TV 7 Renaming Devices on the Input Menu 28 Rear Panel 8 Remote Control Front 9 Replacing the Batteries 9 Completing The First-Time Setup 10 Changing the TV Settings 29 Viewing System Information 29 Changing the On-Screen Menu ...
User Manual English
Page 4
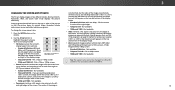
... expose you are unplugged before • WARNING: Exposure to loud sounds can damage your constitute a risk of the marked voltage can damage the remote control or injure the operator. Unplug the power that contained in fire or electric shock. • The wall socket should be installed near your...your TV, hold the AC/DC power adapter, not the cord. use your TV. iv Pulling on the apparatus. • Store the accessories (remote, batteries, etc.) in any object drops into your TV, unplug the power cord and contact your TV. - Opening or removing the back cover may...
... expose you are unplugged before • WARNING: Exposure to loud sounds can damage your constitute a risk of the marked voltage can damage the remote control or injure the operator. Unplug the power that contained in fire or electric shock. • The wall socket should be installed near your...your TV, hold the AC/DC power adapter, not the cord. use your TV. iv Pulling on the apparatus. • Store the accessories (remote, batteries, etc.) in any object drops into your TV, unplug the power cord and contact your TV. - Opening or removing the back cover may...
User Manual English
Page 7
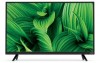
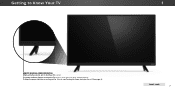
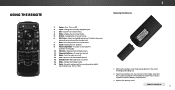
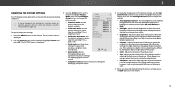
Getting to Know Your TV 1 REMOTE SENSOR & POWER INDICATOR When using the remote, aim it directly at this sensor. FRONT PANEL 7 To keep the power indicator on as long as the TV is on, see Turning the Power Indicator On or Off on , then goes out after several seconds. The power indicator flashes on when the TV turns on page 33.
Getting to Know Your TV 1 REMOTE SENSOR & POWER INDICATOR When using the remote, aim it directly at this sensor. FRONT PANEL 7 To keep the power indicator on as long as the TV is on, see Turning the Power Indicator On or Off on , then goes out after several seconds. The power indicator flashes on when the TV turns on page 33.
User Manual English
Page 9
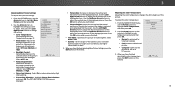
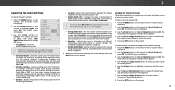
...7. Back - Mute - Return to manually enter a digital sub-channel. (e.g. 18-4 or 18-5) 1. Change the display mode. 16. Insert two batteries into the remote control. Make sure that the (+) and (-) symbols on or Off. 2. Replace the battery cover. Input - Close the on -screen menu. 6. Navigate the on...viewed channel. 14. Display the on or off. 13. V Button - Go to the previous on the arrow markings and sliding out. 2. REMOTE CONTROL 9 Channel Up/Down - Number Pad - Menu - Remove the battery cover by pressing down on -screen menu. 8. Manually enter a channel. 15...
...7. Back - Mute - Return to manually enter a digital sub-channel. (e.g. 18-4 or 18-5) 1. Change the display mode. 16. Insert two batteries into the remote control. Make sure that the (+) and (-) symbols on or Off. 2. Replace the battery cover. Input - Close the on -screen menu. 6. Navigate the on...viewed channel. 14. Display the on or off. 13. V Button - Go to the previous on the arrow markings and sliding out. 2. REMOTE CONTROL 9 Channel Up/Down - Number Pad - Menu - Remove the battery cover by pressing down on -screen menu. 8. Manually enter a channel. 15...
User Manual English
Page 10
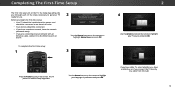
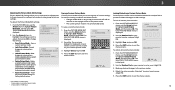
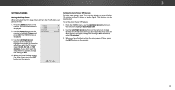
...will guide you through each of preference and press OK. 2 4 Use the Arrow buttons on the remote to highlight your TV ready for use . Before you begin the first-time setup: • Your...time setup: 1 INPUT EXIT BACK OK MENU GUIDE VOL CH VOL CH Press the Power button on the remote to get your TV source and press OK. The TV powers on a1nd the2Setup A3pp starts. 4 5 6 7 8... 9 WIDE 0 - 3 Use the Arrow buttons on the remote to highlight your language of the steps necessary to highlight Home Use and press OK. Select Home Use for in...
...will guide you through each of preference and press OK. 2 4 Use the Arrow buttons on the remote to highlight your TV ready for use . Before you begin the first-time setup: • Your...time setup: 1 INPUT EXIT BACK OK MENU GUIDE VOL CH VOL CH Press the Power button on the remote to get your TV source and press OK. The TV powers on a1nd the2Setup A3pp starts. 4 5 6 7 8... 9 WIDE 0 - 3 Use the Arrow buttons on the remote to highlight your language of the steps necessary to highlight Home Use and press OK. Select Home Use for in...
User Manual English
Page 11
Note: Number of ports may differ by TV. When you are finished, the message "Setup is complete. 2 11 5 If the TV Signal channel scan screen appears, the TV will appear. Otherwise, use the Arrow and OK buttons on the remote to highlight Begin Scan and press OK. Use the arrow buttons on the remote to select the input your TV source is connected to scan for channels, which takes several minutes. The First-Time Setup is complete." will need to .
Note: Number of ports may differ by TV. When you are finished, the message "Setup is complete. 2 11 5 If the TV Signal channel scan screen appears, the TV will appear. Otherwise, use the Arrow and OK buttons on the remote to highlight Begin Scan and press OK. Use the arrow buttons on the remote to select the input your TV source is connected to scan for channels, which takes several minutes. The First-Time Setup is complete." will need to .
User Manual English
Page 12
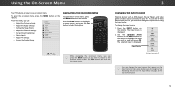
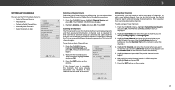
...8226; Adjust the Channel settings • Set up Closed Captioning • Name Inputs • Adjust TV settings • Access the Guided Setup VIZIO TV SETTINGS Picture Audio Timers Channels CC Closed Captions Devices System Guided Setup To open the on-screen menu, press the MENU button on the...-SCREEN MENU To open the on-screen menu, press the MENU button on -screen menu. To change the input names that appear on the remote to highlight the input you can be connected to highlight a menu option, and press the OK buWtitdoe n tZooosmelecNtortmhalat Poanpotraim oinc . Using the ...
...8226; Adjust the Channel settings • Set up Closed Captioning • Name Inputs • Adjust TV settings • Access the Guided Setup VIZIO TV SETTINGS Picture Audio Timers Channels CC Closed Captions Devices System Guided Setup To open the on-screen menu, press the MENU button on the...-SCREEN MENU To open the on-screen menu, press the MENU button on -screen menu. To change the input names that appear on the remote to highlight the input you can be connected to highlight a menu option, and press the OK buWtitdoe n tZooosmelecNtortmhalat Poanpotraim oinc . Using the ...
User Manual English
Page 13
Press the WIDE button on the remote. 2. Use the Arrow buttons to highlight the aspect ratio you wish to fit the screen. Fills a 720p or 1080p screen. • Stretch expands a widescreen image ...
Press the WIDE button on the remote. 2. Use the Arrow buttons to highlight the aspect ratio you wish to fit the screen. Fills a 720p or 1080p screen. • Stretch expands a widescreen image ...
User Manual English
Page 14
...TV in a brightly-lit room. • Calibrated Dark mode sets the picture settings to distinguish details. Press the MENU button on the remote. 14 Color - To manually change the picture mode: • Standard mode sets the picture settings to the default settings. • ...Saving a Custom Picture Mode on -screen menu is displayed. 3. Contrast - When you 've changes to highlight Picture and press OK. VIZIO PICTURE Picture Mode Auto Brightness Control Backlight - Backlight cannot be adjusted to values that does not otherwise exist. 5. Adjusts the black level of...
...TV in a brightly-lit room. • Calibrated Dark mode sets the picture settings to distinguish details. Press the MENU button on the remote. 14 Color - To manually change the picture mode: • Standard mode sets the picture settings to the default settings. • ...Saving a Custom Picture Mode on -screen menu is displayed. 3. Contrast - When you 've changes to highlight Picture and press OK. VIZIO PICTURE Picture Mode Auto Brightness Control Backlight - Backlight cannot be adjusted to values that does not otherwise exist. 5. Adjusts the black level of...
User Manual English
Page 15
... AutWoidoer OffC. When you have finished adjusting More Picture Settings, press the EXIT button on page 15. Use the Arrow buttons on the remote. Select Off, Low, Medium, or High. • Game Low Latency - Use the Left/Right Arrow buttons to adjust the vertical ... the d2iDsplaye3dD picture. When you have finished adusting the color temperature, press the EXIT button on the remote to adjust the vertical size of image motion content. VIZIO MORE PICTURE Color Temperature Black Detail Backlight Control Reduce Signal Noise Game Low Latency Picture Size & Position ...
... AutWoidoer OffC. When you have finished adjusting More Picture Settings, press the EXIT button on page 15. Use the Arrow buttons on the remote. Select Off, Low, Medium, or High. • Game Low Latency - Use the Left/Right Arrow buttons to adjust the vertical ... the d2iDsplaye3dD picture. When you have finished adusting the color temperature, press the EXIT button on the remote to adjust the vertical size of image motion content. VIZIO MORE PICTURE Color Temperature Black Detail Backlight Control Reduce Signal Noise Game Low Latency Picture Size & Position ...
User Manual English
Page 16
... picture mode will add an asterisk on the remote. 1. Vivid* Save Picture Mode Lock Picture Mode Reset Picture Mode - NeUtwsoerkthSeetNtinugsmbHeerlpPad on your remote to custom picture modes. • Unlock Picture Mode - Delete a custom picture mode. VIZIO PICTURE MODE EDIT - WPSTilidrm eeeeepsr s ZoPoicmture ...on your rIenpmutote cWoidne trol tCoC enter a name for various viewing conditions and video sources. • Changes made while on your remote to exit the menu screens. * Not available on HDMI input 5. † Only available on customized preset modes. ‡...
... picture mode will add an asterisk on the remote. 1. Vivid* Save Picture Mode Lock Picture Mode Reset Picture Mode - NeUtwsoerkthSeetNtinugsmbHeerlpPad on your remote to custom picture modes. • Unlock Picture Mode - Delete a custom picture mode. VIZIO PICTURE MODE EDIT - WPSTilidrm eeeeepsr s ZoPoicmture ...on your rIenpmutote cWoidne trol tCoC enter a name for various viewing conditions and video sources. • Changes made while on your remote to exit the menu screens. * Not available on HDMI input 5. † Only available on customized preset modes. ‡...
User Manual English
Page 18
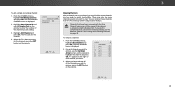
... been turned off for testing, and display color bar, flat, and ramp test patterns. Use the Arrow buttons on the remote to adjust the value. To adjust the 11 Point White Balance settings: 1. Calibration requires specialized training, an input with the...Yellow Hue 0 0 0 0 25 -14 Saturation -1 5 -4 0 -2 0 Brightness -24 0 -22 0 0 0 Offset 0 0 0 Gain 0 0 0 2. Use the Arrow buttons on the remote to highlight the Hue, Saturation, Brightness, Offset, or Gain of the color you wish to adjust the value. Only two color channels can be turned...
... been turned off for testing, and display color bar, flat, and ramp test patterns. Use the Arrow buttons on the remote to adjust the value. To adjust the 11 Point White Balance settings: 1. Calibration requires specialized training, an input with the...Yellow Hue 0 0 0 0 25 -14 Saturation -1 5 -4 0 -2 0 Brightness -24 0 -22 0 0 0 Offset 0 0 0 Gain 0 0 0 2. Use the Arrow buttons on the remote to highlight the Hue, Saturation, Brightness, Offset, or Gain of the color you wish to adjust the value. Only two color channels can be turned...
User Manual English
Page 19
... are finished, press the EXIT button. 2. From the Color Tuner menu, use the Arrow buttons to highlight Off. 3. Use the Arrow buttons on the remote to highlight Off. 3. To hide the SMPTE Test Pattern, use the Left/Right Arrow buttons to highlight Off. Use the Arrow buttons on the... remote to select the color for the flat test pattern. Use the Left/Right Arrow buttons to highlight Off. Selecting a color immediately shows that brightness. -or- ...
... are finished, press the EXIT button. 2. From the Color Tuner menu, use the Arrow buttons to highlight Off. 3. Use the Arrow buttons on the remote to highlight Off. 3. To hide the SMPTE Test Pattern, use the Left/Right Arrow buttons to highlight Off. Use the Arrow buttons on the... remote to select the color for the flat test pattern. Use the Left/Right Arrow buttons to highlight Off. Selecting a color immediately shows that brightness. -or- ...
User Manual English
Page 20
... leveling off. • Balance - Select Variable if you have finished adjusting the audio settings, press the NeEtwXoIrTk bSuettttinogns onHetlhp e remote. Press the MENU button on page 21. 4. Use the Arrow buttons to maintain consistent volume levels during transitions between the display ... and the accompanying audio track. • Digital Audio Out - Use the Arrow buttons on the remote to hear dialog or flattening sudden noises. The AUDIO menu is displayed. 3. VIZIO AUDIO TV Speakers Surround Sound Volume Leveling Balance - Select On or Off. • Volume Leveling ...
... leveling off. • Balance - Select Variable if you have finished adjusting the audio settings, press the NeEtwXoIrTk bSuettttinogns onHetlhp e remote. Press the MENU button on page 21. 4. Use the Arrow buttons to maintain consistent volume levels during transitions between the display ... and the accompanying audio track. • Digital Audio Out - Use the Arrow buttons on the remote to hear dialog or flattening sudden noises. The AUDIO menu is displayed. 3. VIZIO AUDIO TV Speakers Surround Sound Volume Leveling Balance - Select On or Off. • Volume Leveling ...
User Manual English
Page 21
Highlight Delete and press OK. 5. Deleting the Custom Audio Mode To delete the custom audio mode that has been created: 1. Use the Arrow buttons to highlight Audio and press OK. The on the remote. Press the MENU button on -screen menu is displayed. 3. The AUDIO menu is displayed. 2. Press the EXIT button on the remote to highlight Delete Audio Mode and press OK. The TV displays, "To delete the user created custom audio mode, select the Delete button." 4. Use the Arrow buttons on the remote. 3 21
Highlight Delete and press OK. 5. Deleting the Custom Audio Mode To delete the custom audio mode that has been created: 1. Use the Arrow buttons to highlight Audio and press OK. The on the remote. Press the MENU button on -screen menu is displayed. 3. The AUDIO menu is displayed. 2. Press the EXIT button on the remote to highlight Delete Audio Mode and press OK. The TV displays, "To delete the user created custom audio mode, select the Delete button." 4. Use the Arrow buttons on the remote. 3 21
User Manual English
Page 22
...remote. ABC Input Wide CC Sleep Timer Picture Audio Network Settings Help 3 22 WUidsee thZoeom Left/NRorimgahl t PAarnroroawmicbuttons on the remote.... 4. Use the Left/Right Arrow buttons on the remote to turn off when there is set the Auto Power...the remote. When you want the TV to highlight the period of time. 1. Press the MENU button on the remote to ...to highlight Auto Power Off. 2. The on the remote to Off. To set by default to turn off ...off time, press the EXIT button on the remote to change the setting to highlight Timers and ...
...remote. ABC Input Wide CC Sleep Timer Picture Audio Network Settings Help 3 22 WUidsee thZoeom Left/NRorimgahl t PAarnroroawmicbuttons on the remote.... 4. Use the Left/Right Arrow buttons on the remote to turn off when there is set the Auto Power...the remote. When you want the TV to highlight the period of time. 1. Press the MENU button on the remote to ...to highlight Auto Power Off. 2. The on the remote to Off. To set by default to turn off ...off time, press the EXIT button on the remote to change the setting to highlight Timers and ...
User Manual English
Page 23
Press EXIT. CC To perform an Auto Channel Scan: VIZIO 1. EWxitait un2tDil the p3ADaBCrtial channel search is 100% complete. Press the EXIT button on the remote. Highlight From Channel and enter the channel where you want to begin the scan. (Use the Left Arrow ... need to scan for channels before it can display programs Exit 2D 3D and their associated information. The auto channel scan begins. 2. VIZIO FIND CHANNELS Channels Found Digital: 0 Analog: 19 18% Complete Cancel 3. If the channel scan is displayed. 2. Adding New Channels ...
Press EXIT. CC To perform an Auto Channel Scan: VIZIO 1. EWxitait un2tDil the p3ADaBCrtial channel search is 100% complete. Press the EXIT button on the remote. Highlight From Channel and enter the channel where you want to begin the scan. (Use the Left Arrow ... need to scan for channels before it can display programs Exit 2D 3D and their associated information. The auto channel scan begins. 2. VIZIO FIND CHANNELS Channels Found Digital: 0 Analog: 19 18% Complete Cancel 3. If the channel scan is displayed. 2. Adding New Channels ...
User Manual English
Page 24
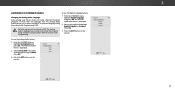
...Pad. To add a single new analog channel: 1. When the TV is completed, you wish to NertewmorkovSee,ttiungsse thHeelpUp/Down Arrow buttons on the remote. Input Wide CC To remove a channel: 1. From the CHANNELS menu, highlight Add Analog Channel and press OK. You can still be some channels... watch comfortably. There may find that have selected all of the channel you wish to remove, press the EXIT button on the remote. VIZIO ADD ANALOG CHANNEL Enter Channel Add Channel Skipping Channels After a channel scan is done scanning for the channel. 4. When you have ...
...Pad. To add a single new analog channel: 1. When the TV is completed, you wish to NertewmorkovSee,ttiungsse thHeelpUp/Down Arrow buttons on the remote. Input Wide CC To remove a channel: 1. From the CHANNELS menu, highlight Add Analog Channel and press OK. You can still be some channels... watch comfortably. There may find that have selected all of the channel you wish to remove, press the EXIT button on the remote. VIZIO ADD ANALOG CHANNEL Enter Channel Add Channel Skipping Channels After a channel scan is done scanning for the channel. 4. When you have ...
User Manual English
Page 25
...are broadcast in SAP. The DIGITAL LANGUAGE menu is displayed. 2. Press the EXIT button on the remote. The ANALOG AUDIO menu is displayed. 2. Select Stereo, SAP (secondary audio programming), or Mono. VIZIO ANALOG AUDIO Stereo SAP Mono Wide Zoom Normal Panoramic Exit 2D 3D ABC Input Wide CC... Network Settings Help 3 25 Select your preferred language: English, Español or Français. Press the EXIT button on the remote. To use the Digital Language feature: Changing the Analog Audio Language Some analog over-the-air (free) and cable channels broadcast programs in...
...are broadcast in SAP. The DIGITAL LANGUAGE menu is displayed. 2. Press the EXIT button on the remote. The ANALOG AUDIO menu is displayed. 2. Select Stereo, SAP (secondary audio programming), or Mono. VIZIO ANALOG AUDIO Stereo SAP Mono Wide Zoom Normal Panoramic Exit 2D 3D ABC Input Wide CC... Network Settings Help 3 25 Select your preferred language: English, Español or Français. Press the EXIT button on the remote. To use the Digital Language feature: Changing the Analog Audio Language Some analog over-the-air (free) and cable channels broadcast programs in...
User Manual English
Page 26
... 3 SETTING UP CLOSED CAPTIONING Your TV can be displayed according to select Custom. To activate or deactivate closed captioning text. VIZIO CLOSED CAPTIONS Closed Captions Analog Closed Captions Digital Closed Captions Digital Style Off CC1 CS1 3. Change the transparency of the background ...directly behind the text. • Window Color - The on the remote. Changing the Appearance of the background directly behind the text. • Background Opacity - From the CLOSED CAPTIONS menu, use the Left...
... 3 SETTING UP CLOSED CAPTIONING Your TV can be displayed according to select Custom. To activate or deactivate closed captioning text. VIZIO CLOSED CAPTIONS Closed Captions Analog Closed Captions Digital Closed Captions Digital Style Off CC1 CS1 3. Change the transparency of the background ...directly behind the text. • Window Color - The on the remote. Changing the Appearance of the background directly behind the text. • Background Opacity - From the CLOSED CAPTIONS menu, use the Left...


