Quickstart Guide / Guide de Demarrage Rapide
Page 1
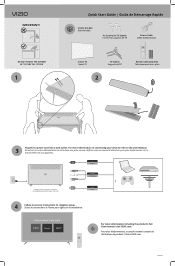
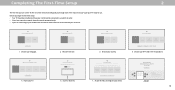
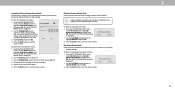
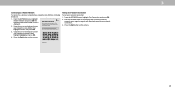
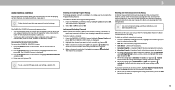
... 5mRCmRACA Adapters may be required. Des adaptateurs peuvent être requis. Watch Now VIZIO IMPORTANT! Choose a Language for TV Stands 4 x Vis Pour supports de TV Power Cable Câble d'alimentation Smart TV Smart TV TV Stands Supports de TV 2 Remote with Batteries Télécommande avec piles $ Watch Now HDRMCRIACTAoT3o 3 RSCtAaSntTadona3drdard OStpOatnipcdtaiacl...
... 5mRCmRACA Adapters may be required. Des adaptateurs peuvent être requis. Watch Now VIZIO IMPORTANT! Choose a Language for TV Stands 4 x Vis Pour supports de TV Power Cable Câble d'alimentation Smart TV Smart TV TV Stands Supports de TV 2 Remote with Batteries Télécommande avec piles $ Watch Now HDRMCRIACTAoT3o 3 RSCtAaSntTadona3drdard OStpOatnipcdtaiacl...
Manuel de l Utilisateur
Page 16
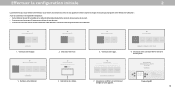
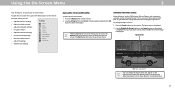
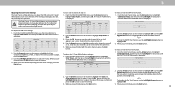
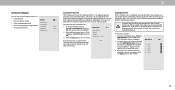
...be bound by the (i) VIZIO Terms of Service and Privacy Policy and (ii) the Google Terms of this device. You can turn your phone into the ultimate remote. Choisissez votre connexion Wi...-Fi et entrez le mot de passe. Skip For Now Accept All Which room is you agree to be bound by the (i) VIZIO Terms of...the antenna, wall or cable box is properly connected to your phone into the ultimate remote. shows now! Encrypted Home Use Store Demo WhicWh hroeorCemhiosisoysoyeouuaVrlIaVZnIZOgIuOTaVTgeVlofcLoaortceyaodtu?erdT?V. Home Use Store ...
...be bound by the (i) VIZIO Terms of Service and Privacy Policy and (ii) the Google Terms of this device. You can turn your phone into the ultimate remote. Choisissez votre connexion Wi...-Fi et entrez le mot de passe. Skip For Now Accept All Which room is you agree to be bound by the (i) VIZIO Terms of...the antenna, wall or cable box is properly connected to your phone into the ultimate remote. shows now! Encrypted Home Use Store Demo WhicWh hroeorCemhiosisoysoyeouuaVrlIaVZnIZOgIuOTaVTgeVlofcLoaortceyaodtu?erdT?V. Home Use Store ...

User Manual
Page 3
...causing serious personal injury or death. • Ensuring the television set is exposed to hang onto the product. • Store the accessories (remote, batteries, etc.) in a location safely out of the reach of children. • The American Academy of Pediatrics discourages television viewing for...: These servicing instructions are unplugged before moving your TV from moisture. Do not try to the sound level, which can damage the remote control television set in accordance with instructions. The power cord fails or frays. - • Only power of the marked voltage can...
...causing serious personal injury or death. • Ensuring the television set is exposed to hang onto the product. • Store the accessories (remote, batteries, etc.) in a location safely out of the reach of children. • The American Academy of Pediatrics discourages television viewing for...: These servicing instructions are unplugged before moving your TV from moisture. Do not try to the sound level, which can damage the remote control television set in accordance with instructions. The power cord fails or frays. - • Only power of the marked voltage can...

User Manual
Page 6
Table Of Contents Getting to Know Your TV 7 Front Panel 7 Rear Panel 8 Connecting Your Devices 11 Wall-mounting the TV 14 Using the Remote 15 Completing The First-Time Setup 16 Using the On-Screen Menu 17 Navigating the On-Screen Menu 17 Changing the Input Source 17 Changing ...
Table Of Contents Getting to Know Your TV 7 Front Panel 7 Rear Panel 8 Connecting Your Devices 11 Wall-mounting the TV 14 Using the Remote 15 Completing The First-Time Setup 16 Using the On-Screen Menu 17 Navigating the On-Screen Menu 17 Changing the Input Source 17 Changing ...

User Manual
Page 7
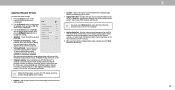
The power indicator flashes on when the TV turns on , see Turning the Power Indicator On or Off. 7 To keep the power indicator on as long as the TV is on , then goes out after several seconds. Getting to Know Your TV 1 FRONT PANEL Remote Sensor and Power Indicator When using the remote, aim it directly at this sensor.
The power indicator flashes on when the TV turns on , see Turning the Power Indicator On or Off. 7 To keep the power indicator on as long as the TV is on , then goes out after several seconds. Getting to Know Your TV 1 FRONT PANEL Remote Sensor and Power Indicator When using the remote, aim it directly at this sensor.
User Manual
Page 15
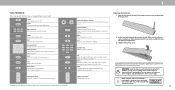
...model. Volume Up/Down VOL CH Increase or decrease the loudness of the audio *Enabled/disabled different accessibility features by holding down this remote with batteries of batteries infire. Find the notch on your batteries consistent with household waste. Insert a coin and pry open the back ... pad to manually enter a digital sub-channel (for 5 seconds. Replace the battery cover. For more information please visit: www.vizio.com/environment WARNING: keep the remote control batteries away from children. Replace only with two, new Duracell 'AAA' alkaline batteries 15
...model. Volume Up/Down VOL CH Increase or decrease the loudness of the audio *Enabled/disabled different accessibility features by holding down this remote with batteries of batteries infire. Find the notch on your batteries consistent with household waste. Insert a coin and pry open the back ... pad to manually enter a digital sub-channel (for 5 seconds. Replace the battery cover. For more information please visit: www.vizio.com/environment WARNING: keep the remote control batteries away from children. Replace only with two, new Duracell 'AAA' alkaline batteries 15
User Manual
Page 16
...& Conditions. Your use of this device. VIZIO Terms & Conditions VIZIO Privacy Policy Google Privacy Policy Google Terms &... Start Watching By the way... The VIZIO SmartCastTM App brings together TV Shows, ...you are covered by the (i) VIZIO Terms of Service and Privacy Policy... the power cord should be bound by VIZIO and Google 's respective Terms of this ...VIZIO TV located? ChooHsoewaaWrei-yFoi uNuestwinogrky.our TV? Home Use Store Demo 2. Choose home use . Where is properly connected to your VIZIO... is properly connected to your VIZIO TV Located? To search for channels...
...& Conditions. Your use of this device. VIZIO Terms & Conditions VIZIO Privacy Policy Google Privacy Policy Google Terms &... Start Watching By the way... The VIZIO SmartCastTM App brings together TV Shows, ...you are covered by the (i) VIZIO Terms of Service and Privacy Policy... the power cord should be bound by VIZIO and Google 's respective Terms of this ...VIZIO TV located? ChooHsoewaaWrei-yFoi uNuestwinogrky.our TV? Home Use Store Demo 2. Choose home use . Where is properly connected to your VIZIO... is properly connected to your VIZIO TV Located? To search for channels...
User Manual
Page 17
... The selected input is displayed. 2. Press the Menu button on -screen menu. The Input menu is displayed. The Exit button will close the on the remote. 2. Press the Input button on -screen menu, you can be connected to your devices easy to recognize. You can : • Adjust the Picture ... User Manual NAVIGATING THE ON-SCREEN MENU To open the on-screen menu, press the Menu button on -screen menu: 1. While navigating the on the remote. To change the input sources: 1. Input Name Change Input SMARTCAST WatchFree HDMI-1 HDMI-2 HDMI-3 HDMI-4 COMP TV Note: Inputs may vary by TV....
... The selected input is displayed. 2. Press the Menu button on -screen menu. The Input menu is displayed. The Exit button will close the on the remote. 2. Press the Input button on -screen menu, you can be connected to your devices easy to recognize. You can : • Adjust the Picture ... User Manual NAVIGATING THE ON-SCREEN MENU To open the on-screen menu, press the Menu button on -screen menu: 1. While navigating the on the remote. To change the input sources: 1. Input Name Change Input SMARTCAST WatchFree HDMI-1 HDMI-2 HDMI-3 HDMI-4 COMP TV Note: Inputs may vary by TV....
User Manual
Page 19
... - If flesh appears too orange, reduce the level of the picture colors. • Tint - Specific adjustments are based on the remote to highlight Picture and press OK. Diminishes artifacts in dark or bright areas of the picture. Select On to change each of brightness... Backlight Control On the setting you have finished adjusting the picture settings, press the Exit button on the remote. * Not applicable to D24h-G9 **Applicable models: D50x-G9, V505-G9, V405-G9 and V655-G9 19 Reduce Signal Noise - Select Off, Low, Medium, or High. - Select Auto or Off. ...
... - If flesh appears too orange, reduce the level of the picture colors. • Tint - Specific adjustments are based on the remote to highlight Picture and press OK. Diminishes artifacts in dark or bright areas of the picture. Select On to change each of brightness... Backlight Control On the setting you have finished adjusting the picture settings, press the Exit button on the remote. * Not applicable to D24h-G9 **Applicable models: D50x-G9, V505-G9, V405-G9 and V655-G9 19 Reduce Signal Noise - Select Off, Low, Medium, or High. - Select Auto or Off. ...
User Manual
Page 20
... • Save Picture Mode - Save Picture Mode Back abc def ghi j k l mn o p q r s t u v wx y z 0 1 2 3 4 5 6 7 8 9 .@# äêí Space Save † Only available on the remote. To save groups of the picture. From the PICTURE MODE EDIT menu, use the Arrow buttons to enter a name for various viewing conditions and video... sources. • Changes made while on any preset picture mode will add an asterisk on the remote to change the setting: Lock Picture Mode Reset Picture Mode - To adjust the color temperature: 1.
... • Save Picture Mode - Save Picture Mode Back abc def ghi j k l mn o p q r s t u v wx y z 0 1 2 3 4 5 6 7 8 9 .@# äêí Space Save † Only available on the remote. To save groups of the picture. From the PICTURE MODE EDIT menu, use the Arrow buttons to enter a name for various viewing conditions and video... sources. • Changes made while on any preset picture mode will add an asterisk on the remote to change the setting: Lock Picture Mode Reset Picture Mode - To adjust the color temperature: 1.
User Manual
Page 21
... window is set, then lock/ unlock. To delete the user created Custom 1 picture mode, select the Delete button. Use the Number Pad on your remote to enter your remote to enter a unique 4-digit PIN. Then turn ON Lock Picture Mode. 6. Locking/Unlocking a Custom Picture Mode Custom picture modes can be locked/unlocked...
... window is set, then lock/ unlock. To delete the user created Custom 1 picture mode, select the Delete button. Use the Number Pad on your remote to enter your remote to enter a unique 4-digit PIN. Then turn ON Lock Picture Mode. 6. Locking/Unlocking a Custom Picture Mode Custom picture modes can be locked/unlocked...
User Manual
Page 22
... color channels, press the Exit button. To adjust the HSB color settings: 1. The Color Tuner menu is displayed. Use the Arrow buttons on the remote to highlight the Hue, Saturation, Brightness, Offset, or Gain of the color you to highlight Calibration Tests, and then press the Left/Right Arrow buttons... point white balance, turn the color channel off for the flat test pattern. Press the OK button to turn color channels off or on the remote to highlight Color Tuner, and then press OK. When you have finished with precisely set colors, and a specialized light meter. From the Color ...
... color channels, press the Exit button. To adjust the HSB color settings: 1. The Color Tuner menu is displayed. Use the Arrow buttons on the remote to highlight the Hue, Saturation, Brightness, Offset, or Gain of the color you to highlight Calibration Tests, and then press the Left/Right Arrow buttons... point white balance, turn the color channel off for the flat test pattern. Press the OK button to turn color channels off or on the remote to highlight Color Tuner, and then press OK. When you have finished with precisely set colors, and a specialized light meter. From the Color ...
User Manual
Page 23
... Exit button. 2. Selecting a color immediately shows that color ramp. -or- When you are finished, press the Exit button. 3 23 Use the Arrow buttons on the remote to select the color for the ramp test pattern. Use the Left/ Right Arrow buttons to highlight Off. Use the Arrow buttons on the... remote to highlight Calibration Test, and then press the Left/Right Arrow buttons until the RAMP TEST PATTERN menu is displayed. To hide the Ramp Test ...
... Exit button. 2. Selecting a color immediately shows that color ramp. -or- When you are finished, press the Exit button. 3 23 Use the Arrow buttons on the remote to select the color for the ramp test pattern. Use the Left/ Right Arrow buttons to highlight Off. Use the Arrow buttons on the... remote to highlight Calibration Test, and then press the Left/Right Arrow buttons until the RAMP TEST PATTERN menu is displayed. To hide the Ramp Test ...
User Manual
Page 24
... • Analog Audio Out - When you have finished adjusting the audio settings, press the Exit button on -screen menu is displayed. The on the remote. • Balance - Surround Sound On 3. Select On or Off. • Volume Leveling - In a few cases, volume leveling may artificially suppress ... levels during transitions between the display image and the accompanying audio track. • Digital Audio Out - Use the Arrow buttons on the remote. If this occurs, turn volume leveling off. ADJUSTING THE AUDIO SETTINGS To adjust the audio settings: 1. Select On or Off. Changes...
... • Analog Audio Out - When you have finished adjusting the audio settings, press the Exit button on -screen menu is displayed. The on the remote. • Balance - Surround Sound On 3. Select On or Off. • Volume Leveling - In a few cases, volume leveling may artificially suppress ... levels during transitions between the display image and the accompanying audio track. • Digital Audio Out - Use the Arrow buttons on the remote. If this occurs, turn volume leveling off. ADJUSTING THE AUDIO SETTINGS To adjust the audio settings: 1. Select On or Off. Changes...

User Manual
Page 25
... Cancel • Pref. Finding MAC Addresses for Network Setup The security settings on the remote to your network when you do not see the wireless network connection menu. The MANUAL SETUP menu is displayed. 3. D24h-G9 , D32h-G9 and D40f-G9 support Wireless-N. You must unplug the Ethernet cable to set up your network when...
... Cancel • Pref. Finding MAC Addresses for Network Setup The security settings on the remote to your network when you do not see the wireless network connection menu. The MANUAL SETUP menu is displayed. 3. D24h-G9 , D32h-G9 and D40f-G9 support Wireless-N. You must unplug the Ethernet cable to set up your network when...
User Manual
Page 26
... the on -screen keyboard, enter your network's password, then highlight Connect and press OK. 4. This is not being broadcast: 1. Press the Exit button on the remote. From the NETWORK menu, highlight Test Connection and press OK. 2. Using the on -screen keyboard, enter your network's name (SSID), then highlight Connect and press... connect to a wireless network whose network name (SSID) is used to connect to an access point with a hidden SSID. 3. Press the Exit button on the remote. The ENTER ACCESS POINT NAME screen is displayed. 2.
... the on -screen keyboard, enter your network's password, then highlight Connect and press OK. 4. This is not being broadcast: 1. Press the Exit button on the remote. From the NETWORK menu, highlight Test Connection and press OK. 2. Using the on -screen keyboard, enter your network's name (SSID), then highlight Connect and press... connect to a wireless network whose network name (SSID) is used to connect to an access point with a hidden SSID. 3. Press the Exit button on the remote. The ENTER ACCESS POINT NAME screen is displayed. 2.
User Manual
Page 27
... or off while audio is set by default to highlight Auto Power Off. 2. From the TIMERS menu, use the Up/Down Arrow buttons on the remote to turn off after a set the Auto Power Off feature: 1. Sleep Timer Auto Power Off Blank Screen Off 10 Minutes 3. Otherwise, select 10 minutes. 3. 3 ... Blank Screen feature: 1. If you don't want the sleep timer to activate, change the setting to turn off time, press the Exit button on the remote. When you have finished setting the auto power off when there is displayed. To exit Blank Screen, press any key. 27 When you have finished...
... or off while audio is set by default to highlight Auto Power Off. 2. From the TIMERS menu, use the Up/Down Arrow buttons on the remote to turn off after a set the Auto Power Off feature: 1. Sleep Timer Auto Power Off Blank Screen Off 10 Minutes 3. Otherwise, select 10 minutes. 3. 3 ... Blank Screen feature: 1. If you don't want the sleep timer to activate, change the setting to turn off time, press the Exit button on the remote. When you have finished setting the auto power off when there is displayed. To exit Blank Screen, press any key. 27 When you have finished...
User Manual
Page 28
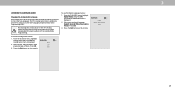
...do not want to scan for Channels The TV may find that some channels you wish to remove, press the Exit button on the remote. A channel scan is canceled, the channels that have selected all channels. From the CHANNELS menu, Find Channels Back highlight Find Channels...displayed. See Locking and Unlocking Channels. Skip Channels Back 2. The auto channel scan begins. To remove a channel: 1. Press the Exit button on the remote. 3 Test 3 4 Test 4 28 Channels that were already discovered are too weak to scan for free over-the-air channels (using the Number Pad....
...do not want to scan for Channels The TV may find that some channels you wish to remove, press the Exit button on the remote. A channel scan is canceled, the channels that have selected all channels. From the CHANNELS menu, Find Channels Back highlight Find Channels...displayed. See Locking and Unlocking Channels. Skip Channels Back 2. The auto channel scan begins. To remove a channel: 1. Press the Exit button on the remote. 3 Test 3 4 Test 4 28 Channels that were already discovered are too weak to scan for free over-the-air channels (using the Number Pad....
User Manual
Page 29
...Spanish/ Video Description French To use the Digital Language feature: 1. The DIGITAL LANGUAGE menu is displayed. Press the Exit button on the remote. 3 29 Press OK. The Analog Audio Back Analog Audio menu is displayed. 2. The TV's Analog Audio feature allows you to ...broadcast with Secondary Audio Programming. Stereo 2. From the Channels menu, highlight Analog Audio and press OK. Press the Exit button on the remote. To use the Analog Audio feature: 1. Select Stereo, SAP (secondary audio SAP programming), or Mono. LISTENING TO ALTERNATE AUDIO Changing ...
...Spanish/ Video Description French To use the Digital Language feature: 1. The DIGITAL LANGUAGE menu is displayed. Press the Exit button on the remote. 3 29 Press OK. The Analog Audio Back Analog Audio menu is displayed. 2. The TV's Analog Audio feature allows you to ...broadcast with Secondary Audio Programming. Stereo 2. From the Channels menu, highlight Analog Audio and press OK. Press the Exit button on the remote. To use the Analog Audio feature: 1. Select Stereo, SAP (secondary audio SAP programming), or Mono. LISTENING TO ALTERNATE AUDIO Changing ...
User Manual
Page 30
...Content with this rating and all unrated content, highlight Block Unrated Shows and use the Up/Down and Left/Right Arrow buttons on the remote to adjust and press OK: • USA TV - The PARENTAL CONTROLS menu only appears when: • You are finished adjusting the... broadcasts. 2. Canadian English television program broadcasts. • Canadian French - To enable or disable the Program Rating feature: 1. The on the remote to block certain programs from displaying certain channels or programs without a password. Use the Arrow buttons on -screen menu is accessible. 3 Blocking and...
...Content with this rating and all unrated content, highlight Block Unrated Shows and use the Up/Down and Left/Right Arrow buttons on the remote to adjust and press OK: • USA TV - The PARENTAL CONTROLS menu only appears when: • You are finished adjusting the... broadcasts. 2. Canadian English television program broadcasts. • Canadian French - To enable or disable the Program Rating feature: 1. The on the remote to block certain programs from displaying certain channels or programs without a password. Use the Arrow buttons on -screen menu is accessible. 3 Blocking and...


