Manuel de l Utilisateur
Page 16
... the antenna, wall or cable box is properly connected to be bound by the (i) VIZIO Terms of Service and Privacy Policy and (ii) the Google Terms of Service and Privacy Policy. Let's set up local channels.Download now from the App Store or Google Play. shows now! To search for local broadcast channels, make sure the cable from multiple apps into the ultimate remote. By...
... the antenna, wall or cable box is properly connected to be bound by the (i) VIZIO Terms of Service and Privacy Policy and (ii) the Google Terms of Service and Privacy Policy. Let's set up local channels.Download now from the App Store or Google Play. shows now! To search for local broadcast channels, make sure the cable from multiple apps into the ultimate remote. By...
User Manual
Page 2
... the power cord. • Use only with the cart, stand, tripod, bracket, or table • The lightning flash with the apparatus. may be maintained between your TV and any heat source, such as a radiator, heater, oven, amplifier etc. Be sure to inspect the package contents to persons. • Unplug this apparatus near any heat sources such as power-supply cord or plug is used, use...
... the power cord. • Use only with the cart, stand, tripod, bracket, or table • The lightning flash with the apparatus. may be maintained between your TV and any heat source, such as a radiator, heater, oven, amplifier etc. Be sure to inspect the package contents to persons. • Unplug this apparatus near any heat sources such as power-supply cord or plug is used, use...

User Manual
Page 3
... of the power plug, not the cord. Do not expose your dealer immediately. Continuous use by qualified service personnel only. Your TV is exposed to repair or service your TV. • To prevent injury, this case may function abnormally. With continued exposure to loud noises, ears may become accustomed to the sound level, which can damage the remote control television set on...
... of the power plug, not the cord. Do not expose your dealer immediately. Continuous use by qualified service personnel only. Your TV is exposed to repair or service your TV. • To prevent injury, this case may function abnormally. With continued exposure to loud noises, ears may become accustomed to the sound level, which can damage the remote control television set on...
User Manual
Page 4
..., connection to grounding electrodes, and requirements of the grounding electrode. Ground Clamp Antenna Lead In Wire Electric Service Equipment Antenna Discharge Unit (NEC Section 810-20) Grounding Conductors (NEC Section 810-21) Ground Clamps Power Service Grounding Electrode System (NEC ART 250, part H) iv Remember, the screen of time, unplug the TV from the wall outlet and disconnect the antenna or cable...
..., connection to grounding electrodes, and requirements of the grounding electrode. Ground Clamp Antenna Lead In Wire Electric Service Equipment Antenna Discharge Unit (NEC Section 810-20) Grounding Conductors (NEC Section 810-21) Ground Clamps Power Service Grounding Electrode System (NEC ART 250, part H) iv Remember, the screen of time, unplug the TV from the wall outlet and disconnect the antenna or cable...

User Manual
Page 6
...Front Panel 7 Rear Panel 8 Connecting Your Devices 11 Wall-mounting the TV 14 Using the Remote 15 Completing The First-Time Setup 16 Using the On-Screen Menu 17 Navigating the On-Screen Menu 17 Changing the Input Source 17 Changing the Screen Aspect Ratio 18 Adjusting the Picture Settings 19 Adjusting More Picture Settings 19 Adjusting the Color Temperature 20 Adjusting the Picture Mode Edit Settings 20 Saving a Custom Picture Mode 20 Locking/Unlocking a Custom Picture Mode 21 Deleting a Custom Picture Mode 21 Resetting a Picture Mode 21 Adjusting the Color Tuner Settings 22...
...Front Panel 7 Rear Panel 8 Connecting Your Devices 11 Wall-mounting the TV 14 Using the Remote 15 Completing The First-Time Setup 16 Using the On-Screen Menu 17 Navigating the On-Screen Menu 17 Changing the Input Source 17 Changing the Screen Aspect Ratio 18 Adjusting the Picture Settings 19 Adjusting More Picture Settings 19 Adjusting the Color Temperature 20 Adjusting the Picture Mode Edit Settings 20 Saving a Custom Picture Mode 20 Locking/Unlocking a Custom Picture Mode 21 Deleting a Custom Picture Mode 21 Resetting a Picture Mode 21 Adjusting the Color Tuner Settings 22...
User Manual
Page 8
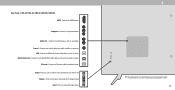
... Input - Composite - USB - Connect to access the input menu. Volume - INPUT 1 Note: The image shown here is for illustrative purposes only and may vary, depending on the TV. Stereo Audio Out - Power - Press to an optical/SPDIF audio device, such as a headset or sound bar. Connect 3.5 mm audio device, such as home audio receiver. Connect an HDMI device. Connect a composite. Video/ L/R Coaxial - Optical Audio Out - Press and hold to change. D24h-G9 HDMI - The actual number of ports...
... Input - Composite - USB - Connect to access the input menu. Volume - INPUT 1 Note: The image shown here is for illustrative purposes only and may vary, depending on the TV. Stereo Audio Out - Power - Press to an optical/SPDIF audio device, such as a headset or sound bar. Connect 3.5 mm audio device, such as home audio receiver. Connect an HDMI device. Connect a composite. Video/ L/R Coaxial - Optical Audio Out - Press and hold to change. D24h-G9 HDMI - The actual number of ports...
User Manual
Page 10
... as home audio receiver. Connect a composite device. Connect to change. USB - Press to an optical/SPDIF audio device, such as sound bar. Connect a USB thumb drive to a coaxial cable from cable, satellite, or antenna. Ethernet - Press to turn on the model. 10 Power - Rear Panel - Audio Out - Press and hold to increase or decrease the TV volume level. D32h-G9, D50x-G9, V405-G9, V505-G9 & V655-G9 HDMI - Press to modem/ router. Connect an Ethernet cable to access the input menu. INPUT 1 Note...
... as home audio receiver. Connect a composite device. Connect to change. USB - Press to an optical/SPDIF audio device, such as sound bar. Connect a USB thumb drive to a coaxial cable from cable, satellite, or antenna. Ethernet - Press to turn on the model. 10 Power - Rear Panel - Audio Out - Press and hold to increase or decrease the TV volume level. D32h-G9, D50x-G9, V405-G9, V505-G9 & V655-G9 HDMI - Press to modem/ router. Connect an Ethernet cable to access the input menu. INPUT 1 Note...
User Manual
Page 14
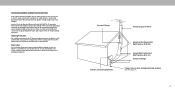
... To mount your TV on a wall: 1. Be sure the mount you choose is capable of supporting the weight of ports and their locations may be subject to change. To install your TV on a wall, you have the correct mount for your TV. If attached, remove the stands by loosening and removing the screws. 4. The actual number of the TV. D24h-G9 D32h-G9 D40f-G9 D50x-G9 V405-G9 V505-G9 V655-G9 Screw Size: Hole...
... To mount your TV on a wall: 1. Be sure the mount you choose is capable of supporting the weight of ports and their locations may be subject to change. To install your TV on a wall, you have the correct mount for your TV. If attached, remove the stands by loosening and removing the screws. 4. The actual number of the TV. D24h-G9 D32h-G9 D40f-G9 D50x-G9 V405-G9 V505-G9 V655-G9 Screw Size: Hole...
User Manual
Page 15
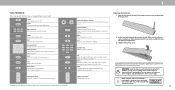
... manually enter a digital sub-channel (for example, 18-4 or 18-5) Wide Change the picture display size/aspect ratio Enable/disable zoom mode* Replacing the Batteries 1. For more information please visit: www.vizio.com/environment WARNING: keep the remote control batteries away from children. Mute Turn the audio on or off Input Change the currently displayed input App Launcher Quickly launch the pictured app MENU EXIT OK BACK INFO Menu Display the settings menu Exit Close the on-screen menu...
... manually enter a digital sub-channel (for example, 18-4 or 18-5) Wide Change the picture display size/aspect ratio Enable/disable zoom mode* Replacing the Batteries 1. For more information please visit: www.vizio.com/environment WARNING: keep the remote control batteries away from children. Mute Turn the audio on or off Input Change the currently displayed input App Launcher Quickly launch the pictured app MENU EXIT OK BACK INFO Menu Display the settings menu Exit Close the on-screen menu...
User Manual
Page 16
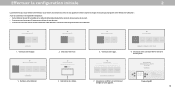
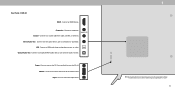
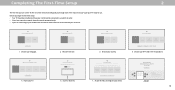
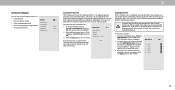
... ultimate remote. Before you begin the first-time setup: • Your TV should be installed and the power cord should be bound by VIZIO and Google 's respective Terms of Service and Privacy Policy. USA Mexico Canada Choose a Wi-Fi Network. 3. To search for channels. Scan for local broadcast channels, make sure the cable from the antenna, wall or cable box is properly connected to your TV. You can turn...
... ultimate remote. Before you begin the first-time setup: • Your TV should be installed and the power cord should be bound by VIZIO and Google 's respective Terms of Service and Privacy Policy. USA Mexico Canada Choose a Wi-Fi Network. 3. To search for channels. Scan for local broadcast channels, make sure the cable from the antenna, wall or cable box is properly connected to your TV. You can turn...
User Manual
Page 17
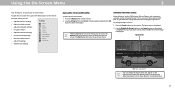
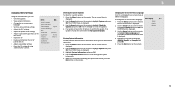
... on the remote. You can be connected to your TV. While navigating the on-screen menu, you can : • Adjust the Picture settings • Adjust the Audio settings • Adjust the Network settings • Set up the Timers • Adjust the Channel settings • Set up Closed Captioning • Name and adjust Inputs • Adjust TV settings TV Settings Picture Audio Network Timers Channels Closed Captions Input Settings System User Manual • View the User Manual NAVIGATING THE ON-SCREEN MENU To open the on-screen menu, press the Menu button on the Input menu to make...
... on the remote. You can be connected to your TV. While navigating the on-screen menu, you can : • Adjust the Picture settings • Adjust the Audio settings • Adjust the Network settings • Set up the Timers • Adjust the Channel settings • Set up Closed Captioning • Name and adjust Inputs • Adjust TV settings TV Settings Picture Audio Network Timers Channels Closed Captions Input Settings System User Manual • View the User Manual NAVIGATING THE ON-SCREEN MENU To open the on-screen menu, press the Menu button on the Input menu to make...
User Manual
Page 19
... for HDMI input only. • Gamma - Use the Arrow buttons on -screen menu is too low, the picture may Picture Mode Backlight Brightness be too dark to compensate for mpeg files. Backlight cannot be used to distinguish in dark or bright areas of brightness. Adjusts the black level of the picture. Adjusts the white level of the picture colors. • Tint - Adjusts the intensity of the picture. This setting is displayed...
... for HDMI input only. • Gamma - Use the Arrow buttons on -screen menu is too low, the picture may Picture Mode Backlight Brightness be too dark to compensate for mpeg files. Backlight cannot be used to distinguish in dark or bright areas of brightness. Adjusts the black level of the picture. Adjusts the white level of the picture colors. • Tint - Adjusts the intensity of the picture. This setting is displayed...
User Manual
Page 24
... external audio device (sound bar or AV receiver) will control the volume. 4. When you have finished adjusting the audio settings, press the Exit button on the remote. ADJUSTING THE AUDIO SETTINGS To adjust the audio settings: 1. Analog Audio Out Fixed • Volume Control Display - Surround sound uses DTS TruSurround™ to maintain consistent volume levels during transitions between program content, AV formats, and input sources. When the TV speakers are controlling the volume with more than two channels (3.0, 5.0, or 5.1, for the RCA connector when connected...
... external audio device (sound bar or AV receiver) will control the volume. 4. When you have finished adjusting the audio settings, press the Exit button on the remote. ADJUSTING THE AUDIO SETTINGS To adjust the audio settings: 1. Analog Audio Out Fixed • Volume Control Display - Surround sound uses DTS TruSurround™ to maintain consistent volume levels during transitions between program content, AV formats, and input sources. When the TV speakers are controlling the volume with more than two channels (3.0, 5.0, or 5.1, for the RCA connector when connected...

User Manual
Page 25
... displayed. 2. From the NETWORK menu, highlight Manual Setup and press OK. The IP address assigned to highlight Network and press OK. DNS Server - From the NETWORK menu, highlight Manual Setup and press OK. D50x-G9, V405-G9, V505-G9 and V655-G9 support Wireless-AC. Press the Exit button on the remote. Network Back Wired Connection Disconnected Wireless Access Points Manual Setup Hidden Networks Test Connection Changing the Manual Setup Settings Advanced users can fine-tune the network settings using the Manual Setup feature. The MANUAL SETUP menu is...
... displayed. 2. From the NETWORK menu, highlight Manual Setup and press OK. The IP address assigned to highlight Network and press OK. DNS Server - From the NETWORK menu, highlight Manual Setup and press OK. D50x-G9, V405-G9, V505-G9 and V655-G9 support Wireless-AC. Press the Exit button on the remote. Network Back Wired Connection Disconnected Wireless Access Points Manual Setup Hidden Networks Test Connection Changing the Manual Setup Settings Advanced users can fine-tune the network settings using the Manual Setup feature. The MANUAL SETUP menu is...
User Manual
Page 28
... viewed, use the parental controls. See Locking and Unlocking Channels. Skip Channels Back 2. The auto channel scan begins. You can remove these channels from an outof-the-wall connection (without a cable box). For each channel you have been removed with the Skip Channel feature can still be some channels are retained. When you select. 0 Test 0 1 Test 1 2 Test 2 3. 3 SETTING UP CHANNELS You can use the TV's Channels menu to: • Find Channels • Select channels to skip • Select Analog Audio mode...
... viewed, use the parental controls. See Locking and Unlocking Channels. Skip Channels Back 2. The auto channel scan begins. You can remove these channels from an outof-the-wall connection (without a cable box). For each channel you have been removed with the Skip Channel feature can still be some channels are retained. When you select. 0 Test 0 1 Test 1 2 Test 2 3. 3 SETTING UP CHANNELS You can use the TV's Channels menu to: • Find Channels • Select channels to skip • Select Analog Audio mode...
User Manual
Page 34
... Arrow buttons on the remote. 34 When you can: • Check for updates • View system information • Change the on-screen menu language • Set time zone and local settings • Adjust the CEC settings • Adjust the power mode settings • Adjust to preserve Aspect Ratio or fill the screen • Name the TV • Review and maintain the list of paired devices • Adjust accessibility settings • Reset the TV settings & setup administrative controls...
... Arrow buttons on the remote. 34 When you can: • Check for updates • View system information • Change the on-screen menu language • Set time zone and local settings • Adjust the CEC settings • Adjust the power mode settings • Adjust to preserve Aspect Ratio or fill the screen • Name the TV • Review and maintain the list of paired devices • Adjust accessibility settings • Reset the TV settings & setup administrative controls...

User Manual
Page 38
... PIN code the next time you access this menu or if you have trouble enabling or disabling Viewing Data, please contact VIZIO Customer Support by devices associated with content on the remote to confirm. System PIN Code Back Change the PIN used to generate summary analysis and reports of our products, software and services. Highlight System PIN Code and press Confirm PIN OK." 5. Using the USB Power Feature The USB port...
... PIN code the next time you access this menu or if you have trouble enabling or disabling Viewing Data, please contact VIZIO Customer Support by devices associated with content on the remote to confirm. System PIN Code Back Change the PIN used to generate summary analysis and reports of our products, software and services. Highlight System PIN Code and press Confirm PIN OK." 5. Using the USB Power Feature The USB port...

User Manual
Page 48
...'s digital capabilities exceed a digital broadcast signal, the signal is off Volume Leveling. The sound is flat or dialog is not responding. • Make sure the batteries are securely attached. VIZIO recommends selecting Calibrated. • Check all cables are always dark. • Your HD TV is not good. • For the best image quality, view high-definition programs using cable TV or antenna connected directly to change the screen mode. The picture...
...'s digital capabilities exceed a digital broadcast signal, the signal is off Volume Leveling. The sound is flat or dialog is not responding. • Make sure the batteries are securely attached. VIZIO recommends selecting Calibrated. • Check all cables are always dark. • Your HD TV is not good. • For the best image quality, view high-definition programs using cable TV or antenna connected directly to change the screen mode. The picture...
User Manual
Page 49
... to cable or satellite, simply connect an HDMI cable (not included) to the receiver. • If you are using an antenna, the signal strength of product and do I change input source, the TV image changes size. • The TV remembers the viewing mode on : Control > Your TV/Device Name > Settings Icon > System > Reset & Admin > Viewing Data Slider. These types of occurrences are watching content on the television, press the INFO button on...
... to cable or satellite, simply connect an HDMI cable (not included) to the receiver. • If you are using an antenna, the signal strength of product and do I change input source, the TV image changes size. • The TV remembers the viewing mode on : Control > Your TV/Device Name > Settings Icon > System > Reset & Admin > Viewing Data Slider. These types of occurrences are watching content on the television, press the INFO button on...
User Manual
Page 53
... with VIZIO. To determine if this warranty. What This Warranty Does Not Cover This warranty does not cover: (a) cosmetic damage; (b) normal wear and tear; (c) improper operation; (d) improper voltage supply or power surges; (e) signal issues; (f) damage from warranty service, whichever is used normally ...warranty on the box, or contact VIZIO Technical Support at VIZIO's option and sole BY THE AMERICAN ARBITRATION ASSOCIATION, IN ACCORDANCE WITH VIZIO's user guides and manuals. In-home Federal Arbitration Act will be restored to resolve the issue informally with Replacement parts...
... with VIZIO. To determine if this warranty. What This Warranty Does Not Cover This warranty does not cover: (a) cosmetic damage; (b) normal wear and tear; (c) improper operation; (d) improper voltage supply or power surges; (e) signal issues; (f) damage from warranty service, whichever is used normally ...warranty on the box, or contact VIZIO Technical Support at VIZIO's option and sole BY THE AMERICAN ARBITRATION ASSOCIATION, IN ACCORDANCE WITH VIZIO's user guides and manuals. In-home Federal Arbitration Act will be restored to resolve the issue informally with Replacement parts...


