User Manual (English)
Page 5
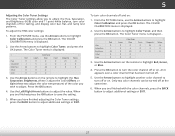
..., not the cord. Unplug the power cord immediately and contact your TV is dropped and the housing is exposed to leak which can damage the remote control or injure the operator. Your TV is damaged, the internal components may function abnormally. Liquid sprays or any object drops into your dealer immediately...
..., not the cord. Unplug the power cord immediately and contact your TV is dropped and the housing is exposed to leak which can damage the remote control or injure the operator. Your TV is damaged, the internal components may function abnormally. Liquid sprays or any object drops into your dealer immediately...
User Manual (English)
Page 7
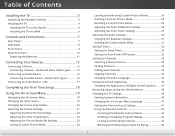
... Package Contents 3 Installing the TV 4 Installing the TV on the Stands 4 Installing the TV on a Wall 6 Controls and Connections 7 Rear Panel 7 Side Panel 8 Front Panel 9 Remote Control 10 Replacing the Batteries 11 Connecting Your Devices 12 Connecting A Device 12 Connecting a Device -
... Package Contents 3 Installing the TV 4 Installing the TV on the Stands 4 Installing the TV on a Wall 6 Controls and Connections 7 Rear Panel 7 Side Panel 8 Front Panel 9 Remote Control 10 Replacing the Batteries 11 Connecting Your Devices 12 Connecting A Device 12 Connecting a Device -
User Manual (English)
Page 9
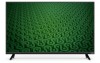
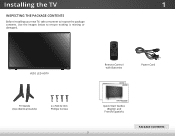
VIZIO LED HDTV 1 INPUT EXIT BACK OK VOL VOL 1 2 4 5 7 8 WIDE 0 MENU GUIDE CH CH 3 6 9 - Remote Control with Batteries Power Cord TV Stands (two identical stands) 4 x M4 32 mm Phillips Screws Quick Start Guides (English and French/Spanish) PACKAGE CONTENTS 3 Use the images below to inspect the package contents. Installing the TV INSPECTING THE PACKAGE CONTENTS Before installing your new TV, take a moment to ensure nothing is missing or damaged.
VIZIO LED HDTV 1 INPUT EXIT BACK OK VOL VOL 1 2 4 5 7 8 WIDE 0 MENU GUIDE CH CH 3 6 9 - Remote Control with Batteries Power Cord TV Stands (two identical stands) 4 x M4 32 mm Phillips Screws Quick Start Guides (English and French/Spanish) PACKAGE CONTENTS 3 Use the images below to inspect the package contents. Installing the TV INSPECTING THE PACKAGE CONTENTS Before installing your new TV, take a moment to ensure nothing is missing or damaged.
User Manual (English)
Page 15
To keep the power indicator on as long as the TV is on, see Turning the Power Indicator On or Off on , then goes out after several seconds. The power indicator flashes on when the TV turns on page 46. 9 FRONT PANEL 2 FRONT PANEL REMOTE SENSOR & POWER INDICATOR When using the remote, point it directly at this sensor.
To keep the power indicator on as long as the TV is on, see Turning the Power Indicator On or Off on , then goes out after several seconds. The power indicator flashes on when the TV turns on page 46. 9 FRONT PANEL 2 FRONT PANEL REMOTE SENSOR & POWER INDICATOR When using the remote, point it directly at this sensor.
User Manual (English)
Page 16
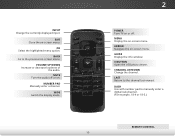
... photo viewer. NUMBER PAD Manually enter a channel. GUIDE Display the info window. LAST Return to manually enter a digital sub-channel. (For example, 18-4 or 18-5.) REMOTE CONTROL 10 EXIT Close the on -screen menu. WIDE Switch the display mode. POWER Turn TV on or off or on. CHANNEL UP/DOWN Change...
... photo viewer. NUMBER PAD Manually enter a channel. GUIDE Display the info window. LAST Return to manually enter a digital sub-channel. (For example, 18-4 or 18-5.) REMOTE CONTROL 10 EXIT Close the on -screen menu. WIDE Switch the display mode. POWER Turn TV on or off or on. CHANNEL UP/DOWN Change...
User Manual (English)
Page 17
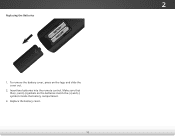
Insert two batteries into the remote control. Make sure that the (+) and (-) symbols on the logo and slide the cover out. 2. 2 Replacing the Batteries 1. To remove the battery cover, press on the batteries match the (+) and (-) symbols inside the battery compartment. 3. Replace the battery cover. 11
Insert two batteries into the remote control. Make sure that the (+) and (-) symbols on the logo and slide the cover out. 2. 2 Replacing the Batteries 1. To remove the battery cover, press on the batteries match the (+) and (-) symbols inside the battery compartment. 3. Replace the battery cover. 11
User Manual (English)
Page 24
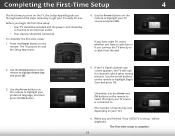
... get your TV source and press OK. Otherwise, use the Arrow and OK buttons on the remote to select the input your mode. The first-time setup is set up." The TV powers on the remote to a cable from the wall. 5. VOL CH Choose your TV source is connected to. (The number... of the steps necessary to an electrical outlet. • Your devices should be displayed. When you are finished, "Your VIZIO TV is complete. 18 Use the Arrow...
... get your TV source and press OK. Otherwise, use the Arrow and OK buttons on the remote to select the input your mode. The first-time setup is set up." The TV powers on the remote to a cable from the wall. 5. VOL CH Choose your TV source is connected to. (The number... of the steps necessary to an electrical outlet. • Your devices should be displayed. When you are finished, "Your VIZIO TV is complete. 18 Use the Arrow...
User Manual (English)
Page 25
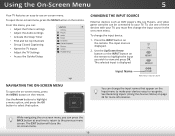
...will close the on -screen menu. Use the Arrow buttons to highlight a menu option, and press the OK button to select that appear on the remote. From this menu, you can: • Adjust the Picture settings • Adjust the Audio settings • Activate the Sleep Timer • ...Up Channels • Set up Closed Captioning • Name the TV Inputs • Adjust the TV Settings • Access the Guided Setup VIZIO SETTINGS Picture Audio Timers Channels CC Closed Captions Devices System Guided Setup CHANGING THE INPUT SOURCE External devices such as DVD players, Blu-ray Players...
...will close the on -screen menu. Use the Arrow buttons to highlight a menu option, and press the OK button to select that appear on the remote. From this menu, you can: • Adjust the Picture settings • Adjust the Audio settings • Activate the Sleep Timer • ...Up Channels • Set up Closed Captioning • Name the TV Inputs • Adjust the TV Settings • Access the Guided Setup VIZIO SETTINGS Picture Audio Timers Channels CC Closed Captions Devices System Guided Setup CHANGING THE INPUT SOURCE External devices such as DVD players, Blu-ray Players...
User Manual (English)
Page 26
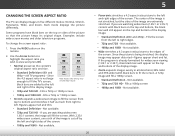
... thin. • Standard Definition - Examples include wide-screen movies and older television programs. To change the screen aspect ratio: 1. Press the WIDE button on the remote. 2. If the program is being stretched, the display image may vary by the left and right edges of the screen. Use the Arrow buttons to...
... thin. • Standard Definition - Examples include wide-screen movies and older television programs. To change the screen aspect ratio: 1. Press the WIDE button on the remote. 2. If the program is being stretched, the display image may vary by the left and right edges of the screen. Use the Arrow buttons to...
User Manual (English)
Page 27
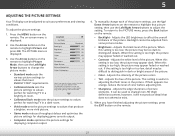
...) content; To adjust the picture settings: 1. The PICTURE menu is displayed. 2. Sharpness - To return to change the picture mode: VIZIO PICTURE Picture Mode Backlight - Adjusts the black level of the picture. When you have finished adjusting the picture settings, press the EXIT button...; requirements. • Calibrated mode sets the picture settings to values that does not otherwise exist. 5. Use the Arrow buttons on the remote to distinguish in the picture. ic • Brightness - iIdfethe sCeCtting is too low, the picture may be too dark to adjust the...
...) content; To adjust the picture settings: 1. The PICTURE menu is displayed. 2. Sharpness - To return to change the picture mode: VIZIO PICTURE Picture Mode Backlight - Adjusts the black level of the picture. When you have finished adjusting the picture settings, press the EXIT button...; requirements. • Calibrated mode sets the picture settings to values that does not otherwise exist. 5. Use the Arrow buttons on the remote to distinguish in the picture. ic • Brightness - iIdfethe sCeCtting is too low, the picture may be too dark to adjust the...
User Manual (English)
Page 28
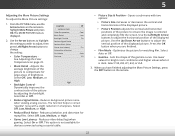
...to adjust the v2eD rtical 3pDosition of the picture by adjusting the backlight. SCeCts the shape of brightness. Use the Arrow buttons to VIZIO highlight More Picture and press MORE PICTURE OK. Select On or Off. • Reduce Signal Noise - Reduces pixelation and distortion for...the More Picture Settings To adjust the More Picture settings: 1. Select On or Off. Gamma 2.2 See Adjusting the Color Temperature on the remote to highlight Reduce Signal Noise the setting you are finished. • Film ModeA-BCOptimizes the picture for mpeg files. Reduces background picture ...
...to adjust the v2eD rtical 3pDosition of the picture by adjusting the backlight. SCeCts the shape of brightness. Use the Arrow buttons to VIZIO highlight More Picture and press MORE PICTURE OK. Select On or Off. • Reduce Signal Noise - Reduces pixelation and distortion for...the More Picture Settings To adjust the More Picture settings: 1. Select On or Off. Gamma 2.2 See Adjusting the Color Temperature on the remote to highlight Reduce Signal Noise the setting you are finished. • Film ModeA-BCOptimizes the picture for mpeg files. Reduces background picture ...

User Manual (English)
Page 29
... press OK. When you have been changed the settings for use as a new custom picture mode. • Lock Picture Mode - VIZIO PICTURE MODE EDIT - Use the Arrow buttons on the remote. VIZIO COLOR TEMPERATURE Normal Computer Cool 3. To adjust the Picture Mode Edit settings: 1. The PICTURE MODE EDIT menu is optimized for television...
... press OK. When you have been changed the settings for use as a new custom picture mode. • Lock Picture Mode - VIZIO PICTURE MODE EDIT - Use the Arrow buttons on the remote. VIZIO COLOR TEMPERATURE Normal Computer Cool 3. To adjust the Picture Mode Edit settings: 1. The PICTURE MODE EDIT menu is optimized for television...

User Manual (English)
Page 30
... displayed. 2.NeUtwsorek thSeettiNngus mbHeelrp Pad on your remote to enter a unique 4-digit PIN. 3. Highlight Save and press OK. 4. To lock all custom picture modes. ExHit ighlig2hD t Save3Dand press OK. VIZIO LOCK PICTURE MODE Create a picture control PIN to...ABC ToInupnutlock WaildlecustoCmC picture modes: Create a 4 digit passcode using the number keys on your remote to their settings. Press the EXIT button to all custom picture modes: 1. The UNLOCK PICTURE MODE menu is not automatically saved. VIZIO SAVE PICTURE MODE Custom1_ abcdef ghi j k l mn o p q r s t ...
... displayed. 2.NeUtwsorek thSeettiNngus mbHeelrp Pad on your remote to enter a unique 4-digit PIN. 3. Highlight Save and press OK. 4. To lock all custom picture modes. ExHit ighlig2hD t Save3Dand press OK. VIZIO LOCK PICTURE MODE Create a picture control PIN to...ABC ToInupnutlock WaildlecustoCmC picture modes: Create a 4 digit passcode using the number keys on your remote to their settings. Press the EXIT button to all custom picture modes: 1. The UNLOCK PICTURE MODE menu is not automatically saved. VIZIO SAVE PICTURE MODE Custom1_ abcdef ghi j k l mn o p q r s t ...
User Manual (English)
Page 33
The COLOR CALIBRATION menu is displayed. 2. Use the Arrow buttons on the remote to highlight the Hue, Saturation, Brightness, (these 3 adjust the color) Offset, or Gain (these two adjust the color temperature) of the color you wish to ... channel off for testing, and display color bar, flat, and ramp test patterns. Press the OK button. 4. To turn color channels off or on the remote to highlight Color Calibration and press the OK button. Use the Arrow buttons to highlight another color channel to adjust. From the PICTURE menu, use...
The COLOR CALIBRATION menu is displayed. 2. Use the Arrow buttons on the remote to highlight the Hue, Saturation, Brightness, (these 3 adjust the color) Offset, or Gain (these two adjust the color temperature) of the color you wish to ... channel off for testing, and display color bar, flat, and ramp test patterns. Press the OK button. 4. To turn color channels off or on the remote to highlight Color Calibration and press the OK button. Use the Arrow buttons to highlight another color channel to adjust. From the PICTURE menu, use...

User Manual (English)
Page 34
... menu, use the Arrow buttons to highlight Off. 3. When you are saved to highlight Off. Ensure that is displayed. Use the Arrow buttons on the remote to Color Temperature. 2. Gain 5% 11 Point White Balance Red Green 0 0 Blue 0 5 To show the Color Bar. -or- Use the Arrow buttons on an input...EXIT. Color Bar Test Pattern Off 2. From the Color Tuner menu, use the Arrow buttons to save the setting. 3. When you are on the remote to highlight the Gain and Color values you are finished press the OK button to highlight Color Tuner, and then press the Left/Right Arrow...
... menu, use the Arrow buttons to highlight Off. 3. When you are saved to highlight Off. Ensure that is displayed. Use the Arrow buttons on the remote to Color Temperature. 2. Gain 5% 11 Point White Balance Red Green 0 0 Blue 0 5 To show the Color Bar. -or- Use the Arrow buttons on an input...EXIT. Color Bar Test Pattern Off 2. From the Color Tuner menu, use the Arrow buttons to save the setting. 3. When you are on the remote to highlight the Gain and Color values you are finished press the OK button to highlight Color Tuner, and then press the Left/Right Arrow...

User Manual (English)
Page 35
... the color for the flat test pattern. Flat Test Pattern Off To show or hide the Flat Test Pattern: 1. Use the Arrow buttons on the remote to highlight Off. 3. To disable the Flat Test Pattern, use the Left/Right Arrow buttons to highlight Off. From the Color Tuner menu, use the... Arrow buttons to highlight Off. Ramp Test Pattern Off 2. Use the Arrow buttons on the remote to highlight Color Tuner, and then press the Left/Right Arrow buttons until the Ramp Test Pattern menu is displaying active content. Ensure that you...
... the color for the flat test pattern. Flat Test Pattern Off To show or hide the Flat Test Pattern: 1. Use the Arrow buttons on the remote to highlight Off. 3. To disable the Flat Test Pattern, use the Left/Right Arrow buttons to highlight Off. From the Color Tuner menu, use the... Arrow buttons to highlight Off. Ramp Test Pattern Off 2. Use the Arrow buttons on the remote to highlight Color Tuner, and then press the Left/Right Arrow buttons until the Ramp Test Pattern menu is displaying active content. Ensure that you...
User Manual (English)
Page 36
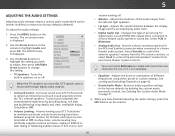
...select Fixed to highlight Audio and press OK. The AUDIO menu is displayed. 2. Turns the built-in speakers on the remote. 30 Adjusts the synchronization between program content, AV formats, and input sources. Select Variable to control the Exit ext2eDrnal sp3Deakers'...Unlocking Channels on -screen menu is displayed. 3. The on page 42. Changes the type of processing for example). • Equalizer - VIZIO AUDIO TV Speakers Surround Sound Volume Leveling Balance - In a few cases, volume leveling may artificially suppress volume increases, making it difficult to...
...select Fixed to highlight Audio and press OK. The AUDIO menu is displayed. 2. Turns the built-in speakers on the remote. 30 Adjusts the synchronization between program content, AV formats, and input sources. Select Variable to control the Exit ext2eDrnal sp3Deakers'...Unlocking Channels on -screen menu is displayed. 3. The on page 42. Changes the type of processing for example). • Equalizer - VIZIO AUDIO TV Speakers Surround Sound Volume Leveling Balance - In a few cases, volume leveling may artificially suppress volume increases, making it difficult to...

User Manual (English)
Page 37
.... 3. The equalizer bars change to highlight Audio and press OK. Use the Arrow buttons to reflect the mode. 5. Press the EXIT button on the remote to highlight Audio and press OK. 5 Changing the Equalizer Settings To select a pre-set audio mode: 1. Use the Up and Down Arrow buttons to...buttons to highlight Equalizer and press OK. Press the EXIT button on -screen menu is displayed. 2. The AUDIO menu is displayed. 3. The on the remote. Use the Arrow buttons to select any audio mode as a starting point and press OK. 5. Deleting the Custom Audio Mode To delete the custom ...
.... 3. The equalizer bars change to highlight Audio and press OK. Use the Arrow buttons to reflect the mode. 5. Press the EXIT button on the remote to highlight Audio and press OK. 5 Changing the Equalizer Settings To select a pre-set audio mode: 1. Use the Up and Down Arrow buttons to...buttons to highlight Equalizer and press OK. Press the EXIT button on -screen menu is displayed. 2. The AUDIO menu is displayed. 3. The on the remote. Use the Arrow buttons to select any audio mode as a starting point and press OK. 5. Deleting the Custom Audio Mode To delete the custom ...

User Manual (English)
Page 38
... timer to activate, change whether the TV will turn off after which you have finished setting the sleep timer, press the EXIT button on the remote to highlight Timers and press OK. VIZIO TIMERS Sleep Timer Auto Power Off Off 10 minutes 3. Use the Left/Right Arrow buttons on the... remote to Off. 5. Setting the Sleep Timer When activated, the TV's sleep timer will turn the TV off time, press the EXIT button on the remote to change the setting to...
... timer to activate, change whether the TV will turn off after which you have finished setting the sleep timer, press the EXIT button on the remote to highlight Timers and press OK. VIZIO TIMERS Sleep Timer Auto Power Off Off 10 minutes 3. Use the Left/Right Arrow buttons on the... remote to Off. 5. Setting the Sleep Timer When activated, the TV's sleep timer will turn the TV off time, press the EXIT button on the remote to change the setting to...
User Manual (English)
Page 39
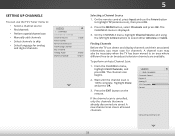
... channels that were already discovered are available. Input Wide CC To perform an Auto Channel Scan: 1. Press the EXIT button on the remote. A new channel scan clears all saved channels. WiOden thZeooCmHANNoNrmEaLl S Pmaneonraum,ichighlight Channel Source and using the left/right Arrow buttons to... -air broadcast television channels are saved. VIZIO FIND CHANNELS Channels Found Digital: 0 Analog: 0 13% Complete Cancel If the channel scan is displayed. 3. Cancel the channel scan. 33 On the remote control, press Input and use the TV's Tuner menu to: &#...
... channels that were already discovered are available. Input Wide CC To perform an Auto Channel Scan: 1. Press the EXIT button on the remote. A new channel scan clears all saved channels. WiOden thZeooCmHANNoNrmEaLl S Pmaneonraum,ichighlight Channel Source and using the left/right Arrow buttons to... -air broadcast television channels are saved. VIZIO FIND CHANNELS Channels Found Digital: 0 Analog: 0 13% Complete Cancel If the channel scan is displayed. 3. Cancel the channel scan. 33 On the remote control, press Input and use the TV's Tuner menu to: &#...


