User Manual (English)
Page 5
..., the disconnect device shall remain readily operable. • CAUTION - These servicing instructions are qualified to repair your dealer for an extended period of time, unplug the power cord. • To reduce risk of your TV may cause fire or electric shock. • Do not install your TV, hold the AC/DC power adapter, not the cord. To reduce the risk of...
..., the disconnect device shall remain readily operable. • CAUTION - These servicing instructions are qualified to repair your dealer for an extended period of time, unplug the power cord. • To reduce risk of your TV may cause fire or electric shock. • Do not install your TV, hold the AC/DC power adapter, not the cord. To reduce the risk of...
User Manual (English)
Page 6
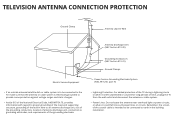
.... Power Lines Do not locate the antenna near overhead light or power circuits, or where it is intended to be connected to the TV, make sure that the antenna or cable system is electrically grounded to proper grounding of the mast and supporting structure, grounding of time, unplug the TV from the wall outlet and disconnect the antenna or cable system. Remember, the screen...
.... Power Lines Do not locate the antenna near overhead light or power circuits, or where it is intended to be connected to the TV, make sure that the antenna or cable system is electrically grounded to proper grounding of the mast and supporting structure, grounding of time, unplug the TV from the wall outlet and disconnect the antenna or cable system. Remember, the screen...
User Manual (English)
Page 7
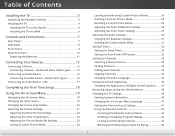
...Stands 4 Installing the TV on a Wall 6 Controls and Connections 7 Rear Panel 7 Side Panel 8 Front Panel 9 Remote Control 10 Replacing the Batteries 11 Connecting Your Devices 12 Connecting A Device 12 Connecting a Device - Table of Digital Closed Captions....... 37 Renaming Inputs (Using the Devices Menu 39 Changing the TV Settings 40 Viewing System Information 40 Changing the On-Screen Menu Language 41 Setting the Time and Local Settings 41 Using the Parental Controls 42 Accessing the Parental Controls Menu 42 Enabling or Disabling Program Ratings 42 Locking and Unlocking...
...Stands 4 Installing the TV on a Wall 6 Controls and Connections 7 Rear Panel 7 Side Panel 8 Front Panel 9 Remote Control 10 Replacing the Batteries 11 Connecting Your Devices 12 Connecting A Device 12 Connecting a Device - Table of Digital Closed Captions....... 37 Renaming Inputs (Using the Devices Menu 39 Changing the TV Settings 40 Viewing System Information 40 Changing the On-Screen Menu Language 41 Setting the Time and Local Settings 41 Using the Parental Controls 42 Accessing the Parental Controls Menu 42 Enabling or Disabling Program Ratings 42 Locking and Unlocking...

User Manual (English)
Page 8
Changing the Parental Control Passcode 43 Resetting the Content Locks 43 Adjusting the Wide Mode (Aspect Ratio 44 Controlling Other Devices with CEC 45 Turning the Power Indicator On or Off 46 Restoring the TV to Factory Default Settings 46 Using the Guided Setup Menu 47 Using the Info Window 48 Using the USB Media Player 49 Preparing your USB drive to display USB Media 49 Displaying USB Media 49 Removing the USB drive from the TV 49 Troubleshooting & Technical Support 51 Specifications 54 Limited Warranty 56 Legal & Compliance 57 2
Changing the Parental Control Passcode 43 Resetting the Content Locks 43 Adjusting the Wide Mode (Aspect Ratio 44 Controlling Other Devices with CEC 45 Turning the Power Indicator On or Off 46 Restoring the TV to Factory Default Settings 46 Using the Guided Setup Menu 47 Using the Info Window 48 Using the USB Media Player 49 Preparing your USB drive to display USB Media 49 Displaying USB Media 49 Removing the USB drive from the TV 49 Troubleshooting & Technical Support 51 Specifications 54 Limited Warranty 56 Legal & Compliance 57 2
User Manual (English)
Page 12
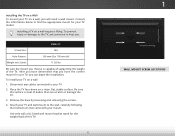
Disconnect any cables connected to find the appropriate mount for your TV model: Installing a TV on a wall requires lifting. Be sure the surface is capable of supporting the weight of the TV. Remove the base by loosening and removing the screws. 4. D32h-C1 Screw Size: M4 Hole Pattern: 100 mm (V) x 100 mm (H) Weight w/o Stand: 11.02 lbs Be sure the mount you choose is clear of this TV. 6 1 WALL MOUNT SCREW LOCATIONS Place the TV...
Disconnect any cables connected to find the appropriate mount for your TV model: Installing a TV on a wall requires lifting. Be sure the surface is capable of supporting the weight of the TV. Remove the base by loosening and removing the screws. 4. D32h-C1 Screw Size: M4 Hole Pattern: 100 mm (V) x 100 mm (H) Weight w/o Stand: 11.02 lbs Be sure the mount you choose is clear of this TV. 6 1 WALL MOUNT SCREW LOCATIONS Place the TV...
User Manual (English)
Page 21
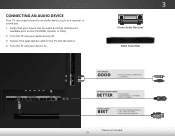
CONNECTING AN AUDIO DEVICE Your TV can output sound to the TV and the device. 4. Turn the TV and your device has an audio port that matches an available port on . 3 Home Audio Receiver VIZIO Sound Bar RCA CABLE* GOOD • ANALOG STEREO CONNECTION • 2.0 CHANNEL OPTICAL/SPDIF CABLE* BETTER • PCM STREAM • DOLBY DIGITAL 5.1 CHANNEL • DTS 5.1 CHANNEL HDMI CABLE* BEST • ARC 2-WAY COMMUNICATION • 2.0-5.1 DIGITAL AUDIO • PCM, DTS, DOLBY DIGITAL * Cables not included. 15 Connect the...
CONNECTING AN AUDIO DEVICE Your TV can output sound to the TV and the device. 4. Turn the TV and your device has an audio port that matches an available port on . 3 Home Audio Receiver VIZIO Sound Bar RCA CABLE* GOOD • ANALOG STEREO CONNECTION • 2.0 CHANNEL OPTICAL/SPDIF CABLE* BETTER • PCM STREAM • DOLBY DIGITAL 5.1 CHANNEL • DTS 5.1 CHANNEL HDMI CABLE* BEST • ARC 2-WAY COMMUNICATION • 2.0-5.1 DIGITAL AUDIO • PCM, DTS, DOLBY DIGITAL * Cables not included. 15 Connect the...
User Manual (English)
Page 24
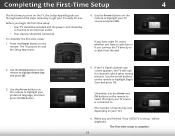
... OK button. Use the Arrow buttons on the remote. VOL CH Choose your mode. If the TV Signal channel scan screen appears, the TV will guide you through each of inputs may vary depending on the TV, the Setup App will scan for in -home use. Before you begin the first-time setup: • Your TV should be installed and the power cord should be connected to highlight Home Use and...
... OK button. Use the Arrow buttons on the remote. VOL CH Choose your mode. If the TV Signal channel scan screen appears, the TV will guide you through each of inputs may vary depending on the TV, the Setup App will scan for in -home use. Before you begin the first-time setup: • Your TV should be installed and the power cord should be connected to highlight Home Use and...
User Manual (English)
Page 25
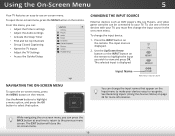
... MENU To open the on-screen menu, press the MENU button on Inptuht e reWmideote tCoC highlight the input you can: • Adjust the Picture settings • Adjust the Audio settings • Activate the Sleep Timer • Find and Set Up Channels • Set up Closed Captioning • Name the TV Inputs • Adjust the TV Settings • Access the Guided Setup VIZIO SETTINGS Picture Audio Timers Channels CC Closed Captions Devices System Guided Setup CHANGING THE INPUT SOURCE External devices such as DVD players, Blu-ray Players, and video game consoles can change the input...
... MENU To open the on-screen menu, press the MENU button on Inptuht e reWmideote tCoC highlight the input you can: • Adjust the Picture settings • Adjust the Audio settings • Activate the Sleep Timer • Find and Set Up Channels • Set up Closed Captioning • Name the TV Inputs • Adjust the TV Settings • Access the Guided Setup VIZIO SETTINGS Picture Audio Timers Channels CC Closed Captions Devices System Guided Setup CHANGING THE INPUT SOURCE External devices such as DVD players, Blu-ray Players, and video game consoles can change the input...
User Manual (English)
Page 27
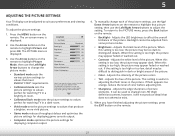
... remote to suit your preferences and viewing conditions. Use the Arrow buttons on -screen menu is useful in the picture. More Picture Picture Mode Edit Color Calibration Standard + 85 + 50 + 52 + 60 +0 +9 • Standard mode sets the various picture settings to values that does not otherwise exist. 5. For the best picture, use the Left/Right Arrow buttons to adjust the setting. Backlight cannot be difficult to values perfect for displaying computer output. 4. Adjusts the black level of picture...
... remote to suit your preferences and viewing conditions. Use the Arrow buttons on -screen menu is useful in the picture. More Picture Picture Mode Edit Color Calibration Standard + 85 + 50 + 52 + 60 +0 +9 • Standard mode sets the various picture settings to values that does not otherwise exist. 5. For the best picture, use the Left/Right Arrow buttons to adjust the setting. Backlight cannot be difficult to values perfect for displaying computer output. 4. Adjusts the black level of picture...
User Manual (English)
Page 36
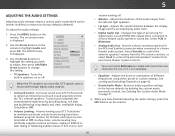
... digital audio out and HDMI ARC output when connected to a home theater audio system or sound bar. To adjust the audio settings: 1. Press the MENU button on or off . • Balance - The on-screen menu is displayed. 3. If this occurs, turn volume leveling off . Sets the volume control properties for example). • Equalizer - ABC You must select Bitstream for audio with more than two Input cWhidaennelsCC(3.0, 5.0, or 5.1, for the RCA (red & white) connector when connected to change...
... digital audio out and HDMI ARC output when connected to a home theater audio system or sound bar. To adjust the audio settings: 1. Press the MENU button on or off . • Balance - The on-screen menu is displayed. 3. If this occurs, turn volume leveling off . Sets the volume control properties for example). • Equalizer - ABC You must select Bitstream for audio with more than two Input cWhidaennelsCC(3.0, 5.0, or 5.1, for the RCA (red & white) connector when connected to change...
User Manual (English)
Page 53
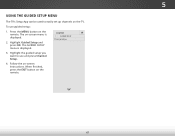
... -screen instructions. Highlight Guided Setup and press OK. Follow the on -screen menu is displayed. When finished, press the EXIT button on the remote. Press the MENU button on the remote. Wide Zoom Normal Panoramic Exit 2D 3D ABC Input Wide CC Sleep Timer Picture Audio Network Settings Help 47 The GUIDED SETUP menu is displayed. 2. VIZIO GUIDED SETUP Channel Setup 3. Highlight the guided setup you want to easily set up channels on the TV. 5 USING THE GUIDED SETUP MENU The TV's Setup App can be used to use guided setup: 1. To use...
... -screen instructions. Highlight Guided Setup and press OK. Follow the on -screen menu is displayed. When finished, press the EXIT button on the remote. Press the MENU button on the remote. Wide Zoom Normal Panoramic Exit 2D 3D ABC Input Wide CC Sleep Timer Picture Audio Network Settings Help 47 The GUIDED SETUP menu is displayed. 2. VIZIO GUIDED SETUP Channel Setup 3. Highlight the guided setup you want to easily set up channels on the TV. 5 USING THE GUIDED SETUP MENU The TV's Setup App can be used to use guided setup: 1. To use...

User Manual (English)
Page 58
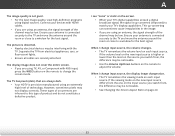
...-ray player, game console, cable/satellite box) that are connected to the TV. • Press the Power/Standby button on the remote or on the remote to ensure mute is securely attached to the TV. • If you are using cable TV, satellite, or an antenna connected directly to the TV, scan for the best signal. Ensure your device's user manual for details. • Adjust Brightness, Contrast, or Backlight. VIZIO recommends...
...-ray player, game console, cable/satellite box) that are connected to the TV. • Press the Power/Standby button on the remote or on the remote to ensure mute is securely attached to the TV. • If you are using cable TV, satellite, or an antenna connected directly to the TV, scan for the best signal. Ensure your device's user manual for details. • Adjust Brightness, Contrast, or Backlight. VIZIO recommends...
User Manual (English)
Page 59
... the viewing mode on the remote to match your devices with 480i input, press the WIDE button on the screen. • When your TV's digital capabilities exceed a digital broadcast signal, the signal is precision-manufactured using an antenna, the signal strength of the channel may not display correctly. A I change the screen mode. The display image does not cover the entire screen. • If you are using TV, AV, or Component with HDMI cables. •...
... the viewing mode on the remote to match your devices with 480i input, press the WIDE button on the screen. • When your TV's digital capabilities exceed a digital broadcast signal, the signal is precision-manufactured using an antenna, the signal strength of the channel may not display correctly. A I change the screen mode. The display image does not cover the entire screen. • If you are using TV, AV, or Component with HDMI cables. •...
User Manual (English)
Page 62
... a VIZIO authorized service center. THIS WARRANTY IS SUBJECT TO CHANGE WITHOUT NOTICE. This warranty does not cover, for example: cosmetic damage, normal wear and tear, improper operation, improper voltage supply or power surges, signal issues, damages from warranty service or replacement, whichever is not responsible for transportation costs to the service center, but VIZIO will provide instructions for packing and shipping the covered Product to obtain warranty service. Replacement parts...
... a VIZIO authorized service center. THIS WARRANTY IS SUBJECT TO CHANGE WITHOUT NOTICE. This warranty does not cover, for example: cosmetic damage, normal wear and tear, improper operation, improper voltage supply or power surges, signal issues, damages from warranty service or replacement, whichever is not responsible for transportation costs to the service center, but VIZIO will provide instructions for packing and shipping the covered Product to obtain warranty service. Replacement parts...
Quickstart Guide (English)
Page 2
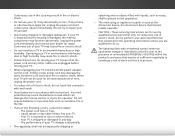
... TV will protect your TV yourself. A polarized plug has two blades with the cart, stand, tripod, bracket, or table specified by qualified service personnel only. If the provided plug does not fit into your dealer for replacement of the obsolete outlet. • Protect the power cord from moisture. Continuous use your TV. Changing the factory default picture settings or enabling other apparatus (including amplifiers) that...
... TV will protect your TV yourself. A polarized plug has two blades with the cart, stand, tripod, bracket, or table specified by qualified service personnel only. If the provided plug does not fit into your dealer for replacement of the obsolete outlet. • Protect the power cord from moisture. Continuous use your TV. Changing the factory default picture settings or enabling other apparatus (including amplifiers) that...
Quickstart Guide (English)
Page 3
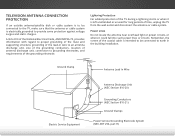
... wire to an antenna discharge unit, size of the grounding conductors, location of antenna discharge unit, connection to grounding electrodes, and requirements of the grounding electrode. • Lightning Protection: For added protection of time, unplug the TV from the wall outlet and disconnect the antenna or cable system. • Power Lines: Do not locate the antenna near overhead light or power circuits, or where...
... wire to an antenna discharge unit, size of the grounding conductors, location of antenna discharge unit, connection to grounding electrodes, and requirements of the grounding electrode. • Lightning Protection: For added protection of time, unplug the TV from the wall outlet and disconnect the antenna or cable system. • Power Lines: Do not locate the antenna near overhead light or power circuits, or where...
Quickstart Guide (English)
Page 14
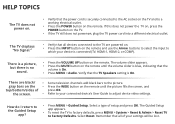
... buttons to select the input to which your device is connected (TV, HDMI-1, HDMI-2, or COMP). The volume slider appears. • Press the MUTE button on the remote until the picture fills the screen, and top/bottom/sides of press OK. Select a type of your connected device's User Guide to the picture. Verify that the TV Speakers setting is On. • Press MENU > Audio. HELP TOPICS The TV does not power...
... buttons to select the input to which your device is connected (TV, HDMI-1, HDMI-2, or COMP). The volume slider appears. • Press the MUTE button on the remote until the picture fills the screen, and top/bottom/sides of press OK. Select a type of your connected device's User Guide to the picture. Verify that the TV Speakers setting is On. • Press MENU > Audio. HELP TOPICS The TV does not power...

Quickstart Guide (English)
Page 17
... installation. Use the AC cords listed below for compliance with the emission limits. To obtain warranty service, contact VIZIO Technical Support via e-mail: TechSupport@VIZIO.com or via phone at 877 MY VIZIO (877.698.4946) from Shutterstock.com. Replacement parts and Products may cause undesired operation. VIZIO is not responsible for restoring all personal information from shipping, acts of God, any interference received, including...
... installation. Use the AC cords listed below for compliance with the emission limits. To obtain warranty service, contact VIZIO Technical Support via e-mail: TechSupport@VIZIO.com or via phone at 877 MY VIZIO (877.698.4946) from Shutterstock.com. Replacement parts and Products may cause undesired operation. VIZIO is not responsible for restoring all personal information from shipping, acts of God, any interference received, including...
Quickstart Guide (English)
Page 18
... and easy access to availability or provide other service type options. Units with the required part number. CANADA ONE-YEAR LIMITED WARRANTY ON PARTS AND LABOR Covers units purchased as installation and set -up issues or any sort of Service Units 32" or larger will cover return shipping to VIZIO's service centers must utilize either the original carton box and shipping material or a replacement box and...
... and easy access to availability or provide other service type options. Units with the required part number. CANADA ONE-YEAR LIMITED WARRANTY ON PARTS AND LABOR Covers units purchased as installation and set -up issues or any sort of Service Units 32" or larger will cover return shipping to VIZIO's service centers must utilize either the original carton box and shipping material or a replacement box and...

Quickstart Guide (English)
Page 19
... Support via email: [email protected] or via phone within the warranty period, VIZIO Sales & Marketing México S. Pre-authorization must utilize either repair or replace the unit at no charge for example: cosmetic damage, normal wear and tear, improper operation, improper voltage supply or power surges, signal issues, damages from warranty service or replacement, whichever is capable of Mexcio (toll free): 001...
... Support via email: [email protected] or via phone within the warranty period, VIZIO Sales & Marketing México S. Pre-authorization must utilize either repair or replace the unit at no charge for example: cosmetic damage, normal wear and tear, improper operation, improper voltage supply or power surges, signal issues, damages from warranty service or replacement, whichever is capable of Mexcio (toll free): 001...


