Installation Guide
Page 2
...cord during lightning. Doing so could short circuit parts causing a fire or electric shock. Do not place any objects on the top of your TV. • Read these instructions. • Keep these instructions. • Heed all warnings. • Follow all instructions. • Do ...etc. Install in fire or electric shock. • The wall socket should be maintained between your TV. Do not install your TV. To prevent your TV from being walked on your TV. Misuse may compromise the integrity of un-isolated, dangerous voltage within defined design limits. To totally...
...cord during lightning. Doing so could short circuit parts causing a fire or electric shock. Do not place any objects on the top of your TV. • Read these instructions. • Keep these instructions. • Heed all warnings. • Follow all instructions. • Do ...etc. Install in fire or electric shock. • The wall socket should be maintained between your TV. Do not install your TV. To prevent your TV from being walked on your TV. Misuse may compromise the integrity of un-isolated, dangerous voltage within defined design limits. To totally...
Installation Guide
Page 3
...Pediatrics discourages television viewing for children younger than that the power cord and any abnormality occurs. If water penetrates into your TV. • Your TV is exposed to loud sounds can safely support the television set • Ensuring the television set on tall furniture (for... considerations as the disconnect device, the disconnect device shall remain readily operable. • CAUTION: These servicing instructions are unplugged before moving your TV in personal injury and/or property damage. • WARNING: Exposure to rain or other than two years of age. • Use...
...Pediatrics discourages television viewing for children younger than that the power cord and any abnormality occurs. If water penetrates into your TV. • Your TV is exposed to loud sounds can safely support the television set • Ensuring the television set on tall furniture (for... considerations as the disconnect device, the disconnect device shall remain readily operable. • CAUTION: These servicing instructions are unplugged before moving your TV in personal injury and/or property damage. • WARNING: Exposure to rain or other than two years of age. • Use...
Installation Guide
Page 4
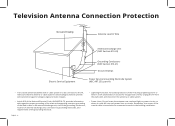
... sure that the antenna or cable system is left unattended or unused for long periods of time, unplug the TV from the wall outlet and disconnect the antenna or cable system. • Article 810 of the National Electrical Code, ANSI/NFPSA 70, provides information with ... antenna near overhead light or power circuits, or where it is electrically grounded to proper grounding of the mast and supporting structure, grounding of the TV during a lightning storm or when it could fall into such power lines or circuits.
... sure that the antenna or cable system is left unattended or unused for long periods of time, unplug the TV from the wall outlet and disconnect the antenna or cable system. • Article 810 of the National Electrical Code, ANSI/NFPSA 70, provides information with ... antenna near overhead light or power circuits, or where it is electrically grounded to proper grounding of the mast and supporting structure, grounding of the TV during a lightning storm or when it could fall into such power lines or circuits.
Installation Guide
Page 5
v Table of Contents Safety Information ii Television Antenna Connection Protection iv Package Contents vii Basic Remote...8 Inserting and Replacing Batteries 9 Installing the TV Stands 10 First-Time Setup 12 Viewing the On-Screen User Manual 17 Accessibility Settings 19 Connecting to the Internet with Wi-Fi 20 Getting Started with VIZIO Internet Apps Plus 22 Additional Connections 24 Connecting an Audio Device 24 Top Tips...26 Regulatory Information 27 Limited Warranty 28 Limited Warranty Mexico 30 Legal Information 32 English -
v Table of Contents Safety Information ii Television Antenna Connection Protection iv Package Contents vii Basic Remote...8 Inserting and Replacing Batteries 9 Installing the TV Stands 10 First-Time Setup 12 Viewing the On-Screen User Manual 17 Accessibility Settings 19 Connecting to the Internet with Wi-Fi 20 Getting Started with VIZIO Internet Apps Plus 22 Additional Connections 24 Connecting an Audio Device 24 Top Tips...26 Regulatory Information 27 Limited Warranty 28 Limited Warranty Mexico 30 Legal Information 32 English -
Installation Guide
Page 8
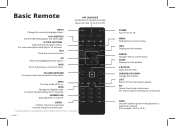
... key for 10 seconds. GUIDE Display the info window. PIC Opens the picture mode menu. CLOSED CAPTIONS Open the closed caption menu. English - 8 POWER Turn TV on or off or on -screen menu. A/V CONTROLS Control USB media player and some apps. OK Select the highlighted menu option. Basic Remote APP LAUNCHER... Quickly launch the pictured App. (Also turns the TV on -screen menu. ENTER Confirm channel or passcode entered using the number pad. *Long key press for 10 seconds.
... key for 10 seconds. GUIDE Display the info window. PIC Opens the picture mode menu. CLOSED CAPTIONS Open the closed caption menu. English - 8 POWER Turn TV on or off or on -screen menu. A/V CONTROLS Control USB media player and some apps. OK Select the highlighted menu option. Basic Remote APP LAUNCHER... Quickly launch the pictured App. (Also turns the TV on -screen menu. ENTER Confirm channel or passcode entered using the number pad. *Long key press for 10 seconds.
Installation Guide
Page 10
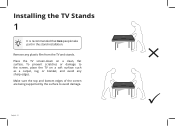
Place the TV screen-down on a soft surface such as a carpet, rug, or blanket, and avoid any plastic film from the TV and stands. English - 10 Î P To prevent scratches or damage to avoid damage. Installing the TV Stands 1 It is recommended that two people take part in the stand installation. Make sure the top and bottom edges of the screen are being supported by the surface to the screen, place the TV on a clean, flat surface. Remove any sharp edges.
Place the TV screen-down on a soft surface such as a carpet, rug, or blanket, and avoid any plastic film from the TV and stands. English - 10 Î P To prevent scratches or damage to avoid damage. Installing the TV Stands 1 It is recommended that two people take part in the stand installation. Make sure the top and bottom edges of the screen are being supported by the surface to the screen, place the TV on a clean, flat surface. Remove any sharp edges.
Installation Guide
Page 11
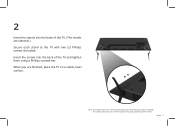
The actual number of ports and their locations may be subject to the TV with two (2) Phillips screws (included). Note: The image shown here is for illustrative purposes only and may vary, depending on a stable, level surface. English - 11 When you are identical.) Secure each stand to change. 2 Insert the stands into the back of the TV and tighten them using a Phillips screwdriver. Insert the screws into the base of the TV. (The stands are finished, place the TV on the model.
The actual number of ports and their locations may be subject to the TV with two (2) Phillips screws (included). Note: The image shown here is for illustrative purposes only and may vary, depending on a stable, level surface. English - 11 When you are identical.) Secure each stand to change. 2 Insert the stands into the back of the TV and tighten them using a Phillips screwdriver. Insert the screws into the base of the TV. (The stands are finished, place the TV on the model.
Installation Guide
Page 12
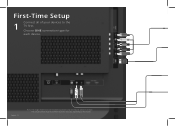
First-Time Setup Connect all of ports and their locations may be subject to the 1 TV first. Choose ONE connection type for illustrative purposes only and may vary, depending on the model. The actual number of your devices to change. English - 12 Note: The image shown here is for each device.
First-Time Setup Connect all of ports and their locations may be subject to the 1 TV first. Choose ONE connection type for illustrative purposes only and may vary, depending on the model. The actual number of your devices to change. English - 12 Note: The image shown here is for each device.
Installation Guide
Page 13
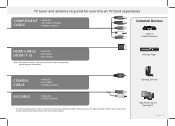
...• HD VIDEO • STEREO AUDIO AV CABLE • ANALOG • STEREO AUDIO * For the best experience, VIZIO recommends using an Ethernet cable. However, your TV also has built-in Wi-Fi. Gaming Console High Performance Gaming PC English - 13 See connecting to the internet with Wi...-Fi section for over-the-air TV (Sold separately) COMPONENT • ANALOG CABLE • HD VIDEO (1080p) • STEREO AUDIO Common Devices Cable or Satellite Receiver HDMI CABLE ...
...• HD VIDEO • STEREO AUDIO AV CABLE • ANALOG • STEREO AUDIO * For the best experience, VIZIO recommends using an Ethernet cable. However, your TV also has built-in Wi-Fi. Gaming Console High Performance Gaming PC English - 13 See connecting to the internet with Wi...-Fi section for over-the-air TV (Sold separately) COMPONENT • ANALOG CABLE • HD VIDEO (1080p) • STEREO AUDIO Common Devices Cable or Satellite Receiver HDMI CABLE ...
Installation Guide
Page 14
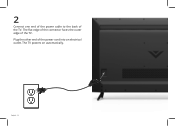
The flat edge of the connector faces the outer edge of the power cord into an electrical outlet. Plug the other end of the TV. English - 14 The TV powers on automatically. 2 Connect one end of the power cable to the back of the TV.
The flat edge of the connector faces the outer edge of the power cord into an electrical outlet. Plug the other end of the TV. English - 14 The TV powers on automatically. 2 Connect one end of the power cable to the back of the TV.

Installation Guide
Page 15
For the best Smart TV experience, VIZIO recommends using an Ethernet cable. However, your TV also has built-in Wi-Fi. See the Connecting to the back of your TV as shown. 3 Ethernet cable If you have a high-speed Internet connection, connect an Ethernet cable from your modem or router to the Internet with Wi-Fi section for more information. English - 15
For the best Smart TV experience, VIZIO recommends using an Ethernet cable. However, your TV also has built-in Wi-Fi. See the Connecting to the back of your TV as shown. 3 Ethernet cable If you have a high-speed Internet connection, connect an Ethernet cable from your modem or router to the Internet with Wi-Fi section for more information. English - 15
Installation Guide
Page 16
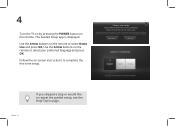
... you skipped a step or would like to repeat the guided setup, see the Help Topics page. Select Home Use for in -home use. 4 Turn the TV on by pressing the POWER button on -screen instructions to complete the first-time setup. Follow the on the remote. Select Store Demo for in...
... you skipped a step or would like to repeat the guided setup, see the Help Topics page. Select Home Use for in -home use. 4 Turn the TV on by pressing the POWER button on -screen instructions to complete the first-time setup. Follow the on the remote. Select Store Demo for in...
Installation Guide
Page 17
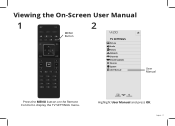
English - 17 Network Settings Help Highlight User Manual and press OK. Viewing the On-Screen User Manual 1 MENU Button 2 VIZIO TV SETTINGS Picture Audio Timers Network Channels CC Closed Captions Devices System User Manual Wide Zoom Normal Exit 2D 3D ABC Input Wide CC User Manual Sleep Timer Picture Audio Press the MENU button on the Remote Control to display the TV SETTINGS menu.
English - 17 Network Settings Help Highlight User Manual and press OK. Viewing the On-Screen User Manual 1 MENU Button 2 VIZIO TV SETTINGS Picture Audio Timers Network Channels CC Closed Captions Devices System User Manual Wide Zoom Normal Exit 2D 3D ABC Input Wide CC User Manual Sleep Timer Picture Audio Press the MENU button on the Remote Control to display the TV SETTINGS menu.
Installation Guide
Page 19
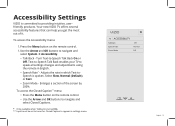
... adjustments using the remote in settings menu. Select Slow, Normal (Default), or Fast. • Zoom Mode - Enlarges a section of it. VIZIO ACCESSIBILITY TalkBack Speech Rate Zoom Mode Off Normal Off Wide Zoom Nor Exit 2D 3D A Input Wide C Sleep Timer Picture Au Network Settings H .... • Use the Arrow and OK buttons to navigate and select System à Accessibility. • Talk Back - Your new VIZIO TV offers several accessibility features that can help you get the most out of the screen by 200%. Turn Text-to providing intuitive, userfriendly products...
... adjustments using the remote in settings menu. Select Slow, Normal (Default), or Fast. • Zoom Mode - Enlarges a section of it. VIZIO ACCESSIBILITY TalkBack Speech Rate Zoom Mode Off Normal Off Wide Zoom Nor Exit 2D 3D A Input Wide C Sleep Timer Picture Au Network Settings H .... • Use the Arrow and OK buttons to navigate and select System à Accessibility. • Talk Back - Your new VIZIO TV offers several accessibility features that can help you get the most out of the screen by 200%. Turn Text-to providing intuitive, userfriendly products...
Installation Guide
Page 20
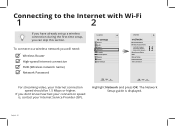
... to a wireless network you will need: Wireless Router High-speed Internet connection SSID (Wireless network name) Network Password VIZIO TV SETTINGS Picture Audio Timers Network Channels CC Closed Captions Devices System User Manual VIZIO Wide Exit Input ZooNmETWNOorRmaKl Panoramic Wired Connection Wireless Access Points Scott's Wi-Fi Network 2DDiana's Wi-Fi3NDetwork Marissa's Wi...
... to a wireless network you will need: Wireless Router High-speed Internet connection SSID (Wireless network name) Network Password VIZIO TV SETTINGS Picture Audio Timers Network Channels CC Closed Captions Devices System User Manual VIZIO Wide Exit Input ZooNmETWNOorRmaKl Panoramic Wired Connection Wireless Access Points Scott's Wi-Fi Network 2DDiana's Wi-Fi3NDetwork Marissa's Wi...
Installation Guide
Page 21
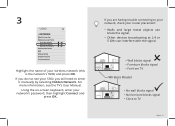
...• Wall blocks signal • Furniture blocks signal • Far from TV Wireless Router P • No wall blocks signal • No furniture blocks signal • Close to your network, check your router placement: VIZIO NETWORK Wired Connection Wireless Access Points Scott's Wi-Fi Network Diana's Wi-Fi... name of your SSID, you will needNettwoork enSettteingrs Help it manually by selecting Hidden Network. 3 If you are having trouble connecting to TV English - 21 Using the on-screen keyboard, enter your network's password, then highlight Connect and press OK. • Walls and ...
...• Wall blocks signal • Furniture blocks signal • Far from TV Wireless Router P • No wall blocks signal • No furniture blocks signal • Close to your network, check your router placement: VIZIO NETWORK Wired Connection Wireless Access Points Scott's Wi-Fi Network Diana's Wi-Fi... name of your SSID, you will needNettwoork enSettteingrs Help it manually by selecting Hidden Network. 3 If you are having trouble connecting to TV English - 21 Using the on-screen keyboard, enter your network's password, then highlight Connect and press OK. • Walls and ...
Installation Guide
Page 22
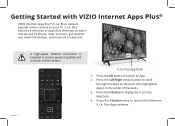
... App is in the center of apps that allow you to watch movies and TV shows, listen to your TV. Plus App Dock 1. Plus Apps window. Plus features a selection of the dock.) 3. Getting Started with VIZIO Internet Apps Plus® VIZIO Internet Apps Plus® (V.I .A. Press the V Button twice to launch an App. 2. Press...
... App is in the center of apps that allow you to watch movies and TV shows, listen to your TV. Plus App Dock 1. Plus Apps window. Plus features a selection of the dock.) 3. Getting Started with VIZIO Internet Apps Plus® VIZIO Internet Apps Plus® (V.I .A. Press the V Button twice to launch an App. 2. Press...
Installation Guide
Page 23
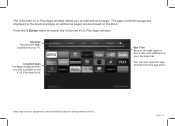
... Apps displayed here are also available in the Dock and Apps on the first page are displayed in the V.I.A. You can be moved to your TV. My Apps Features the apps installed on these tabs and add them to the Dock. App Tabs Browse through apps on your My Apps tab...
... Apps displayed here are also available in the Dock and Apps on the first page are displayed in the V.I.A. You can be moved to your TV. My Apps Features the apps installed on these tabs and add them to the Dock. App Tabs Browse through apps on your My Apps tab...

Installation Guide
Page 24
Additional Connections Connecting an Audio Device Your TV can output sound to change. English - 24 The actual number of ports and their locations may be subject to an audio device, such as a receiver or sound bar. Note: The image shown here is for illustrative purposes only and may vary, depending on the model.
Additional Connections Connecting an Audio Device Your TV can output sound to change. English - 24 The actual number of ports and their locations may be subject to an audio device, such as a receiver or sound bar. Note: The image shown here is for illustrative purposes only and may vary, depending on the model.

Installation Guide
Page 25
Turn the TV and your device has a video port that your audio device off. 3. HDMI CABLE • CEC 2-WAY COMMUNICATION • 2.0 - 5.1 DIGITAL AUDIO • PCM, DTS, DOLBY AUDIOTM ...; ANALOG STEREO CONNECTION • 2.0 CHANNEL Sound bar system Audio Receiver English - 25 Connect the appropriate cable (not included) to an audio device: 1. To connect your TV to the TV and the device. 4. Turn the TV and your device on the TV (HDMI, 3.5mm, etc.) 2. Verify that matches an available port on .
Turn the TV and your device has a video port that your audio device off. 3. HDMI CABLE • CEC 2-WAY COMMUNICATION • 2.0 - 5.1 DIGITAL AUDIO • PCM, DTS, DOLBY AUDIOTM ...; ANALOG STEREO CONNECTION • 2.0 CHANNEL Sound bar system Audio Receiver English - 25 Connect the appropriate cable (not included) to an audio device: 1. To connect your TV to the TV and the device. 4. Turn the TV and your device on the TV (HDMI, 3.5mm, etc.) 2. Verify that matches an available port on .


