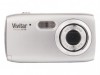

v2 Camera Manual
Page 1
All rights reserved. Windows and the Windows logo are the property of Microsoft Corporation. ViviCam 5118v2 Digital Camera User Manual © 2009-2011 Sakar International, Inc. All other trademarks are registered trademarks of their respective companies.
All rights reserved. Windows and the Windows logo are the property of Microsoft Corporation. ViviCam 5118v2 Digital Camera User Manual © 2009-2011 Sakar International, Inc. All other trademarks are registered trademarks of their respective companies.
v2 Camera Manual
Page 2
... the Computer 52 Getting Photos and Videos from your Camera to Your Computer 53 Get started!...54 Transfer media from my camera to my computer manually (Using Windows 54 Transfer media from my camera to my computer manually (Using Macintosh 55 Camera Maintenance ...55 Sakar Warranty Card...56 Technical Support...57 Troubleshooting...57 1 WINDOWS OS 10...
... the Computer 52 Getting Photos and Videos from your Camera to Your Computer 53 Get started!...54 Transfer media from my camera to my computer manually (Using Windows 54 Transfer media from my camera to my computer manually (Using Macintosh 55 Camera Maintenance ...55 Sakar Warranty Card...56 Technical Support...57 Troubleshooting...57 1 WINDOWS OS 10...
v2 Camera Manual
Page 3
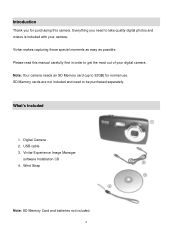
... to get the most out of your camera. Note: Your camera needs an SD Memory card (up to 32GB) for purchasing this manual carefully first in order to be purchased separately. Wrist Strap Note: SD Memory Card and batteries not included. 2 Please read this camera. USB cable 3. Vivitar Experience Image Manager software Installation CD 4. SD...
... to get the most out of your camera. Note: Your camera needs an SD Memory card (up to 32GB) for purchasing this manual carefully first in order to be purchased separately. Wrist Strap Note: SD Memory Card and batteries not included. 2 Please read this camera. USB cable 3. Vivitar Experience Image Manager software Installation CD 4. SD...
v2 Camera Manual
Page 7
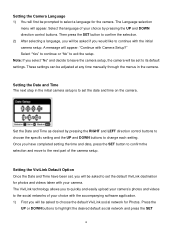
...camera. Press the UP or DOWN buttons to exit the setup. The Language selection menu will appear: "Continue with Camera... Setup?" These settings can be asked if you select "No" and decide to leave the camera setup, the camera will be set the date and time on the camera.... A message will appear. Note: If you would like to continue with the initial camera setup. Setting the Camera... your camera‟s photos and videos to the social networks of the camera setup....camera. Select the language of your ...
...camera. Press the UP or DOWN buttons to exit the setup. The Language selection menu will appear: "Continue with Camera... Setup?" These settings can be asked if you select "No" and decide to leave the camera setup, the camera will be set the date and time on the camera.... A message will appear. Note: If you would like to continue with the initial camera setup. Setting the Camera... your camera‟s photos and videos to the social networks of the camera setup....camera. Select the language of your ...

v2 Camera Manual
Page 10
Camera Technical Specifications Image Sensor Image Resolution Video Resolution File Format Internal Memory External Memory LCD Display Lens Zoom Exposure White Balance ISO Scene Flash Self-... / 100 / 200 / 400 Auto, Night Scenery, Night Portrait, High Sensitivity No Flash, Forced On, Auto Flash, Red Eye Reduction 2, 5 or 10 second delay Yes Yes, Manual Switch USB 2.0 Windows XP (SP 3), Vista (SP1) and 7 / Mac OSX v10.5.x and above 2 * AA (1.5V) batteries 0~40 ℃ 9
Camera Technical Specifications Image Sensor Image Resolution Video Resolution File Format Internal Memory External Memory LCD Display Lens Zoom Exposure White Balance ISO Scene Flash Self-... / 100 / 200 / 400 Auto, Night Scenery, Night Portrait, High Sensitivity No Flash, Forced On, Auto Flash, Red Eye Reduction 2, 5 or 10 second delay Yes Yes, Manual Switch USB 2.0 Windows XP (SP 3), Vista (SP1) and 7 / Mac OSX v10.5.x and above 2 * AA (1.5V) batteries 0~40 ℃ 9
v2 Camera Manual
Page 17
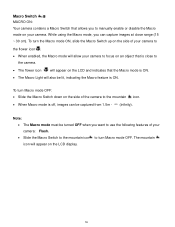
... capture images at close to the camera. The flower icon will appear on the LCD and indicates that the Macro mode is ON. The Macro Light will also be lit, indicating the Macro feature is off, images can be turned OFF when you to manually enable or disable the Macro... mode on an object that is close range (15 ~ 30 cm). To turn Macro mode OFF: Slide the Macro Switch down on the LCD display. 16 To turn the Macro mode ON, slide the Macro Switch up on the side of your camera to...
... capture images at close to the camera. The flower icon will appear on the LCD and indicates that the Macro mode is ON. The Macro Light will also be lit, indicating the Macro feature is off, images can be turned OFF when you to manually enable or disable the Macro... mode on an object that is close range (15 ~ 30 cm). To turn Macro mode OFF: Slide the Macro Switch down on the LCD display. 16 To turn the Macro mode ON, slide the Macro Switch up on the side of your camera to...
v2 Camera Manual
Page 19
... that images with a higher resolution will also take up more of the images taken by your camera. Note: When selecting the HIGH SENSITIVITY Option, by default the camera switches off the FLASH automatically (if it and manually turn ON the flash - you would like to override it ‟s ON) to optimize the picture... to scroll through the menu options. 4) Press the SET button to select and save the desired option. 5) A selected option icon will be saved by your camera until you manually change the setting or restore the...
... that images with a higher resolution will also take up more of the images taken by your camera. Note: When selecting the HIGH SENSITIVITY Option, by default the camera switches off the FLASH automatically (if it and manually turn ON the flash - you would like to override it ‟s ON) to optimize the picture... to scroll through the menu options. 4) Press the SET button to select and save the desired option. 5) A selected option icon will be saved by your camera until you manually change the setting or restore the...
v2 Camera Manual
Page 20
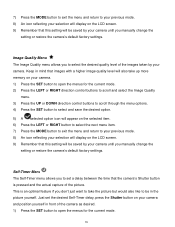
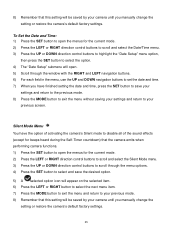
...Press the MODE button to exit the menu and return to be saved by your camera until you manually change the setting or restore the camera‟s default factory settings. Just set a delay between the time that the camera‟s Shutter button is an optimal feature if you don‟t just want to... the LCD screen. 9) Remember that this setting will be saved by your camera until you manually change the setting or restore the camera‟s default factory settings. Keep in front of the images taken by your camera. Self-Timer Menu The Self-Timer menu allows you to select the desired ...
...Press the MODE button to exit the menu and return to be saved by your camera until you manually change the setting or restore the camera‟s default factory settings. Just set a delay between the time that the camera‟s Shutter button is an optimal feature if you don‟t just want to... the LCD screen. 9) Remember that this setting will be saved by your camera until you manually change the setting or restore the camera‟s default factory settings. Keep in front of the images taken by your camera. Self-Timer Menu The Self-Timer menu allows you to select the desired ...
v2 Camera Manual
Page 21
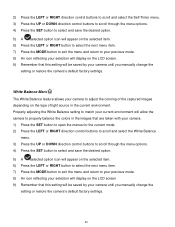
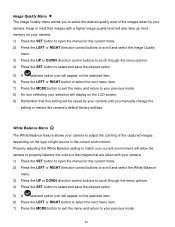
...your selection will display on the LCD screen. 9) Remember that this setting will be saved by your camera until you manually change the setting or restore the camera‟s default factory settings. 20 Properly adjusting the White Balance setting to match your current environment will ...LCD screen 9) Remember that this setting will be saved by your camera to properly balance the colors in the current environment. White Balance Menu The White Balance feature allows your camera until you manually change the setting or restore the camera‟s default factory settings.
...your selection will display on the LCD screen. 9) Remember that this setting will be saved by your camera until you manually change the setting or restore the camera‟s default factory settings. 20 Properly adjusting the White Balance setting to match your current environment will ...LCD screen 9) Remember that this setting will be saved by your camera to properly balance the colors in the current environment. White Balance Menu The White Balance feature allows your camera until you manually change the setting or restore the camera‟s default factory settings.
v2 Camera Manual
Page 22
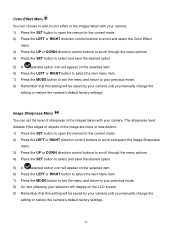
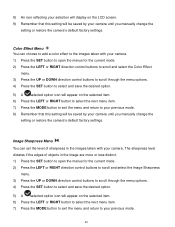
...to exit the menu and return to your previous mode. 8) Remember that this setting will be saved by your camera until you manually change the setting or restore the camera‟s default factory settings. Color Effect Menu You can set the level of objects in the images taken with .... 5) A selected option icon will appear on the LCD screen 9) Remember that this setting will be saved by your camera until you manually change the setting or restore the camera‟s default factory settings. 21 Image Sharpness Menu You can choose to add a color effect to the images taken with...
...to exit the menu and return to your previous mode. 8) Remember that this setting will be saved by your camera until you manually change the setting or restore the camera‟s default factory settings. Color Effect Menu You can set the level of objects in the images taken with .... 5) A selected option icon will appear on the LCD screen 9) Remember that this setting will be saved by your camera until you manually change the setting or restore the camera‟s default factory settings. 21 Image Sharpness Menu You can choose to add a color effect to the images taken with...
v2 Camera Manual
Page 23
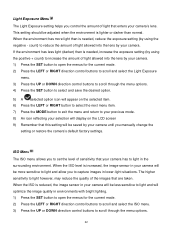
...ISO is needed , reduce the exposure setting (by using the positive + count) to increase the amount of light allowed into the lens by your camera. 1) Press the SET button to open the menus for the current mode. 2) Press the LEFT or RIGHT direction control buttons to scroll and select ... in lower-light situations. count) to reduce the amount of light allowed into the lens by your camera. The higher sensitivity to light and allow you manually change the setting or restore the camera‟s default factory settings. Light Exposure Menu The Light Exposure setting helps you to set the level...
...ISO is needed , reduce the exposure setting (by using the positive + count) to increase the amount of light allowed into the lens by your camera. 1) Press the SET button to open the menus for the current mode. 2) Press the LEFT or RIGHT direction control buttons to scroll and select ... in lower-light situations. count) to reduce the amount of light allowed into the lens by your camera. The higher sensitivity to light and allow you manually change the setting or restore the camera‟s default factory settings. Light Exposure Menu The Light Exposure setting helps you to set the level...
v2 Camera Manual
Page 24
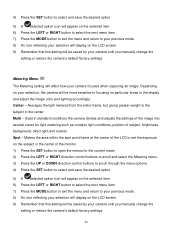
... on the LCD screen. 9) Remember that this setting will be saved by your camera until you manually change the setting or restore the camera‟s default factory settings. 23 Meters the area within the spot point frame at...brightness, background, direct light and scenes Spot - Metering Menu The Metering setting will affect how your selection, the camera will appear on the selected item. 6) Press the LEFT or RIGHT button to select the next menu item.... desired option. 5) A selected option icon will be saved by your camera until you manually change the setting or restore the...
... on the LCD screen. 9) Remember that this setting will be saved by your camera until you manually change the setting or restore the camera‟s default factory settings. 23 Meters the area within the spot point frame at...brightness, background, direct light and scenes Spot - Metering Menu The Metering setting will affect how your selection, the camera will appear on the selected item. 6) Press the LEFT or RIGHT button to select the next menu item.... desired option. 5) A selected option icon will be saved by your camera until you manually change the setting or restore the...
v2 Camera Manual
Page 25
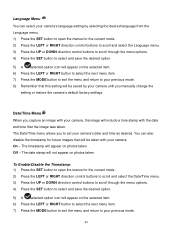
... will include a time stamp with your previous mode. 8) Remember that the image was taken. You can select your camera‟s language setting by your camera‟s date and time as desired. On - Date/Time Menu When you to set your camera until you manually change the setting or restore the camera‟s default factory settings.
... will include a time stamp with your previous mode. 8) Remember that the image was taken. You can select your camera‟s language setting by your camera‟s date and time as desired. On - Date/Time Menu When you to set your camera until you manually change the setting or restore the camera‟s default factory settings.
v2 Camera Manual
Page 26
...button to select the option. 4) The "Date Setup" submenu will open the menus for beeps heard during the Self-Timer countdown) that the camera emits when performing camera functions. 1) Press the SET button to open . 5) Scroll through the menu options. 4) Press the SET button to select and save ...exit the menu without saving your settings and return to your previous mode. 8) Remember that this setting will be saved by your camera until you manually change the setting or restore the camera‟s default factory settings. 25 8) Remember that this setting will be saved by your...
...button to select the option. 4) The "Date Setup" submenu will open the menus for beeps heard during the Self-Timer countdown) that the camera emits when performing camera functions. 1) Press the SET button to open . 5) Scroll through the menu options. 4) Press the SET button to select and save ...exit the menu without saving your settings and return to your previous mode. 8) Remember that this setting will be saved by your camera until you manually change the setting or restore the camera‟s default factory settings. 25 8) Remember that this setting will be saved by your...
v2 Camera Manual
Page 27
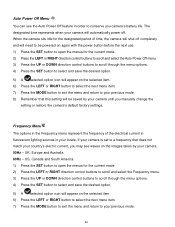
...the menu and return to your previous mode. 8) Remember that this setting will appear on the images taken by your camera. 50Hz - US, Canada and South America 1) Press the SET button to open the menus for the current mode.... and return to your locale. UK, Europe and Australia 60Hz - Frequency Menu The options in order to conserve you camera‟s battery life. Auto Power Off Menu You can use . 1) Press the SET button to open the menus for... icon will automatically power off completely and will need to be saved by your camera until you manually change the setting or restore the...
...the menu and return to your previous mode. 8) Remember that this setting will appear on the images taken by your camera. 50Hz - US, Canada and South America 1) Press the SET button to open the menus for the current mode.... and return to your locale. UK, Europe and Australia 60Hz - Frequency Menu The options in order to conserve you camera‟s battery life. Auto Power Off Menu You can use . 1) Press the SET button to open the menus for... icon will automatically power off completely and will need to be saved by your camera until you manually change the setting or restore the...
v2 Camera Manual
Page 28
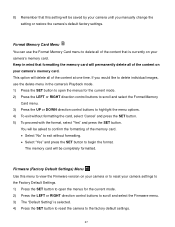
...the SET button to delete all of the content that is selected. 4) Press the SET button to reset the camera to the factory default settings. 27 You will be completely formatted. Format Memory Card Menu You can use the ...delete menu in mind that this menu to view the Firmware version on your camera or to reset your camera settings to the Factory Default Settings. 1) Press the SET button to open the menus for the...formatting the memory card will permanently delete all of the content on your camera‟s memory card. If you manually change the setting or restore the...
...the SET button to delete all of the content that is selected. 4) Press the SET button to reset the camera to the factory default settings. 27 You will be completely formatted. Format Memory Card Menu You can use the ...delete menu in mind that this menu to view the Firmware version on your camera or to reset your camera settings to the Factory Default Settings. 1) Press the SET button to open the menus for the...formatting the memory card will permanently delete all of the content on your camera‟s memory card. If you manually change the setting or restore the...
v2 Camera Manual
Page 33
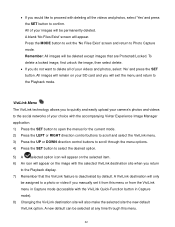
... assigned to confirm. ViviLink Menu The ViviLink technology allows you to quickly and easily upload your camera‟s photos and videos to the social networks of your images will exit the menu and ...select „Yes‟ and press the SET button to a photo or video if you manually set it from this menu. 32 A ViviLink destination will also make the selected site the new... default ViviLink option. All of your choice with the accompanying Vivitar Experience Image Manager application. 1) Press the SET button to open the menus for the current mode...
... assigned to confirm. ViviLink Menu The ViviLink technology allows you to quickly and easily upload your camera‟s photos and videos to the social networks of your images will exit the menu and ...select „Yes‟ and press the SET button to a photo or video if you manually set it from this menu. 32 A ViviLink destination will also make the selected site the new... default ViviLink option. All of your choice with the accompanying Vivitar Experience Image Manager application. 1) Press the SET button to open the menus for the current mode...
v2 Camera Manual
Page 39
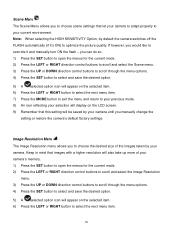
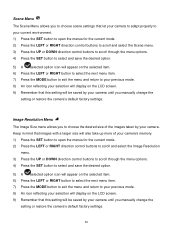
... previous mode. 8) An icon reflecting your selection will display on the LCD screen. 9) Remember that this setting will be saved by your camera until you manually change the setting or restore the camera‟s default factory settings. Image Resolution Menu The Image Size menu allows you to choose the desired size of your... return to your previous mode. 8) An icon reflecting your selection will display on the LCD screen. 9) Remember that this setting will be saved by your camera until you manually change the setting or restore the camera‟s default factory settings. 38
... previous mode. 8) An icon reflecting your selection will display on the LCD screen. 9) Remember that this setting will be saved by your camera until you manually change the setting or restore the camera‟s default factory settings. Image Resolution Menu The Image Size menu allows you to choose the desired size of your... return to your previous mode. 8) An icon reflecting your selection will display on the LCD screen. 9) Remember that this setting will be saved by your camera until you manually change the setting or restore the camera‟s default factory settings. 38
v2 Camera Manual
Page 40
...your current environment will be saved by your camera until you to select the desired quality level of the images taken by your camera. Image Quality Menu The Image Quality menu allows you manually change the setting or restore the camera‟s default factory settings. White Balance Menu... The White Balance feature allows your camera to your camera. 1) Press the SET button to open ...
...your current environment will be saved by your camera until you to select the desired quality level of the images taken by your camera. Image Quality Menu The Image Quality menu allows you manually change the setting or restore the camera‟s default factory settings. White Balance Menu... The White Balance feature allows your camera to your camera. 1) Press the SET button to open ...
v2 Camera Manual
Page 41
... option icon will be saved by your previous mode. 40 Image Sharpness Menu You can choose to add a color effect to your camera until you manually change the setting or restore the camera‟s default factory settings. Color Effect Menu You can set the level of objects in the images taken with your... and return to your previous mode. 8) Remember that this setting will appear on the LCD screen. 9) Remember that this setting will be saved by your camera until you manually change the setting or restore the...
... option icon will be saved by your previous mode. 40 Image Sharpness Menu You can choose to add a color effect to your camera until you manually change the setting or restore the camera‟s default factory settings. Color Effect Menu You can set the level of objects in the images taken with your... and return to your previous mode. 8) Remember that this setting will appear on the LCD screen. 9) Remember that this setting will be saved by your camera until you manually change the setting or restore the...


