User Guide English
Page 1
VS18555 P/N: XG321UG Model No. Warranty information contained in this User Guide to obtain important information on our web site at http://www.viewsonic.com in English, or in specific languages using your product in the upper right corner of our website. XG321UG Display User Guide IMPORTANT: Please read this User Guide will describe your limited coverage from ViewSonic® Corporation, which is also found on installing and using the Regional selection box in a safe manner, as well as registering your product for future service.
VS18555 P/N: XG321UG Model No. Warranty information contained in this User Guide to obtain important information on our web site at http://www.viewsonic.com in English, or in specific languages using your product in the upper right corner of our website. XG321UG Display User Guide IMPORTANT: Please read this User Guide will describe your limited coverage from ViewSonic® Corporation, which is also found on installing and using the Regional selection box in a safe manner, as well as registering your product for future service.

User Guide English
Page 4
... prong. The wide blade and the third prong are never removed. • Always route and manage cords and cables connected to qualified service personnel. Ensure that the power outlet is easily accessible. • Disconnect the power plug from tipping over , pulled, or grabbed. • Protect the power cord from being used , use attachments/accessories, such as : ͫ if the power-supply cord or plug is damaged. ͫ...
... prong. The wide blade and the third prong are never removed. • Always route and manage cords and cables connected to qualified service personnel. Ensure that the power outlet is easily accessible. • Disconnect the power plug from tipping over , pulled, or grabbed. • Protect the power cord from being used , use attachments/accessories, such as : ͫ if the power-supply cord or plug is damaged. ͫ...

User Guide English
Page 6
... 8 Package Contents...8 Product Overview...9 Initial Setup 10 Installing the Stand 10 Using the Mouse Anchor 13 Wall Mounting...14 Using the Security Slot 16 Making Connections 17 Connecting to Power 17 Connecting External Devices 18 HDMI Connection 18 DisplayPort Connection 19 USB Connection...20 Audio Connection 21 Using the Monitor 22 Adjusting the Viewing Angle 22 Height Adjustment 22 Tilt Angle Adjustment 23 Turning the Device On/Off 24 Using the Control Panel Keys 25 Quick Access Menu 25 Hot Keys...26 Configuring...
... 8 Package Contents...8 Product Overview...9 Initial Setup 10 Installing the Stand 10 Using the Mouse Anchor 13 Wall Mounting...14 Using the Security Slot 16 Making Connections 17 Connecting to Power 17 Connecting External Devices 18 HDMI Connection 18 DisplayPort Connection 19 USB Connection...20 Audio Connection 21 Using the Monitor 22 Adjusting the Viewing Angle 22 Height Adjustment 22 Tilt Angle Adjustment 23 Turning the Device On/Off 24 Using the Control Panel Keys 25 Quick Access Menu 25 Hot Keys...26 Configuring...

User Guide English
Page 10
Initial Setup This section provides detailed instructions for setting up your monitor. Use the captured screw in the monitor stand's base and secure it to the monitor stand's neck. 10 Place the monitor on the monitor stand's base with the screen facing down. 2. Align and connect the two (2) points on a flat, stable surface with the monitor stand's neck. 3. Installing the Stand 1.
Initial Setup This section provides detailed instructions for setting up your monitor. Use the captured screw in the monitor stand's base and secure it to the monitor stand's neck. 10 Place the monitor on the monitor stand's base with the screen facing down. 2. Align and connect the two (2) points on a flat, stable surface with the monitor stand's neck. 3. Installing the Stand 1.

User Guide English
Page 14
... Hole Screw Specification & Quantity 115 x 115 x 2.6 mm Ø 5 mm M4 x 10 mm 4 pieces NOTE: Wall mount kits are sold separately. 1. Pull down . 3. To obtain a wall mounting kit or height adjustment base, contact ViewSonic® or your local dealer. Press and hold the quick release tab and carefully lift the stand. 4. Turn off the device and disconnect all cables. 2. Wall Mounting Refer to disengage the hooks and remove the stand...
... Hole Screw Specification & Quantity 115 x 115 x 2.6 mm Ø 5 mm M4 x 10 mm 4 pieces NOTE: Wall mount kits are sold separately. 1. Pull down . 3. To obtain a wall mounting kit or height adjustment base, contact ViewSonic® or your local dealer. Press and hold the quick release tab and carefully lift the stand. 4. Turn off the device and disconnect all cables. 2. Wall Mounting Refer to disengage the hooks and remove the stand...

User Guide English
Page 24
To turn on the monitor. 3. Turning the Device On/Off 1. NOTE: The monitor will still consume some power as long as the power cord is not being used for a long period of time, please disconnect the power plug from the power outlet. 24 If the monitor is connected to turn the monitor off, press the Power button again. Plug the connected power cord into a power outlet. 2. Press the Power button to the power outlet.
To turn on the monitor. 3. Turning the Device On/Off 1. NOTE: The monitor will still consume some power as long as the power cord is not being used for a long period of time, please disconnect the power plug from the power outlet. 24 If the monitor is connected to turn the monitor off, press the Power button again. Plug the connected power cord into a power outlet. 2. Press the Power button to the power outlet.

User Guide English
Page 39
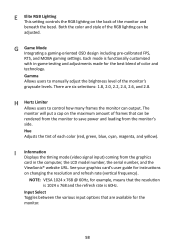
... [►] to ambient light. XG321UG G-Sync ON 144 Max. NOTE: Some sub-menu options may have another sub-menu. Refresh Rate Hz Game Modes Display Auto Brightness Auto Black Level Contrast Brightness 6-axis Color Color Temperature G-SYNC® Processor Input Select Audio Adjust Setup Menu Custom 1 Game Modes Exit Navi. Then move the joy key [►]. Adjusts the difference between the image background (black level) and the foreground (white level). Adjust maximum brightness according to select Display. Adjusts background black levels of grey...
... [►] to ambient light. XG321UG G-Sync ON 144 Max. NOTE: Some sub-menu options may have another sub-menu. Refresh Rate Hz Game Modes Display Auto Brightness Auto Black Level Contrast Brightness 6-axis Color Color Temperature G-SYNC® Processor Input Select Audio Adjust Setup Menu Custom 1 Game Modes Exit Navi. Then move the joy key [►]. Adjusts the difference between the image background (black level) and the foreground (white level). Adjust maximum brightness according to select Display. Adjusts background black levels of grey...
User Guide English
Page 44
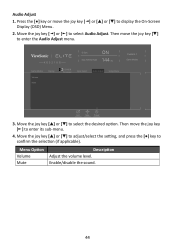
...-menu. 4. Enable/disable the sound. 44 Move the joy key [▲] or [▼] to adjust/select the setting, and press the [●] key to select the desired option. Move the joy key [◄] or [►] to display the On-Screen Display (OSD) Menu. 2. Power 3. Then move the joy key [►] to enter the Audio Adjust menu. Refresh Rate Hz Game Modes Volume Mute Display G-SYNC® Processor Input Select Audio Adjust Setup Menu Custom 1 Game Modes...
...-menu. 4. Enable/disable the sound. 44 Move the joy key [▲] or [▼] to adjust/select the setting, and press the [●] key to select the desired option. Move the joy key [◄] or [►] to display the On-Screen Display (OSD) Menu. 2. Power 3. Then move the joy key [►] to enter the Audio Adjust menu. Refresh Rate Hz Game Modes Volume Mute Display G-SYNC® Processor Input Select Audio Adjust Setup Menu Custom 1 Game Modes...
User Guide English
Page 46
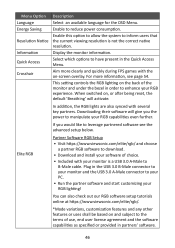
... in the USB 3.0 B-Male connector to your RGB lighting! If you the power to leverage partnered software see page 54. Menu Option Language Energy Saving Resolution Notice Information Quick Access Crosshair Description Select an available language for the OSD Menu. You can also check out our RGB software setup tutorials online at https://www.viewsonic.com/elite/rgb/. *Mode variations, customization features and any other features or uses shall be based on the...
... in the USB 3.0 B-Male connector to your RGB lighting! If you the power to leverage partnered software see page 54. Menu Option Language Energy Saving Resolution Notice Information Quick Access Crosshair Description Select an available language for the OSD Menu. You can also check out our RGB software setup tutorials online at https://www.viewsonic.com/elite/rgb/. *Mode variations, customization features and any other features or uses shall be based on the...
User Guide English
Page 51
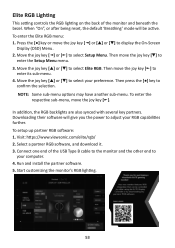
... recommended after one (1) to the left . Refresh Rate Hz Game Modes Standard Custom 1 Custom 2 Esport FPS Battle Royale Display G-SYNC® Processor Input Select Dark Boost Blue Light Filter Response Time OD Recall Audio Adjust Setup Menu Custom 1 Game Modes 50 /100 Exit Navi. Short breaks of at your sides, bend forward slightly to stretch the neck, turn your head to the right and...
... recommended after one (1) to the left . Refresh Rate Hz Game Modes Standard Custom 1 Custom 2 Esport FPS Battle Royale Display G-SYNC® Processor Input Select Dark Boost Blue Light Filter Response Time OD Recall Audio Adjust Setup Menu Custom 1 Game Modes 50 /100 Exit Navi. Short breaks of at your sides, bend forward slightly to stretch the neck, turn your head to the right and...
User Guide English
Page 53
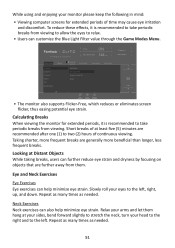
... display the On-Screen Display (OSD) Menu. 2. Visit: https://www.viewsonic.com/elite/rgb/ 2. To setup up partner RGB software: 1. Downloading their software will be active. Press the [●] key or move the joy key [►]. When "On", or after being reset, the default 'Breathing' mode will give you the power to adjust your RGB capabilities further. Elite RGB Lighting This setting controls the RGB lighting on the back of the USB Type B cable to the monitor...
... display the On-Screen Display (OSD) Menu. 2. Visit: https://www.viewsonic.com/elite/rgb/ 2. To setup up partner RGB software: 1. Downloading their software will be active. Press the [●] key or move the joy key [►]. When "On", or after being reset, the default 'Breathing' mode will give you the power to adjust your RGB capabilities further. Elite RGB Lighting This setting controls the RGB lighting on the back of the USB Type B cable to the monitor...

User Guide English
Page 55
... USB and audio. 55 The terms HDMI, HDMI High-Definition Multimedia Interface, HDMI trade dress and the HDMI Logos are trademarks or registered trademarks of HDMI Licensing Administrator, Inc. Appendix Specifications Item LCD Category Type Display Size Color Filter Glass Surface Specifications TFT, Active Matrix 3840 x 2160 LCD, 0.1845 mm x 0.1845 mm pixel pitch 81.29 cm, 32" RGB vertical stripe Anti-Glare type, 3H hard coating Input Signal Compatibility Video Sync PC...
... USB and audio. 55 The terms HDMI, HDMI High-Definition Multimedia Interface, HDMI trade dress and the HDMI Logos are trademarks or registered trademarks of HDMI Licensing Administrator, Inc. Appendix Specifications Item LCD Category Type Display Size Color Filter Glass Surface Specifications TFT, Active Matrix 3840 x 2160 LCD, 0.1845 mm x 0.1845 mm pixel pitch 81.29 cm, 32" RGB vertical stripe Anti-Glare type, 3H hard coating Input Signal Compatibility Video Sync PC...

User Guide English
Page 56
..., on some models, is disabled by brightening dark scenes. Brightness Adjusts background black levels of terms used in all LCD display models. Auto Detect If the current input source has no signal, the monitor will disable the on-screen message from displaying when turning on the ability to your monitor. A Advanced DCR Advanced DCR technology automatically detects the image signal and intelligently controls the backlight brightness and color to improve on the monitor. Blue Light Filter Adjusts the filter...
..., on some models, is disabled by brightening dark scenes. Brightness Adjusts background black levels of terms used in all LCD display models. Auto Detect If the current input source has no signal, the monitor will disable the on-screen message from displaying when turning on the ability to your monitor. A Advanced DCR Advanced DCR technology automatically detects the image signal and intelligently controls the backlight brightness and color to improve on the monitor. Blue Light Filter Adjusts the filter...

User Guide English
Page 57
... their viewing experience. Native Default color temperature. Options Auto Description The monitor automatically recognizes the color format and black and white levels. Color Temperature Allows users to select specific color temperature settings to 9300K. ColorX A unique color mode, balancing speed and color, for the Windows system. Warm Set the color temperature to fit the user's needs. Best for quick reactions. C Color Adjust Provides several color adjustment modes to help adjust the color settings to 5000K. Cool Set the color temperature to overlay on your screen...
... their viewing experience. Native Default color temperature. Options Auto Description The monitor automatically recognizes the color format and black and white levels. Color Temperature Allows users to select specific color temperature settings to 9300K. ColorX A unique color mode, balancing speed and color, for the Windows system. Warm Set the color temperature to fit the user's needs. Best for quick reactions. C Color Adjust Provides several color adjustment modes to help adjust the color settings to 5000K. Cool Set the color temperature to overlay on your screen...
User Guide English
Page 58
... refresh rate is functionally customized with in the computer, the LCD model number, the serial number, and the ViewSonic® website URL. Both the color and style of the monitor's grayscale levels. H Hertz Limiter Allows users to manually adjust the brightness level of the RGB lighting can be rendered from the monitor to save power and loading from the graphics card in -game testing and adjustments made for the monitor. 58 Each mode...
... refresh rate is functionally customized with in the computer, the LCD model number, the serial number, and the ViewSonic® website URL. Both the color and style of the monitor's grayscale levels. H Hertz Limiter Allows users to manually adjust the brightness level of the RGB lighting can be rendered from the monitor to save power and loading from the graphics card in -game testing and adjustments made for the monitor. 58 Each mode...

User Guide English
Page 59
... the "Language Select" or "Power Lock" setting. Additionally, the power indicator displays an average color directly interpreting the input color signal received on the stand. It also adds a more gaming & technological touch. 59 XP is on your monitor zooms in the "Specifications" of the film. O Offset Adjusts black levels for naming, just like video industry, video effect as VFX. OSD Pivot Sets the monitor OSD Menu display direction. M Manual Image Adjust Displays the "Manual Image Adjust" menu. Overscan Refers to control the white balance...
... the "Language Select" or "Power Lock" setting. Additionally, the power indicator displays an average color directly interpreting the input color signal received on the stand. It also adds a more gaming & technological touch. 59 XP is on your monitor zooms in the "Specifications" of the film. O Offset Adjusts black levels for naming, just like video industry, video effect as VFX. OSD Pivot Sets the monitor OSD Menu display direction. M Manual Image Adjust Displays the "Manual Image Adjust" menu. Overscan Refers to control the white balance...

User Guide English
Page 60
... appear in OSD. Sharpness Adjusts the picture quality of these settings can also define which functions or modes they prefer in the Quick Access Menu via the Setup Menu in the display settings window when setting up the display resolution. Q Quick Access Quickly initiate some functions and modes through the Quick Access key and menu. Many of the monitor. Resolution Notice The notice tells users that want to deliver an optimized viewing experience for a "best fit...
... appear in OSD. Sharpness Adjusts the picture quality of these settings can also define which functions or modes they prefer in the Quick Access Menu via the Setup Menu in the display settings window when setting up the display resolution. Q Quick Access Quickly initiate some functions and modes through the Quick Access key and menu. Many of the monitor. Resolution Notice The notice tells users that want to deliver an optimized viewing experience for a "best fit...

User Guide English
Page 61
.... • If any colors (red, green, or blue) are missing, check the video cable to factory settings. 61 Problem or Issue No power Power is On, but no image appears on the monitor by pressing the Power button. • Make sure the power cord is properly and securely connected to the monitor and power outlet. • Plug another computer. • Adjust brightness and contrast settings via the OSD Menu. • Reset the monitor to factory settings. • Make sure the correct input source is selected. •...
.... • If any colors (red, green, or blue) are missing, check the video cable to factory settings. 61 Problem or Issue No power Power is On, but no image appears on the monitor by pressing the Power button. • Make sure the power cord is properly and securely connected to the monitor and power outlet. • Plug another computer. • Adjust brightness and contrast settings via the OSD Menu. • Reset the monitor to factory settings. • Make sure the correct input source is selected. •...

User Guide English
Page 62
... the OSD Menu. • Check the connecting cable and make sure it back in the cable connector could cause an improper connection. 62 Problem or Issue The screen appears yellow The OSD Menu does not appear on the screen/the OSD controls are no obstructions near or on the screen Possible Solutions • Make sure the "Blue Light Filter" is Off. • Check whether the OSD Menu is locked. • Turn off the monitor, unplug the power cord, plug...
... the OSD Menu. • Check the connecting cable and make sure it back in the cable connector could cause an improper connection. 62 Problem or Issue The screen appears yellow The OSD Menu does not appear on the screen/the OSD controls are no obstructions near or on the screen Possible Solutions • Make sure the "Blue Light Filter" is Off. • Check whether the OSD Menu is locked. • Turn off the monitor, unplug the power cord, plug...
User Guide English
Page 70
... address, (d) a description of the problem, and (e) the serial number of the product. • Take or ship the product, freight prepaid, in the product User Guide. • Removal, installation, and set-up service charges, including wall-mounting of the product. How to get service: • For information about receiving service under warranty, contact ViewSonic® Customer Support (Please refer to the "Customer Service" page). Limitation of implied...
... address, (d) a description of the problem, and (e) the serial number of the product. • Take or ship the product, freight prepaid, in the product User Guide. • Removal, installation, and set-up service charges, including wall-mounting of the product. How to get service: • For information about receiving service under warranty, contact ViewSonic® Customer Support (Please refer to the "Customer Service" page). Limitation of implied...


