User Guide
Page 1
... este manual" Model No. VS14880 Warranty information contained in this User Guide to obtain important information on our web site at http:// www.viewsonic.com in English, or in specific languages using your product in the upper right corner of our website. VX2370Smh-LED LCD Display User Guide IMPORTANT: Please read this User Guide will describe your limited coverage from ViewSonic Corporation, which is also found on installing and using...
... este manual" Model No. VS14880 Warranty information contained in this User Guide to obtain important information on our web site at http:// www.viewsonic.com in English, or in specific languages using your product in the upper right corner of our website. VX2370Smh-LED LCD Display User Guide IMPORTANT: Please read this User Guide will describe your limited coverage from ViewSonic Corporation, which is also found on installing and using...

User Guide
Page 2
..., contrast, resolution, black level, gamma curve, color and luminance uniformity, color rendition and image stability. • Product have just purchased carries the TCO Certified label. The requirements included in focus that your display is tested by TCO Development in co-operation with the user in this label have been developed by an accredited impartial test laboratory. This makes for displays...
..., contrast, resolution, black level, gamma curve, color and luminance uniformity, color rendition and image stability. • Product have just purchased carries the TCO Certified label. The requirements included in focus that your display is tested by TCO Development in co-operation with the user in this label have been developed by an accredited impartial test laboratory. This makes for displays...
User Guide
Page 3
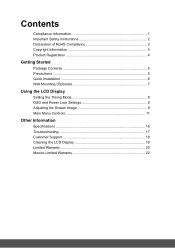
Contents Compliance Information 1 Important Safety Instructions 2 Declaration of RoHS Compliance 3 Copyright Information 4 Product Registration 4 Getting Started Package Contents 5 Precautions 5 Quick Installation 6 Wall Mounting (Optional 7 Using the LCD Display Setting the Timing Mode 8 OSD and Power Lock Settings 8 Adjusting the Screen Image 9 Main Menu Controls 11 Other Information Specifications 16 Troubleshooting 17 Customer Support 18 Cleaning the LCD Display 19 Limited Warranty 20 Mexico Limited Warranty 22
Contents Compliance Information 1 Important Safety Instructions 2 Declaration of RoHS Compliance 3 Copyright Information 4 Product Registration 4 Getting Started Package Contents 5 Precautions 5 Quick Installation 6 Wall Mounting (Optional 7 Using the LCD Display Setting the Timing Mode 8 OSD and Power Lock Settings 8 Adjusting the Screen Image 9 Main Menu Controls 11 Other Information Specifications 16 Troubleshooting 17 Customer Support 18 Cleaning the LCD Display 19 Limited Warranty 20 Mexico Limited Warranty 22

User Guide
Page 4
... different from that changes or modifications not expressly approved by the party responsible for help. These limits are cautioned that to provide reasonable protection against harmful interference in accordance with Canadian ICES-003. Warning: You are designed to which can radiate radio frequency energy, and if not installed and used in a residential installation. The mark indicates...
... different from that changes or modifications not expressly approved by the party responsible for help. These limits are cautioned that to provide reasonable protection against harmful interference in accordance with Canadian ICES-003. Warning: You are designed to which can radiate radio frequency energy, and if not installed and used in a residential installation. The mark indicates...

User Guide
Page 5
Follow all servicing to qualified service personnel. Do not use this guide for replacement of time. 14. Do not block any heat sources such as : if the power-supply cord or plug is damaged, if liquid is exposed to circumvent the safety provisions of fire or electric shock, do not expose this equipment when it is located near water. Install the equipment...
Follow all servicing to qualified service personnel. Do not use this guide for replacement of time. 14. Do not block any heat sources such as : if the power-supply cord or plug is damaged, if liquid is exposed to circumvent the safety provisions of fire or electric shock, do not expose this equipment when it is located near water. Install the equipment...
User Guide
Page 7
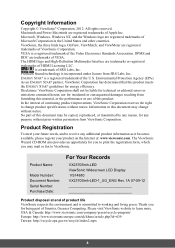
... may be liable for being part of ViewSonic Corporation. All rights reserved. As an ENERGY STAR® partner, ViewSonic Corporation has determined that this document may mail or fax to change without prior written permission from SRS Labs, Inc. Product Name: Model Number: Document Number: Serial Number: Purchase Date: For Your Records VX2370Smh-LED ViewSonic Widescreen LCD Display VS14880 VX2370Smh-LED-1_UG_ENG Rev. 1A 07-09...
... may be liable for being part of ViewSonic Corporation. All rights reserved. As an ENERGY STAR® partner, ViewSonic Corporation has determined that this document may mail or fax to change without prior written permission from SRS Labs, Inc. Product Name: Model Number: Document Number: Serial Number: Purchase Date: For Your Records VX2370Smh-LED ViewSonic Widescreen LCD Display VS14880 VX2370Smh-LED-1_UG_ENG Rev. 1A 07-09...

User Guide
Page 8
...: Windows Vista, and Windows 7. Orient the LCD display away from the LCD display. • Avoid touching the screen. Package Contents Your LCD display package includes: • LCD display • Power cord • AC/DC power adapter • Audio cable • D-Sub cable • DVI cable (available in some countries only) • HDMI cable (available in some countries only) • ViewSonic Wizard CD-ROM • Quick Start Guide NOTE: The CD includes the User Guide PDF files and INF/ICM display optimization files...
...: Windows Vista, and Windows 7. Orient the LCD display away from the LCD display. • Avoid touching the screen. Package Contents Your LCD display package includes: • LCD display • Power cord • AC/DC power adapter • Audio cable • D-Sub cable • DVI cable (available in some countries only) • HDMI cable (available in some countries only) • ViewSonic Wizard CD-ROM • Quick Start Guide NOTE: The CD includes the User Guide PDF files and INF/ICM display optimization files...

User Guide
Page 9
... CD-ROM to ViewSonic. DVI HDMI DC IN D-Sub Audio In Audio Out Power Cord AC Outlet (Wall Socket) Computer Power Cord 6 Connect AC/DC Adapter to LCD Display, and then plug in the Windows Explorer, then doubleclick on viewsonic.exe. • Follow the on changing the resolution and refresh rate, see the graphics card's user guide. Insert the ViewSonic Wizard CD into the adapter. To order a ViewSonic® Macintosh adapter, contact ViewSonic Customer Support. 3. This is on -screen instructions. Follow the...
... CD-ROM to ViewSonic. DVI HDMI DC IN D-Sub Audio In Audio Out Power Cord AC Outlet (Wall Socket) Computer Power Cord 6 Connect AC/DC Adapter to LCD Display, and then plug in the Windows Explorer, then doubleclick on viewsonic.exe. • Follow the on changing the resolution and refresh rate, see the graphics card's user guide. Insert the ViewSonic Wizard CD into the adapter. To order a ViewSonic® Macintosh adapter, contact ViewSonic Customer Support. 3. This is on -screen instructions. Follow the...

User Guide
Page 10
... the best picture quality set the graphics card in permanent damage to your LCD display timing mode to: VESA 1920 x 1080 @ 60Hz. With or without this setting, after a power failure, your computer to adjust the screen image. example 60 Hz). Set the resolution: Right-click on the Windows desktop > Properties > Settings > set the Timing Mode: 1. If any buttons are pressed the message OSD Locked will automatically turn ON when power is restored. • Power Button Unlock: Press...
... the best picture quality set the graphics card in permanent damage to your LCD display timing mode to: VESA 1920 x 1080 @ 60Hz. With or without this setting, after a power failure, your computer to adjust the screen image. example 60 Hz). Set the resolution: Right-click on the Windows desktop > Properties > Settings > set the Timing Mode: 1. If any buttons are pressed the message OSD Locked will automatically turn ON when power is restored. • Power Button Unlock: Press...

User Guide
Page 11
Power light Blue = ON Orange = Power Saving Standby Power On/Off Scrolls through menu options and adjusts the displayed control. Main Menu with OSD controls Front Control Panel shown below in "Main Menu Controls" on the screen. Audio Adjust (T) / Brightness/Contrast (S) 8 Displays the Main Menu or exits the control screen and saves adjustments. Also a shortcut to display and adjust the OSD controls which display on page 11. Adjusting the Screen Image Use the buttons on the front control panel to toggle analog and digital connection. The OSD controls are explained at the top ...
Power light Blue = ON Orange = Power Saving Standby Power On/Off Scrolls through menu options and adjusts the displayed control. Main Menu with OSD controls Front Control Panel shown below in "Main Menu Controls" on the screen. Audio Adjust (T) / Brightness/Contrast (S) 8 Displays the Main Menu or exits the control screen and saves adjustments. Also a shortcut to display and adjust the OSD controls which display on page 11. Adjusting the Screen Image Use the buttons on the front control panel to toggle analog and digital connection. The OSD controls are explained at the top ...

User Guide
Page 12
... OSD timeout setting in the Main Menu. 3. To select a control to the LCD display. (Look for instructions on "changing the refresh rate" in the graphics card's user guide.) • If necessary, make small adjustments using H. The line at the bottom of the screen shows the current functions of the LCD display.) 9 To save the adjustments and exit the menu, press button [1] twice. POSITION and V. To adjust the control, press the up or down T buttons. 5. The following to adjust...
... OSD timeout setting in the Main Menu. 3. To select a control to the LCD display. (Look for instructions on "changing the refresh rate" in the graphics card's user guide.) • If necessary, make small adjustments using H. The line at the bottom of the screen shows the current functions of the LCD display.) 9 To save the adjustments and exit the menu, press button [1] twice. POSITION and V. To adjust the control, press the up or down T buttons. 5. The following to adjust...

User Guide
Page 13
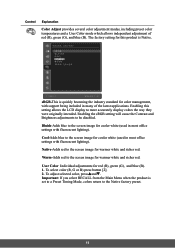
Contrast adjusts the difference between HDMI and jack plug (AUDIO IN). 10 Mute temporarily silences audio output. Main Menu Controls Adjust the menu items shown below by using the up S and down T buttons. NOTE: Auto Image Adjust works with most common video cards. Audio Input (For HDMI mode only) toggles audio source between the image background (black level) and the foreground (white level). Control Explanation Auto Image Adjust automatically sizes, centers, and fine tunes the video signal to its pre-set value. If this function does...
Contrast adjusts the difference between HDMI and jack plug (AUDIO IN). 10 Mute temporarily silences audio output. Main Menu Controls Adjust the menu items shown below by using the up S and down T buttons. NOTE: Auto Image Adjust works with most common video cards. Audio Input (For HDMI mode only) toggles audio source between the image background (black level) and the foreground (white level). Control Explanation Auto Image Adjust automatically sizes, centers, and fine tunes the video signal to its pre-set value. If this function does...
User Guide
Page 14
... several color adjustment modes, including preset color temperatures and a User Color mode which allows independent adjustment of the latest applications. Enabling the sRGB setting will cause the Contrast and Brightness adjustments to the screen image for warmer white and richer red. Bluish-Adds blue to the screen image for cooler white (used in many of red (R), green (G), and blue (B). The factory setting for cooler white (used in most office settings with fluorescent lighting). Native-Adds red to the screen image for this setting allows the LCD display...
... several color adjustment modes, including preset color temperatures and a User Color mode which allows independent adjustment of the latest applications. Enabling the sRGB setting will cause the Contrast and Brightness adjustments to the screen image for warmer white and richer red. Bluish-Adds blue to the screen image for cooler white (used in many of red (R), green (G), and blue (B). The factory setting for cooler white (used in most office settings with fluorescent lighting). Native-Adds red to the screen image for this setting allows the LCD display...
User Guide
Page 15
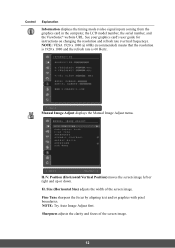
... by aligning text and/or graphics with pixel boundaries. Manual Image Adjust displays the Manual Image Adjust menu. H./V. Control Explanation Information displays the timing mode (video signal input) coming from the graphics card in the computer, the LCD model number, the serial number, and the ViewSonic® website URL. NOTE: VESA 1920 x 1080 @ 60Hz (recommended) means that the resolution is 1920 x 1080 and the refresh rate is 60 Hertz. See your graphics card's user guide for instructions on changing the resolution and refresh rate (vertical frequency).
... by aligning text and/or graphics with pixel boundaries. Manual Image Adjust displays the Manual Image Adjust menu. H./V. Control Explanation Information displays the timing mode (video signal input) coming from the graphics card in the computer, the LCD model number, the serial number, and the ViewSonic® website URL. NOTE: VESA 1920 x 1080 @ 60Hz (recommended) means that the resolution is 1920 x 1080 and the refresh rate is 60 Hertz. See your graphics card's user guide for instructions on changing the resolution and refresh rate (vertical frequency).
User Guide
Page 16
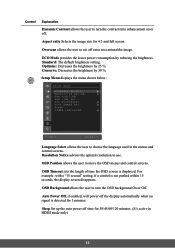
... full screen. Setup Menu displays the menu shown below: Language Select allows the user to use. Standard: The default brightness setting. For example, with a "15 second" setting, if a control is displayed. Overscan allows the user to cut off . Optimize: Decreases the brightness by 50 %. OSD Position allows the user to move the OSD menus and control screens. ECO Mode provides the lower power consumption by reducing the brightness. Control Explanation Dynamic Contrast allows the user to turn the OSD background On...
... full screen. Setup Menu displays the menu shown below: Language Select allows the user to use. Standard: The default brightness setting. For example, with a "15 second" setting, if a control is displayed. Overscan allows the user to cut off . Optimize: Decreases the brightness by 50 %. OSD Position allows the user to move the OSD menus and control screens. ECO Mode provides the lower power consumption by reducing the brightness. Control Explanation Dynamic Contrast allows the user to turn the OSD background On...
User Guide
Page 17
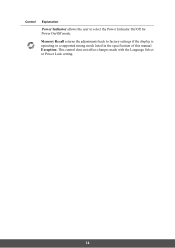
Memory Recall returns the adjustments back to select the Power Indicator On/Off for Power On/Off mode. Control Explanation Power Indicator allows the user to factory settings if the display is operating in a supported timing mode listed in the specification of this manual. Exception: This control does not affect changes made with the Language Select or Power Lock setting. 14
Memory Recall returns the adjustments back to select the Power Indicator On/Off for Power On/Off mode. Control Explanation Power Indicator allows the user to factory settings if the display is operating in a supported timing mode listed in the specification of this manual. Exception: This control does not affect changes made with the Language Select or Power Lock setting. 14
User Guide
Page 18
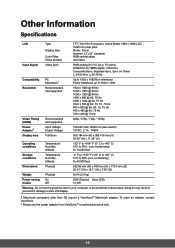
...Specifications LCD Type Display Size Color Filter Glass Surface TFT (Thin Film Transistor), Active Matrix 1920 x 1080 LCD, 0.265 mm pixel pitch Metric: 58 cm Imperial: 23" (23" viewable) RGB vertical stripe Anti-Glare Input Signal Video Sync Compatibility PC Macintosh1 RGB analog (0.7/1.0 Vp-p, 75 ohms) HDMI/DVI-D (TMDS digital, 100ohms) Composite Sync, Separate Sync, Sync on Green fh:24-83 kHz, fv:50-76 Hz Up to 1920 x 1080 Non-interlaced Power...(H) x 179.5 mm (D) 20.91" (W) x 16.1" (H) x 7.06" (D) Weight Physical 8.6 lb (3.9 kg) Power saving On modes Off 30W (Typical) (blue LED)
...Specifications LCD Type Display Size Color Filter Glass Surface TFT (Thin Film Transistor), Active Matrix 1920 x 1080 LCD, 0.265 mm pixel pitch Metric: 58 cm Imperial: 23" (23" viewable) RGB vertical stripe Anti-Glare Input Signal Video Sync Compatibility PC Macintosh1 RGB analog (0.7/1.0 Vp-p, 75 ohms) HDMI/DVI-D (TMDS digital, 100ohms) Composite Sync, Separate Sync, Sync on Green fh:24-83 kHz, fv:50-76 Hz Up to 1920 x 1080 Non-interlaced Power...(H) x 179.5 mm (D) 20.91" (W) x 16.1" (H) x 7.06" (D) Weight Physical 8.6 lb (3.9 kg) Power saving On modes Off 30W (Typical) (blue LED)

User Guide
Page 19
.... 4. Control buttons do not work • Press only one button at a time. Wrong or abnormal colors • If any colors (red, green, or blue) are missing, check the video cable to make sure it to the LCD display. • Adjust brightness and contrast. • If you are using an Macintosh older than G3, you have an older graphics card, contact ViewSonic® for a non-DDC adapter. Locate the ViewSonic Wizard CD (The ViewSonic Wizard...
.... 4. Control buttons do not work • Press only one button at a time. Wrong or abnormal colors • If any colors (red, green, or blue) are missing, check the video cable to make sure it to the LCD display. • Adjust brightness and contrast. • If you are using an Macintosh older than G3, you have an older graphics card, contact ViewSonic® for a non-DDC adapter. Locate the ViewSonic Wizard CD (The ViewSonic Wizard...

User Guide
Page 22
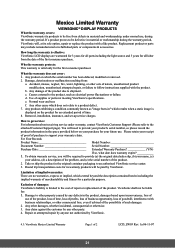
...'s serial number. 2. Removal or installation of the nearest ViewSonic service center, contact ViewSonic. Normal wear and tear. Any damage of time. 4. Removal, installation, one way transportation, insurance, and set-up service charges. You will , at its products to an authorized ViewSonic service center or ViewSonic. 4. Replacement product or parts may include remanufactured or refurbished parts or components. c. e. port (Please refer to provide your address, (d) a description of the problem, and...
...'s serial number. 2. Removal or installation of the nearest ViewSonic service center, contact ViewSonic. Normal wear and tear. Any damage of time. 4. Removal, installation, one way transportation, insurance, and set-up service charges. You will , at its products to an authorized ViewSonic service center or ViewSonic. 4. Replacement product or parts may include remanufactured or refurbished parts or components. c. e. port (Please refer to provide your address, (d) a description of the problem, and...
User Guide
Page 24
... consumer purchaser. c. e. Removal, installation, insurance, and set-up service charges. Please retain your receipt of proof of purchase to support your address, (d) a description of the problem, and (e) the serial number of such damages. 2. Damage to other commercial loss, even if advised of the possibility of the product. 2. Any other acts of use , during the warranty period, ViewSonic will be required...
... consumer purchaser. c. e. Removal, installation, insurance, and set-up service charges. Please retain your receipt of proof of purchase to support your address, (d) a description of the problem, and (e) the serial number of such damages. 2. Damage to other commercial loss, even if advised of the possibility of the product. 2. Any other acts of use , during the warranty period, ViewSonic will be required...


