
User Guide
Page 1
... idadosamente las instrucciones en este manual" Model No. VS16528 P/N: VP2785-2K VP2785-2K Display User Guide IMPORTANT: Please read this User Guide will describe your limited coverage from ViewSonic® Corporation, which is also found on installing and using the Regional selection box in a safe manner, as well as registering your product for future service. Warranty information contained in this User Guide to obtain important information on...
... idadosamente las instrucciones en este manual" Model No. VS16528 P/N: VP2785-2K VP2785-2K Display User Guide IMPORTANT: Please read this User Guide will describe your limited coverage from ViewSonic® Corporation, which is also found on installing and using the Regional selection box in a safe manner, as well as registering your product for future service. Warranty information contained in this User Guide to obtain important information on...

User Guide
Page 5
... Contents...7 Product Overview...8 Initial Setup 9 Installing the Stand 9 Wall Mounting...11 Using the Security Slot 13 Making Connections 14 Connecting to Power 14 Connecting External Devices 15 HDMI Connection 15 DisplayPort Connection 16 DisplayPort/USB Type C MST Daisy Chain Connection 17 USB Connection...18 Audio Connection 19 Using the Monitor 20 Adjusting the Viewing Angle 20 Height Adjustment 20 Tilt Angle Adjustment 21 Swivel Angle Adjustment 22 Turning the Device On/Off 23 Using the Control Panel Keys 24 Quick Menu...24 Hot Keys...26...
... Contents...7 Product Overview...8 Initial Setup 9 Installing the Stand 9 Wall Mounting...11 Using the Security Slot 13 Making Connections 14 Connecting to Power 14 Connecting External Devices 15 HDMI Connection 15 DisplayPort Connection 16 DisplayPort/USB Type C MST Daisy Chain Connection 17 USB Connection...18 Audio Connection 19 Using the Monitor 20 Adjusting the Viewing Angle 20 Height Adjustment 20 Tilt Angle Adjustment 21 Swivel Angle Adjustment 22 Turning the Device On/Off 23 Using the Control Panel Keys 24 Quick Menu...24 Hot Keys...26...
User Guide
Page 28
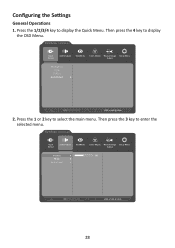
Then press the 4 key to select the main menu. VP2785-2K Input Select Audio Adjust ViewMode Color Adjust Manual Image Setup Menu Adjust Volume 50 Mute Audio Input 2560 x 1440 @ 60Hz 28 Press the 1 or 2 key to display the OSD Menu. Press the 1/2/3/4 key to enter the selected menu. VP2785-2K Input Select Audio Adjust ViewMode Color Adjust Manual Image Setup Menu Adjust DisplayPort HDMI TYPE C Auto Detect 2560 x 1440 @ 60Hz 2. Configuring the Settings General Operations 1. Then press the 3 key to display the Quick Menu.
Then press the 4 key to select the main menu. VP2785-2K Input Select Audio Adjust ViewMode Color Adjust Manual Image Setup Menu Adjust Volume 50 Mute Audio Input 2560 x 1440 @ 60Hz 28 Press the 1 or 2 key to display the OSD Menu. Press the 1/2/3/4 key to enter the selected menu. VP2785-2K Input Select Audio Adjust ViewMode Color Adjust Manual Image Setup Menu Adjust DisplayPort HDMI TYPE C Auto Detect 2560 x 1440 @ 60Hz 2. Configuring the Settings General Operations 1. Then press the 3 key to display the Quick Menu.
User Guide
Page 29
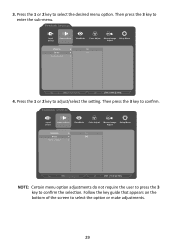
... adjust/select the setting. Press the 1 or 2 key to confirm. VP2785-2K Input Select Audio Adjust ViewMode Color Adjust Manual Image Setup Menu Adjust Volume On Mute Off Audio Input 2560 x 1440 @ 60Hz NOTE: Certain menu option adjustments do not require the user to press the 3 key to enter the sub-menu. Then press the 3 key to confirm the selection. VP2785-2K Input Select Audio Adjust ViewMode Color Adjust Manual Image Setup Menu Adjust Volume On Mute Off Audio Input 2560 x 1440 @ 60Hz 4. Follow the key guide...
... adjust/select the setting. Press the 1 or 2 key to confirm. VP2785-2K Input Select Audio Adjust ViewMode Color Adjust Manual Image Setup Menu Adjust Volume On Mute Off Audio Input 2560 x 1440 @ 60Hz NOTE: Certain menu option adjustments do not require the user to press the 3 key to enter the sub-menu. Then press the 3 key to confirm the selection. VP2785-2K Input Select Audio Adjust ViewMode Color Adjust Manual Image Setup Menu Adjust Volume On Mute Off Audio Input 2560 x 1440 @ 60Hz 4. Follow the key guide...

User Guide
Page 30
Press the 4 key to return to the previous menu. VP2785-2K Input Select Audio Adjust ViewMode Color Adjust Manual Image Setup Menu Adjust Volume On Mute Off Audio Input VP2785-2K Input Select Audio Adjust ViewMode Color Adjust Manual Image Setup Menu Adjust Volume 50 Mute Audio Input 2560 x 1440 @ 60Hz Key Guide 5. NOTE: To exit the OSD Menu, press the 5 key. 2560 x 1440 @ 60Hz Key Guide 30
Press the 4 key to return to the previous menu. VP2785-2K Input Select Audio Adjust ViewMode Color Adjust Manual Image Setup Menu Adjust Volume On Mute Off Audio Input VP2785-2K Input Select Audio Adjust ViewMode Color Adjust Manual Image Setup Menu Adjust Volume 50 Mute Audio Input 2560 x 1440 @ 60Hz Key Guide 5. NOTE: To exit the OSD Menu, press the 5 key. 2560 x 1440 @ 60Hz Key Guide 30
User Guide
Page 41
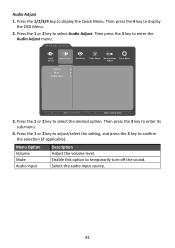
... to display the Quick Menu. Press the 1/2/3/4 key to temporarily turn off the sound. Press the 1 or 2 key to confirm the selection (if applicable). VP2785-2K Input Select Audio Adjust ViewMode Color Adjust Manual Image Setup Menu Adjust Volume Mute Audio Input 2560 x 1440 @ 60Hz 3. Menu Option Volume Mute Audio Input Description Adjust the volume level. Press the 1 or 2 key to adjust/select the setting, and press the 3 key to select Audio Adjust. Then press the 3 key to enter the Audio Adjust menu. Audio Adjust...
... to display the Quick Menu. Press the 1/2/3/4 key to temporarily turn off the sound. Press the 1 or 2 key to confirm the selection (if applicable). VP2785-2K Input Select Audio Adjust ViewMode Color Adjust Manual Image Setup Menu Adjust Volume Mute Audio Input 2560 x 1440 @ 60Hz 3. Menu Option Volume Mute Audio Input Description Adjust the volume level. Press the 1 or 2 key to adjust/select the setting, and press the 3 key to select Audio Adjust. Then press the 3 key to enter the Audio Adjust menu. Audio Adjust...
User Guide
Page 43
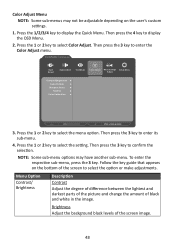
... the Color Adjust menu. Brightness Adjust the background black levels of black and white in the image. Then press the 3 key to select the setting. Then press the 3 key to display the Quick Menu. To enter the respective sub-menu, press the 3 key. Color Adjust Menu NOTE: Some sub-menus may have another sub-menu. Follow the key guide that appears on the user's custom settings. 1. VP2785-2K Input Select Audio Adjust ViewMode Color Adjust Manual Image Setup Menu Adjust Contrast/Brightness Color Format Standard Color Custom Color Calibration...
... the Color Adjust menu. Brightness Adjust the background black levels of black and white in the image. Then press the 3 key to select the setting. Then press the 3 key to display the Quick Menu. To enter the respective sub-menu, press the 3 key. Color Adjust Menu NOTE: Some sub-menus may have another sub-menu. Follow the key guide that appears on the user's custom settings. 1. VP2785-2K Input Select Audio Adjust ViewMode Color Adjust Manual Image Setup Menu Adjust Contrast/Brightness Color Format Standard Color Custom Color Calibration...

User Guide
Page 45
... detects the image signal and intelligently controls the backlight brightness and color, to improve on the ability to customize your User Color (can be saved in a bright environment. Hue Adjust the tint of the monitor's grayscale levels. Gain Adjust white temperature to make the black blacker in a dark scene, and make the white whiter in User Mode) or a specific color temperature and gain value (red, green, blue). Offset Adjust black levels for the upmost control when manipulating contrast and...
... detects the image signal and intelligently controls the backlight brightness and color, to improve on the ability to customize your User Color (can be saved in a bright environment. Hue Adjust the tint of the monitor's grayscale levels. Gain Adjust white temperature to make the black blacker in a dark scene, and make the white whiter in User Mode) or a specific color temperature and gain value (red, green, blue). Offset Adjust black levels for the upmost control when manipulating contrast and...
User Guide
Page 47
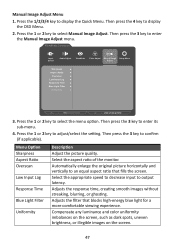
... to display the Quick Menu. Manual Image Adjust Menu 1. Then press the 4 key to confirm (if applicable). Then press the 3 key to display the OSD Menu. 2. Adjusts the filter that fills the screen. Compensate any luminance and color uniformity imbalances on the screen, such as dark spots, uneven brightness, or illegible images on the screen. 47 VP2785-2K Input Select Audio Adjust ViewMode Color Adjust Manual Image Setup Menu Adjust Sharpness Aspect Ratio Overscan Low Input Lag Response Time Blue Light Filter...
... to display the Quick Menu. Manual Image Adjust Menu 1. Then press the 4 key to confirm (if applicable). Then press the 3 key to display the OSD Menu. 2. Adjusts the filter that fills the screen. Compensate any luminance and color uniformity imbalances on the screen, such as dark spots, uneven brightness, or illegible images on the screen. 47 VP2785-2K Input Select Audio Adjust ViewMode Color Adjust Manual Image Setup Menu Adjust Sharpness Aspect Ratio Overscan Low Input Lag Response Time Blue Light Filter...

User Guide
Page 48
...: Some sub-menu options may have another sub-menu. OSD Timeout Set the length of time the OSD Menu remains on the bottom of the screen to inform users that appears on screen. Resolution Notice Enable this option to allow the system to select the option or make adjustments. VP2785-2K Input Select Audio Adjust ViewMode Color Adjust Manual Image Setup Menu Adjust Language Select Resolution Notice Information OSD Timeout OSD Background OSD Pivot Power Indicator Auto Power Off Sleep Ambient Light sensor Presence...
...: Some sub-menu options may have another sub-menu. OSD Timeout Set the length of time the OSD Menu remains on the bottom of the screen to inform users that appears on screen. Resolution Notice Enable this option to allow the system to select the option or make adjustments. VP2785-2K Input Select Audio Adjust ViewMode Color Adjust Manual Image Setup Menu Adjust Language Select Resolution Notice Information OSD Timeout OSD Background OSD Pivot Power Indicator Auto Power Off Sleep Ambient Light sensor Presence...

User Guide
Page 49
... your environment. Dual Color Display two different color settings in -Picture)" section on page 56. For more information, refer to the "PBP (Picture-by -side on the left and right of the screen. Off Disable this function. Menu Option Auto Power Off Sleep Ambient Light Sensor Presence Sensor Multi-Picture ECO Mode DisplayPort Description Enable this option to allow the monitor to switch to Power Saving mode (backlight off after 3 seconds...
... your environment. Dual Color Display two different color settings in -Picture)" section on page 56. For more information, refer to the "PBP (Picture-by -side on the left and right of the screen. Off Disable this function. Menu Option Auto Power Off Sleep Ambient Light Sensor Presence Sensor Multi-Picture ECO Mode DisplayPort Description Enable this option to allow the monitor to switch to Power Saving mode (backlight off after 3 seconds...
User Guide
Page 56
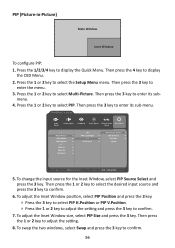
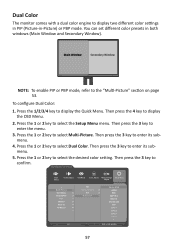
... submenu. 4. VP2785-2K Input Select Audio Adjust ViewMode Color Adjust Manual Image Setup Menu Adjust Multi-Picture ECO Mode DisplayPort MST DDC/CI Save As All Recall Off PBP Left-Right PIP Dual Color PIP Source Select PIP Position PIP Size Swap 2560 x 1440 @ 60Hz 5. To adjust the Inset Window size, select PIP Size and press the 3 key. Then press the 1 or 2 key to display the OSD Menu. 2. Press the 1 or 2 key to display the Quick Menu. Press the...
... submenu. 4. VP2785-2K Input Select Audio Adjust ViewMode Color Adjust Manual Image Setup Menu Adjust Multi-Picture ECO Mode DisplayPort MST DDC/CI Save As All Recall Off PBP Left-Right PIP Dual Color PIP Source Select PIP Position PIP Size Swap 2560 x 1440 @ 60Hz 5. To adjust the Inset Window size, select PIP Size and press the 3 key. Then press the 1 or 2 key to display the OSD Menu. 2. Press the 1 or 2 key to display the Quick Menu. Press the...
User Guide
Page 57
... can set different color presets in -Picture) or PBP mode. Dual Color The monitor comes with a dual color engine to display the Quick Menu. Press the 1 or 2 key to enter the menu. 3. VP2785-2K Input Select Audio Adjust ViewMode Color Adjust Manual Image Setup Menu Adjust Multi-Picture ECO Mode DisplayPort MST DDC/CI Save As All Recall Off PBP Left-Right PIP Dual Color Adobe RGB sRGB EBU SMPTE-C REC709 DICOM SIM D50 CAL 1 CAL 2 CAL 3 Native 2560...
... can set different color presets in -Picture) or PBP mode. Dual Color The monitor comes with a dual color engine to display the Quick Menu. Press the 1 or 2 key to enter the menu. 3. VP2785-2K Input Select Audio Adjust ViewMode Color Adjust Manual Image Setup Menu Adjust Multi-Picture ECO Mode DisplayPort MST DDC/CI Save As All Recall Off PBP Left-Right PIP Dual Color Adobe RGB sRGB EBU SMPTE-C REC709 DICOM SIM D50 CAL 1 CAL 2 CAL 3 Native 2560...

User Guide
Page 58
...://color.viewsonic.com/support/software/. 2. The application will automatically detect and verify your monitor model and current firmware version. 58 With the supplied USB cable and Firmware Update Tool, you can visit: https://color.viewsonic.com/support/software/ to check and download the latest firmware version with 2 cut corners) to complete the application installation. 4. To update the firmware: 1. Connect the USB Type B male cable (square with the update tool. Unzip the downloaded Firmware Update Tool and double-click on -screen instructions...
...://color.viewsonic.com/support/software/. 2. The application will automatically detect and verify your monitor model and current firmware version. 58 With the supplied USB cable and Firmware Update Tool, you can visit: https://color.viewsonic.com/support/software/ to check and download the latest firmware version with 2 cut corners) to complete the application installation. 4. To update the firmware: 1. Connect the USB Type B male cable (square with the update tool. Unzip the downloaded Firmware Update Tool and double-click on -screen instructions...

User Guide
Page 59
Do not disconnect the USB cable or turn off your monitor. NOTE: Any interruptions during the firmware upgrade process may permanently damage your PC and monitor. 59 Click Update to upgrade your monitor firmware. VP Series USB Firmware Update Tool v1.0 Model Name Model Name Current Firmware Current Firmware New Firmware New Firmware CheckSum CheckSum 0% Update EXIT(X) 6. 5. Wait until the upgrade process is complete.
Do not disconnect the USB cable or turn off your monitor. NOTE: Any interruptions during the firmware upgrade process may permanently damage your PC and monitor. 59 Click Update to upgrade your monitor firmware. VP Series USB Firmware Update Tool v1.0 Model Name Model Name Current Firmware Current Firmware New Firmware New Firmware CheckSum CheckSum 0% Update EXIT(X) 6. 5. Wait until the upgrade process is complete.

User Guide
Page 63
... the Specifications of this manual. A Advanced DCR Advanced DCR technology automatically detects the image signal and intelligently controls the backlight brightness and color to make the black blacker in a dark scene, and make the white whiter in all LCD display models. NOTE: (Exception) This control does not affect changes made with the "Language Select" or "Power Lock setting". Brightness Adjusts background black levels of the screen image. 63 Blue Light Filter Adjusts the filter that blocks high-energy blue light for...
... the Specifications of this manual. A Advanced DCR Advanced DCR technology automatically detects the image signal and intelligently controls the backlight brightness and color to make the black blacker in a dark scene, and make the white whiter in all LCD display models. NOTE: (Exception) This control does not affect changes made with the "Language Select" or "Power Lock setting". Brightness Adjusts background black levels of the screen image. 63 Blue Light Filter Adjusts the filter that blocks high-energy blue light for...

User Guide
Page 64
... viewing experience. Contrast Adjusts the difference between the image background (black level) and the foreground (white level). You can detect the input signal color range automatically. Each mode is functionally customized with in-game testing and adjustments made for the best blend of each color (red, green, blue, cyan, magenta, and yellow). 64 Panel Default Panel Original Status Panel Default Panel's default mode. Cool Set the color temperature to manually adjust the brightness level of the monitor's grayscale levels. Gamma Allows users...
... viewing experience. Contrast Adjusts the difference between the image background (black level) and the foreground (white level). You can detect the input signal color range automatically. Each mode is functionally customized with in-game testing and adjustments made for the best blend of each color (red, green, blue, cyan, magenta, and yellow). 64 Panel Default Panel Original Status Panel Default Panel's default mode. Cool Set the color temperature to manually adjust the brightness level of the monitor's grayscale levels. Gamma Allows users...

User Guide
Page 65
... adjustments. P PIP (Picture-in the computer, the LCD model number, the serial number, and the ViewSonic® website URL. You can specify the input source for each screen. O Overscan Refers to a cropped image on changing the resolution and refresh rate (vertical frequency). PIP Swap This exchanges the main-picture source with the sub-picture source. 65 I Information Displays the timing mode (video signal input) coming from the options. NOTE: VESA 1024 x 768 @ 60Hz, for your graphics cards's user guide for the monitor...
... adjustments. P PIP (Picture-in the computer, the LCD model number, the serial number, and the ViewSonic® website URL. You can specify the input source for each screen. O Overscan Refers to a cropped image on changing the resolution and refresh rate (vertical frequency). PIP Swap This exchanges the main-picture source with the sub-picture source. 65 I Information Displays the timing mode (video signal input) coming from the options. NOTE: VESA 1024 x 768 @ 60Hz, for your graphics cards's user guide for the monitor...

User Guide
Page 67
... have turned on screen • Make sure the video cable connecting the monitor to another electrical device into the power outlet to factory settings. Power is On, but no image appears on the monitor by pressing the Power button. • Make sure the power cord is selected. The screen isn't centered correctly • Adjust the horizontal and vertical controls via the OSD Menu. • Reset the monitor to verify that you have an older graphics card, contact ViewSonic®...
... have turned on screen • Make sure the video cable connecting the monitor to another electrical device into the power outlet to factory settings. Power is On, but no image appears on the monitor by pressing the Power button. • Make sure the power cord is selected. The screen isn't centered correctly • Adjust the horizontal and vertical controls via the OSD Menu. • Reset the monitor to verify that you have an older graphics card, contact ViewSonic®...

User Guide
Page 68
... image appears on the screen • Make sure the Power is properly and securely connected. If yes, press and hold the 2 and 3 key for 10 seconds. • Turn off the monitor, unplug the power cord, plug it is On • Adjust brightness and contrast via the OSD Menu. • Check the connecting cable and make sure it back in, and then turn on the monitor. • Reset the monitor to factory settings. Control panel keys do not work...
... image appears on the screen • Make sure the Power is properly and securely connected. If yes, press and hold the 2 and 3 key for 10 seconds. • Turn off the monitor, unplug the power cord, plug it is On • Adjust brightness and contrast via the OSD Menu. • Check the connecting cable and make sure it back in, and then turn on the monitor. • Reset the monitor to factory settings. Control panel keys do not work...


