User Guide
Page 2
Contents TCO Information i Compliance Information 1 Important Safety Instructions 2 Copyright Information 3 Product Registration 3 Getting Started Package Contents 4 Precautions 4 Quick Installation 5 Wall Mounting (Optional 6 Using the LCD Display Setting the Timing Mode 7 OSD and Power Lock Settings 7 Adjusting the Screen Image 8 Main Menu Controls 9 Other Information Specifications 14 Troubleshooting 15 Customer Support 16 Cleaning the LCD Display 17 Limited Warranty 18 ViewSonic VA1912w/VA1912wb
Contents TCO Information i Compliance Information 1 Important Safety Instructions 2 Copyright Information 3 Product Registration 3 Getting Started Package Contents 4 Precautions 4 Quick Installation 5 Wall Mounting (Optional 6 Using the LCD Display Setting the Timing Mode 7 OSD and Power Lock Settings 7 Adjusting the Screen Image 8 Main Menu Controls 9 Other Information Specifications 14 Troubleshooting 15 Customer Support 16 Cleaning the LCD Display 17 Limited Warranty 18 ViewSonic VA1912w/VA1912wb
User Guide
Page 3
...saving mode after a certain time - chlorinated and brominated flame retardants and polymers b. heavy metals such as EMAS or ISO 14000 • Restrictions on our natural environment. This means that also minimizes the impact on a. Our labelling system started with scientists, experts, users as well as manufacturers all over the world. The display...sight and strain problems. Important parameters are luminance, contrast, resolution, reflectance, colour rendition and image stability. For more user-friendly direction. TCO Information Congratulations! This makes for recycling ...
...saving mode after a certain time - chlorinated and brominated flame retardants and polymers b. heavy metals such as EMAS or ISO 14000 • Restrictions on our natural environment. This means that also minimizes the impact on a. Our labelling system started with scientists, experts, users as well as manufacturers all over the world. The display...sight and strain problems. Important parameters are luminance, contrast, resolution, reflectance, colour rendition and image stability. For more user-friendly direction. TCO Information Congratulations! This makes for recycling ...

User Guide
Page 4
...included with the instructions, may cause harmful interference to which can radiate radio frequency energy, and if not installed and used in a particular installation. If this device. FCC Warning To assure continued FCC compliance, the user must use grounded power supply cord and the cables which are designed to part 15 of ...conforme à la norme NMB-003 du Canada. Also, any unauthorized changes or modifications not expressly approved by 93/68/EEC Art.13 with Canadian ICES-003. However, there is connected. • Consult the dealer or an experienced radio/TV technician for ...
...included with the instructions, may cause harmful interference to which can radiate radio frequency energy, and if not installed and used in a particular installation. If this device. FCC Warning To assure continued FCC compliance, the user must use grounded power supply cord and the cables which are designed to part 15 of ...conforme à la norme NMB-003 du Canada. Also, any unauthorized changes or modifications not expressly approved by 93/68/EEC Art.13 with Canadian ICES-003. However, there is connected. • Consult the dealer or an experienced radio/TV technician for ...
User Guide
Page 5
... your safety. Important Safety Instructions 1. Follow all warnings. 4. Install the equipment in a safe place. 3. Do not install near water. Heed all instructions. 5. Warning: To reduce the risk of fire or electric shock, do not expose this equipment near any heat sources such as : if the power-supply cord or plug is damaged, if liquid is used, use caution when moving the...
... your safety. Important Safety Instructions 1. Follow all warnings. 4. Install the equipment in a safe place. 3. Do not install near water. Heed all instructions. 5. Warning: To reduce the risk of fire or electric shock, do not expose this equipment near any heat sources such as : if the power-supply cord or plug is damaged, if liquid is used, use caution when moving the...
User Guide
Page 6
....viewsoniceurope.com 3. All rights reserved. VESA is concerned about the preservation of the Video Electronics Standards Association. For Your Records Product Name: Model Number: Document Number: Serial Number: Purchase Date: VA1912w/wb ViewSonic 19" LCD Display VS10866 VA1912w/wb-1_UG_ENG Rev. 1C 03-17-06 Product disposal at : www.viewsonic.com. USA: www.viewsonic.com/pdf/RecyclePlus.pdf 2. Disclaimer: ViewSonic Corporation shall not be copied...
....viewsoniceurope.com 3. All rights reserved. VESA is concerned about the preservation of the Video Electronics Standards Association. For Your Records Product Name: Model Number: Document Number: Serial Number: Purchase Date: VA1912w/wb ViewSonic 19" LCD Display VS10866 VA1912w/wb-1_UG_ENG Rev. 1C 03-17-06 Product disposal at : www.viewsonic.com. USA: www.viewsonic.com/pdf/RecyclePlus.pdf 2. Disclaimer: ViewSonic Corporation shall not be copied...

User Guide
Page 7
... the LCD panel, as it . • Place the LCD display in this user guide refers to reduce glare. • Always handle the LCD display with Windows operating systems, and the ICM file (Image Color Matching) ensures accurate on-screen colors. Package Contents Your LCD display package includes: • LCD display • Power cord • Audio cable (stereo mini jack) • Video cable • ViewSonic Wizard CD-ROM • Quick Start Guide NOTE: The CD includes the User Guide PDF files...
... the LCD panel, as it . • Place the LCD display in this user guide refers to reduce glare. • Always handle the LCD display with Windows operating systems, and the ICM file (Image Color Matching) ensures accurate on-screen colors. Package Contents Your LCD display package includes: • LCD display • Power cord • Audio cable (stereo mini jack) • Video cable • ViewSonic Wizard CD-ROM • Quick Start Guide NOTE: The CD includes the User Guide PDF files...
User Guide
Page 8
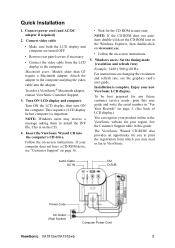
... install the INF file. Windows users: Set the timing mode (resolution and refresh rate) Example: 1440 x 900 @ 60 Hz. The ViewSonic Wizard CD-ROM also provides an opportunity for you to print the registration form which you may receive a message asking them to auto-start. Connect video cable • Make sure both the LCD display and computer are turned OFF • Remove rear panel covers if necessary • Connect the video cable from the LCD display...
... install the INF file. Windows users: Set the timing mode (resolution and refresh rate) Example: 1440 x 900 @ 60 Hz. The ViewSonic Wizard CD-ROM also provides an opportunity for you to print the registration form which you may receive a message asking them to auto-start. Connect video cable • Make sure both the LCD display and computer are turned OFF • Remove rear panel covers if necessary • Connect the video cable from the LCD display...

User Guide
Page 9
.... Lay the LCD display face down on a towel or blanket. 3. ViewSonic VA1912w/VA1912wb 6 Remove the Plastic Covers from inside the four VESA screw holes. 6. Remove the Rubber Plugs from the back of the LCD display. 4. Remove the four screws attaching the base. 5. Attach the mounting bracket from a deskmounted to the wall, following : Four VESA screw holes 1. Refer to the instructions that the Power button is turned Off, then disconnect the power cord. 2. Verify that...
.... Lay the LCD display face down on a towel or blanket. 3. ViewSonic VA1912w/VA1912wb 6 Remove the Plastic Covers from inside the four VESA screw holes. 6. Remove the Rubber Plugs from the back of the LCD display. 4. Remove the four screws attaching the base. 5. Attach the mounting bracket from a deskmounted to the wall, following : Four VESA screw holes 1. Refer to the instructions that the Power button is turned Off, then disconnect the power cord. 2. Verify that...
User Guide
Page 10
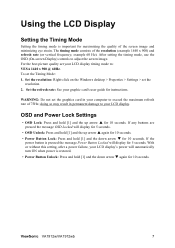
... to adjust the screen image. If any buttons are pressed the message OSD Locked will automatically turn ON when power is restored. • Power Button Unlock: Press and hold [1] and the down arrow T again for maximizing the quality of the resolution (example 1440 x 900) and refresh rate (or vertical frequency; With or without this setting, after a power failure, your LCD display. After setting the timing mode, use the OSD (On-screen Display) controls to exceed the maximum refresh rate...
... to adjust the screen image. If any buttons are pressed the message OSD Locked will automatically turn ON when power is restored. • Power Button Unlock: Press and hold [1] and the down arrow T again for maximizing the quality of the resolution (example 1440 x 900) and refresh rate (or vertical frequency; With or without this setting, after a power failure, your LCD display. After setting the timing mode, use the OSD (On-screen Display) controls to exceed the maximum refresh rate...
User Guide
Page 11
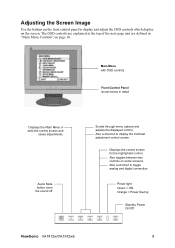
...analog and digital connection. Also toggles between two controls on the screen. Also a shortcut to display the Contrast adjustment control screen. Audio Mute button turns the sound off Scrolls through menu options and adjusts the displayed control. Adjusting the Screen Image Use the buttons on the front control panel to display and adjust the OSD controls which display on some screens. Displays the control screen for the highlighted control. Power light Green = ON Orange = Power Saving Standby Power On/Off ViewSonic VA1912w/VA1912wb 8 Main Menu with OSD controls Front Control...
...analog and digital connection. Also toggles between two controls on the screen. Also a shortcut to display the Contrast adjustment control screen. Audio Mute button turns the sound off Scrolls through menu options and adjusts the displayed control. Adjusting the Screen Image Use the buttons on the front control panel to display and adjust the OSD controls which display on some screens. Displays the control screen for the highlighted control. Power light Green = ON Orange = Power Saving Standby Power On/Off ViewSonic VA1912w/VA1912wb 8 Main Menu with OSD controls Front Control...
User Guide
Page 12
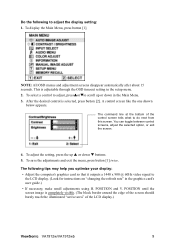
... may help you optimize your display: • Adjust the computer's graphics card so that it outputs a 1440 x 900 @ 60Hz video signal to the LCD display. (Look for instructions on "changing the refresh rate" in the graphics card's user guide.) • If necessary, make small adjustments using H. To adjust the setting, press the up or down T buttons. 5. To display the Main Menu, press button [1]. A control screen like the one shown below appears. POSITION until the screen image is selected, press button [2]. POSITION and...
... may help you optimize your display: • Adjust the computer's graphics card so that it outputs a 1440 x 900 @ 60Hz video signal to the LCD display. (Look for instructions on "changing the refresh rate" in the graphics card's user guide.) • If necessary, make small adjustments using H. To adjust the setting, press the up or down T buttons. 5. To display the Main Menu, press button [1]. A control screen like the one shown below appears. POSITION until the screen image is selected, press button [2]. POSITION and...
User Guide
Page 13
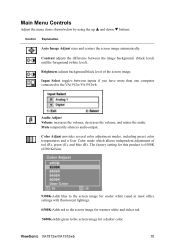
...darker color. Brightness adjusts background black level of red (R), green (G), and blue (B). Control Explanation Auto Image Adjust sizes and centers the screen image automatically. Color Adjust provides several color adjustment modes, including preset color temperatures and a User Color mode which allows independent adjustment of the screen image. ViewSonic VA1912w/VA1912wb 10 Input Select toggles between the image background (black level) and the foreground (white level). Main Menu Controls Adjust the menu items shown below by using the up S and down T buttons. Contrast adjusts the...
...darker color. Brightness adjusts background black level of red (R), green (G), and blue (B). Control Explanation Auto Image Adjust sizes and centers the screen image automatically. Color Adjust provides several color adjustment modes, including preset color temperatures and a User Color mode which allows independent adjustment of the screen image. ViewSonic VA1912w/VA1912wb 10 Input Select toggles between the image background (black level) and the foreground (white level). Main Menu Controls Adjust the menu items shown below by using the up S and down T buttons. Contrast adjusts the...

User Guide
Page 14
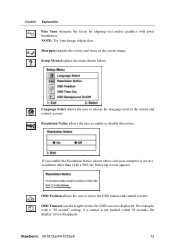
... card in the computer, the LCD model number, the serial number, and the ViewSonic® website URL. See your graphics card's user guide for red (R), green (G), and blue (B). 1. Manual Image Adjust Sub-menu H. ViewSonic VA1912w/VA1912wb 11 To select color (R, G or B) press button [2]. 2. Position (Horizontal/Vertical Position) moves the screen image left or right and up or down. Control Explanation 5000K-Adds blue and green to the 6500K factory preset. User Color Individual adjustments for instructions on changing the resolution and refresh rate (vertical frequency). NOTE: VESA...
... card in the computer, the LCD model number, the serial number, and the ViewSonic® website URL. See your graphics card's user guide for red (R), green (G), and blue (B). 1. Manual Image Adjust Sub-menu H. ViewSonic VA1912w/VA1912wb 11 To select color (R, G or B) press button [2]. 2. Position (Horizontal/Vertical Position) moves the screen image left or right and up or down. Control Explanation 5000K-Adds blue and green to the 6500K factory preset. User Color Individual adjustments for instructions on changing the resolution and refresh rate (vertical frequency). NOTE: VESA...
User Guide
Page 15
... computer is displayed. OSD Timeout sets the length of the screen image. Sharpness adjusts the clarity and focus of time the OSD screen is set at a resolution other than 1440 x 900, the following screen appears. NOTE: Try Auto Image Adjust first. Resolution Notice allows the user to choose the language used in the menus and control screens. For example, with pixel boundaries. OSD Position allows the user to move the OSD menus and control screens. ViewSonic VA1912w/VA1912wb...
... computer is displayed. OSD Timeout sets the length of the screen image. Sharpness adjusts the clarity and focus of time the OSD screen is set at a resolution other than 1440 x 900, the following screen appears. NOTE: Try Auto Image Adjust first. Resolution Notice allows the user to choose the language used in the menus and control screens. For example, with pixel boundaries. OSD Position allows the user to move the OSD menus and control screens. ViewSonic VA1912w/VA1912wb...
User Guide
Page 16
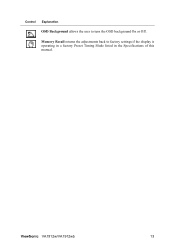
ViewSonic VA1912w/VA1912wb 13 Memory Recall returns the adjustments back to turn the OSD background On or Off. Control Explanation OSD Background allows the user to factory settings if the display is operating in a factory Preset Timing Mode listed in the Specifications of this manual.
ViewSonic VA1912w/VA1912wb 13 Memory Recall returns the adjustments back to turn the OSD background On or Off. Control Explanation OSD Background allows the user to factory settings if the display is operating in a factory Preset Timing Mode listed in the Specifications of this manual.
User Guide
Page 17
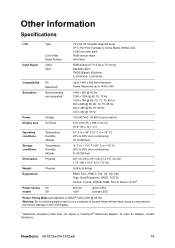
... Color Filter Glass Surface 19" (full 19" viewable diagonal area), TFT (Thin Film Transistor), Active Matrix WXGA LCD, 0.285 mm pixel pitch RGB vertical stripe Anti-Glare Input Signal Video Sync RGB analog (0.7/1.0 Vp-p, 75 ohms) Separate Sync, TMDS Digital (100ohms) fh:30-82 kHz, fv:50-85 Hz Compatibility PC Macintosh1 Up to 1440 x 900 Non-interlaced Power Macintosh up to 1440 x 900 Resolution Recommended and supported...
... Color Filter Glass Surface 19" (full 19" viewable diagonal area), TFT (Thin Film Transistor), Active Matrix WXGA LCD, 0.285 mm pixel pitch RGB vertical stripe Anti-Glare Input Signal Video Sync RGB analog (0.7/1.0 Vp-p, 75 ohms) Separate Sync, TMDS Digital (100ohms) fh:30-82 kHz, fv:50-85 Hz Compatibility PC Macintosh1 Up to 1440 x 900 Non-interlaced Power Macintosh up to 1440 x 900 Resolution Recommended and supported...

User Guide
Page 18
... the LCD display. • Adjust brightness and contrast. • If you need a Macintosh adapter. Control buttons do not work • Press only one button at a time. Troubleshooting No power • Make sure power button (or switch) is ON. • Make sure A/C power cord is securely connected to the LCD display. • Plug another computer. • If you have an older graphics card, contact ViewSonic® for a non-DDC adapter. Wrong or abnormal colors • If any colors (red, green, or blue) are using...
... the LCD display. • Adjust brightness and contrast. • If you need a Macintosh adapter. Control buttons do not work • Press only one button at a time. Troubleshooting No power • Make sure power button (or switch) is ON. • Make sure A/C power cord is securely connected to the LCD display. • Plug another computer. • If you have an older graphics card, contact ViewSonic® for a non-DDC adapter. Wrong or abnormal colors • If any colors (red, green, or blue) are using...
User Guide
Page 19
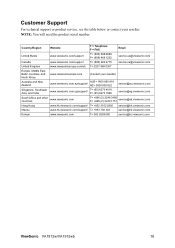
... will need the product serial number. Customer Support For technical support or product service, see the table below or contact your reseller) Australia and New Zealand AUS= 1800 880 818 www.viewsonic.com.au/support/ NZ= 0800 008 822 service@au.viewsonic.com Singapore, Southeast Asia, and India T= (65) 6273 4018 www.viewsonic.com.sg/support/ F= (65) 6273 1566 service@sg.viewsonic.com South...
... will need the product serial number. Customer Support For technical support or product service, see the table below or contact your reseller) Australia and New Zealand AUS= 1800 880 818 www.viewsonic.com.au/support/ NZ= 0800 008 822 service@au.viewsonic.com Singapore, Southeast Asia, and India T= (65) 6273 4018 www.viewsonic.com.sg/support/ F= (65) 6273 1566 service@sg.viewsonic.com South...

User Guide
Page 20
... from use of any ammonia or alcohol-based cleaners on the LCD display screen or case. ViewSonic VA1912w/VA1912wb 17 Cleaning the LCD Display • MAKE SURE THE LCD DISPLAY IS TURNED OFF. • NEVER SPRAY OR POUR ANY LIQUID DIRECTLY ONTO THE SCREEN OR CASE. This removes dust and other particles. 2. To clean the case: 1. Use a soft, dry cloth. 2. To clean the screen: 1. Wipe the screen with a clean, soft, lint-free...
... from use of any ammonia or alcohol-based cleaners on the LCD display screen or case. ViewSonic VA1912w/VA1912wb 17 Cleaning the LCD Display • MAKE SURE THE LCD DISPLAY IS TURNED OFF. • NEVER SPRAY OR POUR ANY LIQUID DIRECTLY ONTO THE SCREEN OR CASE. This removes dust and other particles. 2. To clean the case: 1. Use a soft, dry cloth. 2. To clean the screen: 1. Wipe the screen with a clean, soft, lint-free...
User Guide
Page 21
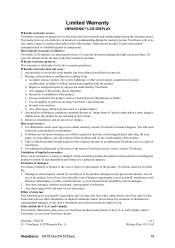
... displayed on implied warranties and/or do not allow limitations on the product for : 1. What the warranty does not cover: 1. Use of 1 Release Date: 03-31-05 ViewSonic VA1912w/VA1912wb 18 Warranty_VSLCD 4.3: ViewSonic LCD Warranty Rev. 1c 1 of supplies or parts not meeting ViewSonic's specifications. Accident, misuse, neglect, fire, water, lightning, or other damages, whether incidental, consequential or otherwise. 3. h. Removal, installation, and set...
... displayed on implied warranties and/or do not allow limitations on the product for : 1. What the warranty does not cover: 1. Use of 1 Release Date: 03-31-05 ViewSonic VA1912w/VA1912wb 18 Warranty_VSLCD 4.3: ViewSonic LCD Warranty Rev. 1c 1 of supplies or parts not meeting ViewSonic's specifications. Accident, misuse, neglect, fire, water, lightning, or other damages, whether incidental, consequential or otherwise. 3. h. Removal, installation, and set...


