User Guide
Page 1
... manual" Model No. VA1911a-LED/VA1911ma-LED LCD Display User Guide IMPORTANT: Please read this User Guide will describe your product for future service. Warranty information contained in this User Guide to obtain important information on installing and using your product in a safe manner, as well as registering your limited coverage from ViewSonic Corporation, which is also found on our web site at http:// www.viewsonic.com in English...
... manual" Model No. VA1911a-LED/VA1911ma-LED LCD Display User Guide IMPORTANT: Please read this User Guide will describe your product for future service. Warranty information contained in this User Guide to obtain important information on installing and using your product in a safe manner, as well as registering your limited coverage from ViewSonic Corporation, which is also found on our web site at http:// www.viewsonic.com in English...
User Guide
Page 2
Contents Compliance Information 1 Important Safety Instructions 2 Declaration of RoHS Compliance 3 Copyright Information 4 Product Registration 4 Getting Started Package Contents 5 Precautions 5 Quick Installation 6 Wall Mounting (Optional 7 Using the LCD Display Setting the Timing Mode 8 OSD and Power Lock Settings 8 Adjusting the Screen Image 9 Main Menu Controls 12 Other Information Specifications 16 Troubleshooting 17 Customer Support 18 Cleaning the LCD Display 19 Limited Warranty 20 Mexico Limited Warranty 22
Contents Compliance Information 1 Important Safety Instructions 2 Declaration of RoHS Compliance 3 Copyright Information 4 Product Registration 4 Getting Started Package Contents 5 Precautions 5 Quick Installation 6 Wall Mounting (Optional 7 Using the LCD Display Setting the Timing Mode 8 OSD and Power Lock Settings 8 Adjusting the Screen Image 9 Main Menu Controls 12 Other Information Specifications 16 Troubleshooting 17 Customer Support 18 Cleaning the LCD Display 19 Limited Warranty 20 Mexico Limited Warranty 22

User Guide
Page 3
...any interference received, including interference that to which can radiate radio frequency energy, and if not installed and used in a residential installation. CE Conformity for European Countries The device complies with part 15 of the following two conditions: (1) this device may not ... connected. • Consult the dealer or an experienced radio/TV technician for compliance could void your authority to radio communications. Compliance Information For U.S.A. Warning: You are designed to local law. 1 For Canada This Class B digital apparatus complies with the instructions,...
...any interference received, including interference that to which can radiate radio frequency energy, and if not installed and used in a residential installation. CE Conformity for European Countries The device complies with part 15 of the following two conditions: (1) this device may not ... connected. • Consult the dealer or an experienced radio/TV technician for compliance could void your authority to radio communications. Compliance Information For U.S.A. Warning: You are designed to local law. 1 For Canada This Class B digital apparatus complies with the instructions,...

User Guide
Page 4
... is required, see "Cleaning the Display" in a safe place. 3. Heed all instructions. 5. Do not use this apparatus to avoid injury from the equipment. Do not install near any ventilation openings. A polarized plug has two blades with the equipment. Keep these instructions completely before using the equipment. 2. Do not block any heat sources such as : if the power-supply cord or plug is damaged, if liquid...
... is required, see "Cleaning the Display" in a safe place. 3. Heed all instructions. 5. Do not use this apparatus to avoid injury from the equipment. Do not install near any ventilation openings. A polarized plug has two blades with the equipment. Keep these instructions completely before using the equipment. 2. Do not block any heat sources such as : if the power-supply cord or plug is damaged, if liquid...
User Guide
Page 6
..., Greener Computing. Product Name: Model Number: Document Number: Serial Number: Purchase Date: For Your Records VA1911a/ma-LED ViewSonic Widescreen LCD Display VS14755 VA1911a/ma-LED-1_UG_ENG Rev. 1B 07-03-12 Product disposal at : www.viewsonic.com. The ViewSonic Wizard CD-ROM also provides an opportunity for you to working and living green. Copyright Information Copyright © ViewSonic® Corporation, 2012. VESA is a registered trademark of the...
..., Greener Computing. Product Name: Model Number: Document Number: Serial Number: Purchase Date: For Your Records VA1911a/ma-LED ViewSonic Widescreen LCD Display VS14755 VA1911a/ma-LED-1_UG_ENG Rev. 1B 07-03-12 Product disposal at : www.viewsonic.com. The ViewSonic Wizard CD-ROM also provides an opportunity for you to working and living green. Copyright Information Copyright © ViewSonic® Corporation, 2012. VESA is a registered trademark of the...
User Guide
Page 7
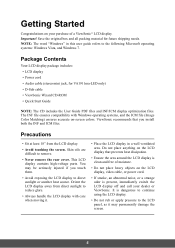
... the LCD display in this user guide refers to remove. • Never remove the rear cover. You may permanently damage the screen. 5 Orient the LCD display away from the LCD display. • Avoid touching the screen. Important! Save the original box and all packing material for VA1911ma-LED only) • D-Sub cable • ViewSonic Wizard CD-ROM • Quick Start Guide NOTE: The CD includes the User Guide PDF files and INF/ICM display optimization files...
... the LCD display in this user guide refers to remove. • Never remove the rear cover. You may permanently damage the screen. 5 Orient the LCD display away from the LCD display. • Avoid touching the screen. Important! Save the original box and all packing material for VA1911ma-LED only) • D-Sub cable • ViewSonic Wizard CD-ROM • Quick Start Guide NOTE: The CD includes the User Guide PDF files and INF/ICM display optimization files...
User Guide
Page 8
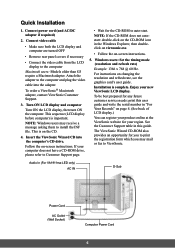
... and plug the video cable into the computer's CD drive. If your region. Audio In (For VA1911ma-LED only) AC IN D-Sub Power Cord AC Outlet (Wall Socket) Computer Power Cord 6 Connect video cable • Make sure both the LCD display and computer are turned OFF • Remove rear panel covers if necessary • Connect the video cable from the LCD display to install the INF file. Attach the adapter to ViewSonic. To order a ViewSonic® Macintosh adapter, contact ViewSonic Customer Support...
... and plug the video cable into the computer's CD drive. If your region. Audio In (For VA1911ma-LED only) AC IN D-Sub Power Cord AC Outlet (Wall Socket) Computer Power Cord 6 Connect video cable • Make sure both the LCD display and computer are turned OFF • Remove rear panel covers if necessary • Connect the video cable from the LCD display to install the INF file. Attach the adapter to ViewSonic. To order a ViewSonic® Macintosh adapter, contact ViewSonic Customer Support...

User Guide
Page 9
... Wall Mount Bracket To obtain a wall-mounting kit or height adjustment base, contact ViewSonic® or your LCD display from the VESA compatible wall mounting kit (100 mm x 100 mm distance), using screws of correct length. Step 2. Lay the LCD display face down on a towel or blanket. Remove the two screws attaching the base. Attach the mounting bracket from a desk-mounted to a wall-mounted display, do the following the instructions in the wall-mounting kit. Step 3. Step 4. Wall Mounting (Optional) For use...
... Wall Mount Bracket To obtain a wall-mounting kit or height adjustment base, contact ViewSonic® or your LCD display from the VESA compatible wall mounting kit (100 mm x 100 mm distance), using screws of correct length. Step 2. Lay the LCD display face down on a towel or blanket. Remove the two screws attaching the base. Attach the mounting bracket from a desk-mounted to a wall-mounted display, do the following the instructions in the wall-mounting kit. Step 3. Step 4. Wall Mounting (Optional) For use...

User Guide
Page 10
... pressed the message OSD Locked will automatically turn ON when power is restored. • Power Button Unlock: Press and hold [1] and the up arrow S for 3 seconds. example 60 Hz). For the best picture quality set the Timing Mode: 1. To set your graphic card's user guide for maximizing the quality of the resolution (example 1366 x 768) and refresh rate (or vertical frequency; With or without this setting, after a power failure, your LCD display. doing so...
... pressed the message OSD Locked will automatically turn ON when power is restored. • Power Button Unlock: Press and hold [1] and the up arrow S for 3 seconds. example 60 Hz). For the best picture quality set the Timing Mode: 1. To set your graphic card's user guide for maximizing the quality of the resolution (example 1366 x 768) and refresh rate (or vertical frequency; With or without this setting, after a power failure, your LCD display. doing so...
User Guide
Page 11
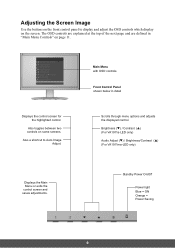
... 11. Also toggles between two controls on some screens. The OSD controls are explained at the top of the next page and are defined in detail Scrolls through menu options and adjusts the displayed control. Displays the control screen for the highlighted control. Also a shortcut to display and adjust the OSD controls which display on the screen. Standby Power On/Off Power light Blue = ON Orange = Power Saving 9 Adjusting the Screen Image Use the buttons on the front control panel to Auto Image Adjust.
... 11. Also toggles between two controls on some screens. The OSD controls are explained at the top of the next page and are defined in detail Scrolls through menu options and adjusts the displayed control. Displays the control screen for the highlighted control. Also a shortcut to display and adjust the OSD controls which display on the screen. Standby Power On/Off Power light Blue = ON Orange = Power Saving 9 Adjusting the Screen Image Use the buttons on the front control panel to Auto Image Adjust.
User Guide
Page 12
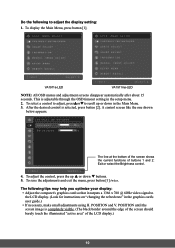
.... (The black border around the edge of the screen should barely touch the illuminated "active area" of buttons 1 and 2: Exit or select the Brightness control. 4. Do the following tips may help you optimize your display: • Adjust the computer's graphics card so that it outputs a 1366 x 768 @ 60Hz video signal to the LCD display. (Look for instructions on "changing the refresh rate" in the graphics card's user guide.) • If necessary, make small adjustments using...
.... (The black border around the edge of the screen should barely touch the illuminated "active area" of buttons 1 and 2: Exit or select the Brightness control. 4. Do the following tips may help you optimize your display: • Adjust the computer's graphics card so that it outputs a 1366 x 768 @ 60Hz video signal to the LCD display. (Look for instructions on "changing the refresh rate" in the graphics card's user guide.) • If necessary, make small adjustments using...

User Guide
Page 13
... resolution to obtain a sharper image. NOTE: Auto Image Adjust works with most common video cards. Audio Adjust (For VA1911ma-LED only) Volume increases the volume, decreases the volume, and mutes the audio. Main Menu Controls Adjust the menu items shown below by using the up S and down T buttons. Press the [2] button to its pre-set value. Mute temporarily silences audio output. 11 Contrast adjusts the difference between the image background (black level) and the foreground (white level). Control Explanation Auto Image Adjust automatically sizes...
... resolution to obtain a sharper image. NOTE: Auto Image Adjust works with most common video cards. Audio Adjust (For VA1911ma-LED only) Volume increases the volume, decreases the volume, and mutes the audio. Main Menu Controls Adjust the menu items shown below by using the up S and down T buttons. Press the [2] button to its pre-set value. Mute temporarily silences audio output. 11 Contrast adjusts the difference between the image background (black level) and the foreground (white level). Control Explanation Auto Image Adjust automatically sizes...
User Guide
Page 14
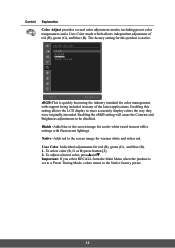
... red (R), green (G), and blue (B). 1. Bluish -Adds blue to the screen image for this setting allows the LCD display to be disabled. To adjust selected color, pressSandT. User Color Individual adjustments for warmer white and richer red. Important: If you select RECALL from the Main Menu when the product is native. Enabling the sRGB setting will cause the Contrast and Brightness adjustments to more accurately display colors the way they were originally intended. The factory setting for cooler white (used...
... red (R), green (G), and blue (B). 1. Bluish -Adds blue to the screen image for this setting allows the LCD display to be disabled. To adjust selected color, pressSandT. User Color Individual adjustments for warmer white and richer red. Important: If you select RECALL from the Main Menu when the product is native. Enabling the sRGB setting will cause the Contrast and Brightness adjustments to more accurately display colors the way they were originally intended. The factory setting for cooler white (used...

User Guide
Page 15
... down. Manual Image Adjust displays the Manual Image Adjust menu. H./V. H. NOTE: VESA 1366 x 768 @ 60Hz (recommended) means that the resolution is 1366 x 768 and the refresh rate is 60 Hertz. Sharpness adjusts the clarity and focus of the screen image. Control Explanation Information displays the timing mode (video signal input) coming from the graphics card in the computer, the LCD model number, the serial number, and the ViewSonic® website URL. See your graphics card's user guide for instructions on changing the resolution and refresh rate (vertical frequency).
... down. Manual Image Adjust displays the Manual Image Adjust menu. H./V. H. NOTE: VESA 1366 x 768 @ 60Hz (recommended) means that the resolution is 1366 x 768 and the refresh rate is 60 Hertz. Sharpness adjusts the clarity and focus of the screen image. Control Explanation Information displays the timing mode (video signal input) coming from the graphics card in the computer, the LCD model number, the serial number, and the ViewSonic® website URL. See your graphics card's user guide for instructions on changing the resolution and refresh rate (vertical frequency).
User Guide
Page 16
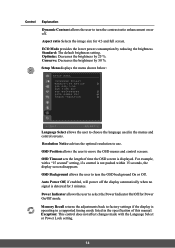
... default brightness setting. OSD Position allows the user to choose the language used in the specification of this manual. Aspect ratio Selects the image size for Power On/Off mode. Optimize: Decreases the brightness by reducing the brightness. Setup Menu displays the menu shown below: Language Select allows the user to move the OSD menus and control screens. OSD Background allows the user to turn the contrast ratio enhancement on or off the display automatically when no signal is detected for 3 minutes. Auto Power...
... default brightness setting. OSD Position allows the user to choose the language used in the specification of this manual. Aspect ratio Selects the image size for Power On/Off mode. Optimize: Decreases the brightness by reducing the brightness. Setup Menu displays the menu shown below: Language Select allows the user to move the OSD menus and control screens. OSD Background allows the user to turn the contrast ratio enhancement on or off the display automatically when no signal is detected for 3 minutes. Auto Power...

User Guide
Page 17
...Specifications LCD Type Display Size Color Filter Glass Surface TFT (Thin Film Transistor), Active Matrix 1366 x 768 LCD, 0.3 mm pixel pitch Metric: 48 cm Imperial: 19" (18.5" viewable) RGB vertical stripe Anti-Glare Input Signal Video Sync Compatibility PC Macintosh1 RGB analog (0.7/1.0 Vp-p, 75 ohms) Separate Sync fh:24-82 kHz, fv:50-75 Hz Up to 1366 x 768 Non-interlaced Power Macintosh up to 1366 x 768 Resolution Recommended and supported... Weight Physical 6.26 lb (2.84 kg) Power saving On modes Off 15W (Typical) (VA1911a-LED) (blue LED) 18W (Typical) (VA1911ma-LED) (blue LED)
...Specifications LCD Type Display Size Color Filter Glass Surface TFT (Thin Film Transistor), Active Matrix 1366 x 768 LCD, 0.3 mm pixel pitch Metric: 48 cm Imperial: 19" (18.5" viewable) RGB vertical stripe Anti-Glare Input Signal Video Sync Compatibility PC Macintosh1 RGB analog (0.7/1.0 Vp-p, 75 ohms) Separate Sync fh:24-82 kHz, fv:50-75 Hz Up to 1366 x 768 Non-interlaced Power Macintosh up to 1366 x 768 Resolution Recommended and supported... Weight Physical 6.26 lb (2.84 kg) Power saving On modes Off 15W (Typical) (VA1911a-LED) (blue LED) 18W (Typical) (VA1911ma-LED) (blue LED)

User Guide
Page 18
Troubleshooting No power • Make sure power button (or switch) is ON. • Make sure A/C power cord is securely connected to the LCD display. • Plug another computer. • If you need a Macintosh adapter. Control buttons do not work • Press only one button at a time. 16 Power is ON but no screen image • Make sure the video cable supplied with the LCD display is tightly secured to the video output port on the back of the video cable is not attached...
Troubleshooting No power • Make sure power button (or switch) is ON. • Make sure A/C power cord is securely connected to the LCD display. • Plug another computer. • If you need a Macintosh adapter. Control buttons do not work • Press only one button at a time. 16 Power is ON but no screen image • Make sure the video cable supplied with the LCD display is tightly secured to the video output port on the back of the video cable is not attached...

User Guide
Page 20
... damage resulting from use of any ammonia or alcohol-based cleaners on the LCD display screen or case. If the screen still not clean, apply a small amount of a non-ammonia, non-alcohol based, mild non-abrasive detergent onto a clean, soft, lint-free cloth, then wipe the surface. Wipe the screen with a clean, soft, lint-free cloth. Cleaning the LCD Display • MAKE SURE THE LCD DISPLAY IS TURNED OFF. •...
... damage resulting from use of any ammonia or alcohol-based cleaners on the LCD display screen or case. If the screen still not clean, apply a small amount of a non-ammonia, non-alcohol based, mild non-abrasive detergent onto a clean, soft, lint-free cloth, then wipe the surface. Wipe the screen with a clean, soft, lint-free cloth. Cleaning the LCD Display • MAKE SURE THE LCD DISPLAY IS TURNED OFF. •...

User Guide
Page 21
... follow instructions supplied with a like product. Replacement product or parts may include remanufactured or refurbished parts or components. What the warranty does not cover: 1. Any product on the product for the first consumer purchaser. Accident, misuse, neglect, fire, water, lightning, or other cause which the serial number has been defaced, modified or removed. 2. Any damage of supplies or parts not meeting ViewSonic's specifications. c. d. Removal, installation...
... follow instructions supplied with a like product. Replacement product or parts may include remanufactured or refurbished parts or components. What the warranty does not cover: 1. Any product on the product for the first consumer purchaser. Accident, misuse, neglect, fire, water, lightning, or other cause which the serial number has been defaced, modified or removed. 2. Any damage of supplies or parts not meeting ViewSonic's specifications. c. d. Removal, installation...
User Guide
Page 23
...; DISPLAY PRODUCTS What the warranty covers: ViewSonic warrants its sole option, repair or replace the product with the product. Replacement product or parts may include remanufactured or refurbished parts or components & accessories. Any damage of supplies or parts not meeting ViewSonic's specifications. You will need to provide your product's serial number, so please record the product information in material and workmanship, under warranty, contact ViewSonic Customer Support...
...; DISPLAY PRODUCTS What the warranty covers: ViewSonic warrants its sole option, repair or replace the product with the product. Replacement product or parts may include remanufactured or refurbished parts or components & accessories. Any damage of supplies or parts not meeting ViewSonic's specifications. You will need to provide your product's serial number, so please record the product information in material and workmanship, under warranty, contact ViewSonic Customer Support...


