

User Guide
Page 1
...instrucciones en este manual" Model No. Warranty information contained in this User Guide to obtain important information on our web site at http://www.viewsonic.com in English, or in specific languages using your product for future service. VS17978 P/N: TD2455 TD2455 Display User Guide ...IMPORTANT: Please read this User Guide will describe your limited coverage from ViewSonic® Corporation, which is also found on installing and using the Regional selection ...
...instrucciones en este manual" Model No. Warranty information contained in this User Guide to obtain important information on our web site at http://www.viewsonic.com in English, or in specific languages using your product for future service. VS17978 P/N: TD2455 TD2455 Display User Guide ...IMPORTANT: Please read this User Guide will describe your limited coverage from ViewSonic® Corporation, which is also found on installing and using the Regional selection ...
User Guide
Page 25
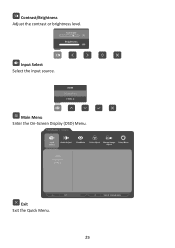
TD2455 Input Select Audio Adjust ViewMode Color Adjust Manual Image Setup Menu Adjust HDMI DisplayPort TYPE C Exit Exit the Quick Menu. 1920 X 1080 @ 60Hz 25 Main Menu Exit Contrast/Brightness Adjust the contrast or brightness level. s HDMI DisplayPort TYPE C Main Menu Enter the On-Screen Display (OSD) Menu. mode ast/Brightness Select Menu Contrast 70 Brightness 100 Input Select Select the input source.
TD2455 Input Select Audio Adjust ViewMode Color Adjust Manual Image Setup Menu Adjust HDMI DisplayPort TYPE C Exit Exit the Quick Menu. 1920 X 1080 @ 60Hz 25 Main Menu Exit Contrast/Brightness Adjust the contrast or brightness level. s HDMI DisplayPort TYPE C Main Menu Enter the On-Screen Display (OSD) Menu. mode ast/Brightness Select Menu Contrast 70 Brightness 100 Input Select Select the input source.

User Guide
Page 28
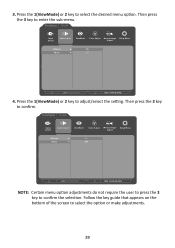
Then press the 4 key to display the Quick Menu. Press the 2/3/4/5 key to display the OSD Menu. Then press the 3 key to select the main menu. TD2455 Input Select Audio Adjust ViewMode Color Adjust Manual Image Setup Menu Adjust HDMI DisplayPort TYPE C 1920 X 1080 @ 60Hz 2. TD2455 Input Select Audio Adjust ViewMode Color Adjust Manual Image Setup Menu Adjust Volume 50 Mute 28 1920 x 1080 @ 60Hz Mute Off Mute Configuring the Settings General Operations 1920 X 1080@60Hz 1920 X 1080@60Hz Key Guide 1. Press the 1(ViewMode) or 2 key to enter the selected menu.
Then press the 4 key to display the Quick Menu. Press the 2/3/4/5 key to display the OSD Menu. Then press the 3 key to select the main menu. TD2455 Input Select Audio Adjust ViewMode Color Adjust Manual Image Setup Menu Adjust HDMI DisplayPort TYPE C 1920 X 1080 @ 60Hz 2. TD2455 Input Select Audio Adjust ViewMode Color Adjust Manual Image Setup Menu Adjust Volume 50 Mute 28 1920 x 1080 @ 60Hz Mute Off Mute Configuring the Settings General Operations 1920 X 1080@60Hz 1920 X 1080@60Hz Key Guide 1. Press the 1(ViewMode) or 2 key to enter the selected menu.
User Guide
Page 29
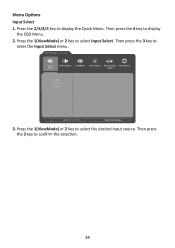
TD2455 Input Select Audio Adjust ViewMode Color Adjust Manual Image Setup Menu Adjust Volume On Mute Off 1920 x 1080 @ 60Hz 4. Then press the 3 key to adjust/select the setting. Press the 1(ViewMode) or 2 key .... Then press the 3 key to select the option or make adjustments. 29 Press the 1(ViewMode) or 2 key to confirm the selection. 3. TD2455 Input Select Audio Adjust ViewMode Color Adjust Manual Image Setup Menu Adjust Volume On Mute Off 1920 x 1080 @ 60Hz NOTE:Certain menu option adjustments do not require the user to...
TD2455 Input Select Audio Adjust ViewMode Color Adjust Manual Image Setup Menu Adjust Volume On Mute Off 1920 x 1080 @ 60Hz 4. Then press the 3 key to adjust/select the setting. Press the 1(ViewMode) or 2 key .... Then press the 3 key to select the option or make adjustments. 29 Press the 1(ViewMode) or 2 key to confirm the selection. 3. TD2455 Input Select Audio Adjust ViewMode Color Adjust Manual Image Setup Menu Adjust Volume On Mute Off 1920 x 1080 @ 60Hz NOTE:Certain menu option adjustments do not require the user to...

User Guide
Page 30
TD2455 Input Select Audio Adjust ViewMode Color Adjust Manual Image Setup Menu Adjust Volume On Mute Off TD2455 Input Select Audio Adjust ViewMode Color Adjust Manual Image Setup Menu Adjust Volume 50 Mute 1920 x 1080 @ 60Hz Key Guide 5. Press the 4 key to return to the previous menu. NOTE:To exit the OSD Menu, press the 5 key. 1920 x 1080 @ 60Hz Key Guide 30
TD2455 Input Select Audio Adjust ViewMode Color Adjust Manual Image Setup Menu Adjust Volume On Mute Off TD2455 Input Select Audio Adjust ViewMode Color Adjust Manual Image Setup Menu Adjust Volume 50 Mute 1920 x 1080 @ 60Hz Key Guide 5. Press the 4 key to return to the previous menu. NOTE:To exit the OSD Menu, press the 5 key. 1920 x 1080 @ 60Hz Key Guide 30

User Guide
Page 32
Main Menu Manual Image Adjust Sub-menu Sharpness Dynamic Contrast Menu Option (-/+, 0/25/50/75/100) (-/+, 0~100) Setup Menu Response Time Aspect Ratio Overscan Low Input Lag Blue Light Filter Language Select Resolution Notice Information OSD Timeout OSD Background OSD Pivot Standard Advanced Ultra Fast 4:3 Full Screen On Off On Off (-/+, 0~100) English Français Deutsch Español Italiano Suomi Türkçe eská Svenska On Off (-/+, 5/15/30/60) On Off 0° +90° -90° 32
Main Menu Manual Image Adjust Sub-menu Sharpness Dynamic Contrast Menu Option (-/+, 0/25/50/75/100) (-/+, 0~100) Setup Menu Response Time Aspect Ratio Overscan Low Input Lag Blue Light Filter Language Select Resolution Notice Information OSD Timeout OSD Background OSD Pivot Standard Advanced Ultra Fast 4:3 Full Screen On Off On Off (-/+, 0~100) English Français Deutsch Español Italiano Suomi Türkçe eská Svenska On Off (-/+, 5/15/30/60) On Off 0° +90° -90° 32
User Guide
Page 34
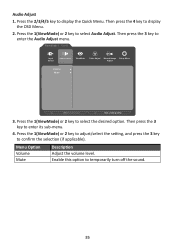
Press the 2/3/4/5 key to display the OSD Menu. 2. Then press the 4 key to display the Quick Menu. Then press the 3 key to select Input Select. Press the 1(ViewMode) or 2 key to enter the Input Select menu. TD2455 Input Select Audio Adjust ViewMode Color Adjust Manual Image Setup Menu Adjust HDMI DisplayPort TYPE C 1920 X 1080 @ 60Hz 3. Press the 1(ViewMode) or 2 key to confirm the selection. 34 Then press the 3 key to select the desired input source. Menu Options Input Select 1.
Press the 2/3/4/5 key to display the OSD Menu. 2. Then press the 4 key to display the Quick Menu. Then press the 3 key to select Input Select. Press the 1(ViewMode) or 2 key to enter the Input Select menu. TD2455 Input Select Audio Adjust ViewMode Color Adjust Manual Image Setup Menu Adjust HDMI DisplayPort TYPE C 1920 X 1080 @ 60Hz 3. Press the 1(ViewMode) or 2 key to confirm the selection. 34 Then press the 3 key to select the desired input source. Menu Options Input Select 1.
User Guide
Page 35
Press the 2/3/4/5 key to confirm the selection (if applicable). TD2455 Input Select Audio Adjust ViewMode Color Adjust Manual Image Setup Menu Adjust Volume Mute 1920 x 1080 @ 60Hz 3. Press the 1(ViewMode) or 2 key to adjust/select the setting, and press the 3 key to display ...
Press the 2/3/4/5 key to confirm the selection (if applicable). TD2455 Input Select Audio Adjust ViewMode Color Adjust Manual Image Setup Menu Adjust Volume Mute 1920 x 1080 @ 60Hz 3. Press the 1(ViewMode) or 2 key to adjust/select the setting, and press the 3 key to display ...

User Guide
Page 36
... to Mac computers. Then press the 4 key to enter the ViewMode menu. Then press the 3 key to display the OSD Menu. 2. TD2455 Input Select Audio Adjust ViewMode Color Adjust Manual Image Setup Menu Adjust Off Office Movie MAC Mono Game 1920 X 1080 @ 60Hz 3. Then press the 3 key to select the setting. Select...
... to Mac computers. Then press the 4 key to enter the ViewMode menu. Then press the 3 key to display the OSD Menu. 2. TD2455 Input Select Audio Adjust ViewMode Color Adjust Manual Image Setup Menu Adjust Off Office Movie MAC Mono Game 1920 X 1080 @ 60Hz 3. Then press the 3 key to select the setting. Select...

User Guide
Page 37
... Menu. Press the 1(ViewMode) or 2 key to select Color Adjust. Follow the key guide that appears on the user's custom settings. 1. TD2455 Input Select Audio Adjust ViewMode Color Adjust Manual Image Setup Menu Adjust Contrast/Brightness Color Temperature Color Space Color Range 1920 X 1080 @ 60Hz 3. To enter the respective sub-menu, press...
... Menu. Press the 1(ViewMode) or 2 key to select Color Adjust. Follow the key guide that appears on the user's custom settings. 1. TD2455 Input Select Audio Adjust ViewMode Color Adjust Manual Image Setup Menu Adjust Contrast/Brightness Color Temperature Color Space Color Range 1920 X 1080 @ 60Hz 3. To enter the respective sub-menu, press...
User Guide
Page 38
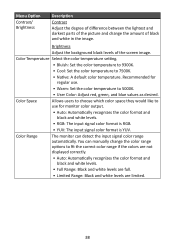
.... • User Color: Adjust red, green, and blue values as desired. You can detect the input signal color range automatically. Color Range The monitor can manually change the amount of the screen image.
.... • User Color: Adjust red, green, and blue values as desired. You can detect the input signal color range automatically. Color Range The monitor can manually change the amount of the screen image.

User Guide
Page 39
...Press the 1(ViewMode) or 2 key to adjust/select the setting. Press the 1(ViewMode) or 2 key to select Manual Image Adjust. Menu Option Description Sharpness Adjust the picture quality. Response Time Adjusts the response time, creating smooth images ..., or ghosting. Overscan Automatically enlarge the original picture horizontally and vertically to enter the Manual Image Adjust menu. Manual Image Adjust Menu 1. TD2455 Input Select Audio Adjust ViewMode Color Adjust Manual Image Setup Menu Adjust Sharpness Dynamic Contrast Response Time Aspect Ratio Overscan Low Input Lag Blue...
...Press the 1(ViewMode) or 2 key to adjust/select the setting. Press the 1(ViewMode) or 2 key to select Manual Image Adjust. Menu Option Description Sharpness Adjust the picture quality. Response Time Adjusts the response time, creating smooth images ..., or ghosting. Overscan Automatically enlarge the original picture horizontally and vertically to enter the Manual Image Adjust menu. Manual Image Adjust Menu 1. TD2455 Input Select Audio Adjust ViewMode Color Adjust Manual Image Setup Menu Adjust Sharpness Dynamic Contrast Response Time Aspect Ratio Overscan Low Input Lag Blue...
User Guide
Page 40
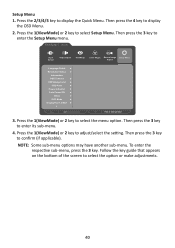
... 3 key. Setup Menu 1. Then press the 3 key to select the menu option. Then press the 3 key to display the OSD Menu. 2. TD2455 Input Select Audio Adjust ViewMode Color Adjust Manual Image Setup Menu Adjust Language Select Resolution Notice Information OSD Timeout OSD Background OSD Pivot Power Indicator Auto Power Off Sleep ECO...
... 3 key. Setup Menu 1. Then press the 3 key to select the menu option. Then press the 3 key to display the OSD Menu. 2. TD2455 Input Select Audio Adjust ViewMode Color Adjust Manual Image Setup Menu Adjust Language Select Resolution Notice Information OSD Timeout OSD Background OSD Pivot Power Indicator Auto Power Off Sleep ECO...

User Guide
Page 44
... will automatically switch to make the black blacker in a dark scene, and make the white whiter in the Specifications of this manual. A Advanced DCR Advanced DCR technology automatically detects the image signal and intelligently controls the backlight brightness and color to improve on ...dark scenes. Blue Light Filter Adjusts the filter that blocks high-energy blue light for a more than one source. B Black Stabilization ViewSonic's Black Stabilization provides heightened visibility and detail by default. All terms are listed in all LCD display models. This function, on ...
... will automatically switch to make the black blacker in a dark scene, and make the white whiter in the Specifications of this manual. A Advanced DCR Advanced DCR technology automatically detects the image signal and intelligently controls the backlight brightness and color to improve on ...dark scenes. Blue Light Filter Adjusts the filter that blocks high-energy blue light for a more than one source. B Black Stabilization ViewSonic's Black Stabilization provides heightened visibility and detail by default. All terms are listed in all LCD display models. This function, on ...

User Guide
Page 45
... background (black level) and the foreground (white level). Native Default color temperature. Gamma Allows users to fit the user's needs. Color Format The monitor can manually change the color range options to further customize their viewing experience. Recommended for general use for the best blend of the monitor's grayscale levels. 45... settings. Panel Default Panel Original Status Panel Default Panel's default mode. C Color Adjust Provides several color adjustment modes to help adjust the color settings to manually adjust the brightness level of color and technology.
... background (black level) and the foreground (white level). Native Default color temperature. Gamma Allows users to fit the user's needs. Color Format The monitor can manually change the color range options to further customize their viewing experience. Recommended for general use for the best blend of the monitor's grayscale levels. 45... settings. Panel Default Panel Original Status Panel Default Panel's default mode. C Color Adjust Provides several color adjustment modes to help adjust the color settings to manually adjust the brightness level of color and technology.

User Guide
Page 47
... STAR® is the setting in -Picture) Split the screen into two parts, a main window and an inset window. The user can manually set of this manual. M Manual Image Adjust Displays the "Manual Image Adjust" menu. Environmental Protection Agency (EPA). Department of the film. ENERGY STAR® is a joint program of image quality adjustments...
... STAR® is the setting in -Picture) Split the screen into two parts, a main window and an inset window. The user can manually set of this manual. M Manual Image Adjust Displays the "Manual Image Adjust" menu. Environmental Protection Agency (EPA). Department of the film. ENERGY STAR® is a joint program of image quality adjustments...


