
Quick Start Guide
Page 1
...ıç Kılavuzu Panduan Mulai Cepat ViewSonic Projector http://vsweb.us Download Link http://vsweb.us/q/dn.php 4 MENU EXIT SOURCE On Off COMP HDMI 1 HDMI 2 Auto Sync Source BLANK COLOR MODE Aspect Freeze Pattern Blank PgUp PgDn Color Mode Network 1 On Off COMP HDMI 1 HDMI 2 Auto Sync Source Aspect Pattern Blank 3D ID Set Brightness 3 Gaming 6 Eco Mode 1 Contrast 4 Standard 7 Movie 2 Color Temp 5 Sports 8 User 2 PX728-4K PX748-4K Home Projector Quick Start Guide Vodič za brzo pokretanje Ú...
...ıç Kılavuzu Panduan Mulai Cepat ViewSonic Projector http://vsweb.us Download Link http://vsweb.us/q/dn.php 4 MENU EXIT SOURCE On Off COMP HDMI 1 HDMI 2 Auto Sync Source BLANK COLOR MODE Aspect Freeze Pattern Blank PgUp PgDn Color Mode Network 1 On Off COMP HDMI 1 HDMI 2 Auto Sync Source Aspect Pattern Blank 3D ID Set Brightness 3 Gaming 6 Eco Mode 1 Contrast 4 Standard 7 Movie 2 Color Temp 5 Sports 8 User 2 PX728-4K PX748-4K Home Projector Quick Start Guide Vodič za brzo pokretanje Ú...

User Guide
Page 1
...://www.viewsonic.com in English, or in specific languages using your product for future service. VS18244/VS18338/VS18339 Model Name: PX701-4K/PX728-4K/PX748-4K "Antes de operar su equipo lea cu idadosamente las instrucciones en este manual" Model No. PX701-4K/PX728-4K/PX748-4K Projector User Guide IMPORTANT: Please read this User Guide will describe your limited coverage from ViewSonic Corporation, which is also found on installing and using the...
...://www.viewsonic.com in English, or in specific languages using your product for future service. VS18244/VS18338/VS18339 Model Name: PX701-4K/PX728-4K/PX748-4K "Antes de operar su equipo lea cu idadosamente las instrucciones en este manual" Model No. PX701-4K/PX728-4K/PX748-4K Projector User Guide IMPORTANT: Please read this User Guide will describe your limited coverage from ViewSonic Corporation, which is also found on installing and using the...

User Guide
Page 3
... any heat sources such as this user guide in a well-ventilated area. Liquids spilled into contact with any objects when the projector is under operation, you start using the projector. • Keep this could cause objects to become wet, disconnect it to dangerous levels. • Do not place liquids near or on the projector that may increase the temperature of more...
... any heat sources such as this user guide in a well-ventilated area. Liquids spilled into contact with any objects when the projector is under operation, you start using the projector. • Keep this could cause objects to become wet, disconnect it to dangerous levels. • Do not place liquids near or on the projector that may increase the temperature of more...
User Guide
Page 5
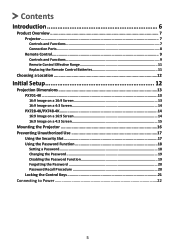
... Overview 7 Projector...7 Controls and Functions 7 Connection Ports...8 Remote Control 9 Controls and Functions 9 Remote Control Effective Range 11 Replacing the Remote Control Batteries 11 Choosing a Location 12 Initial Setup 12 Projection Dimensions 13 PX701-4K...13 16:9 Image on a 16:9 Screen 13 16:9 Image on a 4:3 Screen 14 PX728-4K/PX748-4K 14 16:9 Image on a 16:9 Screen 14 16:9 Image on a 4:3 Screen 15 Mounting the Projector 16 Preventing Unauthorized Use 17 Using the Security Slot 17 Using the Password Function 18 Setting a Password 18 Changing the Password 19...
... Overview 7 Projector...7 Controls and Functions 7 Connection Ports...8 Remote Control 9 Controls and Functions 9 Remote Control Effective Range 11 Replacing the Remote Control Batteries 11 Choosing a Location 12 Initial Setup 12 Projection Dimensions 13 PX701-4K...13 16:9 Image on a 16:9 Screen 13 16:9 Image on a 4:3 Screen 14 PX728-4K/PX748-4K 14 16:9 Image on a 16:9 Screen 14 16:9 Image on a 4:3 Screen 15 Mounting the Projector 16 Preventing Unauthorized Use 17 Using the Security Slot 17 Using the Password Function 18 Setting a Password 18 Changing the Password 19...

User Guide
Page 7
Appendix 60 Projector Dimensions 61 Timing Chart...61 HDMI (PC)...61 HDMI (Video)...62 Troubleshooting...64 Common Problems 64 LED Indicators...65 Maintenance...66 General Precautions 66 Cleaning the Lens 66 Cleaning the Case 66 Storing the Projector 66 Disclaimer...66 Light Source Information 67 Light Source Hour 67 Extending Light Source Life 67 Light Source Replacement Timing 68 Replacing the Light Source 68 7
Appendix 60 Projector Dimensions 61 Timing Chart...61 HDMI (PC)...61 HDMI (Video)...62 Troubleshooting...64 Common Problems 64 LED Indicators...65 Maintenance...66 General Precautions 66 Cleaning the Lens 66 Cleaning the Case 66 Storing the Projector 66 Disclaimer...66 Light Source Information 67 Light Source Hour 67 Extending Light Source Life 67 Light Source Replacement Timing 68 Replacing the Light Source 68 7

User Guide
Page 11
... selection bar. Button On/ Off COMP VIDEO HDMI Auto Sync Source [/] Keystone Keys Enter Description Toggles between the two (2) ports. Operates your display software program (on /off . Decreases the volume level. Magnifies the projected picture size. Reduces the projected picture size. Turns on a connected PC) which responds to switch between standby mode and Power On. Freeze Pattern Blank PgUp (Page Up)/ PgDn (Page Down) Eco Mode (Volume Up) (Volume Down) (Mute) Color Mode Freezes the projected image. NOTE...
... selection bar. Button On/ Off COMP VIDEO HDMI Auto Sync Source [/] Keystone Keys Enter Description Toggles between the two (2) ports. Operates your display software program (on /off . Decreases the volume level. Magnifies the projected picture size. Reduces the projected picture size. Turns on a connected PC) which responds to switch between standby mode and Power On. Freeze Pattern Blank PgUp (Page Up)/ PgDn (Page Down) Eco Mode (Volume Up) (Volume Down) (Mute) Color Mode Freezes the projected image. NOTE...

User Guide
Page 12
...: Only available for display. Displays the source selection bar. Movie Selects the Movie (Rec.709) mode. Color Temp Gaming Displays the color temperature selection menu. PX728-4K / PX748-4K On Off COMP HDMI 1 HDMI 2 Auto Sync Source Aspect Pattern Blank 3D ID Set Brightness 3 Gaming 6 Eco Mode 1 Contrast 4 Standard 7 Movie 2 Color Temp 5 Sports 8 User Button On/ Off COMP HDMI 1 HDMI 2 Auto Sync Source [ / //] Keystone Keys Enter (Corner Adjustment) Description Toggles between on /off . Selects the source from the HDMI 2 port for the displayed image. Selects the...
...: Only available for display. Displays the source selection bar. Movie Selects the Movie (Rec.709) mode. Color Temp Gaming Displays the color temperature selection menu. PX728-4K / PX748-4K On Off COMP HDMI 1 HDMI 2 Auto Sync Source Aspect Pattern Blank 3D ID Set Brightness 3 Gaming 6 Eco Mode 1 Contrast 4 Standard 7 Movie 2 Color Temp 5 Sports 8 User Button On/ Off COMP HDMI 1 HDMI 2 Auto Sync Source [ / //] Keystone Keys Enter (Corner Adjustment) Description Toggles between on /off . Selects the source from the HDMI 2 port for the displayed image. Selects the...
User Guide
Page 21
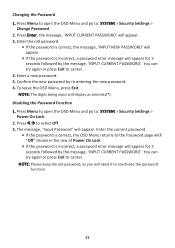
... a new password. 5. Enter the old password. ͫ If the password is correct, the message, 'INPUT NEW PASSWORD' will appear. ͫ If the password is incorrect, a password error message will appear for 5 seconds followed by re-entering the new password. 6. Press Menu to open the OSD Menu and go to cancel. You can try again or press Exit to : SYSTEM > Security Settings > Power On Lock. 2. Confirm the new password by the message, 'INPUT CURRENT PASSWORD'. Changing the Password 1.
... a new password. 5. Enter the old password. ͫ If the password is correct, the message, 'INPUT NEW PASSWORD' will appear. ͫ If the password is incorrect, a password error message will appear for 5 seconds followed by re-entering the new password. 6. Press Menu to open the OSD Menu and go to cancel. You can try again or press Exit to : SYSTEM > Security Settings > Power On Lock. 2. Confirm the new password by the message, 'INPUT CURRENT PASSWORD'. Changing the Password 1.
User Guide
Page 22
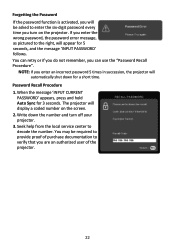
Seek help from the local service center to decode the number. The projector will display a coded number on the projector. Write down for a short time. Password Recall Procedure 1. You may be asked to enter the six-digit password every time you turn off your projector. 3. When the message 'INPUT CURRENT PASSWORD' appears, press and hold Auto Sync for 5 seconds, and the message 'INPUT PASSWORD' follows. If you enter the wrong password, the password error message, as pictured to the...
Seek help from the local service center to decode the number. The projector will display a coded number on the projector. Write down for a short time. Password Recall Procedure 1. You may be asked to enter the six-digit password every time you turn off your projector. 3. When the message 'INPUT CURRENT PASSWORD' appears, press and hold Auto Sync for 5 seconds, and the message 'INPUT PASSWORD' follows. If you enter the wrong password, the password error message, as pictured to the...

User Guide
Page 23
Press / to enter the SYSTEM > Panel Key Lock menu and select Off. 23 To release panel key lock, press and hold on the projector for example). NOTE: You can prevent your settings from being changed accidentally (by children, for 3 seconds. Select Yes and press Enter to : SYSTEM > Panel Key Lock. 2. Locking the Control Keys With the control keys on the projector locked, you can also use the remote control to select On. 3. NOTE: When the Panel Key Lock is On, no control keys on the projector will operate except Power. 1. Press Menu to open the OSD Menu and go to confirm. 4.
Press / to enter the SYSTEM > Panel Key Lock menu and select Off. 23 To release panel key lock, press and hold on the projector for example). NOTE: You can prevent your settings from being changed accidentally (by children, for 3 seconds. Select Yes and press Enter to : SYSTEM > Panel Key Lock. 2. Locking the Control Keys With the control keys on the projector locked, you can also use the remote control to select On. 3. NOTE: When the Panel Key Lock is On, no control keys on the projector will operate except Power. 1. Press Menu to open the OSD Menu and go to confirm. 4.

User Guide
Page 24
... the fixed wiring, or connect the power plug to connect the projector with other equipment. Making Connections This section guides you on how to an easily accessible outlet near the unit. Connect the power cord to the AC IN jack at the rear of the projector, use the disconnect device to Power 1. If a fault should occur during operation of the projector. 2. Connecting to switch off the power supply, or...
... the fixed wiring, or connect the power plug to connect the projector with other equipment. Making Connections This section guides you on how to an easily accessible outlet near the unit. Connect the power cord to the AC IN jack at the rear of the projector, use the disconnect device to Power 1. If a fault should occur during operation of the projector. 2. Connecting to switch off the power supply, or...

User Guide
Page 31
... keystoning at the bottom of the image. PX728-4K / PX748-4K MENU EXIT BLANK On Off COMP HDMI 1 HDMI 2 Auto Sync Source SOURCE COLOR MODE Aspect Pattern Blank 3D ID Set Brightness 3 Gaming 6 Eco Mode 1 Contrast 4 Standard 7 Movie 2 Color Temp 5 Sports 8 User PX701-4K MENU EXIT SOURCE BLANK COLOR MODE 31 Use the keystone keys on the projector or remote control to angled projection. After the keystone page is displayed, press to correct keystoning at the bottom of the image. To correct this, besides adjusting...
... keystoning at the bottom of the image. PX728-4K / PX748-4K MENU EXIT BLANK On Off COMP HDMI 1 HDMI 2 Auto Sync Source SOURCE COLOR MODE Aspect Pattern Blank 3D ID Set Brightness 3 Gaming 6 Eco Mode 1 Contrast 4 Standard 7 Movie 2 Color Temp 5 Sports 8 User PX701-4K MENU EXIT SOURCE BLANK COLOR MODE 31 Use the keystone keys on the projector or remote control to angled projection. After the keystone page is displayed, press to correct keystoning at the bottom of the image. To correct this, besides adjusting...
User Guide
Page 40
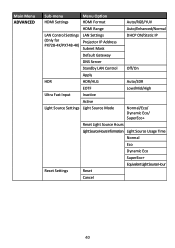
...Sub-menu Menu Option HDMI Settings HDMI Format Auto/RGB/YUV HDMI Range Auto/Enhanced/Normal LAN Control Settings LAN Settings (Only for Projector IP Address PX728-4K/PX748-4K) Subnet Mask DHCP ON/Static IP Default Gateway DNS Server Standby LAN Control Off/On Apply HDR HDR/HLG Auto/SDR EOTF Low/Mid/High Ultra Fast Input Inactive Active Light Source Settings Light Source Mode Normal/Eco/ Dynamic Eco/ SuperEco+ Reset Light Source Hours LightSourceHoursInformation Light Source Usage Time Normal Eco Dynamic Eco SuperEco+ Equivalent Light Source Hour Reset Settings...
...Sub-menu Menu Option HDMI Settings HDMI Format Auto/RGB/YUV HDMI Range Auto/Enhanced/Normal LAN Control Settings LAN Settings (Only for Projector IP Address PX728-4K/PX748-4K) Subnet Mask DHCP ON/Static IP Default Gateway DNS Server Standby LAN Control Off/On Apply HDR HDR/HLG Auto/SDR EOTF Low/Mid/High Ultra Fast Input Inactive Active Light Source Settings Light Source Mode Normal/Eco/ Dynamic Eco/ SuperEco+ Reset Light Source Hours LightSourceHoursInformation Light Source Usage Time Normal Eco Dynamic Eco SuperEco+ Equivalent Light Source Hour Reset Settings...

User Guide
Page 44
... mount or position a projector for warping adjustment. Digital lens shift is a tool that assists in the Warping > Control Method menu. 1. Press Enter to exit the function. Reset Returns settings in the Warping > Enable menu and OSD is selected. 44 NOTE: This function is only available when a Composite Video or HDMI input signal is selected in properly aligning the projector's image with the projected image. 6. Press Menu/Exit to enter adjustment mode...
... mount or position a projector for warping adjustment. Digital lens shift is a tool that assists in the Warping > Control Method menu. 1. Press Enter to exit the function. Reset Returns settings in the Warping > Enable menu and OSD is selected. 44 NOTE: This function is only available when a Composite Video or HDMI input signal is selected in properly aligning the projector's image with the projected image. 6. Press Menu/Exit to enter adjustment mode...

User Guide
Page 50
... HDMI input of time once no input source is detected. When On, the USB Type A port can also select All and the projector will automatically switch to RS-232. 50 NOTE: • In order for synchronized power on automatically upon receiving either a VGA or HDMI signal. Power Saving Lowers power consumption if no input source is detected to prevent unnecessary waste of light source life. CEC This projector supports CEC (Consumer Electronics Control...
... HDMI input of time once no input source is detected. When On, the USB Type A port can also select All and the projector will automatically switch to RS-232. 50 NOTE: • In order for synchronized power on automatically upon receiving either a VGA or HDMI signal. Power Saving Lowers power consumption if no input source is detected to prevent unnecessary waste of light source life. CEC This projector supports CEC (Consumer Electronics Control...

User Guide
Page 55
... device connected. ͫ Auto: Sets the projector to detect the HDMI range of the input signal automatically. ͫ Enhanced: Sets the HDMI color range as 0 - 255. ͫ Normal: Sets the HDMI color range as YUV. HDMI Range Select a suitable HDMI color range according to the color range setting of the output device connected. ͫ Auto: Sets the projector to detect the color space setting of the projected image is dark, please use "High". HDR/HLG The projector supports HDR/HLG imaging sources...
... device connected. ͫ Auto: Sets the projector to detect the HDMI range of the input signal automatically. ͫ Enhanced: Sets the HDMI color range as 0 - 255. ͫ Normal: Sets the HDMI color range as YUV. HDMI Range Select a suitable HDMI color range according to the color range setting of the output device connected. ͫ Auto: Sets the projector to detect the color space setting of the projected image is dark, please use "High". HDR/HLG The projector supports HDR/HLG imaging sources...
User Guide
Page 57
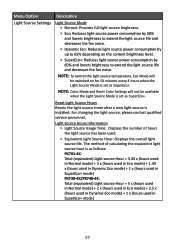
Reset Light Source Hours Resets the light source timer after a new light source is as SuperEco+. NOTE: To control the light source temperature, Eco Mode will not be switched on the content brightness level. ͫ SuperEco+: Reduces light source power consumption by up to extend the light source life and decreases the fan noise. NOTE: Color Mode and Reset Color Settings will be available when the Light Source Mode is set as SuperEco+. For changing the light source, please contact qualified service personnel. Light Source Hours Information ͫ Light Source Usage Time: ...
Reset Light Source Hours Resets the light source timer after a new light source is as SuperEco+. NOTE: To control the light source temperature, Eco Mode will not be switched on the content brightness level. ͫ SuperEco+: Reduces light source power consumption by up to extend the light source life and decreases the fan noise. NOTE: Color Mode and Reset Color Settings will be available when the Light Source Mode is set as SuperEco+. For changing the light source, please contact qualified service personnel. Light Source Hours Information ͫ Light Source Usage Time: ...

User Guide
Page 69
...and press Enter. Extending Light Source Life To prolong light source life, you can adjust the following settings in Eco, Dynamic Eco, or SuperEco+ mode reduces system noise, power consumption, and extends the light sources operational life. Setting Auto Power Off This allows the projector to turn off automatically after a set the Light Source Mode, open the OSD Menu and go to: Advanced > Light Source Settings > Light Source Mode and press / to : Advanced > Light Source Settings > Light Source Hours Information. 2. Light Source Hour When the projector is being used, the duration (in...
...and press Enter. Extending Light Source Life To prolong light source life, you can adjust the following settings in Eco, Dynamic Eco, or SuperEco+ mode reduces system noise, power consumption, and extends the light sources operational life. Setting Auto Power Off This allows the projector to turn off automatically after a set the Light Source Mode, open the OSD Menu and go to: Advanced > Light Source Settings > Light Source Mode and press / to : Advanced > Light Source Settings > Light Source Hours Information. 2. Light Source Hour When the projector is being used, the duration (in...
RS-232/LAN Control Protocol Specification
Page 35
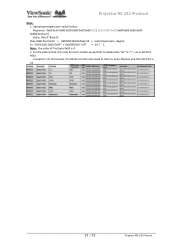
...Operating temperature value format: Response: 0x05 0x14 0x00 0x0A 0x00 0x00 0x00 0x29 0x01 0x00 0x00 0x00 0x00 0x00 0x00 0x48(checksum) Value: Byte7~Byte10 0xaa 0xbb 0xcc 0xdd -> HEX2DEC(ddccbbaa)/10 -> real temperature degree Ex. Note: the order of first byte 0x05 is similar except that to replace the "0x" to Users Manual and the LAN Port... is 23. 33 / 35 Projector RS-232 Protocol Exception: For Pro9 series, the RS232 control code need to...
...Operating temperature value format: Response: 0x05 0x14 0x00 0x0A 0x00 0x00 0x00 0x29 0x01 0x00 0x00 0x00 0x00 0x00 0x00 0x48(checksum) Value: Byte7~Byte10 0xaa 0xbb 0xcc 0xdd -> HEX2DEC(ddccbbaa)/10 -> real temperature degree Ex. Note: the order of first byte 0x05 is similar except that to replace the "0x" to Users Manual and the LAN Port... is 23. 33 / 35 Projector RS-232 Protocol Exception: For Pro9 series, the RS232 control code need to...

RS-232/LAN Control Protocol Specification
Page 37
... user via OSD menu or RC. 6. Power Off: System is turned off, please set and check HW/FW environment. When the projector response the code "0x00 0x14 0x00 0x00 0x00 0x14" at the first byte "0x00", it indicates that function is at initial stage to set LAN control settings/Standby LAN Control to work. HDMI Range: Enhanced / Full = 0 - 255 steps Normal / Limited = 16 -235 steps 7. Light Source Usage Time status...
... user via OSD menu or RC. 6. Power Off: System is turned off, please set and check HW/FW environment. When the projector response the code "0x00 0x14 0x00 0x00 0x00 0x14" at the first byte "0x00", it indicates that function is at initial stage to set LAN control settings/Standby LAN Control to work. HDMI Range: Enhanced / Full = 0 - 255 steps Normal / Limited = 16 -235 steps 7. Light Source Usage Time status...


