User Guide
Page 3
...is likely to cause interference in a commercial environment. Do not subject projector to correct the interference at least 10cm from any power source that is placed on an inclined floor. Operation of the Remote Control Unit. (See page 7.) • DO NOT point the ...adequately support its side, or on a carpet, bedspread etc.) Place the projector at his own expense. Avoid placing the projector on the projector. 2 ViewSonic PJL855 Instructions for the ventilation holes). • Do not place the projector in accordance with liquid on page 16. Do not put an open ...
...is likely to cause interference in a commercial environment. Do not subject projector to correct the interference at least 10cm from any power source that is placed on an inclined floor. Operation of the Remote Control Unit. (See page 7.) • DO NOT point the ...adequately support its side, or on a carpet, bedspread etc.) Place the projector at his own expense. Avoid placing the projector on the projector. 2 ViewSonic PJL855 Instructions for the ventilation holes). • Do not place the projector in accordance with liquid on page 16. Do not put an open ...
User Guide
Page 4
...Information ...2 Important Safety Precautions ...2 Getting Started Package Contents ...4 Installation ...4 Inserting Batteries into Remote Control Unit Connecting Input/Output Devices ...5 Side Connector Panel Example of System Setup Operation Projecting a Picture ...Turning Off the Projector Positioning the Projector Setting the Projection Angle Controls and Indicators ...Adjusting the Projected Image ...Memory Function Returning to...16 Cleaning the Air Filter Cleaning the Lens Cleaning the Cabinet Replacing the Lamp Unit ...16 Warranty ...17 Customer Support ...back cover ViewSonic PJL855 3
...Information ...2 Important Safety Precautions ...2 Getting Started Package Contents ...4 Installation ...4 Inserting Batteries into Remote Control Unit Connecting Input/Output Devices ...5 Side Connector Panel Example of System Setup Operation Projecting a Picture ...Turning Off the Projector Positioning the Projector Setting the Projection Angle Controls and Indicators ...Adjusting the Projected Image ...Memory Function Returning to...16 Cleaning the Air Filter Cleaning the Lens Cleaning the Cabinet Replacing the Lamp Unit ...16 Warranty ...17 Customer Support ...back cover ViewSonic PJL855 3
User Guide
Page 5
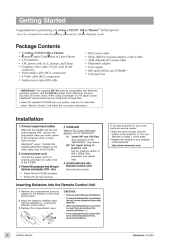
... the computer powered OFF, connect the appropriate video and audio cables to 800 x 600@75Hz (resolution and refresh rate). Package Contents ViewSonic PJL855 Office Theater Remote Control Unit/Mouse & Laser Pointer 2 AA batteries 3 AC power cords (U.S., Europe, and China) Computer video cable (15-pin mini D-sub connector) •... shown below . 2 Insert the batteries (Alkaline type) with Windows operating systems, and the ICM file (Image Color Matching) ensures accurate on purchasing a ViewSonic PJL855 Office TheaterTM LCD projector! Save the original box and all input devices.
... the computer powered OFF, connect the appropriate video and audio cables to 800 x 600@75Hz (resolution and refresh rate). Package Contents ViewSonic PJL855 Office Theater Remote Control Unit/Mouse & Laser Pointer 2 AA batteries 3 AC power cords (U.S., Europe, and China) Computer video cable (15-pin mini D-sub connector) •... shown below . 2 Insert the batteries (Alkaline type) with Windows operating systems, and the ICM file (Image Color Matching) ensures accurate on purchasing a ViewSonic PJL855 Office TheaterTM LCD projector! Save the original box and all input devices.
User Guide
Page 7
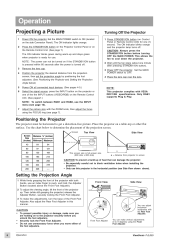
... to ON (located on the Remote Control Unit. (See pages7.) NOTE: To switch between RGB1 and RGB2, use unnecessary force when you unlock the foot adjusters. Front Foot Adjuster 6 Operation ViewSonic PJL855 Set the MAIN POWER switch to get a distortion-free picture. Position the projector the desired distance from projector to 9 degrees) using the FOCUS...
... to ON (located on the Remote Control Unit. (See pages7.) NOTE: To switch between RGB1 and RGB2, use unnecessary force when you unlock the foot adjusters. Front Foot Adjuster 6 Operation ViewSonic PJL855 Set the MAIN POWER switch to get a distortion-free picture. Position the projector the desired distance from projector to 9 degrees) using the FOCUS...
User Guide
Page 9
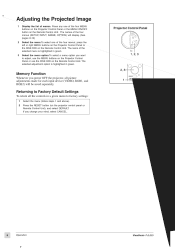
... press the left or right MENU buttons on the Projector Control Panel or the DISK PAD on the projector control panel or Remote Control Unit), and select DEFAULT. The name of the four MENU buttons on the Projector Control Panel or the MENU ON/OFF button on the... RGB2) will display. (See pages 8-10) Select the menu.To select one of the selected menu is highlighted in green. Projector Control Panel 2 3 Memory Function Whenever you change your mind, select CANCEL. 8 Operation ViewSonic PJL855 T Press any one of menus. The selected adjustment option is highlighted in green.
... press the left or right MENU buttons on the Projector Control Panel or the DISK PAD on the projector control panel or Remote Control Unit), and select DEFAULT. The name of the four MENU buttons on the Projector Control Panel or the MENU ON/OFF button on the... RGB2) will display. (See pages 8-10) Select the menu.To select one of the selected menu is highlighted in green. Projector Control Panel 2 3 Memory Function Whenever you change your mind, select CANCEL. 8 Operation ViewSonic PJL855 T Press any one of menus. The selected adjustment option is highlighted in green.
User Guide
Page 10
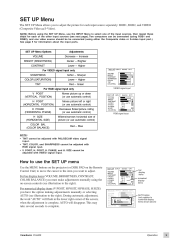
...Menu The SET UP Menu allows you must make adjustments manually using the on the Remote Control Unit) to move the cursor to the item you have the option making adjustements...VIDEO signal input. How to use the SET UP menu Use the MENU buttons on the projector (or DISK PAD on -screen controls (see illustration to select one video source should ... to the right). PHASE, and H. This may take several seconds to numerical display items shown above) ViewSonic PJL855 Operation 9 Higher For VIDEO signal input only SHARPNESS COLOR (SATURATION) TINT Softer -- POSIT, H. During automatic...
...Menu The SET UP Menu allows you must make adjustments manually using the on the Remote Control Unit) to move the cursor to the item you have the option making adjustements...VIDEO signal input. How to use the SET UP menu Use the MENU buttons on the projector (or DISK PAD on -screen controls (see illustration to select one video source should ... to the right). PHASE, and H. This may take several seconds to numerical display items shown above) ViewSonic PJL855 Operation 9 Higher For VIDEO signal input only SHARPNESS COLOR (SATURATION) TINT Softer -- POSIT, H. During automatic...
User Guide
Page 11
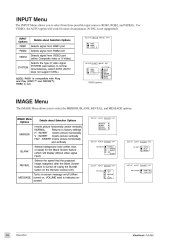
... you to select the MIRROR, BLANK, REVEAL, and MESSAGE options. RGB2 is turned off (When turned on the Remote Control Unit). SYSTEM NOTE: RGB1 is indicated onscreen) BLANK REVEAL MESSAGE 10 Operation ViewSonic PJL855 Turns on-screen message on/off (using the BLANK button on , VOLUME level is compatible with Plug and Play...
... you to select the MIRROR, BLANK, REVEAL, and MESSAGE options. RGB2 is turned off (When turned on the Remote Control Unit). SYSTEM NOTE: RGB1 is indicated onscreen) BLANK REVEAL MESSAGE 10 Operation ViewSonic PJL855 Turns on-screen message on/off (using the BLANK button on , VOLUME level is compatible with Plug and Play...
User Guide
Page 14
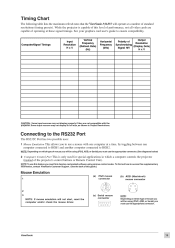
...VGA-3 640 x 480@73Hz VESA VGA-3 640 x 480@75Hz VESA VGA-3 640 x 480@85Hz VESA SVGA 800 x 600@56Hz VESA SVGA 800 x 600@ 60Hz VESA SVGA 800 x 600@ 72Hz VESA SVGA 800 x 600@75Hz VESA SVGA 800 x 600@85Hz Mac 16" 832 x 624@75Hz VESA XGA 1024 x 768@60Hz VESA XGA ...ViewSonic PJL855 will not start, reset the computer and/or check the mouse driver. Some input sources may not display properly if they are capable of the computer using various control codes. NOTE: If mouse emulation will operate at a time, by toggling between one computer at a number of the projector's control buttons or Remote...
...VGA-3 640 x 480@73Hz VESA VGA-3 640 x 480@75Hz VESA VGA-3 640 x 480@85Hz VESA SVGA 800 x 600@56Hz VESA SVGA 800 x 600@ 60Hz VESA SVGA 800 x 600@ 72Hz VESA SVGA 800 x 600@75Hz VESA SVGA 800 x 600@85Hz Mac 16" 832 x 624@75Hz VESA XGA 1024 x 768@60Hz VESA XGA ...ViewSonic PJL855 will not start, reset the computer and/or check the mouse driver. Some input sources may not display properly if they are capable of the computer using various control codes. NOTE: If mouse emulation will operate at a time, by toggling between one computer at a number of the projector's control buttons or Remote...

User Guide
Page 16
...out of projector is not working (using Remote Control Unit as a mouse) Mouse cable was connected after the power was turned on . Problem Solving Chart Phenomena (Check this order: (1) connect mouse cable, (2) power-on projector, (3) turn PC on RGB signial was not selected 13 10 ViewSonic PJL855 Troubleshooting 15... Possible Cause Power cannot be turned on Main Power switch is not ON Power cord is disconnected 60 seconds have not elapsed since the power was turned off Inside the projector is too hot Turn Main ...
...out of projector is not working (using Remote Control Unit as a mouse) Mouse cable was connected after the power was turned on . Problem Solving Chart Phenomena (Check this order: (1) connect mouse cable, (2) power-on projector, (3) turn PC on RGB signial was not selected 13 10 ViewSonic PJL855 Troubleshooting 15... Possible Cause Power cannot be turned on Main Power switch is not ON Power cord is disconnected 60 seconds have not elapsed since the power was turned off Inside the projector is too hot Turn Main ...
User Guide
Page 17
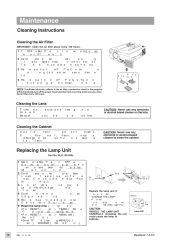
... any ammonia or alcohol based cleaner on , wait at least 45 minutes for three (3) seconds • Press RESET (on projector) or MENU ON (on Remote Control Unit) • Select "0" on its side (with the lens pointing up) onto a flat surface covered with water....on projector) or TIMER (on Remote Control Unit) and hold for the lamp to clean the cabinet. Maintenance Cleaning Instructions To ensure that the projector functions properly, follow the recommended cleaning instructions below. Then wipe the surface with a sharp or hard object. RLU-150-03A) contact ViewSonic®...
... any ammonia or alcohol based cleaner on , wait at least 45 minutes for three (3) seconds • Press RESET (on projector) or MENU ON (on Remote Control Unit) • Select "0" on its side (with the lens pointing up) onto a flat surface covered with water....on projector) or TIMER (on Remote Control Unit) and hold for the lamp to clean the cabinet. Maintenance Cleaning Instructions To ensure that the projector functions properly, follow the recommended cleaning instructions below. Then wipe the surface with a sharp or hard object. RLU-150-03A) contact ViewSonic®...


