

PJD6251 User Guide (English)
Page 2
... limits are cautioned that may not cause harmful interference, and (2) this device may cause undesired operation. This equipment generates, uses, and can be determined by turning the equipment off and on a circuit different from that interference will not occur in compliance with the limits for help. CE Conformity for compliance could...
... limits are cautioned that may not cause harmful interference, and (2) this device may cause undesired operation. This equipment generates, uses, and can be determined by turning the equipment off and on a circuit different from that interference will not occur in compliance with the limits for help. CE Conformity for compliance could...

PJD6251 User Guide (English)
Page 12
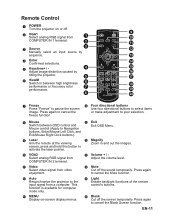
... to sub-menu and confirm the menu selection. 7 SOURCE Manually select an input source. 8 MENU/EXIT Display or exit the on-screen display menus. 9 Power Turn the projector on or off.
... to sub-menu and confirm the menu selection. 7 SOURCE Manually select an input source. 8 MENU/EXIT Display or exit the on-screen display menus. 9 Power Turn the projector on or off.
PJD6251 User Guide (English)
Page 13
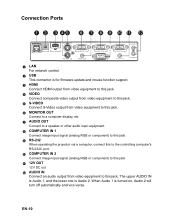
The upper AUDIO IN is Audio 1, and the lower one is turned on, Audio 2 will turn off automatically and vice versa. When Audio 1 is Audio 2. EN-10 Connection Ports 1 2 3 45 6 7 8 9 10 11 12 1 LAN For network control. 2 USB This connector is for firmware update and mouse function support. 3 HDMI...or other audio input equipment. 8 COMPUTER IN 1 Connect image input signal (analog RGB or component) to this jack. 9 RS-232 When operating the projector via a computer, connect this to the controlling computer's RS-232C port. 10 COMPUTER IN 2 Connect image input signal (analog RGB or component) to ...
The upper AUDIO IN is Audio 1, and the lower one is turned on, Audio 2 will turn off automatically and vice versa. When Audio 1 is Audio 2. EN-10 Connection Ports 1 2 3 45 6 7 8 9 10 11 12 1 LAN For network control. 2 USB This connector is for firmware update and mouse function support. 3 HDMI...or other audio input equipment. 8 COMPUTER IN 1 Connect image input signal (analog RGB or component) to this jack. 9 RS-232 When operating the projector via a computer, connect this to the controlling computer's RS-232C port. 10 COMPUTER IN 2 Connect image input signal (analog RGB or component) to ...
PJD6251 User Guide (English)
Page 14
... 2 VGA1 Select analog RGB signal from video equipment. 18 Mute Cut off the sound temporarily. Remote Control 1 POWER Turn the projector on -screen display menus. 20 Blank Cut off the screen temporarily. Press again to cancel the Mute function. 12 Auto Resynchronize ...1 terminal. 3 Source Manually select an input source by sequence. 4 Enter Confirmed selections. 5 Keystone+ / Adjust image distortion caused by tilting the projector. 6 ViewM Switch in and out the images. Press again to your selection. 8 Mouse Switch between high brightness performance or Accuracy color performance. 7...
... 2 VGA1 Select analog RGB signal from video equipment. 18 Mute Cut off the sound temporarily. Remote Control 1 POWER Turn the projector on -screen display menus. 20 Blank Cut off the screen temporarily. Press again to cancel the Mute function. 12 Auto Resynchronize ...1 terminal. 3 Source Manually select an input source by sequence. 4 Enter Confirmed selections. 5 Keystone+ / Adjust image distortion caused by tilting the projector. 6 ViewM Switch in and out the images. Press again to your selection. 8 Mouse Switch between high brightness performance or Accuracy color performance. 7...
PJD6251 User Guide (English)
Page 18
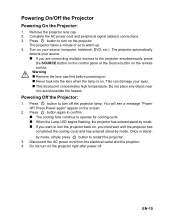
Do not place any object near it to restart the projector. 3. by mode, simply press button to avoid possible fire hazard. Press button to turn off the projector lamp. Press button to turn on the projector right after power off ? Press button again to confirm. „ The ...on the screen. 2. Once in stand- Do not turn the projector back on the projector. EN-15 Turn on the remote control. Powering On/Off the Projector Powering On the Projector: 1. The projector takes a minute or so to the projector simultaneously, press the SOURCE button on the control panel ...
Do not place any object near it to restart the projector. 3. by mode, simply press button to avoid possible fire hazard. Press button to turn off the projector lamp. Press button to turn on the projector right after power off ? Press button again to confirm. „ The ...on the screen. 2. Once in stand- Do not turn the projector back on the projector. EN-15 Turn on the remote control. Powering On/Off the Projector Powering On the Projector: 1. The projector takes a minute or so to the projector simultaneously, press the SOURCE button on the control panel ...
PJD6251 User Guide (English)
Page 19
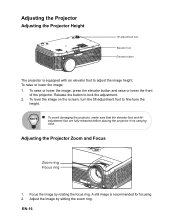
...rotating the focus ring. EN-16 To raise or lower the image, press the elevator button and raise or lower the front of the projector. Adjusting the Projector Zoom and Focus Zoom ring Focus ring 1. A still image is equipped with an elevator foot to adjust the image height. To level the... image on the screen, turn the tilt-adjustment foot to lock the adjustment. 2. adjustment foot are fully retracted before placing the projector in its carrying case. Focus the image by sliding the zoom ring. Release the button to ...
...rotating the focus ring. EN-16 To raise or lower the image, press the elevator button and raise or lower the front of the projector. Adjusting the Projector Zoom and Focus Zoom ring Focus ring 1. A still image is equipped with an elevator foot to adjust the image height. To level the... image on the screen, turn the tilt-adjustment foot to lock the adjustment. 2. adjustment foot are fully retracted before placing the projector in its carrying case. Focus the image by sliding the zoom ring. Release the button to ...
PJD6251 User Guide (English)
Page 24
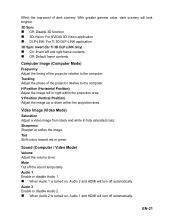
...3D Sync „ Off: Disable 3D function „ 3D-Vision: For NVIDIA 3D Vision application „ DLP-LINK: For TI 3D DLP-LINK application 3D Sync Invert (for TI 3D DLP-LINK only) „ On: Invert left or right within the projection area. Tint Shift colors toward red or.... Tracking Adjust the phase of the projector relative to fully saturated color. V Position (Vertical Position) Adjust the image up or down within the projection area. EN-21 Audio 1 Enable or disable Audio 1. „ When Audio 1 is turned on , Audio 2 and HDMI will turn off the sound temporarily. Sound (Computer...
...3D Sync „ Off: Disable 3D function „ 3D-Vision: For NVIDIA 3D Vision application „ DLP-LINK: For TI 3D DLP-LINK application 3D Sync Invert (for TI 3D DLP-LINK only) „ On: Invert left or right within the projection area. Tint Shift colors toward red or.... Tracking Adjust the phase of the projector relative to fully saturated color. V Position (Vertical Position) Adjust the image up or down within the projection area. EN-21 Audio 1 Enable or disable Audio 1. „ When Audio 1 is turned on , Audio 2 and HDMI will turn off the sound temporarily. Sound (Computer...
PJD6251 User Guide (English)
Page 25
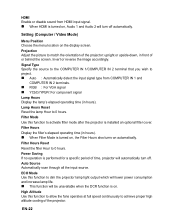
... „ When Filter Mode is installed an optional filter cover. ECO Mode Use this function to activate filter mode after the projector is turned on, the Filter Hours also turns on . Lamp Hours Reset Reset the lamp Hour to 0 hours. EN-22 Setting (Computer / Video Mode) Menu Position ... . Invert or reverse the image accordingly. Power Saving If no operation is performed for a specific period of time, projector will be unavailable when the DCR function is turned on the display screen. HDMI Enable or disable sound from COMPUTER IN 1 and COMPUTER IN 2 terminals. „ RGB : For VGA...
... „ When Filter Mode is installed an optional filter cover. ECO Mode Use this function to activate filter mode after the projector is turned on, the Filter Hours also turns on . Lamp Hours Reset Reset the lamp Hour to 0 hours. EN-22 Setting (Computer / Video Mode) Menu Position ... . Invert or reverse the image accordingly. Power Saving If no operation is performed for a specific period of time, projector will be unavailable when the DCR function is turned on the display screen. HDMI Enable or disable sound from COMPUTER IN 1 and COMPUTER IN 2 terminals. „ RGB : For VGA...

PJD6251 User Guide (English)
Page 26
...turn Off for most video sources and On for bright, true-to obtain IP address from DHCP server. Option (Computer / Video Mode) Blank Screen Blank the screen temporarily, and select the screen color when this function is added, image projection will further enhance contrast ratio by the projector over a network... connection. Start-up Screen Select start -up screen when the projector is powered on or when no signal is shown on the center of OSD menu display ...
...turn Off for most video sources and On for bright, true-to obtain IP address from DHCP server. Option (Computer / Video Mode) Blank Screen Blank the screen temporarily, and select the screen color when this function is added, image projection will further enhance contrast ratio by the projector over a network... connection. Start-up Screen Select start -up screen when the projector is powered on or when no signal is shown on the center of OSD menu display ...
PJD6251 User Guide (English)
Page 28
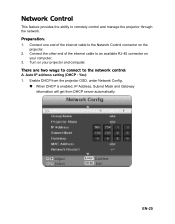
Preparation: 1. Turn on your computer. 3. There are two ways to connect to remotely control and manage the projector through the network. Auto IP address setting (DHCP : Yes): 1. Connect one end of the internet cable to the Network Control connector on your projector and computer. Enable DHCP from the projector OSD, under Network Config. „ When DHCP is enabled...
Preparation: 1. Turn on your computer. 3. There are two ways to connect to remotely control and manage the projector through the network. Auto IP address setting (DHCP : Yes): 1. Connect one end of the internet cable to the Network Control connector on your projector and computer. Enable DHCP from the projector OSD, under Network Config. „ When DHCP is enabled...
PJD6251 User Guide (English)
Page 43
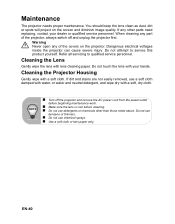
... paper. When cleaning any other than those noted above. Refer all servicing to service this product yourself. Cleaning the Projector Housing Gently wipe with a soft, dry cloth. „ Turn off and unplug the projector first. EN-40 Do not use benzene or thinners. „ Do not use detergents or chemicals other parts need...
... paper. When cleaning any other than those noted above. Refer all servicing to service this product yourself. Cleaning the Projector Housing Gently wipe with a soft, dry cloth. „ Turn off and unplug the projector first. EN-40 Do not use benzene or thinners. „ Do not use detergents or chemicals other parts need...
PJD6251 User Guide (English)
Page 44
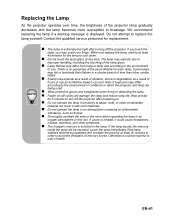
...explosion may explode as a result of vibration, shock or degradation as its lifetime draws to breakage. EN-41 Replacing the Lamp As the projector operates over time, the brightness of mercury fumes. Contact the qualified service personnel for at least 30 minutes in the air). There is... ozone is inhaled, it could be exposed. Risk of use as a result of hours of the same lifetime for 5 minutes to turn off the projector after turning off -cycles will be harmful to user's health. The lamp may explode due to improper handling, including the touching of the lamp glass...
...explosion may explode as a result of vibration, shock or degradation as its lifetime draws to breakage. EN-41 Replacing the Lamp As the projector operates over time, the brightness of mercury fumes. Contact the qualified service personnel for at least 30 minutes in the air). There is... ozone is inhaled, it could be exposed. Risk of use as a result of hours of the same lifetime for 5 minutes to turn off the projector after turning off -cycles will be harmful to user's health. The lamp may explode due to improper handling, including the touching of the lamp glass...
PJD6251 User Guide (English)
Page 45
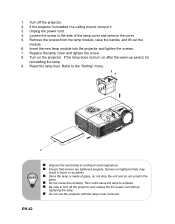
..., and lift out the module. 6. Unplug the power cord. 4. Refer to the "Setting" menu. „ Dispose the used lamp according to turn on the projector. This could cause the lamp to explode. „ Be sure to local regulations. „ Ensure that screws are tightened properly. EN-42 Replace the... lamp cover and tighten the screw. 8. Turn off the projector and unplug the AC power cord before replacing the lamp. „ Do not use the projector with the lamp cover removed. If the projector is made of the lamp cover and remove the cover. 5. Reset ...
..., and lift out the module. 6. Unplug the power cord. 4. Refer to the "Setting" menu. „ Dispose the used lamp according to turn on the projector. This could cause the lamp to explode. „ Be sure to local regulations. „ Ensure that screws are tightened properly. EN-42 Replace the... lamp cover and tighten the screw. 8. Turn off the projector and unplug the AC power cord before replacing the lamp. „ Do not use the projector with the lamp cover removed. If the projector is made of the lamp cover and remove the cover. 5. Reset ...
PJD6251 User Guide (English)
Page 47
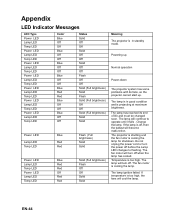
... its end of life and must be changed soon. The projector is shutting and the fan motor is too high. Temperature is cooling the lamp for shutdown. If temperature is too high, the fans will continue to flashing. The lamp will turn off when the lamp has cooled. EN-44 Powering up... LED Temp LED Power LED Lamp LED Temp LED Blue Red Red Off Red Red Solid (Full brightness) Flash Off Off Solid Solid Meaning The projector is in good condition and is projecting at maximum brightness. If the lamp is cooling the lamp. The lamp ignition failed.
... its end of life and must be changed soon. The projector is shutting and the fan motor is too high. Temperature is cooling the lamp for shutdown. If temperature is too high, the fans will continue to flashing. The lamp will turn off when the lamp has cooled. EN-44 Powering up... LED Temp LED Power LED Lamp LED Temp LED Blue Red Red Off Red Red Solid (Full brightness) Flash Off Off Solid Solid Meaning The projector is in good condition and is projecting at maximum brightness. If the lamp is cooling the lamp. The lamp ignition failed.
PJD6251 User Guide (English)
Page 50
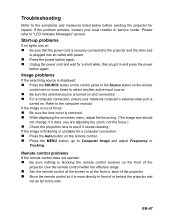
...front of or behind the projector and not as well. Start-up problems If no lights turn on: „ Be sure that the power cord is securely connected to the projector and the other end ...is removed. „ While displaying the on the front of the projector. „... reseller or service center. EN-47 Troubleshooting Refer to the symptoms and measures listed below before sending the projector for a computer connection: „ Press the Auto button on the remote control. „ Press the...
...front of or behind the projector and not as well. Start-up problems If no lights turn on: „ Be sure that the power cord is securely connected to the projector and the other end ...is removed. „ While displaying the on the front of the projector. „... reseller or service center. EN-47 Troubleshooting Refer to the symptoms and measures listed below before sending the projector for a computer connection: „ Press the Auto button on the remote control. „ Press the...


