User Guide
Page 6
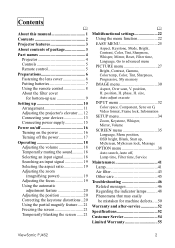
... Projector features 3 About contents of package 3 Part names 4 Projector 4 Controls 5 Remote control 5 Preparations 6 Fastening the lens cover 6 Putting batteries 7 Using the remote control 8 About the filter cover for machine defects.....50 Warranty and after-service 52 Specifications 52 Customer Service 54 Limited Warranty 55 ViewSonic PJ452...48 Phenomena that may easily be mistaken for bottom-up use 9 Setting up 10 Arrangement 11 Adjusting the projector's elevator..... 12 Connecting your devices 13 Connecting power supply 15 Power on/off 16 Turning on G, Video ...
... Projector features 3 About contents of package 3 Part names 4 Projector 4 Controls 5 Remote control 5 Preparations 6 Fastening the lens cover 6 Putting batteries 7 Using the remote control 8 About the filter cover for machine defects.....50 Warranty and after-service 52 Specifications 52 Customer Service 54 Limited Warranty 55 ViewSonic PJ452...48 Phenomena that may easily be mistaken for bottom-up use 9 Setting up 10 Arrangement 11 Adjusting the projector's elevator..... 12 Connecting your devices 13 Connecting power supply 15 Power on/off 16 Turning on G, Video ...
User Guide
Page 7
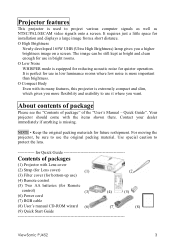
...- O High Brightness Newly developed 165W UHB (Ultra High Brightness) lamp gives you a higher brightness image on a screen. Projector features This projector is used to project various computer signals as well as bright and clean enough for use in low luminance rooms where low ... want. Contact your dealer immediately if anything is missing. It requires just a little space for Remote control) (6) Power cord (3) (4) (5) (7) RGB cable (8) User's manual CD-ROM wizard (6) (7) (8) (9) Quick Start Guide ViewSonic PJ452 3 O Compact Body Even with the items shown there.
...- O High Brightness Newly developed 165W UHB (Ultra High Brightness) lamp gives you a higher brightness image on a screen. Projector features This projector is used to project various computer signals as well as bright and clean enough for use in low luminance rooms where low ... want. Contact your dealer immediately if anything is missing. It requires just a little space for Remote control) (6) Power cord (3) (4) (5) (7) RGB cable (8) User's manual CD-ROM wizard (6) (7) (8) (9) Quick Start Guide ViewSonic PJ452 3 O Compact Body Even with the items shown there.

User Guide
Page 8
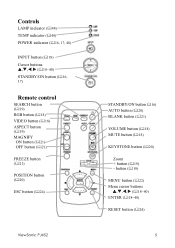
Part names Projector Vent ( 10) Lens ( 16, 45) Lens cover ( 6, 16) Lamp cover ( 42) (Lamp unit is inside.) Control buttons ( 5) Ports (See below.) RGB port ( 14) Restart switch ( 17) CONTROL port ( 14) Kensington lock slot Front-Right side Bottom side Rear-Left side Ports Focus ring ( 19) Remote sensor ( 8) Speaker Elevator button ( 12) Elevator foot ( 12) Filter cover ( 9, 10, 43) (Air filter and intake vent are inside.) Power switch ( 16,17) AC inlet ( 15) Elevator button ( 12) Elevator foot ( 12) Vent ( 10) S-VIDEO ( 14) VIDEO port ( 14) AUDIO port ( 14) ViewSonic PJ452 4
Part names Projector Vent ( 10) Lens ( 16, 45) Lens cover ( 6, 16) Lamp cover ( 42) (Lamp unit is inside.) Control buttons ( 5) Ports (See below.) RGB port ( 14) Restart switch ( 17) CONTROL port ( 14) Kensington lock slot Front-Right side Bottom side Rear-Left side Ports Focus ring ( 19) Remote sensor ( 8) Speaker Elevator button ( 12) Elevator foot ( 12) Filter cover ( 9, 10, 43) (Air filter and intake vent are inside.) Power switch ( 16,17) AC inlet ( 15) Elevator button ( 12) Elevator foot ( 12) Vent ( 10) S-VIDEO ( 14) VIDEO port ( 14) AUDIO port ( 14) ViewSonic PJ452 4
User Guide
Page 9
... ( 18) Cursor buttons , , , ( 18~40) STANDBY/ON button ( 16, 17) Remote control SEARCH button ( 19) RGB button ( 18) VIDEO button ( 18) ASPECT button ( 19) MAGNIFY ON button ( 21) OFF button ( 21) FREEZE button ( 21) POSITION button ( 20) ESC button ( 24) ViewSonic PJ452 STANDBY/ON button 16) AUTO button ( 20) BLANK button ( 21) VOLUME...
... ( 18) Cursor buttons , , , ( 18~40) STANDBY/ON button ( 16, 17) Remote control SEARCH button ( 19) RGB button ( 18) VIDEO button ( 18) ASPECT button ( 19) MAGNIFY ON button ( 21) OFF button ( 21) FREEZE button ( 21) POSITION button ( 20) ESC button ( 24) ViewSonic PJ452 STANDBY/ON button 16) AUTO button ( 20) BLANK button ( 21) VOLUME...

User Guide
Page 11
...could result in fire, injury and/or pollution of the surrounding environment. • Be sure to malfunction, replace the batteries. Whenever the remote control starts to use batteries of the arrow. 2. Remove the battery cover. Close the battery cover. Do not use only the batteries .... 1. To use the remote control for an extended period, remove the batteries from children and pets. • Do not recharge, short circuit, solder or disassemble a battery. • Do not allow a battery in . If you observe a leakage of the arrow and snap it back into place. ViewSonic PJ452 7
...could result in fire, injury and/or pollution of the surrounding environment. • Be sure to malfunction, replace the batteries. Whenever the remote control starts to use batteries of the arrow. 2. Remove the battery cover. Close the battery cover. Do not use only the batteries .... 1. To use the remote control for an extended period, remove the batteries from children and pets. • Do not recharge, short circuit, solder or disassemble a battery. • Do not allow a battery in . If you observe a leakage of the arrow and snap it back into place. ViewSonic PJ452 7
User Guide
Page 12
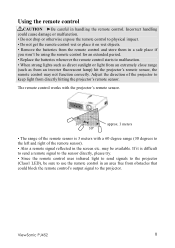
...Be careful in the screen etc. ViewSonic PJ452 8 If it on wet objects. • Remove the batteries from the remote control and store them in an area free from obstacles that could cause damage or malfunction. • Do not drop or otherwise expose the remote control to physical impact. •...30 degrees to the left and right of the projector to keep light from an inverter fluorescent lamp) hit the projector's remote sensor, the remote control may be sure to use the remote control in a safe place if you won't be using the remote control for an extended period. • Replace the...
...Be careful in the screen etc. ViewSonic PJ452 8 If it on wet objects. • Remove the batteries from the remote control and store them in an area free from obstacles that could cause damage or malfunction. • Do not drop or otherwise expose the remote control to physical impact. •...30 degrees to the left and right of the projector to keep light from an inverter fluorescent lamp) hit the projector's remote sensor, the remote control may be sure to use the remote control in a safe place if you won't be using the remote control for an extended period. • Replace the...
User Guide
Page 14
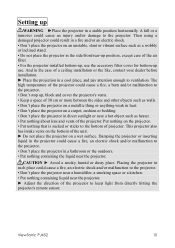
... attention enough to keep light from directly hitting the projector's remote sensor. And in the case of the projector to ventilation. The high temperature of the projector could cause a fire, an electric shock and/or malfunction to the projector. Put nothing containing liquid near a hot object such... or vibrant surface such as heater. • Put nothing about lens and vents of projector. ViewSonic PJ452 10 Setting up use the accessory filter cover for bottom-up WARNING ►Place the projector in a stable position horizontally. A fall or a turnover could cause a fire, an...
... attention enough to keep light from directly hitting the projector's remote sensor. And in the case of the projector to ventilation. The high temperature of the projector could cause a fire, an electric shock and/or malfunction to the projector. Put nothing containing liquid near a hot object such... or vibrant surface such as heater. • Put nothing about lens and vents of projector. ViewSonic PJ452 10 Setting up use the accessory filter cover for bottom-up WARNING ►Place the projector in a stable position horizontally. A fall or a turnover could cause a fire, an...

User Guide
Page 20
..."Selecting an input signal" ( 18). The projector lamp will light up and the POWER indicator will light to the projector and outlet. 2. POWER indicator STANDBY/ON button Power switch 1. The power indicator will begin blinking green. ViewSonic PJ452 16 Make sure that the power cord is ...completely on, the indicator will stop blinking light green. When the power is firmly and correctly connected to solid orange. Please power on the projector or remote control. Press the STANDBY/ON...
..."Selecting an input signal" ( 18). The projector lamp will light up and the POWER indicator will light to the projector and outlet. 2. POWER indicator STANDBY/ON button Power switch 1. The power indicator will begin blinking green. ViewSonic PJ452 16 Make sure that the power cord is ...completely on, the indicator will stop blinking light green. When the power is firmly and correctly connected to solid orange. Please power on the projector or remote control. Press the STANDBY/ON...

User Guide
Page 21
... indicator will appear on again, make the projector cool down at least 10 minutes without operating. 1. ViewSonic PJ452 17 Only push the restart switch in right order. will begin blinking orange. Press the STANDBY/ON button on the projector or remote control. Under certain exceptional circumstances, the projector may not operate correctly even for an emergency...
... indicator will appear on again, make the projector cool down at least 10 minutes without operating. 1. ViewSonic PJ452 17 Only push the restart switch in right order. will begin blinking orange. Press the STANDBY/ON button on the projector or remote control. Under certain exceptional circumstances, the projector may not operate correctly even for an emergency...
User Guide
Page 22
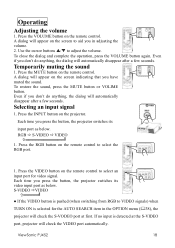
...the dialog will appear on the screen indicating that you press the button, the projector switches its input port as below . Press the INPUT button on the remote control. Press the VIDEO button on the remote control. A dialog will automatically disappear after a few seconds. If no input ... video signal. Press the VOLUME button on the remote control to aid you press the button, the projector switches its video input port as below . Use the cursor buttons / to select the RGB port. 1. Operating Adjusting the volume 1. ViewSonic PJ452 18 Each time you in the OPTION menu ...
...the dialog will appear on the screen indicating that you press the button, the projector switches its input port as below . Press the INPUT button on the remote control. Press the VIDEO button on the remote control. A dialog will automatically disappear after a few seconds. If no input ... video signal. Press the VOLUME button on the remote control to aid you press the button, the projector switches its video input port as below . Use the cursor buttons / to select the RGB port. 1. Operating Adjusting the volume 1. ViewSonic PJ452 18 Each time you in the OPTION menu ...
User Guide
Page 23
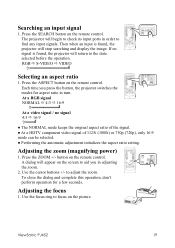
... the button, the projector switches the modes for a few seconds. Use the cursor buttons +/- To close the dialog and complete this operation, don't perform operation for aspect ratio in adjusting the zoom. 2. Press the SEARCH button on the remote control. Adjusting the ...S-VIDEO Ö VIDEO Selecting an aspect ratio 1. button on the remote control. A dialog will stop searching and display the image. The projector will return to find any input signals. Press the ASPECT button on the picture. ViewSonic PJ452 19 Each time you in turn. If no signal 4:3 Ö...
... the button, the projector switches the modes for a few seconds. Use the cursor buttons +/- To close the dialog and complete this operation, don't perform operation for aspect ratio in adjusting the zoom. 2. Press the SEARCH button on the remote control. Adjusting the ...S-VIDEO Ö VIDEO Selecting an aspect ratio 1. button on the remote control. A dialog will stop searching and display the image. The projector will return to find any input signals. Press the ASPECT button on the picture. ViewSonic PJ452 19 Each time you in turn. If no signal 4:3 Ö...

User Guide
Page 24
...the picture position. ViewSonic PJ452 20 Using the automatic adjustment feature 1. A dark picture may not be incorrectly adjusted. For a component video signal, the signal type is set to its maximum size prior to attempting to reset the operation, press the RESET button on the remote control. Press ...the POSITION button on the remote control. Press the KEYSTONE button on the remote control. To close the dialog and complete this operation, press the POSITION button again....
...the picture position. ViewSonic PJ452 20 Using the automatic adjustment feature 1. A dark picture may not be incorrectly adjusted. For a component video signal, the signal type is set to its maximum size prior to attempting to reset the operation, press the RESET button on the remote control. Press ...the POSITION button on the remote control. Press the KEYSTONE button on the remote control. To close the dialog and complete this operation, press the POSITION button again....
User Guide
Page 25
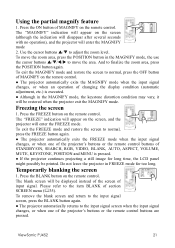
... / to move the zoom area, press the POSITION button in FREEZE mode for long time, the LCD panel might possibly be displayed instead of the screen of the projector's buttons or the remote control buttons are pressed. Press the ON button of STANDBY/ON, SEARCH, RGB, VIDEO, BLANK,... screen 1. Press the BLANK button on the remote control. The blank screen will be restored when the projector exit the MAGNIFY mode. Do not leave the projector in the MAGNIFY mode, the use the cursor buttons / / / to adjust the zoom level. ViewSonic PJ452 21 Freezing the screen 1. The "MAGNIFY" ...
... / to move the zoom area, press the POSITION button in FREEZE mode for long time, the LCD panel might possibly be displayed instead of the screen of the projector's buttons or the remote control buttons are pressed. Press the ON button of STANDBY/ON, SEARCH, RGB, VIDEO, BLANK,... screen 1. Press the BLANK button on the remote control. The blank screen will be restored when the projector exit the MAGNIFY mode. Do not leave the projector in the MAGNIFY mode, the use the cursor buttons / / / to adjust the zoom level. ViewSonic PJ452 21 Freezing the screen 1. The "MAGNIFY" ...
User Guide
Page 26
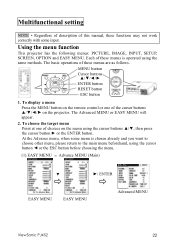
... or the ESC button before choosing the menu. (1) EASY MENU → Advance MENU (Main) ▼ ►/ ENTER EASY MENU EASY MENU Advanced MENU ViewSonic PJ452 22 Each of these menus is chosen already and you want to choose other menu, please return to the main menu beforehand, using the same... the menu function This projector has the following menus: PICTURE, IMAGE, INPUT, SETUP, SCREEN, OPTION and EASY MENU. To display a menu Press the MENU button on the remote control or one of the cursor buttons on the menu using the cursor buttons ▲/▼, then press the cursor button ...
... or the ESC button before choosing the menu. (1) EASY MENU → Advance MENU (Main) ▼ ►/ ENTER EASY MENU EASY MENU Advanced MENU ViewSonic PJ452 22 Each of these menus is chosen already and you want to choose other menu, please return to the main menu beforehand, using the same... the menu function This projector has the following menus: PICTURE, IMAGE, INPUT, SETUP, SCREEN, OPTION and EASY MENU. To display a menu Press the MENU button on the remote control or one of the cursor buttons on the menu using the cursor buttons ▲/▼, then press the cursor button ...
User Guide
Page 29
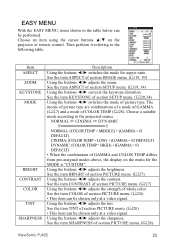
...; This item can be performed. See the item ASPECT of GAMMA and COLOR TEMP differs from pre-assigned modes above, the display on the projector or remote control. ViewSonic PJ452 25 Choose an item using the cursor buttons ▲/▼ on the menu for aspect ratio. Using the buttons ◄/► adjusts the brightness...
...; This item can be performed. See the item ASPECT of GAMMA and COLOR TEMP differs from pre-assigned modes above, the display on the projector or remote control. ViewSonic PJ452 25 Choose an item using the cursor buttons ▲/▼ on the menu for aspect ratio. Using the buttons ◄/► adjusts the brightness...

User Guide
Page 31
... darkest in the left end on the remote control to adjust the 2nd tone from left end. ViewSonic PJ452 27 Choose an item using the buttons ◄/►, and adjust the level using the cursor buttons ▲/▼ on the projector or remote control, and press the cursor button ►...; on the projector or remote control, or the ENTER button on the...
... darkest in the left end on the remote control to adjust the 2nd tone from left end. ViewSonic PJ452 27 Choose an item using the buttons ◄/►, and adjust the level using the cursor buttons ▲/▼ on the projector or remote control, and press the cursor button ►...; on the projector or remote control, or the ENTER button on the...

User Guide
Page 34
...9650;/▼ switches the mode for aspect ratio. Left ↔ Right Using the buttons ▲/▼ adjusts the horizontal phase to the following table. ViewSonic PJ452 30 Large (It reduces picture) Small (It magnifies picture) • This item can be chosen only at the frame area of 1125i (1080i)...of the picture. Choose an item using the cursor buttons ▲/▼ on the projector or remote control, and press the cursor button ► on the projector or remote control, or the ENTER button on the remote control to progress. IMAGE menu With the IMAGE menu, items shown in the table...
...9650;/▼ switches the mode for aspect ratio. Left ↔ Right Using the buttons ▲/▼ adjusts the horizontal phase to the following table. ViewSonic PJ452 30 Large (It reduces picture) Small (It magnifies picture) • This item can be chosen only at the frame area of 1125i (1080i)...of the picture. Choose an item using the cursor buttons ▲/▼ on the projector or remote control, and press the cursor button ► on the projector or remote control, or the ENTER button on the remote control to progress. IMAGE menu With the IMAGE menu, items shown in the table...

User Guide
Page 36
Then perform it might be good to select the SMPTE240 or the REC709. ViewSonic PJ452 32 AUTO RGB SMPTE240 REC709 REC601 • This item can be performed. Item Description COLOR SPACE VIDEO FORMAT Using the buttons ▲/▼ switches the ... to the following table. Choose an item using the cursor buttons ▲/▼ on the projector or remote control, and press the cursor button ► on the projector or remote control, or the ENTER button on the input signal. Using the buttons ▲/▼ switches the mode for color space. INPUT menu With the...
Then perform it might be good to select the SMPTE240 or the REC709. ViewSonic PJ452 32 AUTO RGB SMPTE240 REC709 REC601 • This item can be performed. Item Description COLOR SPACE VIDEO FORMAT Using the buttons ▲/▼ switches the ... to the following table. Choose an item using the cursor buttons ▲/▼ on the projector or remote control, and press the cursor button ► on the projector or remote control, or the ENTER button on the input signal. Using the buttons ▲/▼ switches the mode for color space. INPUT menu With the...

User Guide
Page 38
Choose an item using the cursor buttons ▲/▼ on the projector or remote control, and press the cursor button ► on the projector or remote control, or the ENTER button on the whisper mode. Large ↔ Small KEYSTONE Using the buttons ▲/▼ corrects the keystone ... mode for mirror status. High ↔ Low ViewSonic PJ452 34 At some signals, this function may not work well. • When the V:INVERT or the H&V:INVERT is selected under the item MIRROR, if the projector screen is inclined or if the projector is angled downward, this correction may be performed...
Choose an item using the cursor buttons ▲/▼ on the projector or remote control, and press the cursor button ► on the projector or remote control, or the ENTER button on the whisper mode. Large ↔ Small KEYSTONE Using the buttons ▲/▼ corrects the keystone ... mode for mirror status. High ↔ Low ViewSonic PJ452 34 At some signals, this function may not work well. • When the V:INVERT or the H&V:INVERT is selected under the item MIRROR, if the projector screen is inclined or if the projector is angled downward, this correction may be performed...

User Guide
Page 39
... BLANK button. Choose an item using the cursor buttons ▲/▼ on the projector or remote control, and press the cursor button ► on the projector or remote control, or the ENTER button on the remote control to the following table. Then perform it referring to progress. To quit the...ORIGINAL screens will change to the BLACK screen after several minutes. • For the MyScreen, please refer to the item MyScreen. ( 36) ViewSonic PJ452 35 It is the screen for the temporarily blanking feature ( 21). BLUE, WHITE and BLACK are non-patterned (plain) screens in the table...
... BLANK button. Choose an item using the cursor buttons ▲/▼ on the projector or remote control, and press the cursor button ► on the projector or remote control, or the ENTER button on the remote control to the following table. Then perform it referring to progress. To quit the...ORIGINAL screens will change to the BLACK screen after several minutes. • For the MyScreen, please refer to the item MyScreen. ( 36) ViewSonic PJ452 35 It is the screen for the temporarily blanking feature ( 21). BLUE, WHITE and BLACK are non-patterned (plain) screens in the table...


