English Owner's Manual
Page 1
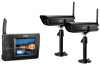
UDW10055 Video Surveillance System User's Manual What's in the Box Portable receiver with a 3-1/2-inch color LCD display UWDC25 wireless weatherproof camera (2) Antenna (2) Camera stand (2) AV cables AC adapter Receiver (1) AC Adapters - Never use damaged products! Contact Uniden's... If You... Phone Number have a ...874-9314 (voice or TTY) * During regular business hours, Central Standard Time. Get answers 24/7 at our website: www.uniden.com. Need Help? Software CD Cameras (2) USB cable Extension cord (2) If any items are missing or damaged, contact our Customer...
UDW10055 Video Surveillance System User's Manual What's in the Box Portable receiver with a 3-1/2-inch color LCD display UWDC25 wireless weatherproof camera (2) Antenna (2) Camera stand (2) AV cables AC adapter Receiver (1) AC Adapters - Never use damaged products! Contact Uniden's... If You... Phone Number have a ...874-9314 (voice or TTY) * During regular business hours, Central Standard Time. Get answers 24/7 at our website: www.uniden.com. Need Help? Software CD Cameras (2) USB cable Extension cord (2) If any items are missing or damaged, contact our Customer...
English Owner's Manual
Page 2
... placing your equipment, always follow these warnings and the assembly instructions could result in use the plug to make sure that both the transmitter and receiver are working properly and are installing this product near water, e.g., near a swimming pool. ►► To avoid any risk of each other. &#...units are between the ages of children. ►► WARNING: KEEP OUT OF THE REACH OF CHILDREN. Do not cover the camera or receiver with any high traffic areas where people might trip over them rub against any sharp edges or lie across any object such as a substitution ...
... placing your equipment, always follow these warnings and the assembly instructions could result in use the plug to make sure that both the transmitter and receiver are working properly and are installing this product near water, e.g., near a swimming pool. ►► To avoid any risk of each other. &#...units are between the ages of children. ►► WARNING: KEEP OUT OF THE REACH OF CHILDREN. Do not cover the camera or receiver with any high traffic areas where people might trip over them rub against any sharp edges or lie across any object such as a substitution ...
English Owner's Manual
Page 3
Uniden assumes no user-serviceable parts inside. ►► Do not expose the equipment to high temperatures, and avoid leaving the equipment in direct sunlight for ... Your TV 13 Reducing pixellation 13 Multiple Camera Features 14 Pairing Cameras 14 Some things to know about pairing cameras 14 Changing to Know the Receiver 9 What the buttons do 9 What the lights mean 10 What the connections do 10 Using the Menu 11 Using Zoom Mode 12 Pan and tilt...
Uniden assumes no user-serviceable parts inside. ►► Do not expose the equipment to high temperatures, and avoid leaving the equipment in direct sunlight for ... Your TV 13 Reducing pixellation 13 Multiple Camera Features 14 Pairing Cameras 14 Some things to know about pairing cameras 14 Changing to Know the Receiver 9 What the buttons do 9 What the lights mean 10 What the connections do 10 Using the Menu 11 Using Zoom Mode 12 Pan and tilt...
English Owner's Manual
Page 4
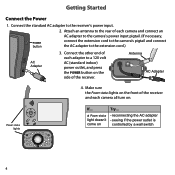
Getting Started Connect the Power 1. Connect the other end of the receiver. a Power status light doesn't come on the side of each adapter to the rear of the receiver and each camera and connect an AC adapter to the camera's power input pigtail. (If necessary, POWER button ...connect the extension cord to the camera's pigtail and connect the AC adapter to the receiver's power input. 2. Attach an antenna to a 120 volt AC (standard indoor) power outlet, and press the Power button on Try... --reconnecting ...
Getting Started Connect the Power 1. Connect the other end of the receiver. a Power status light doesn't come on the side of each adapter to the rear of the receiver and each camera and connect an AC adapter to the camera's power input pigtail. (If necessary, POWER button ...connect the extension cord to the camera's pigtail and connect the AC adapter to the receiver's power input. 2. Attach an antenna to a 120 volt AC (standard indoor) power outlet, and press the Power button on Try... --reconnecting ...
English Owner's Manual
Page 5
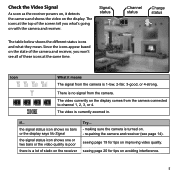
Channel status 1 Charge status Icon What it detects the camera and shows the video on the display. Check the Video Signal As soon as the receiver powers on, it means The signal from the camera is no bars or the display says No Signal the signal status icon shows one or ...two bars or the video quality is poor there is a lot of static on the receiver Try... --making sure the camera is currently zoomed in. There is 1-low, 2-fair, 3-good, or 4-strong. The icons at the same time. Since the icons...
Channel status 1 Charge status Icon What it detects the camera and shows the video on the display. Check the Video Signal As soon as the receiver powers on, it means The signal from the camera is no bars or the display says No Signal the signal status icon shows one or ...two bars or the video quality is poor there is a lot of static on the receiver Try... --making sure the camera is currently zoomed in. There is 1-low, 2-fair, 3-good, or 4-strong. The icons at the same time. Since the icons...
English Owner's Manual
Page 6
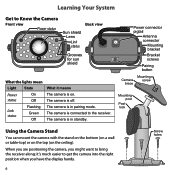
The camera is connected to bring the receiver along; Power connector pigtail Antenna connector Mounting bracket Bracket screws Pairing button Mounting Camera screw brace Mounting post Post lock Using the Camera Stand You ... status Off Link status Flashing Green Off What it 's much easier to get the camera into the right position when you might want to the receiver. When you are positioning the camera, you have the display handy. 6 Screw holes The camera is in pairing mode.
The camera is connected to bring the receiver along; Power connector pigtail Antenna connector Mounting bracket Bracket screws Pairing button Mounting Camera screw brace Mounting post Post lock Using the Camera Stand You ... status Off Link status Flashing Green Off What it 's much easier to get the camera into the right position when you might want to the receiver. When you are positioning the camera, you have the display handy. 6 Screw holes The camera is in pairing mode.
English Owner's Manual
Page 8
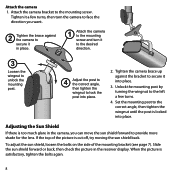
... place. 2. Attach the camera 1. Adjusting the Sun Shield If there is satisfactory, tighten the bolts again. 8 When the picture is too much glare in the receiver display. Attach the camera bracket to the left a few turns, then turn it into place. To adjust the sun shield, loosen the bolts on the...
... place. 2. Attach the camera 1. Adjusting the Sun Shield If there is satisfactory, tighten the bolts again. 8 When the picture is too much glare in the receiver display. Attach the camera bracket to the left a few turns, then turn it into place. To adjust the sun shield, loosen the bolts on the...
English Owner's Manual
Page 9
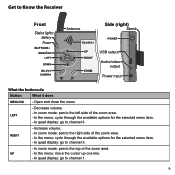
Get to Know the Receiver Front Status lights: Battery Power BUTTONS: MENU/OK LEFT DOWN SELECT CAMERA Antenna Side (right) Stand Speaker POWER OK VOL− VOL+ UP RIGHT ZOOM ...
Get to Know the Receiver Front Status lights: Battery Power BUTTONS: MENU/OK LEFT DOWN SELECT CAMERA Antenna Side (right) Stand Speaker POWER OK VOL− VOL+ UP RIGHT ZOOM ...

English Owner's Manual
Page 10
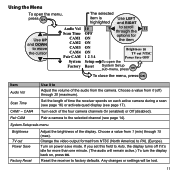
... . What the lights mean Light Power status Battery status State On Off Flashing Green Red Off What it means The receiver is in 3 minutes. The battery is charging. The battery is fully charged. Button DOWN SELECT CAMERA Zoom POWER What it does --In zoom mode: pan ...: link to turn off in pairing mode. What the connections do Connector USB output Audio/video output Use it to Connect the receiver to your computer for use with the Uniden Surveillance System Software. (See the software manual for more information.) Send the signal from the camera to a standard TV (see page...
... . What the lights mean Light Power status Battery status State On Off Flashing Green Red Off What it means The receiver is in 3 minutes. The battery is charging. The battery is fully charged. Button DOWN SELECT CAMERA Zoom POWER What it does --In zoom mode: pan ...: link to turn off in pairing mode. What the connections do Connector USB output Audio/video output Use it to Connect the receiver to your computer for use with the Uniden Surveillance System Software. (See the software manual for more information.) Send the signal from the camera to a standard TV (see page...
English Owner's Manual
Page 11
... the length of the audio from 0 (off if it to PAL (Europe). Choose a value from NTSC (North America) to Adjust the volume of time the receiver spends on each of the display. Change the video output format from 1 (min) through 20 (maximum). Any changes or settings will remain active.) To turn... RIGHT 10 OFF ON 9 to Auto, the display turns off ) through 15 (max). Choose a value from the camera. Pair a camera to factory defaults. Reset the receiver to the selected channel (see page 17).
... the length of the audio from 0 (off if it to PAL (Europe). Choose a value from NTSC (North America) to Adjust the volume of time the receiver spends on each of the display. Change the video output format from 1 (min) through 20 (maximum). Any changes or settings will remain active.) To turn... RIGHT 10 OFF ON 9 to Auto, the display turns off ) through 15 (max). Choose a value from the camera. Pair a camera to factory defaults. Reset the receiver to the selected channel (see page 17).
English Owner's Manual
Page 12
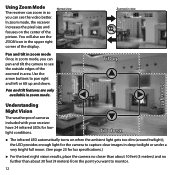
.... Use the arrow buttons to pan right and left or tilt up Pan left Pan right Understanding Night Vision The weatherproof cameras included with your receiver have 24 infrared LEDs for lux specifications.) ►► For the best night vision results, place the camera no closer than about 10 feet... the ZOOM icon in the upper right corner of the display. Using Zoom Mode Normal view The receiver can zoom in so you can see the video better. 1 In zoom mode, the receiver increases the pixel size and focuses on when the ambient light gets too dim (around twilight); Zoomed...
.... Use the arrow buttons to pan right and left or tilt up Pan left Pan right Understanding Night Vision The weatherproof cameras included with your receiver have 24 infrared LEDs for lux specifications.) ►► For the best night vision results, place the camera no closer than about 10 feet... the ZOOM icon in the upper right corner of the display. Using Zoom Mode Normal view The receiver can zoom in so you can see the video better. 1 In zoom mode, the receiver increases the pixel size and focuses on when the ambient light gets too dim (around twilight); Zoomed...
English Owner's Manual
Page 13
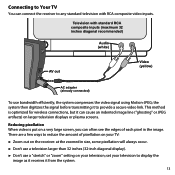
... an indented image line ("ghosting" or JPEG artifacts) on your TV: ►► Zoom out on a very large screen, you can connect the receiver to any standard television with standard RCA composite inputs (maximum 32 inches diagonal recommended) Audio (white) AV out Video (yellow) AC adapter (already connected)... display). ►► Don't use bandwidth efficiently, the system compresses the video signal using Motion-JPEG; This method is put on the receiver: at the zoomed in the image. Connecting to Your TV You can often see the edges of pixellation on your television;
... an indented image line ("ghosting" or JPEG artifacts) on your TV: ►► Zoom out on a very large screen, you can connect the receiver to any standard television with standard RCA composite inputs (maximum 32 inches diagonal recommended) Audio (white) AV out Video (yellow) AC adapter (already connected)... display). ►► Don't use bandwidth efficiently, the system compresses the video signal using Motion-JPEG; This method is put on the receiver: at the zoomed in the image. Connecting to Your TV You can often see the edges of pixellation on your television;
English Owner's Manual
Page 14
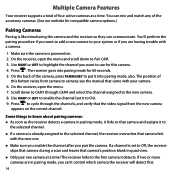
...the back of four active cameras at a time! If two or more cameras are in pairing mode, you are having trouble with a camera. 1. The receiver goes into pairing mode, also. The position of the accessory cameras. (See our website for this button varies from the new camera appears on . 2.... cycle through CAM4 and select the channel assigned to your camera. 6. Some things to know about pairing cameras: ►► As soon as the receiver detects a camera in quad view. ►► Only pair one . ►► Make sure you enable the channel after you want to add...
...the back of four active cameras at a time! If two or more cameras are in pairing mode, you are having trouble with a camera. 1. The receiver goes into pairing mode, also. The position of the accessory cameras. (See our website for this button varies from the new camera appears on . 2.... cycle through CAM4 and select the channel assigned to your camera. 6. Some things to know about pairing cameras: ►► As soon as the receiver detects a camera in quad view. ►► Only pair one . ►► Make sure you enable the channel after you want to add...
English Owner's Manual
Page 15
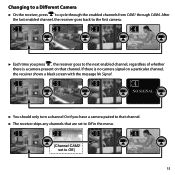
... time you have a camera paired to that channel. ►► The receiver skips any channels that channel. Changing to a Different Camera ►► On the receiver, press to Off.) 15 If there is a camera present on a particular channel, the receiver shows a black screen with the message No Signal. 1 2 3 4 ...NO SIGNAL ►► You should only turn a channel On if you press , the receiver goes to the next enabled channel, regardless of whether there is no camera signal on that are set to Off in the menu. 1 2 3 4...
... time you have a camera paired to that channel. ►► The receiver skips any channels that channel. Changing to a Different Camera ►► On the receiver, press to Off.) 15 If there is a camera present on a particular channel, the receiver shows a black screen with the message No Signal. 1 2 3 4 ...NO SIGNAL ►► You should only turn a channel On if you press , the receiver goes to the next enabled channel, regardless of whether there is no camera signal on that are set to Off in the menu. 1 2 3 4...
English Owner's Manual
Page 16
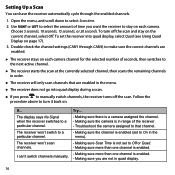
...more than one channel is enabled. --Making sure more than one channel is enabled. --Making sure you are enabled in the menu. ►► The receiver does not go into quad display, select Quad (see Using Quad Display on . Double-check the channel settings (CAM1 through the enabled channels. 1. I can...'t switch to a particular channel. Try... --Making sure there is a camera assigned the channel. --Making sure the camera is in range of the receiver. --Troubleshoot the camera assigned to that are not in the menu). --Making sure Scan Time is enabled (set to On in quad display. 16...
...more than one channel is enabled. --Making sure more than one channel is enabled. --Making sure you are enabled in the menu. ►► The receiver does not go into quad display, select Quad (see Using Quad Display on . Double-check the channel settings (CAM1 through the enabled channels. 1. I can...'t switch to a particular channel. Try... --Making sure there is a camera assigned the channel. --Making sure the camera is in range of the receiver. --Troubleshoot the camera assigned to that are not in the menu). --Making sure Scan Time is enabled (set to On in quad display. 16...
English Owner's Manual
Page 17
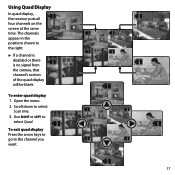
The channels appear in the positions shown to the channel you want. 2 1 2 3 4 4 1 1 2 4 3 4 2 17 Use Right or Left to select Quad. 3 To exit quad display Press the arrow keys to go to the right: ►► If a channel is disabled or there is no signal from 3 the camera, that channel's section of the quad display will be blank. Scroll down to select Scan time. 3. Open the menu. 2. To enter quad display 1. Using Quad Display In quad display, the receiver puts all 1 four channels on the screen at the same time.
The channels appear in the positions shown to the channel you want. 2 1 2 3 4 4 1 1 2 4 3 4 2 17 Use Right or Left to select Quad. 3 To exit quad display Press the arrow keys to go to the right: ►► If a channel is disabled or there is no signal from 3 the camera, that channel's section of the quad display will be blank. Scroll down to select Scan time. 3. Open the menu. 2. To enter quad display 1. Using Quad Display In quad display, the receiver puts all 1 four channels on the screen at the same time.
English Owner's Manual
Page 18
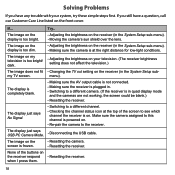
.... Try.. The image on . The display just says No Signal. --Switching to see which channel the receiver is on my television is frozen. --Resetting the camera. --Resetting the receiver. None of the screen to a different channel. --Checking the channel status icon at the right distance for...sure the AV output cable is not connected. --Making sure the receiver is in . --Switching to the receiver. Make sure the camera assigned to this channel is powered on the receiver respond --Resetting the receiver. The image on the receiver (in the System Setup sub-menu). --Making sure the camera ...
.... Try.. The image on . The display just says No Signal. --Switching to see which channel the receiver is on my television is frozen. --Resetting the camera. --Resetting the receiver. None of the screen to a different channel. --Checking the channel status icon at the right distance for...sure the AV output cable is not connected. --Making sure the receiver is in . --Switching to the receiver. Make sure the camera assigned to this channel is powered on the receiver respond --Resetting the receiver. The image on the receiver (in the System Setup sub-menu). --Making sure the camera ...
English Owner's Manual
Page 19
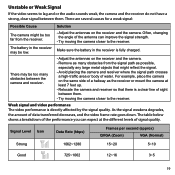
... may be low. Often, changing the angle of a hallway as possible, especially any large metal objects that there is fully charged. The battery in the receiver is a clear line of water. For example, place the camera on the same side of the antenna can expect at least 7 feet up. --Relocate ... of signal quality. There are several causes for a weak signal: Possible Cause Solution The camera might reflect the signal. --Avoid placing the camera and receiver where the signal path crosses a high-traffic area or body of sight between them . --Try moving the camera closer to the...
... may be low. Often, changing the angle of a hallway as possible, especially any large metal objects that there is fully charged. The battery in the receiver is a clear line of water. For example, place the camera on the same side of the antenna can expect at least 7 feet up. --Relocate ... of signal quality. There are several causes for a weak signal: Possible Cause Solution The camera might reflect the signal. --Avoid placing the camera and receiver where the signal path crosses a high-traffic area or body of sight between them . --Try moving the camera closer to the...
English Owner's Manual
Page 20
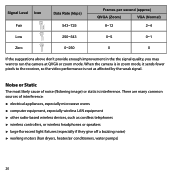
...;► working motors (hair dryers, heater/air conditioners, water pumps) 20 When the camera is in the the signal quality, you may want to the receiver, so the video performance is interference.
...;► working motors (hair dryers, heater/air conditioners, water pumps) 20 When the camera is in the the signal quality, you may want to the receiver, so the video performance is interference.
English Owner's Manual
Page 21
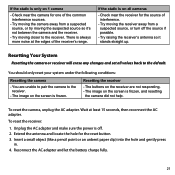
... should only reset your system under the following conditions: Resetting the camera --You are not responding. --The image on 1 camera --Check near the receiver for the reset button. 3. Reconnect the AC adapter and let the battery charge fully. 21 To reset the camera, unplug the AC adapter. Extend..., and resetting the camera did not help. Resetting the receiver --The buttons on the receiver are unable to pair the camera to the receiver. --The image on the screen is on all values back to the receiver. To reset the receiver: 1. If the static is always more noise at least...
... should only reset your system under the following conditions: Resetting the camera --You are not responding. --The image on 1 camera --Check near the receiver for the reset button. 3. Reconnect the AC adapter and let the battery charge fully. 21 To reset the camera, unplug the AC adapter. Extend..., and resetting the camera did not help. Resetting the receiver --The buttons on the receiver are unable to pair the camera to the receiver. --The image on the screen is on all values back to the receiver. To reset the receiver: 1. If the static is always more noise at least...


