Owners Manual
Page 3
......6 Installing Your Monitor...7 Installing the Camera...7 BASIC OPERATION 10 WIRELESS Monitor...10 WIRELESS CAMERA...12 Front & Back Controls...12 LCD DISPLAY...13 USING THE UDR444...14 Viewing Modes...14 Common Operations...14 UDR444 SYSTEM MENUS 17 ALERT...17 POWER SAVE...18 SYSTEM...18 Date & Time...19 Brightness...19 Format...19 Default...20 Language...21 A/V Out...21 CAMERA...21 Pair...22 On/Off...22 RECORD...23 Video Quality...23 Trigger Recording Time...23 Motion Sensitivity...
......6 Installing Your Monitor...7 Installing the Camera...7 BASIC OPERATION 10 WIRELESS Monitor...10 WIRELESS CAMERA...12 Front & Back Controls...12 LCD DISPLAY...13 USING THE UDR444...14 Viewing Modes...14 Common Operations...14 UDR444 SYSTEM MENUS 17 ALERT...17 POWER SAVE...18 SYSTEM...18 Date & Time...19 Brightness...19 Format...19 Default...20 Language...21 A/V Out...21 CAMERA...21 Pair...22 On/Off...22 RECORD...23 Video Quality...23 Trigger Recording Time...23 Motion Sensitivity...

Owners Manual
Page 4
USING THE INTERCOM...28 VIEWING LIVE VIDEO...28 Viewing On Your TV...28 Viewing On Your Computer...28 Viewing on Your Wireless Device or Remote Computer 29 PAIRING ACCESSORY CAMERAS 30 MAINTAINING YOUR SYSTEM 31 MONITOR...31 CAMERAS...31 Troubleshooting 32 Specifications 33 MONITOR...33 General...33 Monitor...33 CAMERA...34 General...34 Camera...34 One-Year Limited Warranty 36
USING THE INTERCOM...28 VIEWING LIVE VIDEO...28 Viewing On Your TV...28 Viewing On Your Computer...28 Viewing on Your Wireless Device or Remote Computer 29 PAIRING ACCESSORY CAMERAS 30 MAINTAINING YOUR SYSTEM 31 MONITOR...31 CAMERAS...31 Troubleshooting 32 Specifications 33 MONITOR...33 General...33 Monitor...33 CAMERA...34 General...34 Camera...34 One-Year Limited Warranty 36
Owners Manual
Page 5
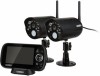
...; 4.3" LCD monitor with built-in your remote computer or other wired/wireless devices. •• Maintaining Your System. motion detection/night vision range •• Camera out of range alert •• Record to microSD card (4GB microSD card included but will find detailed descriptions of basic operations in an abbreviated format, referencing screen details in excellent working condition. •• Solving Problems. Troubleshooting tips are...
...; 4.3" LCD monitor with built-in your remote computer or other wired/wireless devices. •• Maintaining Your System. motion detection/night vision range •• Camera out of range alert •• Record to microSD card (4GB microSD card included but will find detailed descriptions of basic operations in an abbreviated format, referencing screen details in excellent working condition. •• Solving Problems. Troubleshooting tips are...

Owners Manual
Page 6
... create spots that , if they will reflect the light from the infrared LED and might lower video quality. Periodically clean the lens glass with your monitor are used for night vision, thus causing lower quality video. WHAT'S INCLUDED GETTING STARTED Digital Wireless Cameras (2) Digital Wireless Monitor (1) Camera Power Adapters (2) Monitor Power Adapter (1) USB Cable AV Cable CD User Manual Receiver Cradle Screws and anchors (6 each) 4G MicroSD Card (Adapter not shown) If any items are missing or...
... create spots that , if they will reflect the light from the infrared LED and might lower video quality. Periodically clean the lens glass with your monitor are used for night vision, thus causing lower quality video. WHAT'S INCLUDED GETTING STARTED Digital Wireless Cameras (2) Digital Wireless Monitor (1) Camera Power Adapters (2) Monitor Power Adapter (1) USB Cable AV Cable CD User Manual Receiver Cradle Screws and anchors (6 each) 4G MicroSD Card (Adapter not shown) If any items are missing or...

Owners Manual
Page 7
... get the camera into the right position when you are powering the monitor through the cradle, insert the monitor into place. The LEDs automatically activate at clear glass; Avoid pointing the camera lens directly at night and the picture viewed turns to black and white. You can use night vision for the ceiling). If you have installed the cameras and set up the monitor, plug the AC adapter power output cable into a wall outlet...
... get the camera into the right position when you are powering the monitor through the cradle, insert the monitor into place. The LEDs automatically activate at clear glass; Avoid pointing the camera lens directly at night and the picture viewed turns to black and white. You can use night vision for the ceiling). If you have installed the cameras and set up the monitor, plug the AC adapter power output cable into a wall outlet...

Owners Manual
Page 8
... the wingnut to the correct angle, then tighten the wingnut until the post is securely in place. Tighten the camera brace up unlock the against the camera to 2. Drill holes using the 5mm drill bit. 3. the bottom of the camera as a tabletop if needed . Loosen the wingnut to secure it a few turns. 4. The monitor displays the Uniden title screen and then displays the live view. 8
... the wingnut to the correct angle, then tighten the wingnut until the post is securely in place. Tighten the camera brace up unlock the against the camera to 2. Drill holes using the 5mm drill bit. 3. the bottom of the camera as a tabletop if needed . Loosen the wingnut to secure it a few turns. 4. The monitor displays the Uniden title screen and then displays the live view. 8

Owners Manual
Page 9
... camera in . Connect one end of an AC adapter to the camera's power pigtail and plug the other side of windows with the lens flush against the surface to the monitor. Power Up the Camera 1. Verify that the power supply adapter for the camera(s) is poor a white image appears at night Try this... Place the camera on the other end into a 120 volt AC (standard indoor) power outlet. 2. Adjust the camera viewing position if needed...
... camera in . Connect one end of an AC adapter to the camera's power pigtail and plug the other side of windows with the lens flush against the surface to the monitor. Power Up the Camera 1. Verify that the power supply adapter for the camera(s) is poor a white image appears at night Try this... Place the camera on the other end into a 120 volt AC (standard indoor) power outlet. 2. Adjust the camera viewing position if needed...

Owners Manual
Page 10
... does 1 Antenna: Receives signals (video and audio) from cameras. 2 LCD Screen: Displays video from the cameras. 3 Zoom (+/−): Set the image to see the parts of the image not displayed on the LCD screen. You can use the navigation buttons to double size. In Zoom mode, use these controls in Zoom mode as well. ▼Vol, ▲Vol • Move up or down in Menu mode. • Increase or decrease the volume in Live view. • Play...
... does 1 Antenna: Receives signals (video and audio) from cameras. 2 LCD Screen: Displays video from the cameras. 3 Zoom (+/−): Set the image to see the parts of the image not displayed on the LCD screen. You can use the navigation buttons to double size. In Zoom mode, use these controls in Zoom mode as well. ▼Vol, ▲Vol • Move up or down in Menu mode. • Increase or decrease the volume in Live view. • Play...

Owners Manual
Page 11
... • Move right in Menu mode. • Press this button to change viewing camera channel in Live view. • Fast forward in the cradle). 11 Press again to stop recording. 14 Power button: Turns monitor on the back of the monitor. 13 Manual Rec: Press this button to return to previous screen. 7 Video Playback: During live video, press to go to the Recorded File screen. 8 Microphone: For two-way audio to camera. 9 Power On LED • On = Battery...
... • Move right in Menu mode. • Press this button to change viewing camera channel in Live view. • Fast forward in the cradle). 11 Press again to stop recording. 14 Power button: Turns monitor on the back of the monitor. 13 Manual Rec: Press this button to return to previous screen. 7 Video Playback: During live video, press to go to the Recorded File screen. 8 Microphone: For two-way audio to camera. 9 Power On LED • On = Battery...

Owners Manual
Page 12
... this button to pair the camera to the monitor. 8 Camera stand: Connects to the camera to allow multiple mounting positions. 9 Speaker: Transmits sound from the monitor (intercom). 10 Power Input (9V DC): Connect to activate IR LEDs for night vision. 3 Microphone: Receives sounds from the area near the camera. 4 PIR sensor: Detects motion within camera's line of sight. 5 Camera Lens: Mechanism through which the cameras view surroundings and record images. 6 Infrared LED: Infrared LEDs provide viewing in no/low light conditions...
... this button to pair the camera to the monitor. 8 Camera stand: Connects to the camera to allow multiple mounting positions. 9 Speaker: Transmits sound from the monitor (intercom). 10 Power Input (9V DC): Connect to activate IR LEDs for night vision. 3 Microphone: Receives sounds from the area near the camera. 4 PIR sensor: Detects motion within camera's line of sight. 5 Camera Lens: Mechanism through which the cameras view surroundings and record images. 6 Infrared LED: Infrared LEDs provide viewing in no/low light conditions...
Owners Manual
Page 14
...: Scan - The camera records for Live view Manually start recording Set up to disable the function. CH3 - Quad Press MANUAL REC on a single screen in the following modes: •• Quad mode: Monitor displays video from the Record menu (see page 27). 14 CH2 - What it is recording video. USING THE UDR444 Viewing Modes In Live view, video displays live images from the camera in HH:MM:SS format. 13 Auto Recording indicator: Icon appears when the camera's motion detection function has been...
...: Scan - The camera records for Live view Manually start recording Set up to disable the function. CH3 - Quad Press MANUAL REC on a single screen in the following modes: •• Quad mode: Monitor displays video from the Record menu (see page 27). 14 CH2 - What it is recording video. USING THE UDR444 Viewing Modes In Live view, video displays live images from the camera in HH:MM:SS format. 13 Auto Recording indicator: Icon appears when the camera's motion detection function has been...

Owners Manual
Page 15
... specific day whose recording schedule you will see page 25). To view on TV: Use the AV cable to connect the monitor to the computer. To... Use the monitor's control buttons to cancel. 3. When you are connected, you want to access the recorded video on your system's microSD card. Manually cancel a Scheduled Record Playing back a recording on the UDR444 monitor Cancel watching a recorded video Watching recorded video on PC or television Set the date and time...
... specific day whose recording schedule you will see page 25). To view on TV: Use the AV cable to connect the monitor to the computer. To... Use the monitor's control buttons to cancel. 3. When you are connected, you want to access the recorded video on your system's microSD card. Manually cancel a Scheduled Record Playing back a recording on the UDR444 monitor Cancel watching a recorded video Watching recorded video on PC or television Set the date and time...
Owners Manual
Page 18
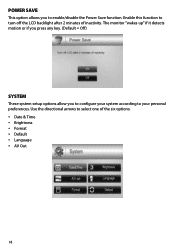
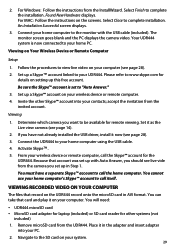
Use the directional arrows to turn off the LCD backlight after 2 minutes of the six options: •• Date & Time •• Brightness •• Format •• Default •• Language •• AV Out 18 The monitor "wakes up" if it detects motion or if you press any key. (Default = Off) SYSTEM These system setup options allow you to enable/disable the Power Save function. Enable this function to select one of inactivity. POWER SAVE This option allows you to configure your system according to your personal preferences.
Use the directional arrows to turn off the LCD backlight after 2 minutes of the six options: •• Date & Time •• Brightness •• Format •• Default •• Language •• AV Out 18 The monitor "wakes up" if it detects motion or if you press any key. (Default = Off) SYSTEM These system setup options allow you to enable/disable the Power Save function. Enable this function to select one of inactivity. POWER SAVE This option allows you to configure your system according to your personal preferences.

Owners Manual
Page 20
FORMAT displays; Default This option allows you make your selection. Press ▲Vol or ▼Vol to factory settings. (Default = No) Camera pairings and date/time settings are not affected by a reset. 1. Insert a microSD card into the monitor if needed. 2. If you try to format the microSD card but no microSD card is complete, the System screen displays. once formatting is inserted, NO SD CARD displays. Press MENU/OK after you to restore the UDR444 to select either No or Yes for this option. 2. 1. Select Yes, then press MENU/OK. 3. The System screen displays. 20
FORMAT displays; Default This option allows you make your selection. Press ▲Vol or ▼Vol to factory settings. (Default = No) Camera pairings and date/time settings are not affected by a reset. 1. Insert a microSD card into the monitor if needed. 2. If you try to format the microSD card but no microSD card is complete, the System screen displays. once formatting is inserted, NO SD CARD displays. Press MENU/OK after you to restore the UDR444 to select either No or Yes for this option. 2. 1. Select Yes, then press MENU/OK. 3. The System screen displays. 20

Owners Manual
Page 23
Press MENU/OK. Press MENU/OK to choose between higher quality (High 640x480) and lower quality (Low 320x240) video output. 2. Press ▲Vol or ▼Vol to confirm the setting. The main Camera screen displays. The Record screen displays. RECORD The Record screen contains 5 sub-screens that help you to begin recording. Trigger Recording Time Various things can alert the system to preset the output video quality for the unit. (Default = Low 320 × 240...
Press MENU/OK. Press MENU/OK to choose between higher quality (High 640x480) and lower quality (Low 320x240) video output. 2. Press ▲Vol or ▼Vol to confirm the setting. The main Camera screen displays. The Record screen displays. RECORD The Record screen contains 5 sub-screens that help you to begin recording. Trigger Recording Time Various things can alert the system to preset the output video quality for the unit. (Default = Low 320 × 240...

Owners Manual
Page 28
... hold on the .MAC driver to x16 speed) • - Connect the monitor to delete. The monitor screen goes blank and the TV screen displays the camera output. Press MENU/OK. 2. Make the camera you exit the video, exits Playback function DELETING RECORDED FILES You can delete a specific recorded videofile or an entire folder of folders and recorded video files on a remote PC or wireless devices such as an iPhone®, iPad®...
... hold on the .MAC driver to x16 speed) • - Connect the monitor to delete. The monitor screen goes blank and the TV screen displays the camera output. Press MENU/OK. 2. Make the camera you exit the video, exits Playback function DELETING RECORDED FILES You can delete a specific recorded videofile or an entire folder of folders and recorded video files on a remote PC or wireless devices such as an iPhone®, iPad®...
Owners Manual
Page 29
... connected to call the home computer. Set up this free account. Determine which camera you have a separate Skype™ account to your wireless device or remote computer. 4. You must have not already installed the USB driver, install it in AVI format. Select Finish to complete installation. For MAC: Follow the instructions on Your Wireless Device or Remote Computer Setup 1. The monitor screen goes blank and the PC displays the camera video...
... connected to call the home computer. Set up this free account. Determine which camera you have a separate Skype™ account to your wireless device or remote computer. 4. You must have not already installed the USB driver, install it in AVI format. Select Finish to complete installation. For MAC: Follow the instructions on Your Wireless Device or Remote Computer Setup 1. The monitor screen goes blank and the PC displays the camera video...

Owners Manual
Page 32
... choppy • Move the camera and monitor closer to view on a smaller TV/PC monitor. (using AV Out to each other. • Remove any obstructions between the camera and monitor. Recording problems • Make sure the microSD card is inserted correctly. • Check that the microSD card memory is not full. • Verify that the AC adapter is plugged in. • Make sure...
... choppy • Move the camera and monitor closer to view on a smaller TV/PC monitor. (using AV Out to each other. • Remove any obstructions between the camera and monitor. Recording problems • Make sure the microSD card is inserted correctly. • Check that the microSD card memory is not full. • Verify that the AC adapter is plugged in. • Make sure...

Owners Manual
Page 35
... equipment away from the monitor. ►► Plug the equipment into an outlet on , the user is connected. ►► Consult the dealer or an experienced radio/television technician for a Class B digital device, pursuant to operate the equipment. CAUTION! Any changes or modifications to this ..., uses, and can be installed to provide a separation distance of the FCC rules and ETSI (EN) 300328. IC Compliance Information Radio Equipment Notice The term "IC:" before the radio certification number only signifies that interference will not occur in residential installations....
... equipment away from the monitor. ►► Plug the equipment into an outlet on , the user is connected. ►► Consult the dealer or an experienced radio/television technician for a Class B digital device, pursuant to operate the equipment. CAUTION! Any changes or modifications to this ..., uses, and can be installed to provide a separation distance of the FCC rules and ETSI (EN) 300328. IC Compliance Information Radio Equipment Notice The term "IC:" before the radio certification number only signifies that interference will not occur in residential installations....
Owners Manual
Page 36
... implies conformity to you without charge for this Uniden Product to the original user shall terminate & be ensured when using this device". Low Voltage Directive (73/23/EEC); Compliance with equipment or parts or as detailed by the owner's manual for parts, service, or any system not manufactured by Uniden, or (F) installed or programmed by anyone other cost (except shipping & handling...
... implies conformity to you without charge for this Uniden Product to the original user shall terminate & be ensured when using this device". Low Voltage Directive (73/23/EEC); Compliance with equipment or parts or as detailed by the owner's manual for parts, service, or any system not manufactured by Uniden, or (F) installed or programmed by anyone other cost (except shipping & handling...


