English Owner's Manual
Page 2
Reading your owner's manual, included with this product to be used for illegal purposes. Calling our customer care specialists at www.uniden.com. 3. For further information on video surveillance and audio recording legal requirements, please consult your questions by law are hereby reserved.... Our customer care specialists are not manufactured and/or sold with all local, state, and federal law. Uniden expects customers' use of these products to be in compliance with the intent to your place of purchase. Visiting our customer support website at...
Reading your owner's manual, included with this product to be used for illegal purposes. Calling our customer care specialists at www.uniden.com. 3. For further information on video surveillance and audio recording legal requirements, please consult your questions by law are hereby reserved.... Our customer care specialists are not manufactured and/or sold with all local, state, and federal law. Uniden expects customers' use of these products to be in compliance with the intent to your place of purchase. Visiting our customer support website at...
English Owner's Manual
Page 3
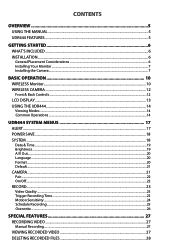
... Monitor...7 Installing the Camera...7 BASIC OPERATION 10 WIRELESS Monitor...10 WIRELESS CAMERA...12 Front & Back Controls...12 LCD DISPLAY...13 USING THE UDR444...14 Viewing Modes...14 Common Operations...14 UDR444 SYSTEM MENUS 17 ALERT...17 POWER SAVE...18 SYSTEM...18 Date & Time...19 Brightness...19 A/V Out...20 Language...20 Format...20...
... Monitor...7 Installing the Camera...7 BASIC OPERATION 10 WIRELESS Monitor...10 WIRELESS CAMERA...12 Front & Back Controls...12 LCD DISPLAY...13 USING THE UDR444...14 Viewing Modes...14 Common Operations...14 UDR444 SYSTEM MENUS 17 ALERT...17 POWER SAVE...18 SYSTEM...18 Date & Time...19 Brightness...19 A/V Out...20 Language...20 Format...20...
English Owner's Manual
Page 4
USING THE INTERCOM...28 VIEWING LIVE VIDEO...28 Viewing On Your TV...28 Viewing On Your Computer...28 Viewing on Your Wireless Device or Remote Computer 29 PAIRING ACCESSORY CAMERAS 30 MAINTAINING YOUR SYSTEM 31 MONITOR...31 CAMERAS...31 Troubleshooting 32 Specifications 33 MONITOR...33 General...33 Monitor...33 CAMERA...34 General...34 Camera...34 One-Year Limited Warranty 36
USING THE INTERCOM...28 VIEWING LIVE VIDEO...28 Viewing On Your TV...28 Viewing On Your Computer...28 Viewing on Your Wireless Device or Remote Computer 29 PAIRING ACCESSORY CAMERAS 30 MAINTAINING YOUR SYSTEM 31 MONITOR...31 CAMERAS...31 Troubleshooting 32 Specifications 33 MONITOR...33 General...33 Monitor...33 CAMERA...34 General...34 Camera...34 One-Year Limited Warranty 36
English Owner's Manual
Page 5
...products! wireless transmission range •• Up to 500 ft. This general section tells you about the UDR444 special features, such as how to connect your UDR444 hardware clean and in microphones and speakers (cameras and monitor) support Intercom function for remote Skype™ ...5 Here you will support up to 4.5 hours) •• Up to 40 ft. UDR444 FEATURES •• 4.3" LCD monitor with built-in the next section. •• Uniden UDR444 Screen Descriptions. This last section contains hardware and software specifications. Never use this manual. If any...
...products! wireless transmission range •• Up to 500 ft. This general section tells you about the UDR444 special features, such as how to connect your UDR444 hardware clean and in microphones and speakers (cameras and monitor) support Intercom function for remote Skype™ ...5 Here you will support up to 4.5 hours) •• Up to 40 ft. UDR444 FEATURES •• 4.3" LCD monitor with built-in the next section. •• Uniden UDR444 Screen Descriptions. This last section contains hardware and software specifications. Never use this manual. If any...
English Owner's Manual
Page 6
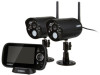
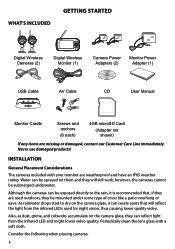
Never use damaged products! INSTALLATION General Placement Considerations The cameras included with a soft cloth. however, the cameras cannot be mounted under some type of cover like a patio overhang or eave. Also, as dust, grime, and cobwebs accumulate on them and they will reflect the light from the infrared LED and might lower video quality. Although the cameras can be exposed directly to dry on the camera glass, it is recommended that will still work; WHAT'S INCLUDED GETTING STARTED Digital Wireless Cameras (2) Digital Wireless Monitor (1) Camera Power Adapters (2) ...
Never use damaged products! INSTALLATION General Placement Considerations The cameras included with a soft cloth. however, the cameras cannot be mounted under some type of cover like a patio overhang or eave. Also, as dust, grime, and cobwebs accumulate on them and they will reflect the light from the infrared LED and might lower video quality. Although the cameras can be exposed directly to dry on the camera glass, it is recommended that will still work; WHAT'S INCLUDED GETTING STARTED Digital Wireless Cameras (2) Digital Wireless Monitor (1) Camera Power Adapters (2) ...
English Owner's Manual
Page 7
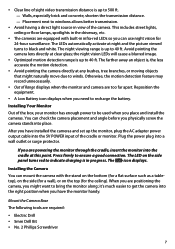
The LEDs automatically activate at any bushes, tree branches, or moving objects that might want to black and white. The farther away an object is, the less accurate the motion detection. •• Avoid pointing the camera directly at night and the picture viewed turns to bring the monitor along; Otherwise, the motion detection feature may record unnecessarily. •• Out of Range displays when the monitor and camera are required: •• Electric Drill •• 5mm Drill Bit •• No. 2 Phillips Screwdriver 7 The LED on the top (for 24-hour ...
The LEDs automatically activate at any bushes, tree branches, or moving objects that might want to black and white. The farther away an object is, the less accurate the motion detection. •• Avoid pointing the camera directly at night and the picture viewed turns to bring the monitor along; Otherwise, the motion detection feature may record unnecessarily. •• Out of Range displays when the monitor and camera are required: •• Electric Drill •• 5mm Drill Bit •• No. 2 Phillips Screwdriver 7 The LED on the top (for 24-hour ...
English Owner's Manual
Page 8
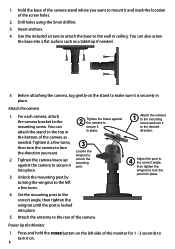
Use the included screws to attach the base to the mounting screw. Attach the camera 1. For each camera, attach the camera bracket to the wall or ceiling. Set the mounting post to the correct angle, then tighten the wingnut until the post is securely in place. 1. Tighten the camera brace up unlock the against the camera to the rear of the screw holes. 2. Attach the antenna to secure it on the left a few turns. 4. Drill holes using the 5mm drill bit. 3. Before attaching the camera, tug gently on the stand to face 3 the direction you want . Tighten it a few ...
Use the included screws to attach the base to the mounting screw. Attach the camera 1. For each camera, attach the camera bracket to the wall or ceiling. Set the mounting post to the correct angle, then tighten the wingnut until the post is securely in place. 1. Tighten the camera brace up unlock the against the camera to the rear of the screw holes. 2. Attach the antenna to secure it on the left a few turns. 4. Drill holes using the 5mm drill bit. 3. Before attaching the camera, tug gently on the stand to face 3 the direction you want . Tighten it a few ...
English Owner's Manual
Page 9
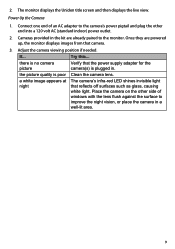
... end into a 120 volt AC (standard indoor) power outlet. 2. Try this... there is poor Clean the camera lens. Cameras provided in . The monitor displays the Uniden title screen and then displays the live view. Power Up the Camera 1. Once they are already paired to the camera's power pigtail and plug the...
... end into a 120 volt AC (standard indoor) power outlet. 2. Try this... there is poor Clean the camera lens. Cameras provided in . The monitor displays the Uniden title screen and then displays the live view. Power Up the Camera 1. Once they are already paired to the camera's power pigtail and plug the...
English Owner's Manual
Page 10
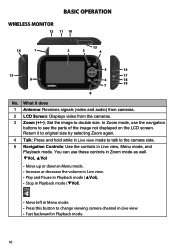
What it to original size by selecting Zoom again. 4 Talk: Press and hold while in Live view mode to talk to see the parts of the image not displayed on the LCD screen. You can use the navigation buttons to the camera side. 5 Navigation Controls: Use the controls in Playback mode. 10 Return it does 1 Antenna: Receives signals (video and audio) from cameras. 2 LCD Screen: Displays video from the cameras. 3 Zoom (+/−): Set the image to change viewing camera channel in Live view. • Fast backward in Live view, Menu mode, and Playback mode. BASIC OPERATION WIRELESS Monitor ...
What it to original size by selecting Zoom again. 4 Talk: Press and hold while in Live view mode to talk to see the parts of the image not displayed on the LCD screen. You can use the navigation buttons to the camera side. 5 Navigation Controls: Use the controls in Playback mode. 10 Return it does 1 Antenna: Receives signals (video and audio) from cameras. 2 LCD Screen: Displays video from the cameras. 3 Zoom (+/−): Set the image to change viewing camera channel in Live view. • Fast backward in Live view, Menu mode, and Playback mode. BASIC OPERATION WIRELESS Monitor ...
English Owner's Manual
Page 11
Menu/OK • Press to access the UDR444 menu. • Confirm selections in Menu mode. 6 Back: Press this button to start Manual Recording mode. Press again to stop recording. 14 Power button: Turns ...
Menu/OK • Press to access the UDR444 menu. • Confirm selections in Menu mode. 6 Back: Press this button to start Manual Recording mode. Press again to stop recording. 14 Power button: Turns ...
English Owner's Manual
Page 12
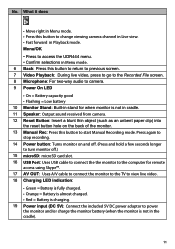
PIR sensor: Detects motion within camera's line of sight. 5 Camera Lens: Mechanism through which the cameras view surroundings and record images. 6 Infrared LED: Infrared LEDs provide viewing in no/low light conditions. What it does 1 Camera Antenna: Sends signals to the monitor. 2 Light sensor: Measures light intensity to activate IR LEDs for night vision. 3 Microphone: Receives sounds from the monitor (intercom). 10 Power Input (9V DC): Connect to allow multiple mounting positions. 9 Speaker: Transmits sound from the area near the camera. 4 PIR sensor: Detects motion within camera's line...
PIR sensor: Detects motion within camera's line of sight. 5 Camera Lens: Mechanism through which the cameras view surroundings and record images. 6 Infrared LED: Infrared LEDs provide viewing in no/low light conditions. What it does 1 Camera Antenna: Sends signals to the monitor. 2 Light sensor: Measures light intensity to activate IR LEDs for night vision. 3 Microphone: Receives sounds from the monitor (intercom). 10 Power Input (9V DC): Connect to allow multiple mounting positions. 9 Speaker: Transmits sound from the area near the camera. 4 PIR sensor: Detects motion within camera's line...
English Owner's Manual
Page 13
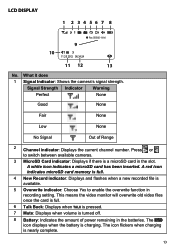
LCD DISPLAY 1 2 34567 8 Rec 055920-1.AVI 9 10 11.25.2012 06:34:24 11 12 13 No. The icon displays when the battery is nearly complete. 13 What it does 1 Signal Indicator: Shows the camera's signal strength. Signal Strength Indicator Warning Perfect None Good None Fair None Low None No Signal Out of power remaining in the batteries. The icon flickers when charging is charging. A white icon indicates a microSD card has been inserted. Press or to enable the overwrite function in the slot. A red icon indicates microSD card memory is full. 4 New Record indicator:...
LCD DISPLAY 1 2 34567 8 Rec 055920-1.AVI 9 10 11.25.2012 06:34:24 11 12 13 No. The icon displays when the battery is nearly complete. 13 What it does 1 Signal Indicator: Shows the camera's signal strength. Signal Strength Indicator Warning Perfect None Good None Fair None Low None No Signal Out of power remaining in the batteries. The icon flickers when charging is charging. A white icon indicates a microSD card has been inserted. Press or to enable the overwrite function in the slot. A red icon indicates microSD card memory is full. 4 New Record indicator:...
English Owner's Manual
Page 14
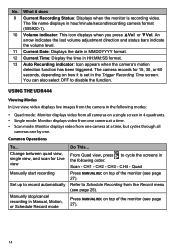
... time in hour/minute/second/recording camera format (055920-1). 10 Volume indicator: This icon displays when you press ▲Vol or ▼Vol. USING THE UDR444 Viewing Modes In Live view, video displays live images from all cameras one by one camera at a time. •• Scan mode: Monitor displays video...
... time in hour/minute/second/recording camera format (055920-1). 10 Volume indicator: This icon displays when you press ▲Vol or ▼Vol. USING THE UDR444 Viewing Modes In Live view, video displays live images from all cameras one by one camera at a time. •• Scan mode: Monitor displays video...

English Owner's Manual
Page 15
... system's microSD card. Watch live video. 3. To view on TV: Use the AV cable to connect the monitor to your smartphone Adjust UDR444 volume Do This... 1. When you are connected, you want to the computer. The icon displays, then turns off after 5 seconds of ... (increase volume) or ▼Vol (decrease volume) when viewing a camera. 2. Manually cancel a Scheduled Record Playing back a recording on the UDR444 monitor Cancel watching a recorded video Watching recorded video on your computer and play them from the monitor and insert it in the PC's memory slot...
... system's microSD card. Watch live video. 3. To view on TV: Use the AV cable to connect the monitor to your smartphone Adjust UDR444 volume Do This... 1. When you are connected, you want to the computer. The icon displays, then turns off after 5 seconds of ... (increase volume) or ▼Vol (decrease volume) when viewing a camera. 2. Manually cancel a Scheduled Record Playing back a recording on the UDR444 monitor Cancel watching a recorded video Watching recorded video on your computer and play them from the monitor and insert it in the PC's memory slot...
English Owner's Manual
Page 16
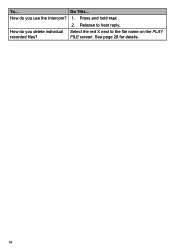
Release to the file name on the PLAY recorded files? How do you delete individual Select the red X next to hear reply. To... Do This... Press and hold TALK. 2. How do you use the Intercom? 1. See page 28 for details. 16 FILE screen.
Release to the file name on the PLAY recorded files? How do you delete individual Select the red X next to hear reply. To... Do This... Press and hold TALK. 2. How do you use the Intercom? 1. See page 28 for details. 16 FILE screen.
English Owner's Manual
Page 17
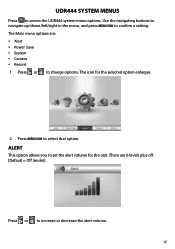
... options are 6 levels plus off. [Default = Off (mute)]. The icon for the unit. Press or to confirm a setting. Press or to access the UDR444 system menu options. UDR444 SYSTEM MENUS Press to change options. ALERT This option allows you to select that option. Press MENU/OK to set the alert volume for...
... options are 6 levels plus off. [Default = Off (mute)]. The icon for the unit. Press or to confirm a setting. Press or to access the UDR444 system menu options. UDR444 SYSTEM MENUS Press to change options. ALERT This option allows you to select that option. Press MENU/OK to set the alert volume for...
English Owner's Manual
Page 18
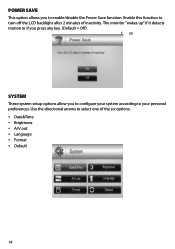
POWER SAVE This option allows you to your personal preferences. The monitor "wakes up" if it detects motion or if you to configure your system according to enable/disable the Power Save function. Use the directional arrows to turn off the LCD backlight after 2 minutes of the six options: •• Date&Time •• Brightness •• A/V out •• Language •• Format •• Default 18 or SYSTEM These system setup options allow you press any key. (Default = Off) 1. Enable this function to select one of inactivity.
POWER SAVE This option allows you to your personal preferences. The monitor "wakes up" if it detects motion or if you to configure your system according to enable/disable the Power Save function. Use the directional arrows to turn off the LCD backlight after 2 minutes of the six options: •• Date&Time •• Brightness •• A/V out •• Language •• Format •• Default 18 or SYSTEM These system setup options allow you press any key. (Default = Off) 1. Enable this function to select one of inactivity.

English Owner's Manual
Page 19
There are 6 brightness levels. (Default = 3) 1. Press ▲Vol or ▼Vol to scroll through the options for that selection. 2. Time displays in "Military" time (i.e., 00-24 hours). Press MENU/OK to save the current setting and return to the System screen. Press MENU/OK to save and return to the System screen. 19 Press or to switch to increase/decrease the brightness level (0 - 6). 2. For example, 14:30 would be 2:30 PM. Brightness This option allows you select Date & Time. 1. Date & Time The Month option is automatically selected when you to change the LCD ...
There are 6 brightness levels. (Default = 3) 1. Press ▲Vol or ▼Vol to scroll through the options for that selection. 2. Time displays in "Military" time (i.e., 00-24 hours). Press MENU/OK to save the current setting and return to the System screen. Press MENU/OK to save and return to the System screen. 19 Press or to switch to increase/decrease the brightness level (0 - 6). 2. For example, 14:30 would be 2:30 PM. Brightness This option allows you select Date & Time. 1. Date & Time The Month option is automatically selected when you to change the LCD ...
English Owner's Manual
Page 20
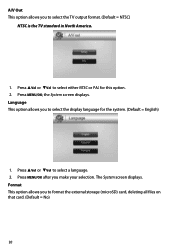
Language This option allows you make your selection. Press MENU/OK after you to select the display language for this option. 2. Format This option allows you to select the TV output format. (Default = NTSC) NTSC is the TV standard in North America. 1. The System screen displays. Press MENU/OK; the System screen displays. A/V Out This option allows you to format the external storage (microSD) card, deleting all files on that card. (Default = No) 20 Press ▲Vol or ▼Vol to select a language. 2. Press ▲Vol or ▼Vol to select either NTSC or PAL for the ...
Language This option allows you make your selection. Press MENU/OK after you to select the display language for this option. 2. Format This option allows you to select the TV output format. (Default = NTSC) NTSC is the TV standard in North America. 1. The System screen displays. Press MENU/OK; the System screen displays. A/V Out This option allows you to format the external storage (microSD) card, deleting all files on that card. (Default = No) 20 Press ▲Vol or ▼Vol to select a language. 2. Press ▲Vol or ▼Vol to select either NTSC or PAL for the ...
English Owner's Manual
Page 21
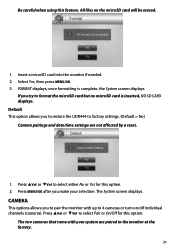
... inserted, NO SD CARD displays. Default This option allows you to pair the monitor with your selection. CAMERA This options allows you to restore the UDR444 to 4 cameras or turn on the microSD card will be erased. 1. All files on /off individual channels (cameras). Press ▲Vol or ▼Vol to...
... inserted, NO SD CARD displays. Default This option allows you to pair the monitor with your selection. CAMERA This options allows you to restore the UDR444 to 4 cameras or turn on the microSD card will be erased. 1. All files on /off individual channels (cameras). Press ▲Vol or ▼Vol to...