User Guide
Page 2
... ! Quickly find answers to serve you need assistance, please do NOT return this product to liquids, or the monitor/ camera has been dropped or is damaged. Calling our customer care specialists at www.uniden.com. 3. IMPORTANT SAFETY PRECAUTIONS This manual contains important information about you must leave this manual or a copy with...
... ! Quickly find answers to serve you need assistance, please do NOT return this product to liquids, or the monitor/ camera has been dropped or is damaged. Calling our customer care specialists at www.uniden.com. 3. IMPORTANT SAFETY PRECAUTIONS This manual contains important information about you must leave this manual or a copy with...
User Guide
Page 3
...•• Do not drop, puncture or disassemble any object such as a medical monitor, nor should this operating manual will void the warranty. Uniden assumes no user-serviceable parts inside. •• Do not expose the equipment to high temperatures, and avoid leaving the equipment in this product...improper handling or failure to comply with a dry cloth. Keep the adapter cords out of the reach of the equipment. Do not cover the camera or receiver with any part of children. •• WARNING: KEEP OUT OF THE REACH OF CHILDREN. There are between usages. •&#...
...•• Do not drop, puncture or disassemble any object such as a medical monitor, nor should this operating manual will void the warranty. Uniden assumes no user-serviceable parts inside. •• Do not expose the equipment to high temperatures, and avoid leaving the equipment in this product...improper handling or failure to comply with a dry cloth. Keep the adapter cords out of the reach of the equipment. Do not cover the camera or receiver with any part of children. •• WARNING: KEEP OUT OF THE REACH OF CHILDREN. There are between usages. •&#...
User Guide
Page 4
... Placement Considerations 9 Wall Mount 10 Suction Mount 10 Connect Power 11 BASIC OPERATION 12 WIRELESS CAMERA 12 WIRELESS MONITOR 14 LCD DISPLAY 17 USING THE UBR243 19 Viewing Modes 19 Common Operations 20 SYSTEM MENU DESCRIPTIONS 21 SYSTEM...21 Date/Time 22 ... INTERCOM 38 CAMERA PAIRING 38 MAINTAINING YOUR SYSTEM 40 MONITOR...40 CAMERA...40 SOLVING PROBLEMS 41 SPECIFICATIONS 42 GENERAL...42 CAMERA...42 MONITOR...43 FCC Notices 43 IC Compliance Information 44 THREE-YEAR LIMITED WARRANTY 44 Uniden surveillance products are hereby reserved. Uniden expects consumer's...
... Placement Considerations 9 Wall Mount 10 Suction Mount 10 Connect Power 11 BASIC OPERATION 12 WIRELESS CAMERA 12 WIRELESS MONITOR 14 LCD DISPLAY 17 USING THE UBR243 19 Viewing Modes 19 Common Operations 20 SYSTEM MENU DESCRIPTIONS 21 SYSTEM...21 Date/Time 22 ... INTERCOM 38 CAMERA PAIRING 38 MAINTAINING YOUR SYSTEM 40 MONITOR...40 CAMERA...40 SOLVING PROBLEMS 41 SPECIFICATIONS 42 GENERAL...42 CAMERA...42 MONITOR...43 FCC Notices 43 IC Compliance Information 44 THREE-YEAR LIMITED WARRANTY 44 Uniden surveillance products are hereby reserved. Uniden expects consumer's...
User Guide
Page 5
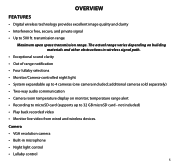
...; Up to 32 GB microSD card - temperature range alert •• Recording to microSD card (supports up to 4 cameras (one camera included; not included) •• Play back recorded video •• Monitor live video from wired and wireless devices...signal path. •• Exceptional sound clarity •• Out of range notification •• Four lullaby selections •• Monitor/Camera-controlled night light •• System expandable up to 500 ft. transmission range Maximum open space transmission range. The actual range varies depending...
...; Up to 32 GB microSD card - temperature range alert •• Recording to microSD card (supports up to 4 cameras (one camera included; not included) •• Play back recorded video •• Monitor live video from wired and wireless devices...signal path. •• Exceptional sound clarity •• Out of range notification •• Four lullaby selections •• Monitor/Camera-controlled night light •• System expandable up to 500 ft. transmission range Maximum open space transmission range. The actual range varies depending...
User Guide
Page 6
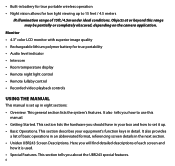
...illumination range of basic operations in an abbreviated format, referencing screen details in the next section. •• Uniden UBR243 Screen Descriptions. Here you should have in your equipment's function keys in detail. This section tells you how ...; Getting Started. It also provides a list of 15ft./4.5m under ideal conditions. It also tells you about the UBR243 special features. 6 •• Built-in battery for true portable wireless operation •• Night vision allows ... this range may be partially or completely obscured, depending on the camera application.
...illumination range of basic operations in an abbreviated format, referencing screen details in the next section. •• Uniden UBR243 Screen Descriptions. Here you should have in your equipment's function keys in detail. This section tells you how ...; Getting Started. It also provides a list of 15ft./4.5m under ideal conditions. It also tells you about the UBR243 special features. 6 •• Built-in battery for true portable wireless operation •• Night vision allows ... this range may be partially or completely obscured, depending on the camera application.
User Guide
Page 8
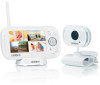
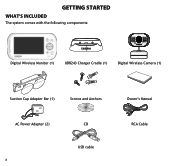
GETTING STARTED WHAT'S INCLUDED The system comes with the following components: Digital Wireless Monitor (1) UBR243 Charger Cradle (1) Digital Wireless Camera (1) Suction Cup Adapter Bar (1) Screws and Anchors AC Power Adapter (2) 8 CD USB cable Owner's Manual RCA Cable
GETTING STARTED WHAT'S INCLUDED The system comes with the following components: Digital Wireless Monitor (1) UBR243 Charger Cradle (1) Digital Wireless Camera (1) Suction Cup Adapter Bar (1) Screws and Anchors AC Power Adapter (2) 8 CD USB cable Owner's Manual RCA Cable
User Guide
Page 9
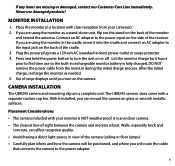
... stand-alone unit, flip out the stand on or off. DO NOT remove the power cable from your monitor is NOT weatherproof; CAMERA INSTALLATION The UBR243 camera and mounting clip are using the monitor in view of the monitor and extend the antenna. it installed, you can affect reception quality.... the monitor charge for 6 hours prior to turn on the back of range displays until you are a complete unit. The UBR243 camera does come with your camera(s). 2. If any items are using the monitor as needed. 5. Press and hold the power button to first time use damaged products! Out ...
... stand-alone unit, flip out the stand on or off. DO NOT remove the power cable from your monitor is NOT weatherproof; CAMERA INSTALLATION The UBR243 camera and mounting clip are using the monitor in view of the monitor and extend the antenna. it installed, you can affect reception quality.... the monitor charge for 6 hours prior to turn on the back of range displays until you are a complete unit. The UBR243 camera does come with your camera(s). 2. If any items are using the monitor as needed. 5. Press and hold the power button to first time use damaged products! Out ...
User Guide
Page 10
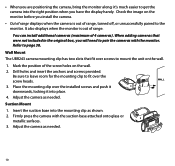
...wall. 1. Refer to get the camera into the mounting clip as needed . 10 WALL 3. Adjust the camera as needed . It also displays when the monitor is out of 4 cameras). Place the mounting clip over the screw heads. Wall Mount The UBR243 camera mounting clip has two slots that ...were not included in the original box, you are positioning the camera, bring the monitor along; Adjust the camera as shown. 2. Mark the position of range. When adding cameras that fit over screws to the...
...wall. 1. Refer to get the camera into the mounting clip as needed . 10 WALL 3. Adjust the camera as needed . It also displays when the monitor is out of 4 cameras). Place the mounting clip over the screw heads. Wall Mount The UBR243 camera mounting clip has two slots that ...were not included in the original box, you are positioning the camera, bring the monitor along; Adjust the camera as shown. 2. Mark the position of range. When adding cameras that fit over screws to the...
User Guide
Page 11
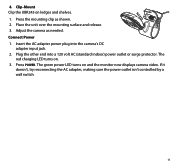
... volt AC (standard indoor) power outlet or surge protector. The red charging LED turns on and the monitor now displays camera video. Adjust the camera as shown. 2. Press POWER. If it doesn't, try reconnecting the AC adapter, making sure the power outlet isn't ...controlled by a wall switch. 11 Connect Power 1. Place the unit over the mounting surface and release. 3. The green power LED turns on . 3. Press the mounting clip as needed. Clip-Mount Clip the UBR243...
... volt AC (standard indoor) power outlet or surge protector. The red charging LED turns on and the monitor now displays camera video. Adjust the camera as shown. 2. Press POWER. If it doesn't, try reconnecting the AC adapter, making sure the power outlet isn't ...controlled by a wall switch. 11 Connect Power 1. Place the unit over the mounting surface and release. 3. The green power LED turns on . 3. Press the mounting clip as needed. Clip-Mount Clip the UBR243...
User Guide
Page 12
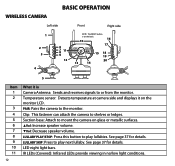
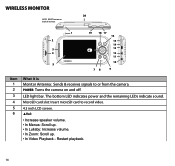
.... LULLABY PLAY/STOP: Press this button to play next lullaby. LED night light bars. See page 37 for details. Suction base: Attach to mount the camera on the back. 10 16 17 15 18 19 20 13 14 5 Item 1 2 3 4 5 6 7 8 9 10 11 12 What it on the monitor LCD. WIRELESS... the monitor. IR LEDs (Covered): Infrared LEDs provide viewing in no/low light conditions. Temperature sensor: Detects temperature at camera side and displays it is on glass or metallic surfaces. ▲Vol: Increase speaker volume. ▼Vol: Decrease speaker volume. LULLABY SKIP: Press to play ...
.... LULLABY PLAY/STOP: Press this button to play next lullaby. LED night light bars. See page 37 for details. Suction base: Attach to mount the camera on the back. 10 16 17 15 18 19 20 13 14 5 Item 1 2 3 4 5 6 7 8 9 10 11 12 What it on the monitor LCD. WIRELESS... the monitor. IR LEDs (Covered): Infrared LEDs provide viewing in no/low light conditions. Temperature sensor: Detects temperature at camera side and displays it is on glass or metallic surfaces. ▲Vol: Increase speaker volume. ▼Vol: Decrease speaker volume. LULLABY SKIP: Press to play ...
User Guide
Page 13
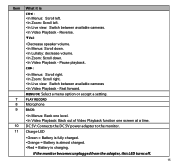
...or OFF. 17 NIGHT LIGHT: Press to the camera. 13 Item What it is 12 Light sensor: Measures light intensity on the camera side. 13 Lens: Camera lens. 14 Microphone: Receives sounds for the area near the camera, and transmits sound from the camera to the monitor. 15 Speaker: Produces the ...sound transmitted from power source. 19 Power LED: Green = Camera is low. 20 DC 5V Power:...
...or OFF. 17 NIGHT LIGHT: Press to the camera. 13 Item What it is 12 Light sensor: Measures light intensity on the camera side. 13 Lens: Camera lens. 14 Microphone: Receives sounds for the area near the camera, and transmits sound from the camera to the monitor. 15 Speaker: Produces the ...sound transmitted from power source. 19 Power LED: Green = Camera is low. 20 DC 5V Power:...
User Guide
Page 14
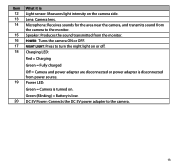
... The bottom LED indicates power and the remaining LEDs indicate sound. LED light bar. MicroSD card slot: Insert microSD card to or from the camera. POWER: Turns the camera on back of monitor. 1 19 18 17 16 2 ZOOM 15 TALK 14 3 Vol 13 6 CH MENU CH OK 4 Vol 12 11 BACK MIC...
... The bottom LED indicates power and the remaining LEDs indicate sound. LED light bar. MicroSD card slot: Insert microSD card to or from the camera. POWER: Turns the camera on back of monitor. 1 19 18 17 16 2 ZOOM 15 TALK 14 3 Vol 13 6 CH MENU CH OK 4 Vol 12 11 BACK MIC...
User Guide
Page 15
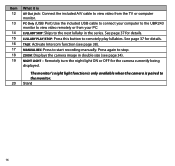
.... • In Video Playback - Fast forward. CH►: • In Menus: Scroll right. • In Zoom: Scroll right. • In Live view: Switch between available cameras. • In Video Playback - Item What it is charging. If the monitor becomes unplugged from the adapter, this LED turns off. 15 Pause playback. MENU... almost charged. • Red = Battery is CH◄ : • In Menus: Scroll left. • In Zoom: Scroll left. • In Live view: Switch between available cameras • In Video Playback -
.... • In Video Playback - Fast forward. CH►: • In Menus: Scroll right. • In Zoom: Scroll right. • In Live view: Switch between available cameras. • In Video Playback - Item What it is charging. If the monitor becomes unplugged from the adapter, this LED turns off. 15 Pause playback. MENU... almost charged. • Red = Battery is CH◄ : • In Menus: Scroll left. • In Zoom: Scroll left. • In Live view: Switch between available cameras • In Video Playback -
User Guide
Page 16
... being displayed. TALK: Activate Intercom function (see page 34). Press again to the monitor. ZOOM: Displays the camera image in the series. Remotely turn the night light ON or OFF for details. See page 37 for details. Stand 16 PC Only (USB Port):... lullaby in double size (see page 38). The monitor's night light function is only available when the camera is AV Out jack: Connect the included A/V cable to view video from your computer to the UBR243 monitor to view video remotely or from the TV or computer monitor. LULLABY PLAY/STOP: Press this...
... being displayed. TALK: Activate Intercom function (see page 34). Press again to the monitor. ZOOM: Displays the camera image in the series. Remotely turn the night light ON or OFF for details. See page 37 for details. Stand 16 PC Only (USB Port):... lullaby in double size (see page 38). The monitor's night light function is only available when the camera is AV Out jack: Connect the included A/V cable to view video from your computer to the UBR243 monitor to view video remotely or from the TV or computer monitor. LULLABY PLAY/STOP: Press this...

User Guide
Page 17
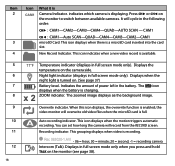
One or no bars indicates the signal is 1 Signal Indicator (displays in the signal indicator shows the strength of the signal received from the camera. Signal Strength Indicator Strong Warning None Good None Fair None Low None No Signal Out of bars in full screen mode only). The number of Range 17 LCD DISPLAY 13 14 1 2 3456 7 8 CAM 1 9 10 77°F Rec 063020-1.AVI 11 x 2 12 1 01.02.2013 06:34:24 15 Item Icon What it is poor, and 4 bars indicate a very strong signal.
One or no bars indicates the signal is 1 Signal Indicator (displays in the signal indicator shows the strength of the signal received from the camera. Signal Strength Indicator Strong Warning None Good None Fair None Low None No Signal Out of bars in full screen mode only). The number of Range 17 LCD DISPLAY 13 14 1 2 3456 7 8 CAM 1 9 10 77°F Rec 063020-1.AVI 11 x 2 12 1 01.02.2013 06:34:24 15 Item Icon What it is poor, and 4 bars indicate a very strong signal.
User Guide
Page 18
... displays when the motion triggers automatic recording. Rec 063020-1.AVI - 06 = hour; 30 = minute; 20 = second; -1 = recording camera Intercom (Talk). The icon displays when the battery is enabled; When this icon displays, the overwrite function is charging. You can set how...: CH► : CAM1-CAM2-CAM3-CAM4-QUAD-AUTO SCAN - Night light indicator (displays in the battery. Auto recording indicator. indicates which camera is 2 CAM1 Camera Indicator. Item Icon What it is displaying. This icon indicates when a new video record is available. 5 6 7 8 9 10 11 12...
... displays when the motion triggers automatic recording. Rec 063020-1.AVI - 06 = hour; 30 = minute; 20 = second; -1 = recording camera Intercom (Talk). The icon displays when the battery is enabled; When this icon displays, the overwrite function is charging. You can set how...: CH► : CAM1-CAM2-CAM3-CAM4-QUAD-AUTO SCAN - Night light indicator (displays in the battery. Auto recording indicator. indicates which camera is 2 CAM1 Camera Indicator. Item Icon What it is displaying. This icon indicates when a new video record is available. 5 6 7 8 9 10 11 12...
User Guide
Page 19
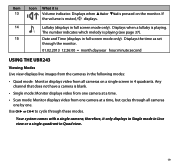
...9668; to cycle through all cameras on the monitor. therefore, it is muted, X displays. 14 Lullaby (displays in full screen mode only). Displays the time as set through the monitor. 01.02.2013 12:26:00 = month.day.year hour:minute:second USING THE UBR243 Viewing Modes Live view displays... live images from one camera at a time. •• Scan mode: Monitor displays video from the cameras in 4 quadrants. Displays when ▲Vol or ▼Vol is playing (see page ...
...9668; to cycle through all cameras on the monitor. therefore, it is muted, X displays. 14 Lullaby (displays in full screen mode only). Displays the time as set through the monitor. 01.02.2013 12:26:00 = month.day.year hour:minute:second USING THE UBR243 Viewing Modes Live view displays... live images from one camera at a time. •• Scan mode: Monitor displays video from the cameras in 4 quadrants. Displays when ▲Vol or ▼Vol is playing (see page ...
User Guide
Page 20
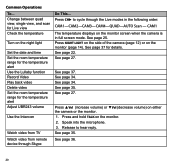
... page 25. See page 22. See page 37. Release to cycle through Skype Do This... CAM1 The temperature displays on the monitor screen when the camera is in the following order: CAM1-CAM2-CAM3-CAM4-QUAD-AUTO Scan - See page 34. Speak into the microphone. 3. See page 37 for the ...temperature alert Adjust UBR243 volume Use the Intercom Watch video from TV Watch video from remote device through the Live modes in full screen mode. See page 27. Change...
... page 25. See page 22. See page 37. Release to cycle through Skype Do This... CAM1 The temperature displays on the monitor screen when the camera is in the following order: CAM1-CAM2-CAM3-CAM4-QUAD-AUTO Scan - See page 34. Speak into the microphone. 3. See page 37 for the ...temperature alert Adjust UBR243 volume Use the Intercom Watch video from TV Watch video from remote device through the Live modes in full screen mode. See page 27. Change...
User Guide
Page 21
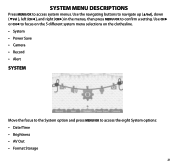
... CH► or CH◄ to focus on the 5 different system menu selections on the clothesline. •• System •• Power Save •• Camera •• Record •• Alert SYSTEM Move the focus to the System option and press MENU/OK to access system menus. SYSTEM MENU DESCRIPTIONS...
... CH► or CH◄ to focus on the 5 different system menu selections on the clothesline. •• System •• Power Save •• Camera •• Record •• Alert SYSTEM Move the focus to the System option and press MENU/OK to access system menus. SYSTEM MENU DESCRIPTIONS...
User Guide
Page 23
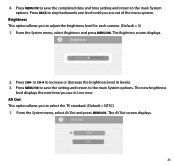
... step backwards one level until you are out of the menu system. Press CH► or CH◄ to adjust the brightness level for each camera. (Default = 3) 1. AV Out This option allows you to increase or decrease the brightness level (6 levels). 3.
... step backwards one level until you are out of the menu system. Press CH► or CH◄ to adjust the brightness level for each camera. (Default = 3) 1. AV Out This option allows you to increase or decrease the brightness level (6 levels). 3.


