Owner s Manual
Page 2
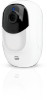
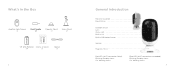
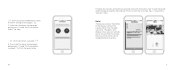
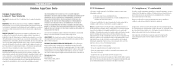
What's in the Box AppCam Solo Camera x1 Reset Needle x1 Magnetic Mount x1 Screw Mount x1 CR123A CR 123A Batteries Screws (in pack) x4 x1 Opener x1 2 General Introduction Micro SD Card Slot Reset Button Daylight Sensor Lens Status LED Built-in Mic Built-in PIR Motion Sensor Speaker Magnetic Mount Red LED (Wi-Fi connection failed) Blinking: Standby status On: Working status Blue LED (Wi-Fi connection succeeded) Blinking: Standby status On: Working status 3
What's in the Box AppCam Solo Camera x1 Reset Needle x1 Magnetic Mount x1 Screw Mount x1 CR123A CR 123A Batteries Screws (in pack) x4 x1 Opener x1 2 General Introduction Micro SD Card Slot Reset Button Daylight Sensor Lens Status LED Built-in Mic Built-in PIR Motion Sensor Speaker Magnetic Mount Red LED (Wi-Fi connection failed) Blinking: Standby status On: Working status Blue LED (Wi-Fi connection succeeded) Blinking: Standby status On: Working status 3
Owner s Manual
Page 3
... (IR LEDs off in the right direction of polarity; • Do not use the product for long periods, please remove the batteries from the camera. It's designed to make it close firmly for 24/7 full capacity running or aroundthe-clock live streaming only when you don't use batteries of the casing to record motion events and remotely view live streaming. Uniden AppCam Solo Supports •...
... (IR LEDs off in the right direction of polarity; • Do not use the product for long periods, please remove the batteries from the camera. It's designed to make it close firmly for 24/7 full capacity running or aroundthe-clock live streaming only when you don't use batteries of the casing to record motion events and remotely view live streaming. Uniden AppCam Solo Supports •...
Owner s Manual
Page 4
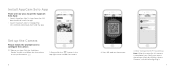
Click "Connect to Wi-Fi" to set up the Camera Please follow the instructions to continue. Note: When the setup for Android), download and install the app. Scan QR code on the camera. 3. Click the "Add New Device" button, and follow the prompt tone to get the AppCam Solo App: • Search "AppCam Solo" in App Store (for iOS) download and install the app. • Search "AppCam Solo...
Click "Connect to Wi-Fi" to set up the Camera Please follow the instructions to continue. Note: When the setup for Android), download and install the app. Scan QR code on the camera. 3. Click the "Add New Device" button, and follow the prompt tone to get the AppCam Solo App: • Search "AppCam Solo" in App Store (for iOS) download and install the app. • Search "AppCam Solo...

Owner s Manual
Page 5
.... Camera is connecting to enter the next page. Distance (20cm) 5cm 10cm 15cm 20cm 8 9 Enter the Wi-Fi password of about 20cm to enter the next page. If you 've ripped the protection film off the camera's lens. A QR code will be generated on your phone towards the AppCam Solo camera lens at a distance of the selected Wi-Fi network...
.... Camera is connecting to enter the next page. Distance (20cm) 5cm 10cm 15cm 20cm 8 9 Enter the Wi-Fi password of about 20cm to enter the next page. If you 've ripped the protection film off the camera's lens. A QR code will be generated on your phone towards the AppCam Solo camera lens at a distance of the selected Wi-Fi network...
Owner s Manual
Page 6
... prompt, please press "I heard 'Wi-Fi connection succeeds' " to start the Live View. "Playback" only displays when you hear the above voice prompt, please press "I heard 'Wi-Fi connection failed' " for help. Wi-Fi connection failed! Please check the Wi-Fi settings and try again. 7. Wi-Fi connection succeeds! 8. Note: "Name your camera and create a password (at least 6 characters), tap "Create...
... prompt, please press "I heard 'Wi-Fi connection succeeds' " to start the Live View. "Playback" only displays when you hear the above voice prompt, please press "I heard 'Wi-Fi connection failed' " for help. Wi-Fi connection failed! Please check the Wi-Fi settings and try again. 7. Wi-Fi connection succeeds! 8. Note: "Name your camera and create a password (at least 6 characters), tap "Create...
Owner s Manual
Page 7
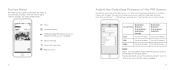
..., please launch your AppCam Solo App, and then click "Device Settings" -> "PIR Settings" and click the "Save" button to more configurations. Device Settings Access the Live View Battery Status 12 Adjust the Detecting Distance of the PIR Sensor The default sensitivity of the PIR sensor is at "Mid" and the detecting distance is enabled). Menu Add New Device Enable/Disable PIR Motion Sensor (in default, the PIR sensor is...
..., please launch your AppCam Solo App, and then click "Device Settings" -> "PIR Settings" and click the "Save" button to more configurations. Device Settings Access the Live View Battery Status 12 Adjust the Detecting Distance of the PIR Sensor The default sensitivity of the PIR sensor is at "Mid" and the detecting distance is enabled). Menu Add New Device Enable/Disable PIR Motion Sensor (in default, the PIR sensor is...
Owner s Manual
Page 8
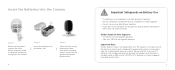
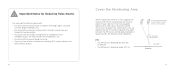
... of projectors, etc. • Do not install the camera facing the mirror. • Stay away from wireless interference, inlcuding Wi-Fi routers, phones and other wireless devices. 14 Cover the Monitoring Area When installing the camera, it's not suggested to make the PIR sensor vertically face the moving object. ! FYI: • The PIR sensor's detecting distance: 6m (in a place within...
... of projectors, etc. • Do not install the camera facing the mirror. • Stay away from wireless interference, inlcuding Wi-Fi routers, phones and other wireless devices. 14 Cover the Monitoring Area When installing the camera, it's not suggested to make the PIR sensor vertically face the moving object. ! FYI: • The PIR sensor's detecting distance: 6m (in a place within...
Owner s Manual
Page 9
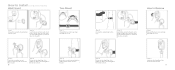
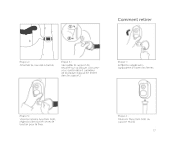
... plate is inserted into the mount.) to pull the mount out. Step 1: Press the security mount button to Remove 2 SPbthtureeetpstmos3not:huuenntst.iel citusriptylatmeoculinctkSPusntreetiipsnl sitt3ost:hpelasteeSSatchdtccueelrjiruepciktskwyn4tsom:iiitnnbsottuotdhoniterthfebeiAcxumpttiittpooo.Cnunnaatmn. of thebacking plate is inbsaecrkteindg mount). into the wall. aSll omloount. 17 How to Install How to Install (using screw moun(uts)ing screw mount) Wall Mount Wall Mount 1 Front 2 Back Tree Mount Tree Mount How to Remove Step 1: Step...
... plate is inserted into the mount.) to pull the mount out. Step 1: Press the security mount button to Remove 2 SPbthtureeetpstmos3not:huuenntst.iel citusriptylatmeoculinctkSPusntreetiipsnl sitt3ost:hpelasteeSSatchdtccueelrjiruepciktskwyn4tsom:iiitnnbsottuotdhoniterthfebeiAcxumpttiittpooo.Cnunnaatmn. of thebacking plate is inbsaecrkteindg mount). into the wall. aSll omloount. 17 How to Install How to Install (using screw moun(uts)ing screw mount) Wall Mount Wall Mount 1 Front 2 Back Tree Mount Tree Mount How to Remove Step 1: Step...
Owner s Manual
Page 10
... is void outside the United configurations not sold by Uniden, (C) improperly installed, (D) serviced or repaired by the party responsible for compliance could void the user's authority to which can radiate radio frequency energy and, if not installed and used in connection with the performance of this device must accept any time while this Uniden Product to be free from that may not apply...
... is void outside the United configurations not sold by Uniden, (C) improperly installed, (D) serviced or repaired by the party responsible for compliance could void the user's authority to which can radiate radio frequency energy and, if not installed and used in connection with the performance of this device must accept any time while this Uniden Product to be free from that may not apply...
Quick Reference - French Owner Manual
Page 17
How to fix it. Step 5: Screw the Solo, adjust its direction and tighten the knob to Remove mount on its e top edge is inserted Step 4: Press the security mount button until its plate clicks into the mount. nt loop strap Step 2: Fasten the warp strap to pull the mount out. Step 1: Press the security mount button to the tree. Step 2: Unscrew the Solo from wall mount. 17
How to fix it. Step 5: Screw the Solo, adjust its direction and tighten the knob to Remove mount on its e top edge is inserted Step 4: Press the security mount button until its plate clicks into the mount. nt loop strap Step 2: Fasten the warp strap to pull the mount out. Step 1: Press the security mount button to the tree. Step 2: Unscrew the Solo from wall mount. 17


