
User Guide
Page 3
......18 Uniden Guardian Settings Screen 18 Camera Setup Screen 20 Pairing...20 Camera On 21 Recorder Setup Screen 22 Network Setup Screen 24 Alarm Setup Screen 27 System Setup Screen 29 System Upgrade 34 Language 34 Quick Tips...35 Remote Access 36 Overview...36 System Requirements 36 Connecting to the Internet 36 Connecting to the Intranet (Home network 37 Setting up a Portal Account 37 Enter the UID Code 39 Enter Security Code 39 Record Video 40 Take A Snapshot 40 Downloading Apps 40 AndroidTM 40 iPhone®...
......18 Uniden Guardian Settings Screen 18 Camera Setup Screen 20 Pairing...20 Camera On 21 Recorder Setup Screen 22 Network Setup Screen 24 Alarm Setup Screen 27 System Setup Screen 29 System Upgrade 34 Language 34 Quick Tips...35 Remote Access 36 Overview...36 System Requirements 36 Connecting to the Internet 36 Connecting to the Intranet (Home network 37 Setting up a Portal Account 37 Enter the UID Code 39 Enter Security Code 39 Record Video 40 Take A Snapshot 40 Downloading Apps 40 AndroidTM 40 iPhone®...

User Guide
Page 4
... your PC or other devices. •• Maintaining Your System •• Solving Problems 4 GETTING STARTED Using This Manual This manual is used. •• Remote Access. This section describes your surveillance system to physically set up . •• Uniden Guardian™ Software Operations Overview. It references screen details in an abbreviated format. This section lists basic operations in the third section. ••...
... your PC or other devices. •• Maintaining Your System •• Solving Problems 4 GETTING STARTED Using This Manual This manual is used. •• Remote Access. This section describes your surveillance system to physically set up . •• Uniden Guardian™ Software Operations Overview. It references screen details in an abbreviated format. This section lists basic operations in the third section. ••...
User Guide
Page 6
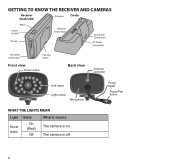
The camera is on. Getting to Know the Receiver and Cameras Receiver (back/side) Antenna Cradle Reset Power On/O SD slot Receiver Power Dock Data Cable Connection AC Power Connection AC Power Connection Pull-Out Stand Front view Power status Back view Antenna connector Link status Light sensor Microphone Power pigtail Power/Pair button What the lights mean Light Power status State On (Red) Off What it means The camera is off. 6
The camera is on. Getting to Know the Receiver and Cameras Receiver (back/side) Antenna Cradle Reset Power On/O SD slot Receiver Power Dock Data Cable Connection AC Power Connection AC Power Connection Pull-Out Stand Front view Power status Back view Antenna connector Link status Light sensor Microphone Power pigtail Power/Pair button What the lights mean Light Power status State On (Red) Off What it means The camera is off. 6
User Guide
Page 7
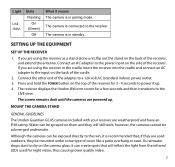
.... Setting Up the Equipment Set Up the Receiver 1. If you are powered up . 4. The receiver displays the Uniden Welcome screen for night vision, thus causing lower quality video. 7 The camera is connected to the LIVE view. Connect an AC adapter to power it up . Light Link status State Flashing On (Green) Off What it means The camera is in standby. The screen remains dark until the cameras are using the receiver as a stand-alone unit...
.... Setting Up the Equipment Set Up the Receiver 1. If you are powered up . 4. The receiver displays the Uniden Welcome screen for night vision, thus causing lower quality video. 7 The camera is connected to the LIVE view. Connect an AC adapter to power it up . Light Link status State Flashing On (Green) Off What it means The camera is in standby. The screen remains dark until the cameras are using the receiver as a stand-alone unit...
User Guide
Page 8
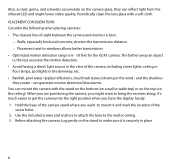
... shadows they can mount the camera with a soft cloth. can generate motion detection false alarms. You can reflect light from the infrared LED and might want to mount it 's much easier to get the camera into the right position when you want to the wall or ceiling. 3. Use the included screws and anchors to attach the base to bring the receiver along; Placement next...
... shadows they can mount the camera with a soft cloth. can generate motion detection false alarms. You can reflect light from the infrared LED and might want to mount it 's much easier to get the camera into the right position when you want to the wall or ceiling. 3. Use the included screws and anchors to attach the base to bring the receiver along; Placement next...
User Guide
Page 9
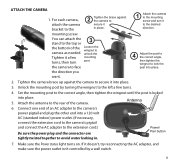
... AC adapter, and make sure the power outlet isn't controlled by turning the wingnut to lock the post into place. 5. Tighten the camera brace up against the camera to secure it into place. 3. Connect one end of the camera. Power/ Pair button 7. Set the mounting post to avoid water leaking in place. Antenna 6. If it a few turns. 4. mounting screw. Unlock the mounting post by a wall switch. 9 the camera to...
... AC adapter, and make sure the power outlet isn't controlled by turning the wingnut to lock the post into place. 5. Tighten the camera brace up against the camera to secure it into place. 3. Connect one end of the camera. Power/ Pair button 7. Set the mounting post to avoid water leaking in place. Antenna 6. If it a few turns. 4. mounting screw. Unlock the mounting post by a wall switch. 9 the camera to...
User Guide
Page 11
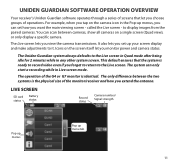
... the main viewing screen - to the Live screen in Quad mode after being idle for 2 minutes while in any other system screen. The system can set up menu tab 11 The Uniden Guardian system always defaults to display images from the paired cameras. The only difference between cameras, show all cameras on the screen itself let you monitor power and camera status. Uniden Guardian Software Operation Overview Your receiver's Uniden Guardian software operates through a series of screens that...
... the main viewing screen - to the Live screen in Quad mode after being idle for 2 minutes while in any other system screen. The system can set up menu tab 11 The Uniden Guardian system always defaults to display images from the paired cameras. The only difference between cameras, show all cameras on the screen itself let you monitor power and camera status. Uniden Guardian Software Operation Overview Your receiver's Uniden Guardian software operates through a series of screens that...
User Guide
Page 16
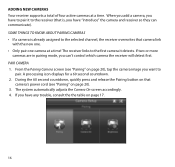
... one camera at a time. From the Pairing Camera screen (see "Pairing" on page 17. 16 Adding New Cameras Your receiver supports a total of four active cameras at a time! If two or more cameras are in pairing mode, you have any trouble, consult the the table on page 20). 3. When you add a camera, you have to pair it detects. The system automatically adjusts the Camera On screen accordingly. 4. The receiver links...
... one camera at a time. From the Pairing Camera screen (see "Pairing" on page 17. 16 Adding New Cameras Your receiver supports a total of four active cameras at a time! If two or more cameras are in pairing mode, you have any trouble, consult the the table on page 20). 3. When you add a camera, you have to pair it detects. The system automatically adjusts the Camera On screen accordingly. 4. The receiver links...
User Guide
Page 18
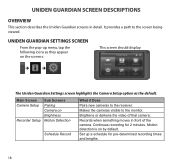
... Settings screen highlights the Camera Setup option as the default. Main Screen Camera Setup Recorder Setup Sub Screens Pairing Camera on Brightness Motion Detection Schedule Record What it Does Pairs new cameras to the screen being viewed. It provides a path to the receiver. Makes the cameras visible to the monitor. Continues recording for pre-determined recording times and lengths. 18 Uniden Guardian Settings Screen From the pop-up a schedule for 2 minutes. Records when something moves in detail. Set up menu...
... Settings screen highlights the Camera Setup option as the default. Main Screen Camera Setup Recorder Setup Sub Screens Pairing Camera on Brightness Motion Detection Schedule Record What it Does Pairs new cameras to the screen being viewed. It provides a path to the receiver. Makes the cameras visible to the monitor. Continues recording for pre-determined recording times and lengths. 18 Uniden Guardian Settings Screen From the pop-up a schedule for 2 minutes. Records when something moves in detail. Set up menu...
User Guide
Page 19
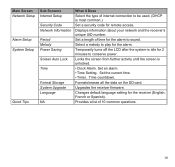
...). Main Screen Network Setup Alarm Setup System Setup Quick Tips Sub Screens Internet Setup Security Code Network Information Period Melody Power Saving Screen Auto Lock Time Format Storage System Upgrade Language NA What it Does Select the type of internet connection to conserve power. Select a melody to sound. Set the current time. • Timer. Set a length of 10 common questions. 19 Changes default language setting for the alarm. Formats/erases all the data on the SD card. Upgrades the receiver firmware. Locks the screen from...
...). Main Screen Network Setup Alarm Setup System Setup Quick Tips Sub Screens Internet Setup Security Code Network Information Period Melody Power Saving Screen Auto Lock Time Format Storage System Upgrade Language NA What it Does Select the type of internet connection to conserve power. Select a melody to sound. Set the current time. • Timer. Set a length of 10 common questions. 19 Changes default language setting for the alarm. Formats/erases all the data on the SD card. Upgrades the receiver firmware. Locks the screen from...
User Guide
Page 20
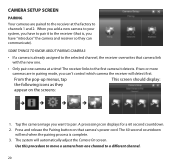
... button on the screens: 1. Camera Setup Screen Pairing Your cameras are in pairing mode, you can communicate). From the pop-up menus, tap This screen should display: the following icons as they can 't control which camera the receiver will detect first. Tap the camera image you have to pair it detects. Use this procedure to move a camera from one camera at the factory to the first camera...
... button on the screens: 1. Camera Setup Screen Pairing Your cameras are in pairing mode, you can communicate). From the pop-up menus, tap This screen should display: the following icons as they can 't control which camera the receiver will detect first. Tap the camera image you have to pair it detects. Use this procedure to move a camera from one camera at the factory to the first camera...
User Guide
Page 24
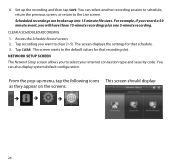
... default values for that recording slot. The screen displays the settings for that schedule. 3. The screen resets to clear (1-5). You can select another recording session to schedule, return the previous screen, or return to select your internet connection type and security code. Tap CLEAR. Tap recording you will have three 15-minute recordings plus one 5-minute recording. Network Setup Screen The Network Setup screen allows you to the Live screen. 6. From the pop-up menu...
... default values for that recording slot. The screen displays the settings for that schedule. 3. The screen resets to clear (1-5). You can select another recording session to schedule, return the previous screen, or return to select your internet connection type and security code. Tap CLEAR. Tap recording you will have three 15-minute recordings plus one 5-minute recording. Network Setup Screen The Network Setup screen allows you to the Live screen. 6. From the pop-up menu...
User Guide
Page 26
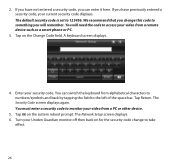
... a remote device such as a smart phone or PC. 3. Tap on the system reboot prompt. Tap Return. Turn your video from alphabetical characters to numbers/symbols and back by tapping the field to take effect. 26 We recommend that you will need the code to 123456. The Network Setup screen displays. 6. You can enter it here. A keyboard screen displays. 4. You must enter a security code to monitor your Uniden...
... a remote device such as a smart phone or PC. 3. Tap on the system reboot prompt. Tap Return. Turn your video from alphabetical characters to numbers/symbols and back by tapping the field to take effect. 26 We recommend that you will need the code to 123456. The Network Setup screen displays. 6. You can enter it here. A keyboard screen displays. 4. You must enter a security code to monitor your Uniden...
User Guide
Page 31
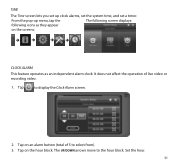
Time The Time screen lets you set a timer. The UP/DOWN arrows move to display the Clock Alarm screen. 2. From the pop-up clock alarms, set the system time, and set up menu, tap the The following screen displays: following icons as they appear on the screens: Clock Alarm This feature operates as an independent alarm clock. It does not affect the operation of 5 to select from). 3. Tap on an alarm button (total of live video or recording video. 1. Set the hour. 31 Tap on the hour block. Tap to the hour block.
Time The Time screen lets you set a timer. The UP/DOWN arrows move to display the Clock Alarm screen. 2. From the pop-up clock alarms, set the system time, and set up menu, tap the The following screen displays: following icons as they appear on the screens: Clock Alarm This feature operates as an independent alarm clock. It does not affect the operation of 5 to select from). 3. Tap on an alarm button (total of live video or recording video. 1. Set the hour. 31 Tap on the hour block. Tap to the hour block.
User Guide
Page 36
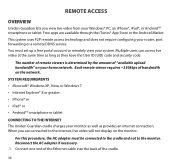
... not to remotely view your router, port forwarding or a remote DDNS service. Multiple users can access live video at the same time as long as provides an internet connection. The number of remote viewers is determined by the amount of "available upload bandwidth" on the monitor. This system uses P2P remote access technology and does not require configuring your system. For this procedure, the AC adapter must set up a free portal account to the monitor. Connect one end...
... not to remotely view your router, port forwarding or a remote DDNS service. Multiple users can access live video at the same time as long as provides an internet connection. The number of remote viewers is determined by the amount of "available upload bandwidth" on the monitor. This system uses P2P remote access technology and does not require configuring your system. For this procedure, the AC adapter must set up a free portal account to the monitor. Connect one end...
User Guide
Page 37
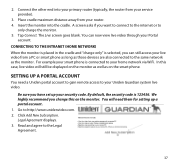
... view live video from your service provider). 3. Click Add New Subscription. Read and agree to http://www.unidenvideo.com. 2. 2. The Live screen goes blank. Setting up a portal account. 1. Insert the monitor into your primary router (typically, the router from your router. 4. Tap Connect. For example your smart phone is 123456. By default, the security code is connected to your Uniden Guardian system live video will need them for setting up a Portal Account You need a Uniden...
... view live video from your service provider). 3. Click Add New Subscription. Read and agree to http://www.unidenvideo.com. 2. 2. The Live screen goes blank. Setting up a portal account. 1. Insert the monitor into your primary router (typically, the router from your router. 4. Tap Connect. For example your smart phone is 123456. By default, the security code is connected to your Uniden Guardian system live video will need them for setting up a Portal Account You need a Uniden...
User Guide
Page 39
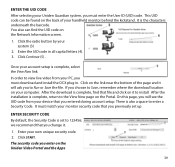
... Uniden Video Portal and the Apps 39 It is complete, select the View Now link. Once your handheld monitor behind the kickstand. You also can be found on the Network Information screen. 1. The security code you must match your monitor security code that you previously set to the View Now page on the Portal. This UID code can find that you change it will see the UID code...
... Uniden Video Portal and the Apps 39 It is complete, select the View Now link. Once your handheld monitor behind the kickstand. You also can be found on the Network Information screen. 1. The security code you must match your monitor security code that you previously set to the View Now page on the Portal. This UID code can find that you change it will see the UID code...
User Guide
Page 41
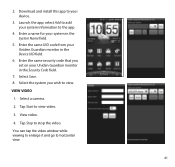
... device. 3. Select a camera. 2. View video. 4. 2. Enter the same security code that you wish to your Uniden Guardian monitor in the System Name field. 5. Download and install this app to view. Tap Stop to view video. 3. Tap Start to stop the video. Enter the same UID code from your system information to horizontal view. 41 Launch the app; Select Save. 8. View Video 1. You can tap the video window while viewing to enlarge it...
... device. 3. Select a camera. 2. View video. 4. 2. Enter the same security code that you wish to your Uniden Guardian monitor in the System Name field. 5. Download and install this app to view. Tap Stop to view video. 3. Tap Start to stop the video. Enter the same UID code from your system information to horizontal view. 41 Launch the app; Select Save. 8. View Video 1. You can tap the video window while viewing to enlarge it...
User Guide
Page 43
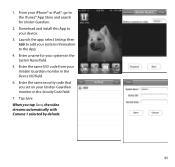
select Settings then ADD to the App. 4. When you set on your device. 3. Enter the same UID code from your system information to add your Uniden Guardian monitor in the Device UID field. 6. Enter the same security code that you tap Save, the video streams automatically with Camera 1 selected by default. 43 Download and install this App to the iTunes® App Store and search for your iPhone® or...
select Settings then ADD to the App. 4. When you set on your device. 3. Enter the same UID code from your system information to add your Uniden Guardian monitor in the Device UID field. 6. Enter the same security code that you tap Save, the video streams automatically with Camera 1 selected by default. 43 Download and install this App to the iTunes® App Store and search for your iPhone® or...
User Guide
Page 46
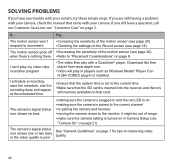
... video files play my video clips in Camera Setup (see "Customer Care" on improving video quality. 46 If you still have any trouble with your camera. The motion sensor goes off when there's nothing there. If you are still having a problem with your camera, check the manual that card. • making sure the camera is plugged in is installed. • Ensure that the system time is set...
... video files play my video clips in Camera Setup (see "Customer Care" on improving video quality. 46 If you still have any trouble with your camera. The motion sensor goes off when there's nothing there. If you are still having a problem with your camera, check the manual that card. • making sure the camera is plugged in is installed. • Ensure that the system time is set...


