
User Guide
Page 4
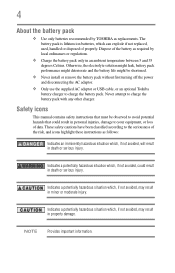
... minor or moderate injury. Safety icons This manual contains safety instructions that must be shortened. ❖ Never install or remove the battery pack without first turning off the power and disconnecting the AC adaptor. ❖ Only use the supplied AC adaptor or USB cable, or an optional Toshiba battery charger to charge the battery pack with any other charger. Indicates a potentially hazardous situation which , if not...
... minor or moderate injury. Safety icons This manual contains safety instructions that must be shortened. ❖ Never install or remove the battery pack without first turning off the power and disconnecting the AC adaptor. ❖ Only use the supplied AC adaptor or USB cable, or an optional Toshiba battery charger to charge the battery pack with any other charger. Indicates a potentially hazardous situation which , if not...

User Guide
Page 6
Contents Chapter 1: Getting to Know Your Camcorder 9 Overview 9 Check the components 10 System requirements 10 Front view 11 Rear view 11 Side views 12 Underside view 12 Chapter 2: Getting Started 13 Loading the battery 13 Charge your battery 14 Inserting and removing an SD™ Card (optional).....18 Turning the camcorder on and getting started .......19 Turning off the camcorder 19 Chapter 3: Record Mode 20 Button functions 20 LCD touch screen information 21 Menu options 22 Movie recording 24 6
Contents Chapter 1: Getting to Know Your Camcorder 9 Overview 9 Check the components 10 System requirements 10 Front view 11 Rear view 11 Side views 12 Underside view 12 Chapter 2: Getting Started 13 Loading the battery 13 Charge your battery 14 Inserting and removing an SD™ Card (optional).....18 Turning the camcorder on and getting started .......19 Turning off the camcorder 19 Chapter 3: Record Mode 20 Button functions 20 LCD touch screen information 21 Menu options 22 Movie recording 24 6

User Guide
Page 7
... Using the Flash or digital light function 25 Using zoom 26 Record menu options 26 Movie Record mode menu 26 Picture record mode menu 27 Record mode operations 27 Movie resolution 28 Picture resolution 28 White balance 29 Scene 29 Movie effects 30 Stabilization 30 Macro mode 31 Motion Detection 31 Slow Motion 32 Time Lapse 32 Picture effects 33 Self-Timer 33 Macro mode 34 ISO 34 Chapter 4: Playback Mode 35 LCD touch screen information 36 Playback mode operations 38 Movie playback 39 Delete movies 40 Picture playback 41 Delete picture 42 Chapter 5: Camcorder Settings...
... Using the Flash or digital light function 25 Using zoom 26 Record menu options 26 Movie Record mode menu 26 Picture record mode menu 27 Record mode operations 27 Movie resolution 28 Picture resolution 28 White balance 29 Scene 29 Movie effects 30 Stabilization 30 Macro mode 31 Motion Detection 31 Slow Motion 32 Time Lapse 32 Picture effects 33 Self-Timer 33 Macro mode 34 ISO 34 Chapter 4: Playback Mode 35 LCD touch screen information 36 Playback mode operations 38 Movie playback 39 Delete movies 40 Picture playback 41 Delete picture 42 Chapter 5: Camcorder Settings...
User Guide
Page 8
8 Contents Time Settings 45 Format 46 Default settings 47 Chapter 6: Viewing Pictures and Movies on TV 49 Connecting to a high-definition 16:9 (wide) TV.......49 Connecting to a non-high-definition 4:3 TV ...........50 Chapter 7: Viewing Pictures and Movies on a Computer ...... 51 Installing bundled software 51 Transferring pictures or movies to a computer.......52 Chapter 8: Burning Recorded Clips to DVD 53 Chapter 9: Uploading Video Files to YouTube 57 Chapter 10: Video File Converter 63 Chapter 11: Specifications 66 Operating Environment...
8 Contents Time Settings 45 Format 46 Default settings 47 Chapter 6: Viewing Pictures and Movies on TV 49 Connecting to a high-definition 16:9 (wide) TV.......49 Connecting to a non-high-definition 4:3 TV ...........50 Chapter 7: Viewing Pictures and Movies on a Computer ...... 51 Installing bundled software 51 Transferring pictures or movies to a computer.......52 Chapter 8: Burning Recorded Clips to DVD 53 Chapter 9: Uploading Video Files to YouTube 57 Chapter 10: Video File Converter 63 Chapter 11: Specifications 66 Operating Environment...
User Guide
Page 9
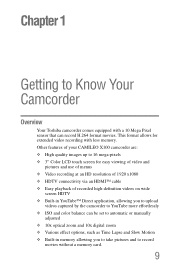
... X100 camcorder are: ❖ High quality images up to 16 mega-pixels ❖ 3" Color LCD touch screen for extended video recording with a 10 Mega Pixel sensor that can be set to automatic or manually adjusted ❖ 10x optical zoom and 10x digital zoom ❖ Various effect options, such as Time Lapse and Slow Motion ❖ Built-in YouTube™ Direct application, allowing you to upload videos captured by the camcorder to record movies without a memory card...
... X100 camcorder are: ❖ High quality images up to 16 mega-pixels ❖ 3" Color LCD touch screen for extended video recording with a 10 Mega Pixel sensor that can be set to automatic or manually adjusted ❖ 10x optical zoom and 10x digital zoom ❖ Various effect options, such as Time Lapse and Slow Motion ❖ Built-in YouTube™ Direct application, allowing you to upload videos captured by the camcorder to record movies without a memory card...
User Guide
Page 10
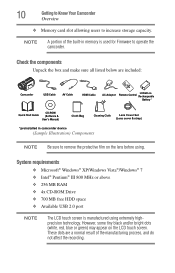
... are included: Camcorder USB Cable AV Cable HDMI Cable SET AC-Adaptor Remote Control Lithiunm-io Rechargeable Battery 㕚 Quick Start Guide CD-ROM (Software & User's Manual) Cloth Bag Cleaning Cloth Lens Cover Set (Lens cover & strap) *preinstalled in memory is manufactured using . 10 Getting to Know Your Camcorder Overview ❖ Memory card slot allowing users to remove the protective film on the LCD touch screen. NOTE A portion of the manufacturing process, and do not affect the recording. System...
... are included: Camcorder USB Cable AV Cable HDMI Cable SET AC-Adaptor Remote Control Lithiunm-io Rechargeable Battery 㕚 Quick Start Guide CD-ROM (Software & User's Manual) Cloth Bag Cleaning Cloth Lens Cover Set (Lens cover & strap) *preinstalled in memory is manufactured using . 10 Getting to Know Your Camcorder Overview ❖ Memory card slot allowing users to remove the protective film on the LCD touch screen. NOTE A portion of the manufacturing process, and do not affect the recording. System...

User Guide
Page 14
... either accidentally or intentionally bringing the battery terminals in serious injury. In AC charging mode, the light will indicate that charging is complete. Leakage of the battery pack, to prevent accidental shortcircuiting which could result in contact with or repair a battery pack. A blinking light will indicate active charging and a solid light will turn off the camcorder. Heat can cause a battery pack to disassemble, tamper with...
... either accidentally or intentionally bringing the battery terminals in serious injury. In AC charging mode, the light will indicate that charging is complete. Leakage of the battery pack, to prevent accidental shortcircuiting which could result in contact with or repair a battery pack. A blinking light will indicate active charging and a solid light will turn off the camcorder. Heat can cause a battery pack to disassemble, tamper with...

User Guide
Page 16
... gloves when handling a damaged battery. Continued use , such as abnormal sound In such an event, carefully and immediately remove the battery pack from the product. Battery pack warning indicators ❖ Always immediately turn on the product's power again until an authorized Toshiba service provider has checked it off and disconnect the power cable/cord plug from the plug socket and stop using the battery pack if you might have...
... gloves when handling a damaged battery. Continued use , such as abnormal sound In such an event, carefully and immediately remove the battery pack from the product. Battery pack warning indicators ❖ Always immediately turn on the product's power again until an authorized Toshiba service provider has checked it off and disconnect the power cable/cord plug from the plug socket and stop using the battery pack if you might have...
User Guide
Page 19
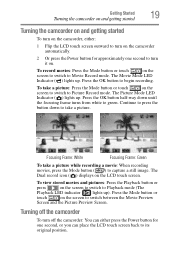
... the screen to switch between the Movie Preview Screen and the Picture Preview Screen. Press the OK button half-way down to take a picture while recording a movie: When recording movies, press the Mode button ( ) to capture a still image. The Picture Mode LED Indicator ( ) lights up . Press the Mode button or touch on . Turning off the camcorder To turn off the camcorder: You can either : 1 Flip the LCD touch screen outward to turn on the camcorder automatically. 2 Or press the Power button...
... the screen to switch between the Movie Preview Screen and the Picture Preview Screen. Press the OK button half-way down to take a picture while recording a movie: When recording movies, press the Mode button ( ) to capture a still image. The Picture Mode LED Indicator ( ) lights up . Press the Mode button or touch on . Turning off the camcorder To turn off the camcorder: You can either : 1 Flip the LCD touch screen outward to turn on the camcorder automatically. 2 Or press the Power button...
User Guide
Page 20
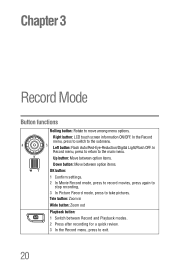
... button: Move between Record and Playback modes. 2 Press after recording for a quick review. 3 In the Record menu, press to the submenu. In the Record menu, press to switch to exit. 20 Tele button: Zoom in Wide button: Zoom out Playback button: 1 Switch between option items. OK button: 1 Confirm settings. 2 In Movie Record mode, press to record movies, press again to stop recording, 3 In Picture Record mode, press to the main menu. Left button: Flash Auto/Red-Eye-Reduction/Digital Light/Flash OFF. Chapter 3 Record Mode Button functions Rolling button: Rotate to move among menu...
... button: Move between Record and Playback modes. 2 Press after recording for a quick review. 3 In the Record menu, press to the submenu. In the Record menu, press to switch to exit. 20 Tele button: Zoom in Wide button: Zoom out Playback button: 1 Switch between option items. OK button: 1 Confirm settings. 2 In Movie Record mode, press to record movies, press again to stop recording, 3 In Picture Record mode, press to the main menu. Left button: Flash Auto/Red-Eye-Reduction/Digital Light/Flash OFF. Chapter 3 Record Mode Button functions Rolling button: Rotate to move among menu...
User Guide
Page 24
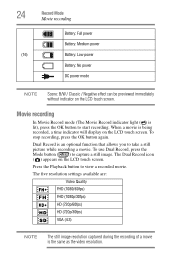
.../30fps) VGA (4:3) NOTE The still image resolution captured during the recording of a movie is an optional function that allows you to view a recorded movie. 24 (16) Record Mode Movie recording Battery: Full power Battery: Medium power Battery: Low power Battery: No power DC power mode NOTE Scene: B/W / Classic / Negative effect can be previewed immediately without indicator on the LCD touch screen. The Dual Record icon ( ) appears on the LCD touch screen. Press the Playback button to take a still picture while recording a movie.
.../30fps) VGA (4:3) NOTE The still image resolution captured during the recording of a movie is an optional function that allows you to view a recorded movie. 24 (16) Record Mode Movie recording Battery: Full power Battery: Medium power Battery: Low power Battery: No power DC power mode NOTE Scene: B/W / Classic / Negative effect can be previewed immediately without indicator on the LCD touch screen. The Dual Record icon ( ) appears on the LCD touch screen. Press the Playback button to take a still picture while recording a movie.

User Guide
Page 25
... Using the Flash or digital light function The camcorder has three Flash settings and one additional setting that you will fire to reduce the red-eye effect, (Picture Recording only). Record Mode 25 Using the pre-record function Using the pre-record function The Pre-record function ensures that allows you actually press the OK button.) To use the function again, repeat steps 1-3 above. Picture recording In Picture Record mode (The Picture Record LED indicator is activated. Press Playback button to take a picture. To use light function: 1 Flash Auto ( ): The flash...
... Using the Flash or digital light function The camcorder has three Flash settings and one additional setting that you will fire to reduce the red-eye effect, (Picture Recording only). Record Mode 25 Using the pre-record function Using the pre-record function The Pre-record function ensures that allows you actually press the OK button.) To use the function again, repeat steps 1-3 above. Picture recording In Picture Record mode (The Picture Record LED indicator is activated. Press Playback button to take a picture. To use light function: 1 Flash Auto ( ): The flash...
User Guide
Page 26
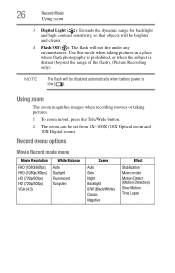
... disabled automatically when battery power is distant (beyond the range of the flash), (Picture Recording only). Using zoom The zoom magnifies images when recording movies or taking pictures in /out, press the Tele/Wide button. 2 The zoom can be brighter and clearer. 4 Flash Off ( ): The flash will not fire under any circumstances. Record menu options Movie Record mode menu Movie Resolution FHD (1080i/60fps) FHD (1080p/30fps) HD (720p/60fps) HD (720p/30fps) VGA (4:3) White Balance Auto...
... disabled automatically when battery power is distant (beyond the range of the flash), (Picture Recording only). Using zoom The zoom magnifies images when recording movies or taking pictures in /out, press the Tele/Wide button. 2 The zoom can be brighter and clearer. 4 Flash Off ( ): The flash will not fire under any circumstances. Record menu options Movie Record mode menu Movie Resolution FHD (1080i/60fps) FHD (1080p/30fps) HD (720p/60fps) HD (720p/30fps) VGA (4:3) White Balance Auto...

User Guide
Page 27
...) White Balance Auto Daylight Fluorescent Tungsten Scene Auto Skin Night Backlight B/W (Black/White) Classic Negative Effect Self-Timer Macro mode ISO Record mode operations Operation 1 Touch the Menu ( ) icon in Record mode. The wheel menu displays. Screen 2 Lightly scroll the on-screen wheel menu with your finger to view the options: Resolution, Scene, Effect, White Balance, Scene, and Setting. 3 As you scroll, the submenus for each option will display. 4 Touch the specific option you want to adjust...
...) White Balance Auto Daylight Fluorescent Tungsten Scene Auto Skin Night Backlight B/W (Black/White) Classic Negative Effect Self-Timer Macro mode ISO Record mode operations Operation 1 Touch the Menu ( ) icon in Record mode. The wheel menu displays. Screen 2 Lightly scroll the on-screen wheel menu with your finger to view the options: Resolution, Scene, Effect, White Balance, Scene, and Setting. 3 As you scroll, the submenus for each option will display. 4 Touch the specific option you want to adjust...

User Guide
Page 32
... Stabilization function can set them to confirm the setting. Operation 1 In the Effect submenu, touch to confirm the setting. 32 Record Mode Movie effects Slow Motion This setting records videos with a slow motion effect. Screen Time Lapse While recording still images at specific intervals you can not be used when the Time Lapse function is played, the playback time will display the options screen. 2 Touch the desired option to select it . 3 Touch OK to play as one movie file. ❖ Off: Disables Time...
... Stabilization function can set them to confirm the setting. Operation 1 In the Effect submenu, touch to confirm the setting. 32 Record Mode Movie effects Slow Motion This setting records videos with a slow motion effect. Screen Time Lapse While recording still images at specific intervals you can not be used when the Time Lapse function is played, the playback time will display the options screen. 2 Touch the desired option to select it . 3 Touch OK to play as one movie file. ❖ Off: Disables Time...
User Guide
Page 34
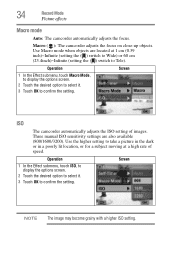
... also available (800/1600/3200). Screen ISO The camcorder automatically adjusts the ISO setting of speed. Operation 1 In the Effect submenu, touch Macro Mode, to display the options screen. 2 Touch the desired option to select it . 3 Touch OK to confirm the setting. Use the higher setting to Tele). Screen NOTE The image may become grainy with a higher ISO setting. 34 Record Mode Picture effects Macro mode Auto: The camcorder automatically adjusts the focus.
... also available (800/1600/3200). Screen ISO The camcorder automatically adjusts the ISO setting of speed. Operation 1 In the Effect submenu, touch Macro Mode, to display the options screen. 2 Touch the desired option to select it . 3 Touch OK to confirm the setting. Use the higher setting to Tele). Screen NOTE The image may become grainy with a higher ISO setting. 34 Record Mode Picture effects Macro mode Auto: The camcorder automatically adjusts the focus.

User Guide
Page 35
...Movie/Picture Playback mode. 2 Confirm the setting. 3 In Picture Playback mode, press to the previous screen. Tele button: Zoom in Playback mode. Fast forward. Mode button: Switch between Record and Playback modes. 2 Return to start/stop the slideshow. Right button: LCD touch screen information ON/OFF. Left button: Fast rewind. Pre-Record/YouTube™ Direct button: In Movie Playback mode, press to select the current movie to upload to the previous/next movie/picture. Chapter 4 Playback Mode The buttons have the following functions in Wide button: Zoom out Playback button...
...Movie/Picture Playback mode. 2 Confirm the setting. 3 In Picture Playback mode, press to the previous screen. Tele button: Zoom in Playback mode. Fast forward. Mode button: Switch between Record and Playback modes. 2 Return to start/stop the slideshow. Right button: LCD touch screen information ON/OFF. Left button: Fast rewind. Pre-Record/YouTube™ Direct button: In Movie Playback mode, press to select the current movie to upload to the previous/next movie/picture. Chapter 4 Playback Mode The buttons have the following functions in Wide button: Zoom out Playback button...

User Guide
Page 43
Screen 43 Chapter 5 Camcorder Settings Settings Menu Operation 1 In Movie Record mode, touch the onscreen Menu ( ) icon to display the wheel menu. 2 Scroll and stop on the screen to change between the pages. The Setting submenu displays. 3 The Setting submenu offers six options for configuring your camcorder setup: Sound (operation sound), TV, Language, Time Setting, Format, and Default Setting. 4 Touch / on Setting.
Screen 43 Chapter 5 Camcorder Settings Settings Menu Operation 1 In Movie Record mode, touch the onscreen Menu ( ) icon to display the wheel menu. 2 Scroll and stop on the screen to change between the pages. The Setting submenu displays. 3 The Setting submenu offers six options for configuring your camcorder setup: Sound (operation sound), TV, Language, Time Setting, Format, and Default Setting. 4 Touch / on Setting.

User Guide
Page 51
Follow the on-screen instructions to read the User's Manual. Chapter 7 Viewing Pictures and Movies on a Computer Installing bundled software The CD-ROM supplied with your camcorder contains three software applications. ❖ ArcSoft MediaImpression® is a user-friendly application that you need to have this software installed on their computer. To install the bundled software: 1 Insert the CD-ROM into compatible format with your media, burning your videos onto DVD, and uploading your videos to YouTube™...
Follow the on-screen instructions to read the User's Manual. Chapter 7 Viewing Pictures and Movies on a Computer Installing bundled software The CD-ROM supplied with your camcorder contains three software applications. ❖ ArcSoft MediaImpression® is a user-friendly application that you need to have this software installed on their computer. To install the bundled software: 1 Insert the CD-ROM into compatible format with your media, burning your videos onto DVD, and uploading your videos to YouTube™...
User Guide
Page 71
... found online by going to www.warranty.toshiba.com then selecting Click to regularly check the Toshiba Web site at www.pcsupport.toshiba.com. Customers located outside the fifty (50) United States and District of Columbia may obtain warranty service by visiting the Toshiba Acclaim Web site at www.acclaim.toshiba.com or by contacting the telephone support center...
... found online by going to www.warranty.toshiba.com then selecting Click to regularly check the Toshiba Web site at www.pcsupport.toshiba.com. Customers located outside the fifty (50) United States and District of Columbia may obtain warranty service by visiting the Toshiba Acclaim Web site at www.acclaim.toshiba.com or by contacting the telephone support center...


