User Guide
Page 5
... equipment, for information. 5 Connection to party line service is subject to the telephone network, the telephone company will notify the customer as soon as possible. If Problems Arise If this change. or an authorized representative of Toshiba, or the Toshiba Support Centre within the United States ...person to use a computer or other entity, or individual. (The telephone number provided may occasionally be advised of your modem from its present line, please call the telephone company and let them to make any changes necessary to the fax software instructions installed on the...
... equipment, for information. 5 Connection to party line service is subject to the telephone network, the telephone company will notify the customer as soon as possible. If Problems Arise If this change. or an authorized representative of Toshiba, or the Toshiba Support Centre within the United States ...person to use a computer or other entity, or individual. (The telephone number provided may occasionally be advised of your modem from its present line, please call the telephone company and let them to make any changes necessary to the fax software instructions installed on the...
User Guide
Page 28
... 47 Opening the display panel 47 Your computer's features and specifications ....48 Turning on the power 48 Adding memory (optional 49 Installing a memory module 50 Removing a memory module 54 Checking total memory 55 Hard Drive Recovery Utilities 56 Creating Recovery CDs/DVDs 56 Hard Disk Drive Recovery options 57 Hard Disk Drive Recovery using the Recovery media 62 Installing drivers and applications 63 Using the Toshiba Dual Pointing Device 64 Using the TouchPad 64 Scrolling with the TouchPad 65 Control buttons 65 Disabling or enabling the TouchPad 65 Using external display...
... 47 Opening the display panel 47 Your computer's features and specifications ....48 Turning on the power 48 Adding memory (optional 49 Installing a memory module 50 Removing a memory module 54 Checking total memory 55 Hard Drive Recovery Utilities 56 Creating Recovery CDs/DVDs 56 Hard Disk Drive Recovery options 57 Hard Disk Drive Recovery using the Recovery media 62 Installing drivers and applications 63 Using the Toshiba Dual Pointing Device 64 Using the TouchPad 64 Scrolling with the TouchPad 65 Control buttons 65 Disabling or enabling the TouchPad 65 Using external display...
User Guide
Page 31
... while using the SD card 130 Removing an SD card 131 Using the Ultra SlimBay 132 Removing a module from the Ultra SlimBay ...132 Inserting a module into the Ultra SlimBay.......133 Using an expansion device 134 Using an Optional Toshiba Express Port Replicator with your computer 134 Chapter 5: Utilities 135 TOSHIBA Assist 136 Connect 137 Secure 138 Protect & Fix 139 Optimize 140 TOSHIBA Application Installer 141 Setting passwords 142 Using an instant password 142 Using a supervisor password...
... while using the SD card 130 Removing an SD card 131 Using the Ultra SlimBay 132 Removing a module from the Ultra SlimBay ...132 Inserting a module into the Ultra SlimBay.......133 Using an expansion device 134 Using an Optional Toshiba Express Port Replicator with your computer 134 Chapter 5: Utilities 135 TOSHIBA Assist 136 Connect 137 Secure 138 Protect & Fix 139 Optimize 140 TOSHIBA Application Installer 141 Setting passwords 142 Using an instant password 142 Using a supervisor password...

User Guide
Page 50
... the memory module slot on , begin at step 1; The operating system turns off computer or Shut Down window appears. 2 Click Turn Off or Shut Down. The Turn off the computer. 3 Unplug and remove any cables connected to room temperature before they have cooled. For information on removing the main battery, see "Removing the battery from the computer" on the system). 50 Getting Started Adding memory (optional) Installing a memory module A memory module can be hot...
... the memory module slot on , begin at step 1; The operating system turns off computer or Shut Down window appears. 2 Click Turn Off or Shut Down. The Turn off the computer. 3 Unplug and remove any cables connected to room temperature before they have cooled. For information on removing the main battery, see "Removing the battery from the computer" on the system). 50 Getting Started Adding memory (optional) Installing a memory module A memory module can be hot...
User Guide
Page 51
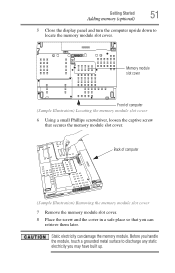
Getting Started 51 Adding memory (optional) 5 Close the display panel and turn the computer upside down to discharge any static electricity you may have built up. Before you can damage the memory module. Static electricity can retrieve them later. Back of computer (Sample Illustration) Locating the memory module slot cover 6 Using a small Phillips screwdriver, loosen the captive screw that you handle the module, touch a grounded metal surface...
Getting Started 51 Adding memory (optional) 5 Close the display panel and turn the computer upside down to discharge any static electricity you may have built up. Before you can damage the memory module. Static electricity can retrieve them later. Back of computer (Sample Illustration) Locating the memory module slot cover 6 Using a small Phillips screwdriver, loosen the captive screw that you handle the module, touch a grounded metal surface...
User Guide
Page 55
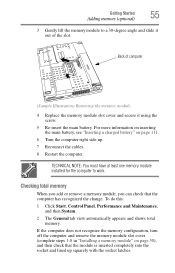
...: 1 Click Start, Control Panel, Performance and Maintenance, and then System. 2 The General tab view automatically appears and shows total memory. If the computer does not recognize the memory configuration, turn off the computer and remove the memory module slot cover (complete steps 1-8 in "Installing a memory module" on page 111. 6 Turn the computer right side up squarely with the socket latches. Getting Started 55 Adding memory (optional) 3 Gently lift the memory module to work.
...: 1 Click Start, Control Panel, Performance and Maintenance, and then System. 2 The General tab view automatically appears and shows total memory. If the computer does not recognize the memory configuration, turn off the computer and remove the memory module slot cover (complete steps 1-8 in "Installing a memory module" on page 111. 6 Turn the computer right side up squarely with the socket latches. Getting Started 55 Adding memory (optional) 3 Gently lift the memory module to work.
User Guide
Page 129
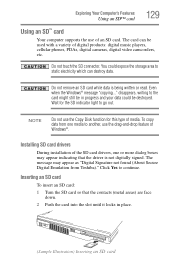
... players, cellular phones, PDAs, digital cameras, digital video camcorders, etc. Exploring Your Computer's Features Using an SD™ card 129 Using an SD™ card Your computer supports the use the drag-and-drop feature of Windows®. NOTE Do not use the Copy Disk function for the SD indicator light to go out. Click Yes to the card might still be in place. (Sample...
... players, cellular phones, PDAs, digital cameras, digital video camcorders, etc. Exploring Your Computer's Features Using an SD™ card 129 Using an SD™ card Your computer supports the use the drag-and-drop feature of Windows®. NOTE Do not use the Copy Disk function for the SD indicator light to go out. Click Yes to the card might still be in place. (Sample...
User Guide
Page 145
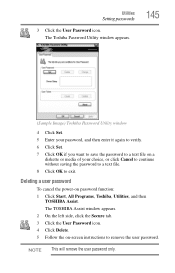
... User Password icon. 4 Click Delete. 5 Follow the on-screen instructions to exit. Deleting a user password To cancel the power-on a diskette or media of your choice, or click Cancel to continue without saving the password to a text file. 8 Click OK to remove the user password. Utilities Setting passwords 3 Click the User Password icon. NOTE This will remove the user password only. The Toshiba Password Utility window appears. 145 (Sample Image) Toshiba Password Utility window 4 Click Set. 5 Enter your password, and then enter...
... User Password icon. 4 Click Delete. 5 Follow the on-screen instructions to exit. Deleting a user password To cancel the power-on a diskette or media of your choice, or click Cancel to continue without saving the password to a text file. 8 Click OK to remove the user password. Utilities Setting passwords 3 Click the User Password icon. NOTE This will remove the user password only. The Toshiba Password Utility window appears. 145 (Sample Image) Toshiba Password Utility window 4 Click Set. 5 Enter your password, and then enter...

User Guide
Page 158
... USB ports to Mode-1. Changing the setting to use of the options that appear in either mode. If the function does not work with Mode-1 setting, change will generate heat if they come into contact with metal products, for example when carrying the computer in Enabled. Disables the function ❖ LAN-Allows you change it to Disabled. There are two modes, Mode-1 and Mode-2 in your system. Enables the function Enabled (Mode-2) -- Setting item: Enabled (Mode-1) -- Enables the function Disabled (Default) -- USB Sleep and Charge Function Settings-The default setting...
... USB ports to Mode-1. Changing the setting to use of the options that appear in either mode. If the function does not work with Mode-1 setting, change will generate heat if they come into contact with metal products, for example when carrying the computer in Enabled. Disables the function ❖ LAN-Allows you change it to Disabled. There are two modes, Mode-1 and Mode-2 in your system. Enables the function Enabled (Mode-2) -- Setting item: Enabled (Mode-1) -- Enables the function Disabled (Default) -- USB Sleep and Charge Function Settings-The default setting...
User Guide
Page 181
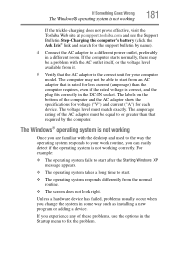
... change the system in the Startup menu to start from the normal routine. ❖ The screen does not look right. The labels on the bottom of these problems, use the options in some way such as installing a new program or adding a device. For example: ❖ The operating system fails to start after the Starting Windows XP message appears. ❖ The operating system takes a long time to fix...
... change the system in the Startup menu to start from the normal routine. ❖ The screen does not look right. The labels on the bottom of these problems, use the options in some way such as installing a new program or adding a device. For example: ❖ The operating system fails to start after the Starting Windows XP message appears. ❖ The operating system takes a long time to fix...

User Guide
Page 190
... simultaneously (once). Display problems Here are using the built-in screen, make sure the display priority is firmly attached. ❖ Try adjusting the contrast and brightness controls on the external monitor. ❖ Press Fn and F5 simultaneously to continue working. Press any key to its previous setting. HINT: Holding the Fn key and pressing the F5 key several times will restart and recognize the device. You may...
... simultaneously (once). Display problems Here are using the built-in screen, make sure the display priority is firmly attached. ❖ Try adjusting the contrast and brightness controls on the external monitor. ❖ Press Fn and F5 simultaneously to continue working. Press any key to its previous setting. HINT: Holding the Fn key and pressing the F5 key several times will restart and recognize the device. You may...

User Guide
Page 206
.... Select Open writable CD folder using Windows Explorer, and click OK. 3 A Windows® Explorer window will appear. Fortunately, the Windows® operating system offers a convenient way to back up the computer while running on its hard drive. No additional software is recommended in case the internal hard drive fails. External optical disc writers are also widely available. This window will be a recent backup of options will open for the...
.... Select Open writable CD folder using Windows Explorer, and click OK. 3 A Windows® Explorer window will appear. Fortunately, the Windows® operating system offers a convenient way to back up the computer while running on its hard drive. No additional software is recommended in case the internal hard drive fails. External optical disc writers are also widely available. This window will be a recent backup of options will open for the...

User Guide
Page 209
...; Change the Enabled Mode setting. ❖ Turn OFF the computer while external devices are working correctly, and verify that accompany the hardware or software. ❖ Restart the Windows® operating system. It is often necessary to run an installation utility first-before each installation, even if the installation utility does not prompt you have several new items to add to use the "USB Sleep and Charge function". This will clean up critical data. 2 Create a Restore...
...; Change the Enabled Mode setting. ❖ Turn OFF the computer while external devices are working correctly, and verify that accompany the hardware or software. ❖ Restart the Windows® operating system. It is often necessary to run an installation utility first-before each installation, even if the installation utility does not prompt you have several new items to add to use the "USB Sleep and Charge function". This will clean up critical data. 2 Create a Restore...

User Guide
Page 231
... disable settings of wired and wireless network devices, infrared devices, and set the power status of Bluetooth® antennas ❖ TCP/IP settings-includes DHCP, IP address, subnet mask, default gateway, DNS server, and WINS server settings ❖ Personal firewall settings for Internet connections ❖ Dial-up connection settings for the default connection ❖ File and printer sharing settings ❖ Printer settings for the default printer ❖ Bluetooth® Security Level (for easily switching network settings...
... disable settings of wired and wireless network devices, infrared devices, and set the power status of Bluetooth® antennas ❖ TCP/IP settings-includes DHCP, IP address, subnet mask, default gateway, DNS server, and WINS server settings ❖ Personal firewall settings for Internet connections ❖ Dial-up connection settings for the default connection ❖ File and printer sharing settings ❖ Printer settings for the default printer ❖ Bluetooth® Security Level (for easily switching network settings...

User Guide
Page 249
... with the Fn key can set system options or control system parameters, such as a mouse. See also cache, CPU cache, L1 cache. A type of using a pointing device such as the battery save mode. (2) A key or combination of computers or other on the screen that polarizes the light passing through it. A key or combination of keys that you use to perform a task instead of display that activates a memory resident program. L2...
... with the Fn key can set system options or control system parameters, such as a mouse. See also cache, CPU cache, L1 cache. A type of using a pointing device such as the battery save mode. (2) A key or combination of computers or other on the screen that polarizes the light passing through it. A key or combination of keys that you use to perform a task instead of display that activates a memory resident program. L2...
User Guide
Page 255
... 134 memory 49 adding memory 49 adjusting recording quality 125 Alt keys 84 audio files 124 audio features 124 B backing up files 82 battery alarms 107 changing 109 charge indicator light 46, 104 charge not lasting 189 charging 44, 46 conserving power 107 disposal 114 low charge 106 monitoring power 46, 104 not charging 188 power profile 215 power profile hot key 109 real-time clock (RTC) 101 removing 110 BIOS Setup see TOSHIBA Hardware Setup button power 49, 57 start...
... 134 memory 49 adding memory 49 adjusting recording quality 125 Alt keys 84 audio files 124 audio features 124 B backing up files 82 battery alarms 107 changing 109 charge indicator light 46, 104 charge not lasting 189 charging 44, 46 conserving power 107 disposal 114 low charge 106 monitoring power 46, 104 not charging 188 power profile 215 power profile hot key 109 real-time clock (RTC) 101 removing 110 BIOS Setup see TOSHIBA Hardware Setup button power 49, 57 start...

User Guide
Page 256
... a power source 44 connection set up 120 control buttons 65 Ctrl keys 84 D desktop creating new icon 117 major features 117 desktop exploration 116 desktop icons 117 Device Manager 186 checking properties 186 disabling a device 186 devices keyboard 67 mouse 67 Disk Defragmenter 193 disk drive corrupted/damaged data files 193 missing files/trouble accessing a disk 192 running slow 193 diskette drive cannot insert a diskette 193 cannot read a diskette 193 connecting 70 external, connecting 70 display...
... a power source 44 connection set up 120 control buttons 65 Ctrl keys 84 D desktop creating new icon 117 major features 117 desktop exploration 116 desktop icons 117 Device Manager 186 checking properties 186 disabling a device 186 devices keyboard 67 mouse 67 Disk Defragmenter 193 disk drive corrupted/damaged data files 193 missing files/trouble accessing a disk 192 running slow 193 diskette drive cannot insert a diskette 193 cannot read a diskette 193 connecting 70 external, connecting 70 display...

User Guide
Page 257
... and Support Windows® operating system 183 Hibernation mode 71 configuring 75 starting again from 76 hot key display brightness 217 display modes 217 Hibernation mode 216 keyboard overlays 219 password security 214 power profile 215 Standby mode 216 volume mute 213 zooming 218 hot key power profile 109 http 122 I icon 117 desktop 117 Internet Explorer 117 moving to desktop 117 recycle bin 117 safety 37 Windows Media® Player 117 installation memory module 50 installing memory modules 49 mouse...
... and Support Windows® operating system 183 Hibernation mode 71 configuring 75 starting again from 76 hot key display brightness 217 display modes 217 Hibernation mode 216 keyboard overlays 219 password security 214 power profile 215 Standby mode 216 volume mute 213 zooming 218 hot key power profile 109 http 122 I icon 117 desktop 117 Internet Explorer 117 moving to desktop 117 recycle bin 117 safety 37 Windows Media® Player 117 installation memory module 50 installing memory modules 49 mouse...
User Guide
Page 258
... 83 Windows® special keys 84 keyboard, external 67 keyboard, full-size 83 L lock computer, using 79 M main battery removing 110 memory adding 49 problem solving 187 removing memory module slot cover 51 memory module inserting 52 installation 50 removing 55 memory module slot 51 microphone 125 modem connecting to telephone line 120 problem solving 198 monitor 66 connecting 66 not working 190 mouse installing 67 mouse utility 154 N network accessing 120 Dial-Up Networking Wizard 120 networking wireless 119 O opening the display panel 47 optical discs inserting 93 optical drive problems 194...
... 83 Windows® special keys 84 keyboard, external 67 keyboard, full-size 83 L lock computer, using 79 M main battery removing 110 memory adding 49 problem solving 187 removing memory module slot cover 51 memory module inserting 52 installation 50 removing 55 memory module slot 51 microphone 125 modem connecting to telephone line 120 problem solving 198 monitor 66 connecting 66 not working 190 mouse installing 67 mouse utility 154 N network accessing 120 Dial-Up Networking Wizard 120 networking wireless 119 O opening the display panel 47 optical discs inserting 93 optical drive problems 194...

User Guide
Page 259
... Device Manager 186 disabling a device 186 disk drive is slow 193 display is blank 190 external display not working 191 external monitor 190 faulty memory 187 hardware conflict 184, 185 high-pitched noise 195 illegal operation 178 Internet bookmarked site not found 183 Internet connection is slow 183 keyboard not responding 179 missing files/trouble accessing a disk 192 modem not receiving or transmitting 198 no sound 195 non-system disk or disk error 180, 193 PC Card...
... Device Manager 186 disabling a device 186 disk drive is slow 193 display is blank 190 external display not working 191 external monitor 190 faulty memory 187 hardware conflict 184, 185 high-pitched noise 195 illegal operation 178 Internet bookmarked site not found 183 Internet connection is slow 183 keyboard not responding 179 missing files/trouble accessing a disk 192 modem not receiving or transmitting 198 no sound 195 non-system disk or disk error 180, 193 PC Card...


