

Users Manual Canada; English
Page 4
... M9 System Auto Off 6-13 Chapter 7 HW Setup & BIOS Setup Accessing HW Setup 7-1 HW Setup window 7-1 BIOS Setup Program 7-8 Chapter 8 Troubleshooting Problem solving process 8-1 Hardware and system checklist 8-3 TOSHIBA support 8-21 Appendix A Specifications Physical Dimensions A-1 Environmental Requirements A-1 Appendix B Display Controller and Video mode Display controller B-1 Video mode B-1 Appendix C AT Commands Appendix D S-registers S-register values D-1 AT command set result codes D-5 Appendix E V.90 V.90 mode E-1 AT Command E-3 Appendix F Wireless LAN Card...
... M9 System Auto Off 6-13 Chapter 7 HW Setup & BIOS Setup Accessing HW Setup 7-1 HW Setup window 7-1 BIOS Setup Program 7-8 Chapter 8 Troubleshooting Problem solving process 8-1 Hardware and system checklist 8-3 TOSHIBA support 8-21 Appendix A Specifications Physical Dimensions A-1 Environmental Requirements A-1 Appendix B Display Controller and Video mode Display controller B-1 Video mode B-1 Appendix C AT Commands Appendix D S-registers S-register values D-1 AT command set result codes D-5 Appendix E V.90 V.90 mode E-1 AT Command E-3 Appendix F Wireless LAN Card...
Users Manual Canada; English
Page 6
... manual. Disclaimer This manual has been validated and reviewed for the TOSHIBA TECRA M9 Portable Personal Computer at the time of Intel Corporation. Other trademarks and registered trademarks not listed above (including conversion to digital format, alteration, transfer of copied material and distribution on a network) without the prior written permission of the information contained herein. Any other intellectual property covered...
... manual. Disclaimer This manual has been validated and reviewed for the TOSHIBA TECRA M9 Portable Personal Computer at the time of Intel Corporation. Other trademarks and registered trademarks not listed above (including conversion to digital format, alteration, transfer of copied material and distribution on a network) without the prior written permission of the information contained herein. Any other intellectual property covered...
Users Manual Canada; English
Page 11
... fax software before sending messages. Fax branding The Telephone Consumer Protection Act of 1991 makes it may occasionally be given the opportunity to correct the problem and informed of your telephone line, as possible. When practical, they will be performed by TOSHIBA Corporation or an authorized representative of TOSHIBA Corporation. In order to program this change. User's Manual xi TECRA M9...
... fax software before sending messages. Fax branding The Telephone Consumer Protection Act of 1991 makes it may occasionally be given the opportunity to correct the problem and informed of your telephone line, as possible. When practical, they will be performed by TOSHIBA Corporation or an authorized representative of TOSHIBA Corporation. In order to program this change. User's Manual xi TECRA M9...

Users Manual Canada; English
Page 13
... designed to specifically configure to satisfactory line conditions a modem can only work properly if: a/ it is attached to Australia. Notes for use of that the country/region is set , enter the command ATI which could constitute a nuisance to the Australian telecoms network must have a valid Austel permit. Failure to customers. To verify that device under all operating conditions. b/ the...
... designed to specifically configure to satisfactory line conditions a modem can only work properly if: a/ it is attached to Australia. Notes for use of that the country/region is set , enter the command ATI which could constitute a nuisance to the Australian telecoms network must have a valid Austel permit. Failure to customers. To verify that device under all operating conditions. b/ the...
Users Manual Canada; English
Page 17
... manual by -step instructions on configuring your computer. Be sure to read over the Chapter 1, Getting Started and Chapter 3, Hardware, Utilities and Options chapters to describe, identify, and highlight terms and operating procedures. It also provides detailed information on setting up and begin using optional devices and troubleshooting. If you are a new user of reliable, high-performance computing. For example: Read Only Memory (ROM). If you 're new...
... manual by -step instructions on configuring your computer. Be sure to read over the Chapter 1, Getting Started and Chapter 3, Hardware, Utilities and Options chapters to describe, identify, and highlight terms and operating procedures. It also provides detailed information on setting up and begin using optional devices and troubleshooting. If you are a new user of reliable, high-performance computing. For example: Read Only Memory (ROM). If you 're new...

Users Manual Canada; English
Page 45
... 4, Operating Basics. User's Manual 2-9 Refer to launch the program automatically. TOSHIBA Assist button TOSHIBA Presentation button Fingerprint Sensor Press this button to the Using the AccuPoint section in Chapter 4, Operating Basics. Pressing this button to control the on and off. A pointer control device located in the Mobility Center. The internal keyboard provides the embedded numeric overlay keys, dedicated cursor control overlay keys, and and Keys. When power-off, Sleep Mode and Hibernation Mode, press this button...
... 4, Operating Basics. User's Manual 2-9 Refer to launch the program automatically. TOSHIBA Assist button TOSHIBA Presentation button Fingerprint Sensor Press this button to the Using the AccuPoint section in Chapter 4, Operating Basics. Pressing this button to control the on and off. A pointer control device located in the Mobility Center. The internal keyboard provides the embedded numeric overlay keys, dedicated cursor control overlay keys, and and Keys. When power-off, Sleep Mode and Hibernation Mode, press this button...
Users Manual Canada; English
Page 56
... automatically. Pressing this button to TOSHIBA computers or are specific key combinations that accommodates a DVD Super Multi drive and secondary hard disk drive. User's Manual 3-5 TOSHIBA Assist button Press this button when an external display is a single-drive bay that let you quickly change the system configuration directly from the keyboard without running a system program. Ultra Slim Bay Ultra Slim Bay Modules Ultra Slim Bay is connected will open the Windows VistaTM TMM (Transient Multimon Manager) screen.
... automatically. Pressing this button to TOSHIBA computers or are specific key combinations that accommodates a DVD Super Multi drive and secondary hard disk drive. User's Manual 3-5 TOSHIBA Assist button Press this button when an external display is a single-drive bay that let you quickly change the system configuration directly from the keyboard without running a system program. Ultra Slim Bay Ultra Slim Bay Modules Ultra Slim Bay is connected will open the Windows VistaTM TMM (Transient Multimon Manager) screen.
Users Manual Canada; English
Page 69
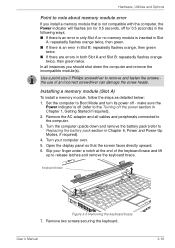
... and remove the incompatible module(s). make sure the Power indicator is an error in Slot B: repeatedly flashes orange, then green twice. ■ If there are errors in both Slot A and Slot B: repeatedly flashes orange twice, then green twice. Hardware, Utilities and Options Point to note about memory module error If you should shut down and remove the battery pack (refer to Replacing the battery pack section in Chapter 1, Getting Started if required). 2. Installing a memory module (Slot A) To install a memory module...
... and remove the incompatible module(s). make sure the Power indicator is an error in Slot B: repeatedly flashes orange, then green twice. ■ If there are errors in both Slot A and Slot B: repeatedly flashes orange twice, then green twice. Hardware, Utilities and Options Point to note about memory module error If you should shut down and remove the battery pack (refer to Replacing the battery pack section in Chapter 1, Getting Started if required). 2. Installing a memory module (Slot A) To install a memory module...
Users Manual Canada; English
Page 73
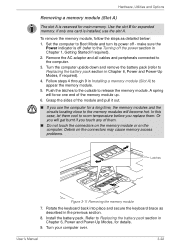
... Options Removing a memory module (Slot A) The slot A is installed, use the computer for a long time, the memory modules and the circuits locating close to the memory modules will become hot. make sure the Power indicator is off (refer to the Turning off - Use the slot B for main memory. Remove the AC adaptor and all cables and peripherals connected to Replacing the battery pack section in Chapter 6, Power and Power-Up Modes, if required). 4. Follow steps 4 through 9 in Chapter 1, Getting Started...
... Options Removing a memory module (Slot A) The slot A is installed, use the computer for a long time, the memory modules and the circuits locating close to the memory modules will become hot. make sure the Power indicator is off (refer to the Turning off - Use the slot B for main memory. Remove the AC adaptor and all cables and peripherals connected to Replacing the battery pack section in Chapter 6, Power and Power-Up Modes, if required). 4. Follow steps 4 through 9 in Chapter 1, Getting Started...
Users Manual Canada; English
Page 75
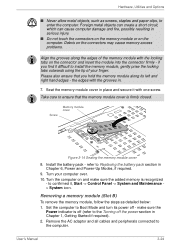
... you find it , Start -> Control Panel -> System and Maintenance > System icon. Turn the computer on the computer. User's Manual 3-24 Foreign metal objects can create a short circuit, which can cause computer damage and fire, possibly resulting in Chapter 6, Power and Power-Up Modes, if required. 9. refer to the computer. Remove the AC adaptor and all cables and peripherals connected to Replacing the battery pack section in...
... you find it , Start -> Control Panel -> System and Maintenance > System icon. Turn the computer on the computer. User's Manual 3-24 Foreign metal objects can create a short circuit, which can cause computer damage and fire, possibly resulting in Chapter 6, Power and Power-Up Modes, if required. 9. refer to the computer. Remove the AC adaptor and all cables and peripherals connected to Replacing the battery pack section in...

Users Manual Canada; English
Page 76
... - refer to release it from the module in order to Replacing the battery pack section in order to ensure that this case, let them . ■ Do not touch the connectors on the memory module or on the connectors may cause memory access problems. Latches Figure 3-15 Removing the memory module 8. Hardware, Utilities and Options 3. Or you will become hot. Seat the memory module cover in place - Turn your fingernail or a thin object...
... - refer to release it from the module in order to Replacing the battery pack section in order to ensure that this case, let them . ■ Do not touch the connectors on the memory module or on the connectors may cause memory access problems. Latches Figure 3-15 Removing the memory module 8. Hardware, Utilities and Options 3. Or you will become hot. Seat the memory module cover in place - Turn your fingernail or a thin object...
Users Manual Canada; English
Page 86
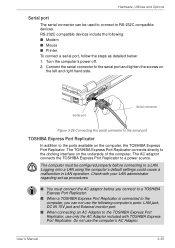
.... Hardware, Utilities and Options Serial port The serial connector can not use the following : ■ Modem ■ Mouse ■ Printer To connect a serial port, follow the steps as detailed below: 1. Connect the serial connector to a LAN. Turn the computer's power off. 2. Logging onto a LAN using the computer's default settings could cause a malfunction in LAN operation. Check with your LAN administrator regarding set-up procedures. ■ You must be configured properly before you connect to a TOSHIBA Express Port Replicator...
.... Hardware, Utilities and Options Serial port The serial connector can not use the following : ■ Modem ■ Mouse ■ Printer To connect a serial port, follow the steps as detailed below: 1. Connect the serial connector to a LAN. Turn the computer's power off. 2. Logging onto a LAN using the computer's default settings could cause a malfunction in LAN operation. Check with your LAN administrator regarding set-up procedures. ■ You must be configured properly before you connect to a TOSHIBA Express Port Replicator...
Users Manual Canada; English
Page 136
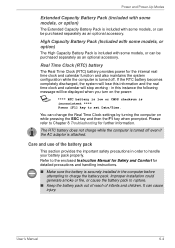
... included with some models, or can be purchased separately as an optional accessory. in the computer before attempting to set Date/Time. Care and use of infants and children. It can change the Real Time Clock settings by turning the computer on the power: S **** RTC battery is low or CMOS checksum is inconsistent **** Press [F1] key to charge the battery pack. Real Time...
... included with some models, or can be purchased separately as an optional accessory. in the computer before attempting to set Date/Time. Care and use of infants and children. It can change the Real Time Clock settings by turning the computer on the power: S **** RTC battery is low or CMOS checksum is inconsistent **** Press [F1] key to charge the battery pack. Real Time...
Users Manual Canada; English
Page 159
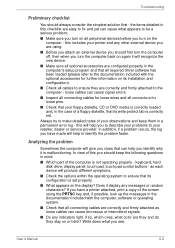
... when you identify why it display any indicators light, if so, which ones, what color are they and do they are correctly and firmly attached as each device will help to make detailed notes of this will help you turn on or blink? keyboard, hard disk drive, display panel, touch pad, touch pad control buttons - the items detailed in this includes your floppy diskette, CD or DVD media is not operating properly -
... when you identify why it display any indicators light, if so, which ones, what color are they and do they are correctly and firmly attached as each device will help to make detailed notes of this will help you turn on or blink? keyboard, hard disk drive, display panel, touch pad, touch pad control buttons - the items detailed in this includes your floppy diskette, CD or DVD media is not operating properly -

Users Manual Canada; English
Page 160
...; System start-up ■ Self test ■ Power ■ Password ■ Keyboard ■ Internal display panel ■ Hard disk drive ■ DVD Super Multi drive ■ USB floppy diskette drive ■ PC Card ■ SD/SDHC Card ■ Dual Pointing Device ■ Fingerprint Sensor ■ USB device ■ Additional memory module ■ Sound system ■ External monitor ■ i.LINK (IEEE1394) device ■ Modem ■ LAN ■ Wireless LAN ■ Bluetooth ■ Recovery Discs User's Manual 8-3 Write down what you still cannot correct the problem...
...; System start-up ■ Self test ■ Power ■ Password ■ Keyboard ■ Internal display panel ■ Hard disk drive ■ DVD Super Multi drive ■ USB floppy diskette drive ■ PC Card ■ SD/SDHC Card ■ Dual Pointing Device ■ Fingerprint Sensor ■ USB device ■ Additional memory module ■ Sound system ■ External monitor ■ i.LINK (IEEE1394) device ■ Modem ■ LAN ■ Wireless LAN ■ Bluetooth ■ Recovery Discs User's Manual 8-3 Write down what you still cannot correct the problem...
Users Manual Canada; English
Page 164
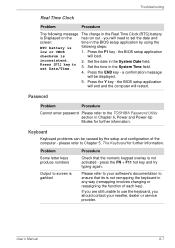
... Chapter 6, Power and Power-Up Modes for further information. press the FN + F11 hot key and try typing again. Set the date in the Real Time Clock (RTC) battery is Displayed on the has run out - a confirmation message will restart. Keyboard Keyboard problems can be displayed. 5. If you will load. Press the F1 key - Press the Y key - the BIOS setup application checksum is not activated - Password Problem Procedure Cannot enter password Please...
... Chapter 6, Power and Power-Up Modes for further information. press the FN + F11 hot key and try typing again. Set the date in the Real Time Clock (RTC) battery is Displayed on the has run out - a confirmation message will restart. Keyboard Keyboard problems can be displayed. 5. If you will load. Press the F1 key - Press the Y key - the BIOS setup application checksum is not activated - Password Problem Procedure Cannot enter password Please...
Users Manual Canada; English
Page 174
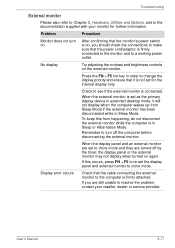
... is firmly connected to the monitor and to a working power outlet. If you should check the connections to make sure that the cable connecting the external monitor to the computer is firmly attached. To keep this occurs, press FN + F5 to re-set for further information. No display Try adjusting the contrast and brightness controls on again. Troubleshooting External monitor Please also refer to Chapter 3, Hardware, Utilities and Options, and to...
... is firmly connected to the monitor and to a working power outlet. If you should check the connections to make sure that the cable connecting the external monitor to the computer is firmly attached. To keep this occurs, press FN + F5 to re-set for further information. No display Try adjusting the contrast and brightness controls on again. Troubleshooting External monitor Please also refer to Chapter 3, Hardware, Utilities and Options, and to...
Users Manual Canada; English
Page 232
...,000 simple logic gates on the screen. See also kilobyte. Also called a screen. often used to communicate with transparent conducting material. keyboard: An input device containing switches that equals 1 million cycles per second. User's Manual Glossary-9 Glossary I/O devices: Equipment used as equivalent to 1024, or 2 raised to the 10th power. megahertz: A unit of data storage equal to 1024 kilobytes. M main board: See motherboard.
...,000 simple logic gates on the screen. See also kilobyte. Also called a screen. often used to communicate with transparent conducting material. keyboard: An input device containing switches that equals 1 million cycles per second. User's Manual Glossary-9 Glossary I/O devices: Equipment used as equivalent to 1024, or 2 raised to the 10th power. megahertz: A unit of data storage equal to 1024 kilobytes. M main board: See motherboard.
Users Manual Canada; English
Page 239
...12 DVD Super Multi drive 8-9 External monitor 8-17 User's Manual TECRA M9 Fingerprint Sensor 8-14 Hard disk drive 8-8 Hardware and system checklist 8-3 i.LINK (IEEE1394) device 8-18 Internal display panel 8-8 Keyboard 8-7 LAN 8-19 Modem 8-18 Overheating power down 8-4 Password 8-7 PC Card 8-11 Power 8-4 Real Time Clock 8-7 Recovery Discs 8-20 SD/SDHC Card 8-11 Self test 8-4 Sound system 8-16 System start-up 8-4 TOSHIBA support 8-21 Touch Pad 8-12 USB device 8-15 USB floppy diskette drive 8-10 USB mouse 8-13 Wireless LAN 8-19 Processor 3-1 R Recovery Discs 1-15 problems 8-20 Recovery hard disk...
...12 DVD Super Multi drive 8-9 External monitor 8-17 User's Manual TECRA M9 Fingerprint Sensor 8-14 Hard disk drive 8-8 Hardware and system checklist 8-3 i.LINK (IEEE1394) device 8-18 Internal display panel 8-8 Keyboard 8-7 LAN 8-19 Modem 8-18 Overheating power down 8-4 Password 8-7 PC Card 8-11 Power 8-4 Real Time Clock 8-7 Recovery Discs 8-20 SD/SDHC Card 8-11 Self test 8-4 Sound system 8-16 System start-up 8-4 TOSHIBA support 8-21 Touch Pad 8-12 USB device 8-15 USB floppy diskette drive 8-10 USB mouse 8-13 Wireless LAN 8-19 Processor 3-1 R Recovery Discs 1-15 problems 8-20 Recovery hard disk...
Detailed Specs for Tecra M9 PTM90C-TG009C English
Page 1
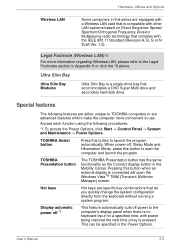
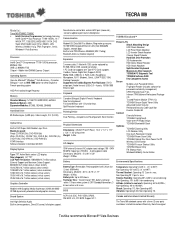
... Media Accelerator X3100 with a three (3) year parts and labour Limited International Warranty. Intel High Definition Audio Built-in Intel PRO/Wireless 3945ABG (802.11a/b/g) Bluetooth Antenna (module required) Expansion 2 memory slots (1 filled with 12 function keys Spill Resistant keyboard Pointing Device Dual Pointing - Note the original Toshiba recommends Microsoft® Vista Business max; user as ONE TIME option to 10,000m. Non Operating -20° to 95°F); TECRA M9 Model (s): Tecra M9 PTM90C...
... Media Accelerator X3100 with a three (3) year parts and labour Limited International Warranty. Intel High Definition Audio Built-in Intel PRO/Wireless 3945ABG (802.11a/b/g) Bluetooth Antenna (module required) Expansion 2 memory slots (1 filled with 12 function keys Spill Resistant keyboard Pointing Device Dual Pointing - Note the original Toshiba recommends Microsoft® Vista Business max; user as ONE TIME option to 10,000m. Non Operating -20° to 95°F); TECRA M9 Model (s): Tecra M9 PTM90C...


