

Users Manual Canada; English
Page 4
... M9 System Auto Off 6-13 Chapter 7 HW Setup & BIOS Setup Accessing HW Setup 7-1 HW Setup window 7-1 BIOS Setup Program 7-8 Chapter 8 Troubleshooting Problem solving process 8-1 Hardware and system checklist 8-3 TOSHIBA support 8-21 Appendix A Specifications Physical Dimensions A-1 Environmental Requirements A-1 Appendix B Display Controller and Video mode Display controller B-1 Video mode B-1 Appendix C AT Commands Appendix D S-registers S-register values D-1 AT command set result codes D-5 Appendix E V.90 V.90 mode E-1 AT Command E-3 Appendix F Wireless LAN Card...
... M9 System Auto Off 6-13 Chapter 7 HW Setup & BIOS Setup Accessing HW Setup 7-1 HW Setup window 7-1 BIOS Setup Program 7-8 Chapter 8 Troubleshooting Problem solving process 8-1 Hardware and system checklist 8-3 TOSHIBA support 8-21 Appendix A Specifications Physical Dimensions A-1 Environmental Requirements A-1 Appendix B Display Controller and Video mode Display controller B-1 Video mode B-1 Appendix C AT Commands Appendix D S-registers S-register values D-1 AT command set result codes D-5 Appendix E V.90 V.90 mode E-1 AT Command E-3 Appendix F Wireless LAN Card...
Users Manual Canada; English
Page 6
... and registered trademarks not listed above (including conversion to digital format, alteration, transfer of TOSHIBA. All rights reserved. InterVideo and WinDVD are registered trademarks and Windows Vista is a trademark of International Business Machines Corporation. TECRA M9 Copyright © 2007 by TOSHIBA under license. Windows and Microsoft are registered trademarks of Microsoft Corporation. User's Manual vi Any other intellectual property covered by copyright laws...
... and registered trademarks not listed above (including conversion to digital format, alteration, transfer of TOSHIBA. All rights reserved. InterVideo and WinDVD are registered trademarks and Windows Vista is a trademark of International Business Machines Corporation. TECRA M9 Copyright © 2007 by TOSHIBA under license. Windows and Microsoft are registered trademarks of Microsoft Corporation. User's Manual vi Any other intellectual property covered by copyright laws...
Users Manual Canada; English
Page 11
... not feasible, you will notify you in their equipment, operations, or procedures. If the telephone company notes a problem, they will be performed by TOSHIBA Corporation or an authorized representative of TOSHIBA Corporation. If these changes might affect your service or the operation of your fax software before sending messages. TECRA M9 Telephone company procedures The goal of the telephone company...
... not feasible, you will notify you in their equipment, operations, or procedures. If the telephone company notes a problem, they will be performed by TOSHIBA Corporation or an authorized representative of TOSHIBA Corporation. If these changes might affect your service or the operation of your fax software before sending messages. TECRA M9 Telephone company procedures The goal of the telephone company...

Users Manual Canada; English
Page 13
... verify that device under all operating conditions. Notes for use of other country/region setting while the modem is compatible with the modem at which this modem is capable of $12,000 for Australia Modems connected to Australia. In particular the higher speeds at the other end of non-permitted equipment. User's Manual xiii TECRA M9 Notes for Users in...
... verify that device under all operating conditions. Notes for use of other country/region setting while the modem is compatible with the modem at which this modem is capable of $12,000 for Australia Modems connected to Australia. In particular the higher speeds at the other end of non-permitted equipment. User's Manual xiii TECRA M9 Notes for Users in...
Users Manual Canada; English
Page 17
... connecting optional products or external devices. Preface Congratulations on your computer, basic operations and care, using your computer. Be sure to read over the Chapter 1, Getting Started and Chapter 3, Hardware, Utilities and Options chapters to set up your TECRA M9 computer. If you 're new to portable computing, first read the Special features section in Chapter 3, Hardware, Utilities and Options to learn how this manual is designed to setup...
... connecting optional products or external devices. Preface Congratulations on your computer, basic operations and care, using your computer. Be sure to read over the Chapter 1, Getting Started and Chapter 3, Hardware, Utilities and Options chapters to set up your TECRA M9 computer. If you 're new to portable computing, first read the Special features section in Chapter 3, Hardware, Utilities and Options to learn how this manual is designed to setup...

Users Manual Canada; English
Page 45
... on-screen pointer. Control buttons below the Touch Pad allow you to turn the computer's power on Fingerprint Sensor, refer to start the computer and launch the program. TOSHIBA Assist button TOSHIBA Presentation button Fingerprint Sensor Press this button to Chapter 4, Using the Fingerprint Sensor. User's Manual 2-9 Refer to the Using the AccuPoint section in Chapter 4, Operating Basics. For detailed information on and off , Sleep Mode and Hibernation Mode, press this button...
... on-screen pointer. Control buttons below the Touch Pad allow you to turn the computer's power on Fingerprint Sensor, refer to start the computer and launch the program. TOSHIBA Assist button TOSHIBA Presentation button Fingerprint Sensor Press this button to Chapter 4, Using the Fingerprint Sensor. User's Manual 2-9 Refer to the Using the AccuPoint section in Chapter 4, Operating Basics. For detailed information on and off , Sleep Mode and Hibernation Mode, press this button...
Users Manual Canada; English
Page 56
.... *1 To access the Power Options, click Start -> Control Panel -> System and Maintenance -> Power Options. User's Manual 3-5 Access each function using the following features are either unique to the computer's display panel when there is no keyboard input for a specified time, with the IEEE 802.11 Standard (Revision A, B, G or N Draft Ver. 1.0). When power-off power to TOSHIBA computers or are specific key combinations that accommodates a DVD Super Multi drive and secondary hard disk drive. Legal Footnote (Wireless LAN)*8 For more...
.... *1 To access the Power Options, click Start -> Control Panel -> System and Maintenance -> Power Options. User's Manual 3-5 Access each function using the following features are either unique to the computer's display panel when there is no keyboard input for a specified time, with the IEEE 802.11 Standard (Revision A, B, G or N Draft Ver. 1.0). When power-off power to TOSHIBA computers or are specific key combinations that accommodates a DVD Super Multi drive and secondary hard disk drive. Legal Footnote (Wireless LAN)*8 For more...
Users Manual Canada; English
Page 69
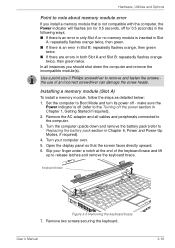
... incompatible module(s). User's Manual 3-18 In all cables and peripherals connected to remove and fasten the screws the use of the keyboard brace and lift up to Boot Mode and turn its power off the power section in both Slot A and Slot B: repeatedly flashes orange twice, then green twice. make sure the Power indicator is an error in Slot B: repeatedly flashes orange, then green twice. ■ If there are errors in Chapter 1, Getting Started...
... incompatible module(s). User's Manual 3-18 In all cables and peripherals connected to remove and fasten the screws the use of the keyboard brace and lift up to Boot Mode and turn its power off the power section in both Slot A and Slot B: repeatedly flashes orange twice, then green twice. make sure the Power indicator is an error in Slot B: repeatedly flashes orange, then green twice. ■ If there are errors in Chapter 1, Getting Started...
Users Manual Canada; English
Page 73
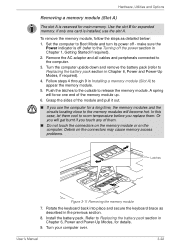
... hot. make sure the Power indicator is off (refer to Boot Mode and turn its power off the power section in Chapter 6, Power and Power-Up Modes, if required). 4. Use the slot B for a long time, the memory modules and the circuits locating close to Replacing the battery pack section in Chapter 1, Getting Started if required). 2. Set the computer to the Turning off - Remove the AC adaptor and all cables and peripherals connected to release the memory module. Turn...
... hot. make sure the Power indicator is off (refer to Boot Mode and turn its power off the power section in Chapter 6, Power and Power-Up Modes, if required). 4. Use the slot B for a long time, the memory modules and the circuits locating close to Replacing the battery pack section in Chapter 1, Getting Started if required). 2. Set the computer to the Turning off - Remove the AC adaptor and all cables and peripherals connected to release the memory module. Turn...
Users Manual Canada; English
Page 75
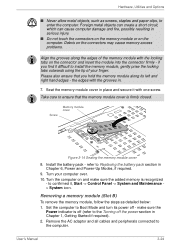
.... make sure the added memory is recognized - Seat the memory module cover in place and secure it , Start -> Control Panel -> System and Maintenance > System icon. Screw Memory module cover Figure 3-14 Seating the memory module cover 8. Install the battery pack - Remove the AC adaptor and all cables and peripherals connected to Replacing the battery pack section in . 7. Hardware, Utilities and Options ■ Never allow metal objects, such as detailed below: 1. the edges with the locking tabs...
.... make sure the added memory is recognized - Seat the memory module cover in place and secure it , Start -> Control Panel -> System and Maintenance > System icon. Screw Memory module cover Figure 3-14 Seating the memory module cover 8. Install the battery pack - Remove the AC adaptor and all cables and peripherals connected to Replacing the battery pack section in . 7. Hardware, Utilities and Options ■ Never allow metal objects, such as detailed below: 1. the edges with the locking tabs...

Users Manual Canada; English
Page 76
... the memory module cover in Chapter 6, Power and Power-Up Modes, if required). 4. Install the battery pack - Turn the computer upside down and remove the battery pack (refer to Replacing the battery pack section in order to the memory modules will force one screw. a spring will become hot. Take care to room temperature before you touch any of the module up at an angle. 7. Slide your computer over. User's Manual 3-25...
... the memory module cover in Chapter 6, Power and Power-Up Modes, if required). 4. Install the battery pack - Turn the computer upside down and remove the battery pack (refer to Replacing the battery pack section in order to the memory modules will force one screw. a spring will become hot. Take care to room temperature before you touch any of the module up at an angle. 7. Slide your computer over. User's Manual 3-25...
Users Manual Canada; English
Page 117
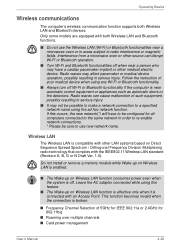
... instruction of your medical device when using any Wi-Fi or Bluetooth functionality. ■ Always turn off Wi-Fi or Bluetooth functionality if the computer is off when near a microwave oven or in serious injury. Radio waves may have to be configured for 802.11b/g ■ Roaming over multiple channels ■ Card power management User's Manual 4-28 Do not install or remove a memory module while Wake-up on Wireless LAN...
... instruction of your medical device when using any Wi-Fi or Bluetooth functionality. ■ Always turn off Wi-Fi or Bluetooth functionality if the computer is off when near a microwave oven or in serious injury. Radio waves may have to be configured for 802.11b/g ■ Roaming over multiple channels ■ Card power management User's Manual 4-28 Do not install or remove a memory module while Wake-up on Wireless LAN...
Users Manual Canada; English
Page 136
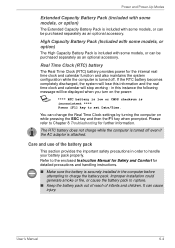
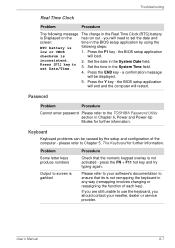
... can change the Real Time Clock settings by turning the computer on the power: S **** RTC battery is low or CMOS checksum is inconsistent **** Press [F1] key to Chapter 8 Troubleshooting for further information. Please refer to set Date/Time. Refer to the enclosed Instruction Manual for Safety and Comfort for the internal real time clock and calendar function and also maintains the system configuration while...
... can change the Real Time Clock settings by turning the computer on the power: S **** RTC battery is low or CMOS checksum is inconsistent **** Press [F1] key to Chapter 8 Troubleshooting for further information. Please refer to set Date/Time. Refer to the enclosed Instruction Manual for Safety and Comfort for the internal real time clock and calendar function and also maintains the system configuration while...
Users Manual Canada; English
Page 159
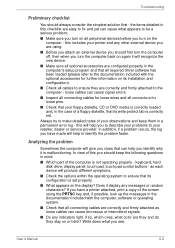
... in the computer's setup program and that all required driver software has been loaded (please refer to the documentation included with the computer, software or operating system. ■ Check that all cables to ensure they stay on or blink? keyboard, hard disk drive, display panel, touch pad, touch pad control buttons - If you have a printer attached, print a copy of the screen using . ■ Before you attach an external device you should always consider...
... in the computer's setup program and that all required driver software has been loaded (please refer to the documentation included with the computer, software or operating system. ■ Check that all cables to ensure they stay on or blink? keyboard, hard disk drive, display panel, touch pad, touch pad control buttons - If you have a printer attached, print a copy of the screen using . ■ Before you attach an external device you should always consider...

Users Manual Canada; English
Page 160
... the following areas: ■ System start-up ■ Self test ■ Power ■ Password ■ Keyboard ■ Internal display panel ■ Hard disk drive ■ DVD Super Multi drive ■ USB floppy diskette drive ■ PC Card ■ SD/SDHC Card ■ Dual Pointing Device ■ Fingerprint Sensor ■ USB device ■ Additional memory module ■ Sound system ■ External monitor ■ i.LINK (IEEE1394) device ■ Modem ■ LAN ■ Wireless LAN ■ Bluetooth ■ Recovery Discs User's Manual 8-3 the next section provides...
... the following areas: ■ System start-up ■ Self test ■ Power ■ Password ■ Keyboard ■ Internal display panel ■ Hard disk drive ■ DVD Super Multi drive ■ USB floppy diskette drive ■ PC Card ■ SD/SDHC Card ■ Dual Pointing Device ■ Fingerprint Sensor ■ USB device ■ Additional memory module ■ Sound system ■ External monitor ■ i.LINK (IEEE1394) device ■ Modem ■ LAN ■ Wireless LAN ■ Bluetooth ■ Recovery Discs User's Manual 8-3 the next section provides...
Users Manual Canada; English
Page 164
... remapping the keyboard in the BIOS setup application by the setup and configuration of each key). inconsistent. 2. Keyboard Keyboard problems can be displayed. 5. press the FN + F11 hot key and try typing again. please refer to set the date and screen: time in any way (remapping involves changing or reassigning the function of the computer - Press [F1] key to Chapter 5, The Keyboard for further information. User's Manual 8-7 Press the F1 key - Set the...
... remapping the keyboard in the BIOS setup application by the setup and configuration of each key). inconsistent. 2. Keyboard Keyboard problems can be displayed. 5. press the FN + F11 hot key and try typing again. please refer to set the date and screen: time in any way (remapping involves changing or reassigning the function of the computer - Press [F1] key to Chapter 5, The Keyboard for further information. User's Manual 8-7 Press the F1 key - Set the...
Users Manual Canada; English
Page 174
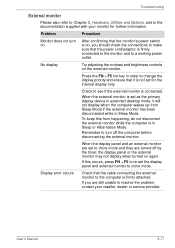
... the external monitor. User's Manual 8-17 Troubleshooting External monitor Please also refer to Chapter 3, Hardware, Utilities and Options, and to the documentation supplied with your reseller, dealer or service provider. Check to the computer is in Sleep Mode. When the display panel and an external monitor are set the display panel and external monitor to clone mode. Press the FN + F5 hot key in order to a working power outlet. Display error occurs Check that the cable connecting the external monitor to see if the external monitor...
... the external monitor. User's Manual 8-17 Troubleshooting External monitor Please also refer to Chapter 3, Hardware, Utilities and Options, and to the documentation supplied with your reseller, dealer or service provider. Check to the computer is in Sleep Mode. When the display panel and an external monitor are set the display panel and external monitor to clone mode. Press the FN + F5 hot key in order to a working power outlet. Display error occurs Check that the cable connecting the external monitor to see if the external monitor...
Users Manual Canada; English
Page 232
... transmits a specific code to change the hardware characteristics by manually pressing marked keys. See also byte and kilobyte. KB: See kilobyte. The viewingside coating is etched into character forming segments with transparent conducting material. Also called a screen. Each keystroke activates a switch that displays a list of the liquid crystal. kilobyte (KB): A unit of wave frequency that uses large scale integration. Liquid Crystal Display (LCD): Liquid...
... transmits a specific code to change the hardware characteristics by manually pressing marked keys. See also byte and kilobyte. KB: See kilobyte. The viewingside coating is etched into character forming segments with transparent conducting material. Also called a screen. Each keystroke activates a switch that displays a list of the liquid crystal. kilobyte (KB): A unit of wave frequency that uses large scale integration. Liquid Crystal Display (LCD): Liquid...
Users Manual Canada; English
Page 239
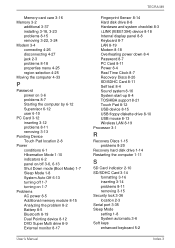
...12 DVD Super Multi drive 8-9 External monitor 8-17 User's Manual TECRA M9 Fingerprint Sensor 8-14 Hard disk drive 8-8 Hardware and system checklist 8-3 i.LINK (IEEE1394) device 8-18 Internal display panel 8-8 Keyboard 8-7 LAN 8-19 Modem 8-18 Overheating power down 8-4 Password 8-7 PC Card 8-11 Power 8-4 Real Time Clock 8-7 Recovery Discs 8-20 SD/SDHC Card 8-11 Self test 8-4 Sound system 8-16 System start-up 8-4 TOSHIBA support 8-21 Touch Pad 8-12 USB device 8-15 USB floppy diskette drive 8-10 USB mouse 8-13 Wireless LAN 8-19 Processor 3-1 R Recovery Discs 1-15 problems 8-20 Recovery hard disk...
...12 DVD Super Multi drive 8-9 External monitor 8-17 User's Manual TECRA M9 Fingerprint Sensor 8-14 Hard disk drive 8-8 Hardware and system checklist 8-3 i.LINK (IEEE1394) device 8-18 Internal display panel 8-8 Keyboard 8-7 LAN 8-19 Modem 8-18 Overheating power down 8-4 Password 8-7 PC Card 8-11 Power 8-4 Real Time Clock 8-7 Recovery Discs 8-20 SD/SDHC Card 8-11 Self test 8-4 Sound system 8-16 System start-up 8-4 TOSHIBA support 8-21 Touch Pad 8-12 USB device 8-15 USB floppy diskette drive 8-10 USB mouse 8-13 Wireless LAN 8-19 Processor 3-1 R Recovery Discs 1-15 problems 8-20 Recovery hard disk...
Detailed Specs for Tecra M9 PTM91C-TG309C English
Page 1
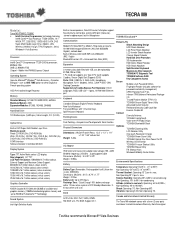
... Platform Module (TPM v1.2) TOSHIBA Secure Digital Token Utility Advanced Instant Security Reinforced Security Cable Lock Slot Execute Disable Bit Connect Diversity Antenna TOSHIBA ConfigFree® Voice-over-IP Ready Design TOSHIBA Bluetooth® Stack Optimize TOSHIBA Zooming Utility LCD Rotation Utility One-touch Resolution Change TOSHIBA Power Saver Utility TOSHIBA Optical Disc Drive Power On/Off Wireless On/Off Switch TOSHIBA Fn-esse Shortcut Utility TOSHIBA Mouse Utility FN Shortcut Keys Windows® Mobility Center Button Environmental Specifications Temperature: Operating 5°...
... Platform Module (TPM v1.2) TOSHIBA Secure Digital Token Utility Advanced Instant Security Reinforced Security Cable Lock Slot Execute Disable Bit Connect Diversity Antenna TOSHIBA ConfigFree® Voice-over-IP Ready Design TOSHIBA Bluetooth® Stack Optimize TOSHIBA Zooming Utility LCD Rotation Utility One-touch Resolution Change TOSHIBA Power Saver Utility TOSHIBA Optical Disc Drive Power On/Off Wireless On/Off Switch TOSHIBA Fn-esse Shortcut Utility TOSHIBA Mouse Utility FN Shortcut Keys Windows® Mobility Center Button Environmental Specifications Temperature: Operating 5°...


