
User Manual
Page 3
The safeguards incorporated in this product, read Do not look into the lens while the the owner's manual carefully, and lamp is fully transistorized and does not contain any parts that can result in electric shock or fire hazard. Power Sources 4. ...manufacturer's instructions have been adhered to the operating instructions. Source of power supply to instructions. only from follow all the operating and other the lamp may cause damage to your home, consult your eyes or sight. 2. For products intended to operate from overheating, and these openings must not...
The safeguards incorporated in this product, read Do not look into the lens while the the owner's manual carefully, and lamp is fully transistorized and does not contain any parts that can result in electric shock or fire hazard. Power Sources 4. ...manufacturer's instructions have been adhered to the operating instructions. Source of power supply to instructions. only from follow all the operating and other the lamp may cause damage to your home, consult your eyes or sight. 2. For products intended to operate from overheating, and these openings must not...
User Manual
Page 6
... covered by following conditions: a) When the power-supply cord or plug is damaged. This product incorporates glass components, including a lens and a lamp. In the unlikely event of glass may expose you to its normal operation. The product may result in performance - S3125A 16. f) When.... Accessories Do not place this indicates a need for repair service. Adjust only those controls that area. 18. The broken pieces of the lamp rupturing, thoroughly clean the area around the projector and discard any way. b) If liquid has been spilled, or objects have fallen into the...
... covered by following conditions: a) When the power-supply cord or plug is damaged. This product incorporates glass components, including a lens and a lamp. In the unlikely event of glass may expose you to its normal operation. The product may result in performance - S3125A 16. f) When.... Accessories Do not place this indicates a need for repair service. Adjust only those controls that area. 18. The broken pieces of the lamp rupturing, thoroughly clean the area around the projector and discard any way. b) If liquid has been spilled, or objects have fallen into the...

User Manual
Page 7
... the eyes or sight. 21. IMPORTANT SAFETY INSTRUCTIONS (Continued) 19. Otherwise it may cause damage to determine that the product is in a risk of the lamp only should be sure the service technician has used replacement parts specified by users.) 20.
... the eyes or sight. 21. IMPORTANT SAFETY INSTRUCTIONS (Continued) 19. Otherwise it may cause damage to determine that the product is in a risk of the lamp only should be sure the service technician has used replacement parts specified by users.) 20.
User Manual
Page 10
... including obtaining a license from the copyright holder. For example, if making a reference to humans and the environment. • The lamp contains inorganic mercury. For this reason, please take appropriate measures before performing one of this document are harmful to page 35: •... The illustrations in this product or used lamps in This Manual • References to pages with related information are trademakes of Texas Instruments. • Macintosh is a registered trademark ...
... including obtaining a license from the copyright holder. For example, if making a reference to humans and the environment. • The lamp contains inorganic mercury. For this reason, please take appropriate measures before performing one of this document are harmful to page 35: •... The illustrations in this product or used lamps in This Manual • References to pages with related information are trademakes of Texas Instruments. • Macintosh is a registered trademark ...

User Manual
Page 12
... the menus 32 The image adjustment menu 33 The display setting menu 34 The default setting menu 35 Displaying Information (Status display 36 Maintenance About lamp ...37 Lamp replacement ...37 Lens and main unit cleaning 40 Others Trouble indications ...41 13
... the menus 32 The image adjustment menu 33 The display setting menu 34 The default setting menu 35 Displaying Information (Status display 36 Maintenance About lamp ...37 Lamp replacement ...37 Lens and main unit cleaning 40 Others Trouble indications ...41 13

User Manual
Page 15
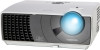
... (15) Foot adjuster : Adjusts the vertical projection angle. p.28 16 p.28 (7) Focusing ring : Adjusts screen focus. p.20 (3) Foot adjuster release button : Press to replace lamp. p.28 (4) Air exhaust (5) Control panel : Expels air that has grown hot inside the projector. : Operates the projector. p.17 (6) Zooming lever : Adjusts screen size. p.17...Attach a safety cable or any other antitheft device. (12) Speaker : Outputs audio sound. (13) Tilt adjuster : Adjusts the projector's horizontal tilt. p.28 (14) Lamp cover : Remove to set up or stow the foot adjuster.
... (15) Foot adjuster : Adjusts the vertical projection angle. p.28 16 p.28 (7) Focusing ring : Adjusts screen focus. p.20 (3) Foot adjuster release button : Press to replace lamp. p.28 (4) Air exhaust (5) Control panel : Expels air that has grown hot inside the projector. : Operates the projector. p.17 (6) Zooming lever : Adjusts screen size. p.17...Attach a safety cable or any other antitheft device. (12) Speaker : Outputs audio sound. (13) Tilt adjuster : Adjusts the projector's horizontal tilt. p.28 (14) Lamp cover : Remove to set up or stow the foot adjuster.

User Manual
Page 16
...p.26 : Displays power on /off mode. p.26 : Selects input. p.27 : Menu selections and adjustments. p.32 : Displays lamp mode. p.41 : Accepts the selected mode. : Displays menus. p.26 : Lights when internal temperature too high. Preparations Names of...(16) Warning label Name Control panel (1) ENTER button (2) MENU button (3) KEYSTONE button (4) ON/STANDBY button (5) INPUT button (6) Selection button (7) LAMP indicator (8) POWER indicator (9) TEMP indicator Remote control (1) ENTER button (2) MENU button (3) KEYSTONE button (4) ON/STANDBY button (5) INPUT button (6) Selection...
...p.26 : Displays power on /off mode. p.26 : Selects input. p.27 : Menu selections and adjustments. p.32 : Displays lamp mode. p.41 : Accepts the selected mode. : Displays menus. p.26 : Lights when internal temperature too high. Preparations Names of...(16) Warning label Name Control panel (1) ENTER button (2) MENU button (3) KEYSTONE button (4) ON/STANDBY button (5) INPUT button (6) Selection button (7) LAMP indicator (8) POWER indicator (9) TEMP indicator Remote control (1) ENTER button (2) MENU button (3) KEYSTONE button (4) ON/STANDBY button (5) INPUT button (6) Selection...
User Manual
Page 21
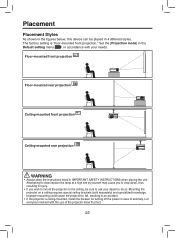
... that fact. 22 Set the [Projection mode] in the Default setting menu p.36 , in accordance with the use of anomaly. Attempting to clean/replace the lamp at a high site by yourself may cause you to drop down, thus resulting in injury. • If you wish to mount the projector on a ceiling...
... that fact. 22 Set the [Projection mode] in the Default setting menu p.36 , in accordance with the use of anomaly. Attempting to clean/replace the lamp at a high site by yourself may cause you to drop down, thus resulting in injury. • If you wish to mount the projector on a ceiling...
User Manual
Page 24
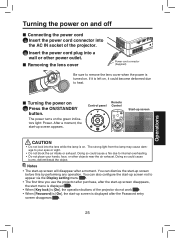
Notes • The start -up screen will disappear after a moment. After a moment, the start -up screen appears. The strong light from the lamp may cause damage to your hands, face, or other power outlet. ■ Removing the lens cover Power cord connector (Supplied) Be sure to heat. Doing ... eyes or sight. • Do not block the air intake or exhaust. Start-up screen CAUTION • Do not look into the lens while the lamp is left on .
Notes • The start -up screen will disappear after a moment. After a moment, the start -up screen appears. The strong light from the lamp may cause damage to your hands, face, or other power outlet. ■ Removing the lens cover Power cord connector (Supplied) Be sure to heat. Doing ... eyes or sight. • Do not block the air intake or exhaust. Start-up screen CAUTION • Do not look into the lens while the lamp is left on .
User Manual
Page 25
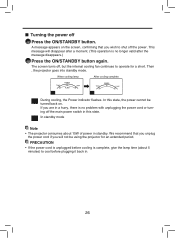
... for a short. We recommend that you wish to operate for an extended period. PRECAUTION • If the power cord is complete, give the lamp time (about 15W of power in a hurry, there is no problem with unplugging the power cord or turning off , but the internal cooling fan... message will not be turned back on the screen, confirming that you unplug the power cord if you are in standby. When cooling lamp After cooling complete POWER POWER FLASH A B C A During cooling, the Power indicator flashes. If you will disappear after a moment. (This operation is ...
... for a short. We recommend that you wish to operate for an extended period. PRECAUTION • If the power cord is complete, give the lamp time (about 15W of power in a hurry, there is no problem with unplugging the power cord or turning off , but the internal cooling fan... message will not be turned back on the screen, confirming that you unplug the power cord if you are in standby. When cooling lamp After cooling complete POWER POWER FLASH A B C A During cooling, the Power indicator flashes. If you will disappear after a moment. (This operation is ...

User Manual
Page 27
...supported by the projector is input, the "Unsupport signal" will appear. • If an unavailable operation button is consumable item. Please note that a lamp characteristics may prevent the images from the connected equipment or signal input is stopped while projecting, the "No signal" will appear. • If a ...turn off the LCD display, see the owner's manual of your computer. • If no signal is not malfunction. (The lifetime of the lamp depends on conditions of use the tilt adjuster. 2 To stow the foot adjuster, hold up the front of the projector to 1 the desired angle...
...supported by the projector is input, the "Unsupport signal" will appear. • If an unavailable operation button is consumable item. Please note that a lamp characteristics may prevent the images from the connected equipment or signal input is stopped while projecting, the "No signal" will appear. • If a ...turn off the LCD display, see the owner's manual of your computer. • If no signal is not malfunction. (The lifetime of the lamp depends on conditions of use the tilt adjuster. 2 To stow the foot adjuster, hold up the front of the projector to 1 the desired angle...

User Manual
Page 30
...] is unplugged. How to re-enter the password. Note • The password entry screen appears when the power is turned back on the power. 2 The lamp lights and the password entry screen appears. 3 Enter the password using numeric key of the remote control. If you forgot the password, please inquire your...
...] is unplugged. How to re-enter the password. Note • The password entry screen appears when the power is turned back on the power. 2 The lamp lights and the password entry screen appears. 3 Enter the password using numeric key of the remote control. If you forgot the password, please inquire your...

User Manual
Page 34
...(Ceiling) (Rear ceiling) Set whether the input with signals is plugged in (Auto). Set this option to turn on On Off Fan mode Lamp power Password Sets the cooling fan speed. Operations 35 Manual Auto Detailed description [Fan mode] Setting [Fan mode] to [Low], the screen ... fan noise gets quieter. Using the menus (Continued) ■ The default setting menu This menu shows placement status and other settings. Sets the lamp power. On Off Select one of the languages below to use the projector, for displaying the menu and messages [ : Enter setting mode] [...
...(Ceiling) (Rear ceiling) Set whether the input with signals is plugged in (Auto). Set this option to turn on On Off Fan mode Lamp power Password Sets the cooling fan speed. Operations 35 Manual Auto Detailed description [Fan mode] Setting [Fan mode] to [Low], the screen ... fan noise gets quieter. Using the menus (Continued) ■ The default setting menu This menu shows placement status and other settings. Sets the lamp power. On Off Select one of the languages below to use the projector, for displaying the menu and messages [ : Enter setting mode] [...
User Manual
Page 35
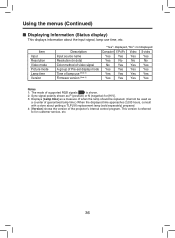
... signal polarity shown as P (positive) or N (negative) for [H/V]. 3: Displays [Lamp time] as a measure of when the lamp should be replaced. (Cannot be used as a counter of guaranteed lamp time.) When the displayed time approaches 2,000 hours, consult with a store about the input signal, lamp use [Note 3] Firmware version [Note 4] "Yes": displayed, "No": not displayed...
... signal polarity shown as P (positive) or N (negative) for [H/V]. 3: Displays [Lamp time] as a measure of when the lamp should be replaced. (Cannot be used as a counter of guaranteed lamp time.) When the displayed time approaches 2,000 hours, consult with a store about the input signal, lamp use [Note 3] Firmware version [Note 4] "Yes": displayed, "No": not displayed...

User Manual
Page 36
... likely to a danger of glass may vary greatly by yourself. • When replacing, always use your Toshiba dealership when the lamp has to "Status display". Uncovering the lamp while the projector is mounted on condition of use . • Burst is consumable supplies. CAUTION • If you breathe it with care to avoid injury...
... likely to a danger of glass may vary greatly by yourself. • When replacing, always use your Toshiba dealership when the lamp has to "Status display". Uncovering the lamp while the projector is mounted on condition of use . • Burst is consumable supplies. CAUTION • If you breathe it with care to avoid injury...

User Manual
Page 37
... nails and/or tip of your convenience. Lamp cover 1 4 Pull out the lamp. 4 1 Loosen the two lamp locking screws, pull up the handle to remove the lamp. 2 5 Mount the new lamp. 5 2 Align the orientation, press down the new lamp until lamp is sufficiently cooled. Lamp replacement (Continued) 1 Unplug power cord. ...2 Wait until the bottom is reached, and lock in place using the two lamp locking screws. 1 6 Replace the lamp cover. If you have any difficulty in step 3 until the lamp cover is no longer loose. 38 Align the cover, and press it in, then tighten...
... nails and/or tip of your convenience. Lamp cover 1 4 Pull out the lamp. 4 1 Loosen the two lamp locking screws, pull up the handle to remove the lamp. 2 5 Mount the new lamp. 5 2 Align the orientation, press down the new lamp until lamp is sufficiently cooled. Lamp replacement (Continued) 1 Unplug power cord. ...2 Wait until the bottom is reached, and lock in place using the two lamp locking screws. 1 6 Replace the lamp cover. If you have any difficulty in step 3 until the lamp cover is no longer loose. 38 Align the cover, and press it in, then tighten...

User Manual
Page 38
... accordance with your bare hands, bang it, or scratch it. (Dirt, jolts, scratches and the like could break the lamp.) Used Lamps This projector's lamps contain trace amounts of use.When [Lamp time] reaches 2,000 hours,the icon and a message will appear. (After 2,000 hours, they will appear when the ...64257;rst time every 100 hours.) This display disappears when you press the button. • Attach the outer lamp cover correctly so that the lamp be powered on or the lamp may fail to come on resetting the lamp timer. Do not touch the glass surface with local regulations. 39 Maintenance
... accordance with your bare hands, bang it, or scratch it. (Dirt, jolts, scratches and the like could break the lamp.) Used Lamps This projector's lamps contain trace amounts of use.When [Lamp time] reaches 2,000 hours,the icon and a message will appear. (After 2,000 hours, they will appear when the ...64257;rst time every 100 hours.) This display disappears when you press the button. • Attach the outer lamp cover correctly so that the lamp be powered on or the lamp may fail to come on resetting the lamp timer. Do not touch the glass surface with local regulations. 39 Maintenance

User Manual
Page 39
... dirt off the main unit gently with a soft cloth. • Do not wipe the main unit with the cloth. 40 Attempting to clean/replace the lamp at a high site by yourself may deform or discolor the unit or damage the paint surface. • When using a chemically treated cloth, follow the precautions...
... dirt off the main unit gently with a soft cloth. • Do not wipe the main unit with the cloth. 40 Attempting to clean/replace the lamp at a high site by yourself may deform or discolor the unit or damage the paint surface. • When using a chemically treated cloth, follow the precautions...
User Manual
Page 40
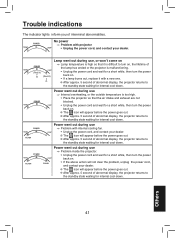
...⇒ Problem with a new one. ❈ After approx. 5 second of interminal abnormalities. POWER (Red lit) (Red lit) POWER POWER FLASH POWER FLASH FLASH Lamp went out during use ⇒ Problem with internal cooling fan. • Unplug the power cord, and contact your dealer. Power went out during use ⇒..., the projector returns to the standby state waiting for internal cool down. Power went out during use , or won't come on ⇒ Lamp temperature is malfunctioning. • Unplug the power cord and wait for a short while, then turn the power back on . • If...
...⇒ Problem with a new one. ❈ After approx. 5 second of interminal abnormalities. POWER (Red lit) (Red lit) POWER POWER FLASH POWER FLASH FLASH Lamp went out during use ⇒ Problem with internal cooling fan. • Unplug the power cord, and contact your dealer. Power went out during use ⇒..., the projector returns to the standby state waiting for internal cool down. Power went out during use , or won't come on ⇒ Lamp temperature is malfunctioning. • Unplug the power cord and wait for a short while, then turn the power back on . • If...
User Manual
Page 41
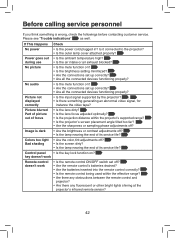
... • Is the mute function on ? Picture not displayed correctly • Is the input signal supported by the projector? p.33 • Is the lamp nearing the end of its service life? p.33 Control panel • Is the key lock function on ? p.20 • Are the remote control's ...focus • Is the lens dirty? • Is the lens focus adjusted optimally? Is it connected to the projector? • Is the outer lamp cover attached properly? p.30 key doesn't work Remote control doesn't work • Is the remote control ON/OFF switch set up correctly? Picture blurred...
... • Is the mute function on ? Picture not displayed correctly • Is the input signal supported by the projector? p.33 • Is the lamp nearing the end of its service life? p.33 Control panel • Is the key lock function on ? p.20 • Are the remote control's ...focus • Is the lens dirty? • Is the lens focus adjusted optimally? Is it connected to the projector? • Is the outer lamp cover attached properly? p.30 key doesn't work Remote control doesn't work • Is the remote control ON/OFF switch set up correctly? Picture blurred...

