User Manual
Page 1
...operating and maintenance (servicing) instructions in a particular installation. WARNING: TO REDUCE THE RISK OF FIRE OR ELECTRIC SHOCK, DO NOT EXPOSE THIS APPLIANCE TO RAIN OR MOISTURE. DANGEROUS HIGH VOLTAGES ARE PRESENT INSIDE THE ENCLOSURE. This equipment generates, uses and can be regulated due USA only to correct the interference by turning...State of the FCC Rules. MODEL NAME: TDP-T9 USA only TRADE NAME: DATA PROJECTOR Tested To Comply With FCC Standards FOR HOME OR OFFICE USE MODEL NAME: TDP-T9 FCC NOTICE: This device complies with part 15 of California to persons....
...operating and maintenance (servicing) instructions in a particular installation. WARNING: TO REDUCE THE RISK OF FIRE OR ELECTRIC SHOCK, DO NOT EXPOSE THIS APPLIANCE TO RAIN OR MOISTURE. DANGEROUS HIGH VOLTAGES ARE PRESENT INSIDE THE ENCLOSURE. This equipment generates, uses and can be regulated due USA only to correct the interference by turning...State of the FCC Rules. MODEL NAME: TDP-T9 USA only TRADE NAME: DATA PROJECTOR Tested To Comply With FCC Standards FOR HOME OR OFFICE USE MODEL NAME: TDP-T9 FCC NOTICE: This device complies with part 15 of California to persons....

User Manual
Page 3
... power source vided for installation, use can be placed in this product, read Do not look into the lens while the the owner's manual carefully, and lamp is provided or the manufacturer's instructions have been adhered to ensure indicated on a bed, sofa, rug or other similar surface. reliable operation of power supply to instructions. This unit is fully transistorized and does not contain any parts...
... power source vided for installation, use can be placed in this product, read Do not look into the lens while the the owner's manual carefully, and lamp is provided or the manufacturer's instructions have been adhered to ensure indicated on a bed, sofa, rug or other similar surface. reliable operation of power supply to instructions. This unit is fully transistorized and does not contain any parts...
User Manual
Page 6
...power-supply cord or plug is damaged. This product incorporates glass components, including a lens and a lamp. Servicing Do not attempt to injury. Adjust only those controls that are covered by a qualified technician to restore the product to overturn. b) If liquid has been spilled, or objects have fallen into the product. If such parts... change in damage and will often require extensive work by the operating instructions as opening or removing covers may expose you to dangerous voltage or other controls may cause to service this indicates a need for repair service....
...power-supply cord or plug is damaged. This product incorporates glass components, including a lens and a lamp. Servicing Do not attempt to injury. Adjust only those controls that are covered by a qualified technician to restore the product to overturn. b) If liquid has been spilled, or objects have fallen into the product. If such parts... change in damage and will often require extensive work by the operating instructions as opening or removing covers may expose you to dangerous voltage or other controls may cause to service this indicates a need for repair service....

User Manual
Page 7
... the laser light source of any other hazards. (Replacement of the lamp only should be sure the service technician has used replacement parts specified by users.) 20. IMPORTANT SAFETY INSTRUCTIONS (Continued) 19. The heat from the unit could result in fire, electric shock, or other closed installation state. Unauthorized substitutions may result in a risk of time. Do not use the...
... the laser light source of any other hazards. (Replacement of the lamp only should be sure the service technician has used replacement parts specified by users.) 20. IMPORTANT SAFETY INSTRUCTIONS (Continued) 19. The heat from the unit could result in fire, electric shock, or other closed installation state. Unauthorized substitutions may result in a risk of time. Do not use the...

User Manual
Page 8
... packing materials will dirty the optical parts, shortening their lives, and darkening the screen. • Do not use one of the following types of the projector. • Avoid locations with [Fan mode] set as near a TV or radio may cause interference to use it from possible damage, do not use the projector with oil or cigarette smoke. Before Using POWER SUPPLY CORD SELECTION If your...
... packing materials will dirty the optical parts, shortening their lives, and darkening the screen. • Do not use one of the following types of the projector. • Avoid locations with [Fan mode] set as near a TV or radio may cause interference to use it from possible damage, do not use the projector with oil or cigarette smoke. Before Using POWER SUPPLY CORD SELECTION If your...
User Manual
Page 9
... projector near a power source and the like, or in locations like a ship or vehicle that is hot after use volatile liquids, such as an insect spray, near the unit. If cleaning with equipment or software that are subject to vibration or shock. Model No. IMPORTANT PRECAUTIONS (Continued) • The set of projector is not related to Toshiba Corporation. Retain this Instruction Manual. • Toshiba...
... projector near a power source and the like, or in locations like a ship or vehicle that is hot after use volatile liquids, such as an insect spray, near the unit. If cleaning with equipment or software that are subject to vibration or shock. Model No. IMPORTANT PRECAUTIONS (Continued) • The set of projector is not related to Toshiba Corporation. Retain this Instruction Manual. • Toshiba...

User Manual
Page 12
... part on the control panel and remote control 17 Label locations ...18 Parts on the rear panel ...19 Preparing and using the remote control 20 Operating a computer using the remote control 21 Placement ...22 Connection ...24 Operations Turning the power on and off 25 Basic operations ...27 Using handy features ...29 Using auto setting ...29 Correcting the keystone distortion 29 Cutting off the picture and sound temporarily (Mute 30 Freezing the image (Freeze 30 Key Lock ...30 Password function ...30 Using...
... part on the control panel and remote control 17 Label locations ...18 Parts on the rear panel ...19 Preparing and using the remote control 20 Operating a computer using the remote control 21 Placement ...22 Connection ...24 Operations Turning the power on and off 25 Basic operations ...27 Using handy features ...29 Using auto setting ...29 Correcting the keystone distortion 29 Cutting off the picture and sound temporarily (Mute 30 Freezing the image (Freeze 30 Key Lock ...30 Password function ...30 Using...

User Manual
Page 15
...) Front Name : Function (1) Lens (2) Infrared remote sensor : Projects expanded image. : Senses commands from outside the projector. (9) AC IN socket : Connect the supplied power cord here. (10) Rear panel : Connects external devices. p.28 (14) Lamp cover : Remove to set up or stow the foot adjuster. p.28 (4) Air exhaust (5) Control panel : Expels air that has grown hot inside the projector. : Operates the projector. p.28 (8) Air intake : Draws in air from the remote control. p.28 16 p.20 (3) Foot adjuster release button : Press to replace lamp.
...) Front Name : Function (1) Lens (2) Infrared remote sensor : Projects expanded image. : Senses commands from outside the projector. (9) AC IN socket : Connect the supplied power cord here. (10) Rear panel : Connects external devices. p.28 (14) Lamp cover : Remove to set up or stow the foot adjuster. p.28 (4) Air exhaust (5) Control panel : Expels air that has grown hot inside the projector. : Operates the projector. p.28 (8) Air intake : Draws in air from the remote control. p.28 16 p.20 (3) Foot adjuster release button : Press to replace lamp.

User Manual
Page 16
... (17) Remote Control Remote control transmitter (4) (10) (3) (19) Battery cover (1) (13) (14) (15) (16) Warning label Name Control panel (1) ENTER button (2) MENU button (3) KEYSTONE button (4) ON/STANDBY button (5) INPUT button (6) Selection button (7) LAMP indicator (8) POWER indicator (9) TEMP indicator Remote control (1) ENTER button (2) MENU button (3) KEYSTONE button (4) ON/STANDBY button (5) INPUT button (6) Selection button (10) LASER button (11) AUTO SET button : Main Function : Accepts the selected mode. : Displays menus. p.26 : Selects input. Preparations Names of each part on...
... (17) Remote Control Remote control transmitter (4) (10) (3) (19) Battery cover (1) (13) (14) (15) (16) Warning label Name Control panel (1) ENTER button (2) MENU button (3) KEYSTONE button (4) ON/STANDBY button (5) INPUT button (6) Selection button (7) LAMP indicator (8) POWER indicator (9) TEMP indicator Remote control (1) ENTER button (2) MENU button (3) KEYSTONE button (4) ON/STANDBY button (5) INPUT button (6) Selection button (10) LASER button (11) AUTO SET button : Main Function : Accepts the selected mode. : Displays menus. p.26 : Selects input. Preparations Names of each part on...

User Manual
Page 19
...; Remove batteries from the front Approx. 15 Approx. 5m Two batteries (LR03, SIZE AAA) are used. Replace the battery cover. Point toward the projector's infrared remote sensor, and press a button on the ON/OFF switch of the remote control. The remote control • Turn off the ON/OFF switch of the remote control when not in use or to store in baggage. • The remote control may fail to operate...
...; Remove batteries from the front Approx. 15 Approx. 5m Two batteries (LR03, SIZE AAA) are used. Replace the battery cover. Point toward the projector's infrared remote sensor, and press a button on the ON/OFF switch of the remote control. The remote control • Turn off the ON/OFF switch of the remote control when not in use or to store in baggage. • The remote control may fail to operate...
User Manual
Page 24
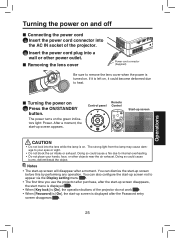
... block the air intake or exhaust. You can also configure the start-up screen not to remove the lens cover when the power is turned on the green indicators light: Power. The power turns on . Turning the power on and off ■ Connecting the power cord 1 Insert the power cord connector into the AC IN socket of the projector do not work p.30 . • When [Password] is [On], the start-up screen appears. Control panel POWER Remote Control KEYSTONE + KEYSTONE - If...
... block the air intake or exhaust. You can also configure the start-up screen not to remove the lens cover when the power is turned on the green indicators light: Power. The power turns on . Turning the power on and off ■ Connecting the power cord 1 Insert the power cord connector into the AC IN socket of the projector do not work p.30 . • When [Password] is [On], the start-up screen appears. Control panel POWER Remote Control KEYSTONE + KEYSTONE - If...

User Manual
Page 26
.... An image of focus,adjust it switches to display the menus and messages on the next time, the start the connected device such as a computer. 4 Press the INPUT button. played in the Default setting menu (factory setting is [On]), the input is outputting video signals each time you press the INPUT button, it according to the step 6 .) Use the or button to the connected equipment that is set via the Display setting menu p.34 • This owner's manual assumes that...
.... An image of focus,adjust it switches to display the menus and messages on the next time, the start the connected device such as a computer. 4 Press the INPUT button. played in the Default setting menu (factory setting is [On]), the input is outputting video signals each time you press the INPUT button, it according to the step 6 .) Use the or button to the connected equipment that is set via the Display setting menu p.34 • This owner's manual assumes that...

User Manual
Page 27
... adjuster release button, then slowly lower the projector. 6 Adjusting the screen size and focus 1 Use the zooming lever to adjust the screen size. Use the focusing ring to adjust the focus. 2 Notes • Note that a lamp characteristics may rarely cause the brightness to XGA resolution. • With some models of computer having LCD displays or the like, displaying images simultaneously on the projector and the monitor's display may be black spots (pixels that do not light...
... adjuster release button, then slowly lower the projector. 6 Adjusting the screen size and focus 1 Use the zooming lever to adjust the screen size. Use the focusing ring to adjust the focus. 2 Notes • Note that a lamp characteristics may rarely cause the brightness to XGA resolution. • With some models of computer having LCD displays or the like, displaying images simultaneously on the projector and the monitor's display may be black spots (pixels that do not light...
User Manual
Page 28
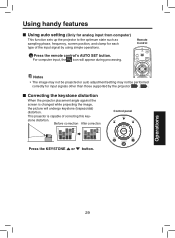
... the projector placement angle against the screen is changed while projecting the image, the picture will appear during processing. Remote Control Notes • The image may not be projected or auto adjustment/setting may not be performed correctly for each type of correcting this keystone distortion. Before correction After correction Control panel POWER KEYSTONE + KEYSTONE - Press the remote control's AUTO SET button. For computer input, the icon will undergo keystone (trapezoidal) distortion. Using handy features ■ Using auto setting (Only...
... the projector placement angle against the screen is changed while projecting the image, the picture will appear during processing. Remote Control Notes • The image may not be projected or auto adjustment/setting may not be performed correctly for each type of correcting this keystone distortion. Before correction After correction Control panel POWER KEYSTONE + KEYSTONE - Press the remote control's AUTO SET button. For computer input, the icon will undergo keystone (trapezoidal) distortion. Using handy features ■ Using auto setting (Only...

User Manual
Page 34
... Setting screen is set to turn on On Off Fan mode Lamp power Password Sets the cooling fan speed. Sets the lamp power. Set this option to [High] increases the cooling fan speed. Using the menus (Continued) ■ The default setting menu This menu shows placement status and other settings. Manual Auto Detailed description [Fan mode] Setting [Fan mode] to use for example, at high altitude (over 1,500 meters above sea level). [Lamp power] When [Lamp power] is displayed. Operations 35 Item Projection mode Auto input search Language Description Sets projection mode...
... Setting screen is set to turn on On Off Fan mode Lamp power Password Sets the cooling fan speed. Sets the lamp power. Set this option to [High] increases the cooling fan speed. Using the menus (Continued) ■ The default setting menu This menu shows placement status and other settings. Manual Auto Detailed description [Fan mode] Setting [Fan mode] to use for example, at high altitude (over 1,500 meters above sea level). [Lamp power] When [Lamp power] is displayed. Operations 35 Item Projection mode Auto input search Language Description Sets projection mode...

User Manual
Page 36
... the openings for ventilation. ■ Immediately replace the lamp when a sign appears on the screen. • When the replacement time approaches, a message will increase if the lamp is continuously used without being replaced. • Frequently check the used for extended periods, images will be hazardous. Lamp replacement A lamp is broken. WARNING • If the projector is mounted on the screen. • The risk of mercury gas enclosed in that lights at...
... the openings for ventilation. ■ Immediately replace the lamp when a sign appears on the screen. • When the replacement time approaches, a message will increase if the lamp is continuously used without being replaced. • Frequently check the used for extended periods, images will be hazardous. Lamp replacement A lamp is broken. WARNING • If the projector is mounted on the screen. • The risk of mercury gas enclosed in that lights at...

User Manual
Page 37
... tool for at least 1 hour. 3 Remove the lamp cover. 3 Loosen the two screws, raise the outer lamp cover with your fingers as shown to nails and/or tip of your convenience. If you have any difficulty in place using the two lamp locking screws. 1 6 Replace the lamp cover. Wait for your finger(s). Lamp replacement (Continued) 1 Unplug power cord. 2 Wait until lamp is no longer loose...
... tool for at least 1 hour. 3 Remove the lamp cover. 3 Loosen the two screws, raise the outer lamp cover with your fingers as shown to nails and/or tip of your convenience. If you have any difficulty in place using the two lamp locking screws. 1 6 Replace the lamp cover. Wait for your finger(s). Lamp replacement (Continued) 1 Unplug power cord. 2 Wait until lamp is no longer loose...
User Manual
Page 41
...? • Is the lens focus adjusted optimally? Image is wrong, check the followings before contacting customer service. Please see "Trouble indications" p.41 as well. No audio • Is the mute function on? Is it connected to the projector? • Is the outer lamp cover attached properly? Picture blurred Part of picture out of its service life? p.20 • Are there any obstructions between the remote control and projector? • Are there...
...? • Is the lens focus adjusted optimally? Image is wrong, check the followings before contacting customer service. Please see "Trouble indications" p.41 as well. No audio • Is the mute function on? Is it connected to the projector? • Is the outer lamp cover attached properly? Picture blurred Part of picture out of its service life? p.20 • Are there any obstructions between the remote control and projector? • Are there...
User Manual
Page 42
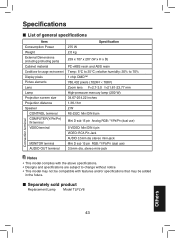
... the future. ■ Separately sold product Replacement Lamp Model TLPLV6 Connection terminal Others 43 Specifications ■ List of general specifications Item Consumption Power Weight External Dimensions (including protruding parts) Cabinet material Conditions for usage environment Display pixels Picture elements Lens Lamp Projection screen size Projection distance Speaker CONTROL terminal COMPUTER(Y/PB/PR) IN terminal VIDEO terminal MONITOR terminal AUDIO OUT terminal 275 W 2.0 kg Speci...
... the future. ■ Separately sold product Replacement Lamp Model TLPLV6 Connection terminal Others 43 Specifications ■ List of general specifications Item Consumption Power Weight External Dimensions (including protruding parts) Cabinet material Conditions for usage environment Display pixels Picture elements Lens Lamp Projection screen size Projection distance Speaker CONTROL terminal COMPUTER(Y/PB/PR) IN terminal VIDEO terminal MONITOR terminal AUDIO OUT terminal 275 W 2.0 kg Speci...
Brochure
Page 2
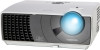
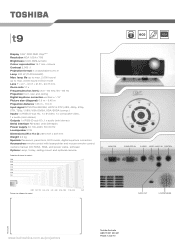
... Weight 2.0 kg Specials Password, panel lock, ECO mode, digital keystone correction Accessoires remote control with laserpointer and mouse remote control, owners manual (CD ROM), RGB- colours Contrast 2,000 : 1 Projection format 4 : 3 switchable to max. 3,000 hours in meter) 5.58 - 6.14 6.45 AUDIO OUT LOUDSPEAKER Feburary 06 www.isd.toshiba.com.au/projectors Toshiba Australia ABN 19 001 320 421 Phone: 13 30 70 t9 Display 0.55" DDR DMD Chip™* Resolution XGA 1,024 x 768 Brightness...
... Weight 2.0 kg Specials Password, panel lock, ECO mode, digital keystone correction Accessoires remote control with laserpointer and mouse remote control, owners manual (CD ROM), RGB- colours Contrast 2,000 : 1 Projection format 4 : 3 switchable to max. 3,000 hours in meter) 5.58 - 6.14 6.45 AUDIO OUT LOUDSPEAKER Feburary 06 www.isd.toshiba.com.au/projectors Toshiba Australia ABN 19 001 320 421 Phone: 13 30 70 t9 Display 0.55" DDR DMD Chip™* Resolution XGA 1,024 x 768 Brightness...


