

User Manual
Page 3
...ensure indicated on . only from the type of Light After unpacking this unit will protect you if you are pro- reliable operation of power supply to . 4 Ventilation This product should be placed in this product, read Do not look into the lens while the the ...should never be blocked or covered. Read Owner's Manual 3. If you observe the following procedures for ventilation and to assure personal safety. Power Sources 4. IMPORTANT SAFETY INSTRUCTIONS CAUTION: PLEASE READ AND OBSERVE ALL WARNINGS AND INSTRUCTIONS GIVEN IN THIS OWNER'S MANUAL AND THOSE MARKED ON ...
...ensure indicated on . only from the type of Light After unpacking this unit will protect you if you are pro- reliable operation of power supply to . 4 Ventilation This product should be placed in this product, read Do not look into the lens while the the ...should never be blocked or covered. Read Owner's Manual 3. If you observe the following procedures for ventilation and to assure personal safety. Power Sources 4. IMPORTANT SAFETY INSTRUCTIONS CAUTION: PLEASE READ AND OBSERVE ALL WARNINGS AND INSTRUCTIONS GIVEN IN THIS OWNER'S MANUAL AND THOSE MARKED ON ...

User Manual
Page 4
...electric shock. 7. Overloading swimming pool and the like. Heat 8. Cleaning Unplug this product from heat sources such as this product near wa- Power-Cord Protection The product should be routed so that produce heat. Do not overload wall outlets; or near a bath tub, wash bowl,...;ers) that they exit from the product. 6. ter. - extension cords, or integral con- Use a soft cloth for example, near a 9. Power-supply cords should be walked on or pinched by items placed upon or against them, paying particular attention to cords at plugs, convenience receptacles, and...
...electric shock. 7. Overloading swimming pool and the like. Heat 8. Cleaning Unplug this product from heat sources such as this product near wa- Power-Cord Protection The product should be routed so that produce heat. Do not overload wall outlets; or near a bath tub, wash bowl,...;ers) that they exit from the product. 6. ter. - extension cords, or integral con- Use a soft cloth for example, near a 9. Power-supply cords should be walked on or pinched by items placed upon or against them, paying particular attention to cords at plugs, convenience receptacles, and...

User Manual
Page 5
... into this product develops heat and may touch dangerous voltage points or short-out parts that could result in the upright position to lightning and power-line surges. Never spill liquid of any kind on the other equipment. Lightning storms For added protection for long periods of this product through openings...
... into this product develops heat and may touch dangerous voltage points or short-out parts that could result in the upright position to lightning and power-line surges. Never spill liquid of any kind on the other equipment. Lightning storms For added protection for long periods of this product through openings...
User Manual
Page 6
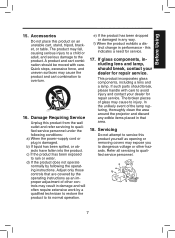
... only those controls that area. 18. f) When the product exhibits a distinct change in damage and will often require extensive work by following conditions: a) When the power-supply cord or plug is damaged. The product may cause the product and cart combination to qualified service personnel. 7 A product and cart combination...
... only those controls that area. 18. f) When the product exhibits a distinct change in damage and will often require extensive work by following conditions: a) When the power-supply cord or plug is damaged. The product may cause the product and cart combination to qualified service personnel. 7 A product and cart combination...

User Manual
Page 8
... thin, cooling efficiency is reduced so use this happens, move it from a low-temperature room to a high-temperature room may result. Before Using POWER SUPPLY CORD SELECTION If your line voltage is 220 to ship your projector. Switzerland 200 240V 240V 6A North American 200 240V 240V 15A IMPORTANT...
... thin, cooling efficiency is reduced so use this happens, move it from a low-temperature room to a high-temperature room may result. Before Using POWER SUPPLY CORD SELECTION If your line voltage is 220 to ship your projector. Switzerland 200 240V 240V 6A North American 200 240V 240V 15A IMPORTANT...
User Manual
Page 9
... accidents, or use under abnormal conditions including erroneous or improper operation and other problems. • Toshiba Corporation bears no liability whatsoever for any damages arising from malfunctions arising from natural disaster such as an insect spray, near a power source and the like, or in your projector. If cleaning with care. • Do...
... accidents, or use under abnormal conditions including erroneous or improper operation and other problems. • Toshiba Corporation bears no liability whatsoever for any damages arising from malfunctions arising from natural disaster such as an insect spray, near a power source and the like, or in your projector. If cleaning with care. • Do...

User Manual
Page 12
Before Using CONTENTS Before Using SAFETY PRECAUTIONS 2 IMPORTANT SAFETY INSTRUCTIONS 4 POWER SUPPLY CORD SELECTION 9 IMPORTANT PRECAUTIONS 9 EXEMPTION CLAUSES 10 OTHER CAUTIONS AND INFORMATIONS 11 REMOTE CONTROL BATTERIES 12 Preparations Checking the package contents ... panel ...19 Preparing and using the remote control 20 Operating a computer using the remote control 21 Placement ...22 Connection ...24 Operations Turning the power on and off 25 Basic operations ...27 Using handy features ...29 Using auto setting ...29 Correcting the keystone distortion 29 Cutting off the picture ...
Before Using CONTENTS Before Using SAFETY PRECAUTIONS 2 IMPORTANT SAFETY INSTRUCTIONS 4 POWER SUPPLY CORD SELECTION 9 IMPORTANT PRECAUTIONS 9 EXEMPTION CLAUSES 10 OTHER CAUTIONS AND INFORMATIONS 11 REMOTE CONTROL BATTERIES 12 Preparations Checking the package contents ... panel ...19 Preparing and using the remote control 20 Operating a computer using the remote control 21 Placement ...22 Connection ...24 Operations Turning the power on and off 25 Basic operations ...27 Using handy features ...29 Using auto setting ...29 Correcting the keystone distortion 29 Cutting off the picture ...
User Manual
Page 14
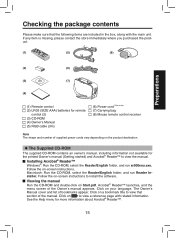
...double-click on your language. Click on Start.pdf. Follow the on p. The Owner's Manual cover and list of supplied power cords vary depending on the product destination. Installing Acrobat® Reader™ Windows®: Run the CD-ROM, select the...45 46 (2) (6) Preparations (3) (7) (4) (1) Remote control (2) LR03 (SIZE AAA) batteries for remote control (2) (3) CD-ROM (4) Owner's Manual (5) RGB cable (3m) (6) Power cord (See note) (7) Carrying bag (8) Mouse remote control receiver Note The shape and number of bookmarks appear. See the Help menu for the printed Owner...
...double-click on your language. Click on Start.pdf. Follow the on p. The Owner's Manual cover and list of supplied power cords vary depending on the product destination. Installing Acrobat® Reader™ Windows®: Run the CD-ROM, select the...45 46 (2) (6) Preparations (3) (7) (4) (1) Remote control (2) LR03 (SIZE AAA) batteries for remote control (2) (3) CD-ROM (4) Owner's Manual (5) RGB cable (3m) (6) Power cord (See note) (7) Carrying bag (8) Mouse remote control receiver Note The shape and number of bookmarks appear. See the Help menu for the printed Owner...

User Manual
Page 15
... (13) (14) (15) Front Name : Function (1) Lens (2) Infrared remote sensor : Projects expanded image. : Senses commands from outside the projector. (9) AC IN socket : Connect the supplied power cord here. (10) Rear panel : Connects external devices. p.28 (4) Air exhaust (5) Control panel : Expels air that has grown hot inside the projector. : Operates the projector...
... (13) (14) (15) Front Name : Function (1) Lens (2) Infrared remote sensor : Projects expanded image. : Senses commands from outside the projector. (9) AC IN socket : Connect the supplied power cord here. (10) Rear panel : Connects external devices. p.28 (4) Air exhaust (5) Control panel : Expels air that has grown hot inside the projector. : Operates the projector...

User Manual
Page 16
... Control panel (1) ENTER button (2) MENU button (3) KEYSTONE button (4) ON/STANDBY button (5) INPUT button (6) Selection button (7) LAMP indicator (8) POWER indicator (9) TEMP indicator Remote control (1) ENTER button (2) MENU button (3) KEYSTONE button (4) ON/STANDBY button (5) INPUT button (6) Selection button ...menus. p.41 : Accepts the selected mode. : Displays menus. p.26 : Selects input. p.32 : Adjusts keystone distortion. : Turns the power on /off (standby). p.32 : Shows a laser pointer. : Sets up analog input from computer. 17 p.27 : Menu selections and adjustments...
... Control panel (1) ENTER button (2) MENU button (3) KEYSTONE button (4) ON/STANDBY button (5) INPUT button (6) Selection button (7) LAMP indicator (8) POWER indicator (9) TEMP indicator Remote control (1) ENTER button (2) MENU button (3) KEYSTONE button (4) ON/STANDBY button (5) INPUT button (6) Selection button ...menus. p.41 : Accepts the selected mode. : Displays menus. p.26 : Selects input. p.32 : Adjusts keystone distortion. : Turns the power on /off (standby). p.32 : Shows a laser pointer. : Sets up analog input from computer. 17 p.27 : Menu selections and adjustments...
User Manual
Page 21
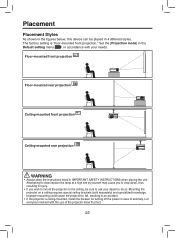
... an accident. • If the projector is "floor-mounted front projection." The factory setting is ceiling-mounted, install the breaker for turning off the power in case of the projector know that fact. 22 Mounting the projector on the ceiling, be placed in 4 different styles. Attempting to clean/replace the...
... an accident. • If the projector is "floor-mounted front projection." The factory setting is ceiling-mounted, install the breaker for turning off the power in case of the projector know that fact. 22 Mounting the projector on the ceiling, be placed in 4 different styles. Attempting to clean/replace the...
User Manual
Page 23
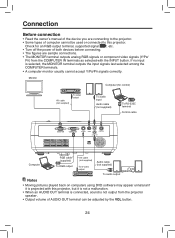
... correctly. If no input is projected with the INPUT button. Monitor Computer (for an RGB output terminal, supported signal p.44 , etc. • Turn off the power of both devices before connecting. • The figures are connecting to the projector. • Some types of AUDIO OUT terminal can be used or...
... correctly. If no input is projected with the INPUT button. Monitor Computer (for an RGB output terminal, supported signal p.44 , etc. • Turn off the power of both devices before connecting. • The figures are connecting to the projector. • Some types of AUDIO OUT terminal can be used or...
User Manual
Page 24
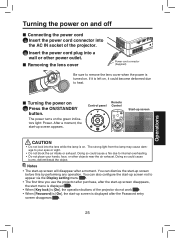
... configure the start-up screen not to heat. You can dismiss the start-up screen before this by performing any operation. Control panel POWER Remote Control KEYSTONE + KEYSTONE - Notes • The start-up screen will disappear after the Password entry screen disappears p.30 . 25 If it could ...-up screen disappears, the start menu is displayed p.27 . • When [Key lock] is [On], the operation buttons of the projector. 2 Insert the power cord plug into a wall or other objects near the air exhaust. Start-up screen CAUTION • Do not look into the lens while the lamp...
... configure the start-up screen not to heat. You can dismiss the start-up screen before this by performing any operation. Control panel POWER Remote Control KEYSTONE + KEYSTONE - Notes • The start-up screen will disappear after the Password entry screen disappears p.30 . 25 If it could ...-up screen disappears, the start menu is displayed p.27 . • When [Key lock] is [On], the operation buttons of the projector. 2 Insert the power cord plug into a wall or other objects near the air exhaust. Start-up screen CAUTION • Do not look into the lens while the lamp...
User Manual
Page 25
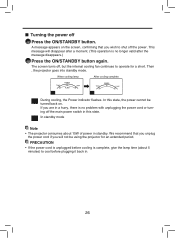
... (This operation is complete, give the lamp time (about 15W of power in standby. The screen turns off the main power switch in . 26 PRECAUTION • If the power cord is unplugged before plugging it back in this state, the power cannot be using the projector for a short. When cooling lamp After .... This message will not be turned back on the screen, confirming that you unplug the power cord if you wish to cool before cooling is no problem with unplugging the power cord or turning off , but the internal cooling fan continues to operate for an extended period. We...
... (This operation is complete, give the lamp time (about 15W of power in standby. The screen turns off the main power switch in . 26 PRECAUTION • If the power cord is unplugged before plugging it back in this state, the power cannot be using the projector for a short. When cooling lamp After .... This message will not be turned back on the screen, confirming that you unplug the power cord if you wish to cool before cooling is no problem with unplugging the power cord or turning off , but the internal cooling fan continues to operate for an extended period. We...

User Manual
Page 26
... the INPUT button p.43 . Operations 27 Basic operations 1 Turn on . • The language can also be displayed the next time when the power is displayed in a selected language. Message for language(to display the menus and messages on the next time, the start menu does not appear upon...8226; When [Auto input search] is set via the Display setting menu p.34 • This owner's manual assumes that is dis- Turn on the power by following the instructions in the Default setting menu (factory setting is [On]), the input is switched to the connected equipment that is outputting video...
... the INPUT button p.43 . Operations 27 Basic operations 1 Turn on . • The language can also be displayed the next time when the power is displayed in a selected language. Message for language(to display the menus and messages on the next time, the start menu does not appear upon...8226; When [Auto input search] is set via the Display setting menu p.34 • This owner's manual assumes that is dis- Turn on the power by following the instructions in the Default setting menu (factory setting is [On]), the input is switched to the connected equipment that is outputting video...
User Manual
Page 28
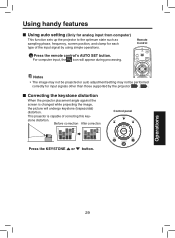
... the screen is capable of correcting this keystone distortion. For computer input, the icon will undergo keystone (trapezoidal) distortion. Before correction After correction Control panel POWER KEYSTONE + KEYSTONE - Using handy features ■ Using auto setting (Only for analog input from computer) This function sets up the projector to the optimum state...
... the screen is capable of correcting this keystone distortion. For computer input, the icon will undergo keystone (trapezoidal) distortion. Before correction After correction Control panel POWER KEYSTONE + KEYSTONE - Using handy features ■ Using auto setting (Only for analog input from computer) This function sets up the projector to the optimum state...

User Manual
Page 30
...menu button. 4 Select [OK] and press the button. When the password is confirmed the setting is [On] 1 Turn on only after the power cord is wrong repeat the procedure from [On] to operate when password is complete and the password becomes [On]. How to [Off]) 1 Select [Password...Default setting menu and press the button. If the password is unplugged. If you enter a wrong password for more than 5 times, the projector will automatically power off and enter standby mode. Operations 31 button to cancel password (from step 3 . How to the set new passwor item and 3 Enter a 4 ...
...menu button. 4 Select [OK] and press the button. When the password is confirmed the setting is [On] 1 Turn on only after the power cord is wrong repeat the procedure from [On] to operate when password is complete and the password becomes [On]. How to [Off]) 1 Select [Password...Default setting menu and press the button. If the password is unplugged. If you enter a wrong password for more than 5 times, the projector will automatically power off and enter standby mode. Operations 31 button to cancel password (from step 3 . How to the set new passwor item and 3 Enter a 4 ...

User Manual
Page 34
...cooling fan noise gets quieter. Set this option to use for example, at high altitude (over 1,500 meters above sea level). [Lamp power] When [Lamp power] is displayed. Power on Sets whether to use the projector, for displaying the menu and messages [ : Enter setting mode] [ :Selection] [Apply: .../Svenska/Türkçe/Polski/ / / / Start-up screen Display start-up screen when power is turned on the power when the ON/STANDBY button is pressed (Manual), or when the power cord is only selected or not. Item Projection mode Auto input search Language Description Sets projection...
...cooling fan noise gets quieter. Set this option to use for example, at high altitude (over 1,500 meters above sea level). [Lamp power] When [Lamp power] is displayed. Power on Sets whether to use the projector, for displaying the menu and messages [ : Enter setting mode] [ :Selection] [Apply: .../Svenska/Türkçe/Polski/ / / / Start-up screen Display start-up screen when power is turned on the power when the ON/STANDBY button is pressed (Manual), or when the power cord is only selected or not. Item Projection mode Auto input search Language Description Sets projection...

User Manual
Page 37
Align the cover, and press it in, then tighten the screws loosened in step 3 until lamp is sufficiently cooled. Lamp replacement (Continued) 1 Unplug power cord. 2 Wait until the lamp cover is no longer loose. 38 Wait for your finger(s). Lamp cover 1 4 Pull out the lamp. 4 1 Loosen the two ...
Align the cover, and press it in, then tighten the screws loosened in step 3 until lamp is sufficiently cooled. Lamp replacement (Continued) 1 Unplug power cord. 2 Wait until the lamp cover is no longer loose. 38 Wait for your finger(s). Lamp cover 1 4 Pull out the lamp. 4 1 Loosen the two ...

User Manual
Page 38
... surface with a new one. • The lamp is on resetting the lamp timer. If it is not attached correctly, the projector may fail to be powered on or the lamp may fail to break used lamps, and dispose of use.When [Lamp time] reaches 2,000 hours,the icon and a message will... appear. (After 2,000 hours, they will appear when the power is made out of environmentally harmful inorganic mercury. 7 Reset the lamp timer. Be careful not to come on. • Always replace the lamp with your...
... surface with a new one. • The lamp is on resetting the lamp timer. If it is not attached correctly, the projector may fail to be powered on or the lamp may fail to break used lamps, and dispose of use.When [Lamp time] reaches 2,000 hours,the icon and a message will... appear. (After 2,000 hours, they will appear when the power is made out of environmentally harmful inorganic mercury. 7 Reset the lamp timer. Be careful not to come on. • Always replace the lamp with your...


