
User Manual
Page 3
...: PLEASE READ AND OBSERVE ALL WARNINGS AND INSTRUCTIONS GIVEN IN THIS OWNER'S MANUAL AND THOSE MARKED ON THE UNIT. DO NOT REMOVE THE CABINET COVER, OR YOU MAY BE EXPOSED TO DANGEROUS VOLTAGE. Read Owner's Manual 3. Power Sources 4. For products intended to operate from battery power, or... and other similar surface. REFER SERVICING TO QUALIFIED SERVICE PERSONNEL ONLY. 1. only from overheating, and these openings must not be blocked or covered. reliable operation of Light After unpacking this unit will protect you if you are pro- This unit is fully transistorized and does not contain...
...: PLEASE READ AND OBSERVE ALL WARNINGS AND INSTRUCTIONS GIVEN IN THIS OWNER'S MANUAL AND THOSE MARKED ON THE UNIT. DO NOT REMOVE THE CABINET COVER, OR YOU MAY BE EXPOSED TO DANGEROUS VOLTAGE. Read Owner's Manual 3. Power Sources 4. For products intended to operate from battery power, or... and other similar surface. REFER SERVICING TO QUALIFIED SERVICE PERSONNEL ONLY. 1. only from overheating, and these openings must not be blocked or covered. reliable operation of Light After unpacking this unit will protect you if you are pro- This unit is fully transistorized and does not contain...
User Manual
Page 6
... the product has been dropped or damaged in any edible items placed in performance - f) When the product exhibits a distinct change in that are covered by following conditions: a) When the power-supply cord or plug is damaged. If such parts should break, please handle with care. The broken pieces...outlet and refer servicing to its normal operation. d) If the product does not operate normally by the operating instructions as opening or removing covers may cause the product and cart combination to the product. In the unlikely event of glass may fall, causing serious injury to a ...
... the product has been dropped or damaged in any edible items placed in performance - f) When the product exhibits a distinct change in that are covered by following conditions: a) When the power-supply cord or plug is damaged. If such parts should break, please handle with care. The broken pieces...outlet and refer servicing to its normal operation. d) If the product does not operate normally by the operating instructions as opening or removing covers may cause the product and cart combination to the product. In the unlikely event of glass may fall, causing serious injury to a ...

User Manual
Page 8
... a high altitude location where air is thin, cooling efficiency is reduced so use the unit for at the factory. Always replace the fuse cover after moving it from a low-temperature room to use it up or down by more than 20° from possible damage, do not use the...
... a high altitude location where air is thin, cooling efficiency is reduced so use the unit for at the factory. Always replace the fuse cover after moving it from a low-temperature room to use it up or down by more than 20° from possible damage, do not use the...
User Manual
Page 14
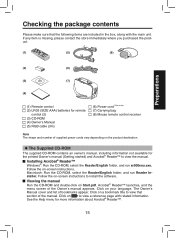
... p. Follow the on Start.pdf. Click on the product destination. Acrobat® Reader™ launches, and the menu screen of bookmarks appear. The Owner's Manual cover and list of the Owner's manual appears. to view that the following items are included in the box, along with related information. Installing Acrobat®...
... p. Follow the on Start.pdf. Click on the product destination. Acrobat® Reader™ launches, and the menu screen of bookmarks appear. The Owner's Manual cover and list of the Owner's manual appears. to view that the following items are included in the box, along with related information. Installing Acrobat®...

User Manual
Page 15
... (6) Zooming lever : Adjusts screen size. p.28 (7) Focusing ring : Adjusts screen focus. p.28 16 p.20 (3) Foot adjuster release button : Press to replace lamp. p.28 (14) Lamp cover : Remove to set up or stow the foot adjuster. p.17 (11) Antitheft lock hole : Attach a safety cable or any other antitheft device. (12) Speaker : Outputs...
... (6) Zooming lever : Adjusts screen size. p.28 (7) Focusing ring : Adjusts screen focus. p.28 16 p.20 (3) Foot adjuster release button : Press to replace lamp. p.28 (14) Lamp cover : Remove to set up or stow the foot adjuster. p.17 (11) Antitheft lock hole : Attach a safety cable or any other antitheft device. (12) Speaker : Outputs...

User Manual
Page 16
...; Handling and adjusting other than described here may lead to dangerous exposure to laser. (18) (14) (17) Remote Control Remote control transmitter (4) (10) (3) (19) Battery cover (1) (13) (14) (15) (16) Warning label Name Control panel (1) ENTER button (2) MENU button (3) KEYSTONE button (4) ON/STANDBY button (5) INPUT button (6) Selection button (7) LAMP indicator (8) POWER...
...; Handling and adjusting other than described here may lead to dangerous exposure to laser. (18) (14) (17) Remote Control Remote control transmitter (4) (10) (3) (19) Battery cover (1) (13) (14) (15) (16) Warning label Name Control panel (1) ENTER button (2) MENU button (3) KEYSTONE button (4) ON/STANDBY button (5) INPUT button (6) Selection button (7) LAMP indicator (8) POWER...

User Manual
Page 19
... described in previous pages. • Remove batteries from the front Approx. 15 Approx. 5m Two batteries (LR03, SIZE AAA) are used. Replace the battery cover. If this happens, point the remote control at the main unit again, and repeat the operation. 20 Preparing and using for extended periods. • If...; Operating the projector from remote control when not using the remote control ■ Loading dry-cell batteries into the remote control Remove the battery cover. Insert the dry-cell batteries.
... described in previous pages. • Remove batteries from the front Approx. 15 Approx. 5m Two batteries (LR03, SIZE AAA) are used. Replace the battery cover. If this happens, point the remote control at the main unit again, and repeat the operation. 20 Preparing and using for extended periods. • If...; Operating the projector from remote control when not using the remote control ■ Loading dry-cell batteries into the remote control Remove the battery cover. Insert the dry-cell batteries.
User Manual
Page 24
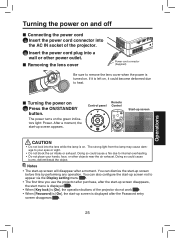
... heat. Doing so could become deformed due to internal overheating. • Do not place your hands, face, or other power outlet. ■ Removing the lens cover Power cord connector (Supplied) Be sure to your eyes or sight. • Do not block the air intake or exhaust. Turning the power on and... it is left on, it could cause burns, deform/break the object. The strong light from the lamp may cause damage to remove the lens cover when the power is displayed after a moment. Notes • The start -up screen is turned on the green indicators light: Power.
... heat. Doing so could become deformed due to internal overheating. • Do not place your hands, face, or other power outlet. ■ Removing the lens cover Power cord connector (Supplied) Be sure to your eyes or sight. • Do not block the air intake or exhaust. Turning the power on and... it is left on, it could cause burns, deform/break the object. The strong light from the lamp may cause damage to remove the lens cover when the power is displayed after a moment. Notes • The start -up screen is turned on the green indicators light: Power.

User Manual
Page 37
... use a screwdriver or any damage to avoid any other smaller tool for at least 1 hour. 3 Remove the lamp cover. 3 Loosen the two screws, raise the outer lamp cover with your convenience. Lamp cover 1 4 Pull out the lamp. 4 1 Loosen the two lamp locking screws, pull up the handle to remove the...fingers as shown to remove the lamp. 2 5 Mount the new lamp. 5 2 Align the orientation, press down the new lamp until the lamp cover is no longer loose. 38 Lamp replacement (Continued) 1 Unplug power cord. 2 Wait until lamp is reached, and lock in place using the two lamp ...
... use a screwdriver or any damage to avoid any other smaller tool for at least 1 hour. 3 Remove the lamp cover. 3 Loosen the two screws, raise the outer lamp cover with your convenience. Lamp cover 1 4 Pull out the lamp. 4 1 Loosen the two lamp locking screws, pull up the handle to remove the...fingers as shown to remove the lamp. 2 5 Mount the new lamp. 5 2 Align the orientation, press down the new lamp until the lamp cover is no longer loose. 38 Lamp replacement (Continued) 1 Unplug power cord. 2 Wait until lamp is reached, and lock in place using the two lamp ...

User Manual
Page 38
... not to come on at the first time every 100 hours.) This display disappears when you press the button. • Attach the outer lamp cover correctly so that it . (Dirt, jolts, scratches and the like could break the lamp.) Used Lamps This projector's lamps contain trace amounts of glass. 7 Reset...
... not to come on at the first time every 100 hours.) This display disappears when you press the button. • Attach the outer lamp cover correctly so that it . (Dirt, jolts, scratches and the like could break the lamp.) Used Lamps This projector's lamps contain trace amounts of glass. 7 Reset...
User Manual
Page 41
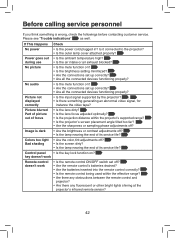
... of focus • Is the lens dirty? • Is the lens focus adjusted optimally? Is it connected to the projector? • Is the outer lamp cover attached properly? p.41 during use • Is the air intake or air exhaust blocked? p.30 • Is the brightness setting minimized? p.20 • Are there...
... of focus • Is the lens dirty? • Is the lens focus adjusted optimally? Is it connected to the projector? • Is the outer lamp cover attached properly? p.41 during use • Is the air intake or air exhaust blocked? p.30 • Is the brightness setting minimized? p.20 • Are there...