
User Manual
Page 3
.... The openings should not be placed in this product, read Do not look into the lens while the the owner's manual carefully, and lamp is on the marking label. Power Sources 4. Source of Light After unpacking this unit will protect you if you are pro- reliable operation of...for installation, use can be blocked by the user. your product dealer or local power company. only from battery power, or other the lamp may cause damage to assure personal safety. This set has been designed and manufactured to instructions. DO NOT REMOVE THE CABINET COVER, OR YOU...
.... The openings should not be placed in this product, read Do not look into the lens while the the owner's manual carefully, and lamp is on the marking label. Power Sources 4. Source of Light After unpacking this unit will protect you if you are pro- reliable operation of...for installation, use can be blocked by the user. your product dealer or local power company. only from battery power, or other the lamp may cause damage to assure personal safety. This set has been designed and manufactured to instructions. DO NOT REMOVE THE CABINET COVER, OR YOU...
User Manual
Page 6
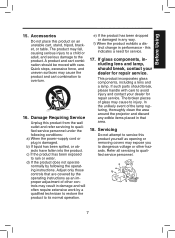
... attempt to overturn. Refer all servicing to rain or water. If glass components, including lens and lamp, should break, please handle with care. The broken pieces of the lamp rupturing, thoroughly clean the area around the projector and discard any way. Quick stops, excessive force,.... S3125A 16. e) If the product has been dropped or damaged in performance - This product incorporates glass components, including a lens and a lamp. Adjust only those controls that area. 18. b) If liquid has been spilled, or objects have fallen into the product. In the unlikely ...
... attempt to overturn. Refer all servicing to rain or water. If glass components, including lens and lamp, should break, please handle with care. The broken pieces of the lamp rupturing, thoroughly clean the area around the projector and discard any way. Quick stops, excessive force,.... S3125A 16. e) If the product has been dropped or damaged in performance - This product incorporates glass components, including a lens and a lamp. Adjust only those controls that area. 18. b) If liquid has been spilled, or objects have fallen into the product. In the unlikely ...

User Manual
Page 7
... source of fire. 23. This could erase the information on top of the unit or near the air exhaust for long periods of the lamp only should be sure the service technician has used replacement parts specified by users.) 20. Safety Check Upon completion of any other hazards...
... source of fire. 23. This could erase the information on top of the unit or near the air exhaust for long periods of the lamp only should be sure the service technician has used replacement parts specified by users.) 20. Safety Check Upon completion of any other hazards...
User Manual
Page 10
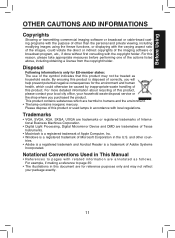
... Acrobat Reader is a registered trademark of Microsoft Corporation in This Manual • References to humans and the environment. • The lamp contains inorganic mercury. For example, if making a reference to page 35: • The illustrations in accordance with local regulations. For this product... or used lamps in this document are harmful to pages with related information are trademakes of Texas Instruments. • Macintosh is a registered trademark of ...
... Acrobat Reader is a registered trademark of Microsoft Corporation in This Manual • References to humans and the environment. • The lamp contains inorganic mercury. For example, if making a reference to page 35: • The illustrations in accordance with local regulations. For this product... or used lamps in this document are harmful to pages with related information are trademakes of Texas Instruments. • Macintosh is a registered trademark of ...

User Manual
Page 12
... the menus 32 The image adjustment menu 33 The display setting menu 34 The default setting menu 35 Displaying Information (Status display 36 Maintenance About lamp ...37 Lamp replacement ...37 Lens and main unit cleaning 40 Others Trouble indications ...41 13
... the menus 32 The image adjustment menu 33 The display setting menu 34 The default setting menu 35 Displaying Information (Status display 36 Maintenance About lamp ...37 Lamp replacement ...37 Lens and main unit cleaning 40 Others Trouble indications ...41 13

User Manual
Page 15
p.20 (3) Foot adjuster release button : Press to replace lamp. p.28 (14) Lamp cover : Remove to set up or stow the foot adjuster. p.28 16 p.17 (6) Zooming lever : Adjusts screen size. p.17 (11) Antitheft lock hole : Attach a safety ...
p.20 (3) Foot adjuster release button : Press to replace lamp. p.28 (14) Lamp cover : Remove to set up or stow the foot adjuster. p.28 16 p.17 (6) Zooming lever : Adjusts screen size. p.17 (11) Antitheft lock hole : Attach a safety ...

User Manual
Page 16
p.32 : Displays lamp mode. p.41 : Accepts the selected mode. : Displays menus. p.26 : Selects input. p.32 : Adjusts keystone distortion. : Turns the power on /off (standby). p.26 : ...19) Battery cover (1) (13) (14) (15) (16) Warning label Name Control panel (1) ENTER button (2) MENU button (3) KEYSTONE button (4) ON/STANDBY button (5) INPUT button (6) Selection button (7) LAMP indicator (8) POWER indicator (9) TEMP indicator Remote control (1) ENTER button (2) MENU button (3) KEYSTONE button (4) ON/STANDBY button (5) INPUT button (6) Selection button (10) LASER button (11) AUTO...
p.32 : Displays lamp mode. p.41 : Accepts the selected mode. : Displays menus. p.26 : Selects input. p.32 : Adjusts keystone distortion. : Turns the power on /off (standby). p.26 : ...19) Battery cover (1) (13) (14) (15) (16) Warning label Name Control panel (1) ENTER button (2) MENU button (3) KEYSTONE button (4) ON/STANDBY button (5) INPUT button (6) Selection button (7) LAMP indicator (8) POWER indicator (9) TEMP indicator Remote control (1) ENTER button (2) MENU button (3) KEYSTONE button (4) ON/STANDBY button (5) INPUT button (6) Selection button (10) LASER button (11) AUTO...
User Manual
Page 21
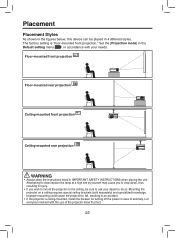
... rear projection Ceiling-mounted front projection Ceiling-mounted rear projection WARNING • Always obey the instructions listed in 4 different styles. Attempting to clean/replace the lamp at a high site by yourself may cause you wish to mount the projector on a ceiling requires special ceiling brackets (sold separately) and specialized knowledge. Set...
... rear projection Ceiling-mounted front projection Ceiling-mounted rear projection WARNING • Always obey the instructions listed in 4 different styles. Attempting to clean/replace the lamp at a high site by yourself may cause you wish to mount the projector on a ceiling requires special ceiling brackets (sold separately) and specialized knowledge. Set...
User Manual
Page 24
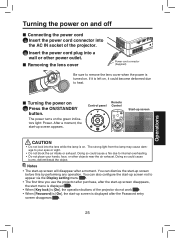
Operations ■ Turning the power on the green indicators light: Power. After a moment, the start -up screen appears. The strong light from the lamp may cause damage to heat. The power turns on 1 Press the ON/STANDBY button. Doing so could cause burns, deform/break the object. You can ... power cord plug into a wall or other objects near the air exhaust. Start-up screen CAUTION • Do not look into the lens while the lamp is left on . Doing so could cause a fire due to remove the lens cover when the power is turned on , it is on...
Operations ■ Turning the power on the green indicators light: Power. After a moment, the start -up screen appears. The strong light from the lamp may cause damage to heat. The power turns on 1 Press the ON/STANDBY button. Doing so could cause burns, deform/break the object. You can ... power cord plug into a wall or other objects near the air exhaust. Start-up screen CAUTION • Do not look into the lens while the lamp is left on . Doing so could cause a fire due to remove the lens cover when the power is turned on , it is on...
User Manual
Page 25
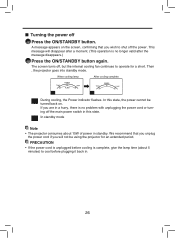
Then , the projector goes into standby mode. When cooling lamp After cooling complete POWER POWER FLASH A B C A During cooling, the Power indicator flashes. B In standby mode Note • The projector consumes about 5 minutes) to operate ... is no problem with unplugging the power cord or turning off , but the internal cooling fan continues to cool before cooling is complete, give the lamp time (about 15W of power in . 26 In this state. If you wish to shut off 1 Press the ON/STANDBY button.
Then , the projector goes into standby mode. When cooling lamp After cooling complete POWER POWER FLASH A B C A During cooling, the Power indicator flashes. B In standby mode Note • The projector consumes about 5 minutes) to operate ... is no problem with unplugging the power cord or turning off , but the internal cooling fan continues to cool before cooling is complete, give the lamp time (about 15W of power in . 26 In this state. If you wish to shut off 1 Press the ON/STANDBY button.

User Manual
Page 27
...the position. To adjust the horizontal angle, use .) • The DMDTM is pressed, the icon will appear dark, and the lamp could burn out. If used for extended periods, images will appear. 28 Please note that are not malfunctions. • Although this projector (XGA...With some models of computer having LCD displays or the like, displaying images simultaneously on how to fluctuate slightly. • A lamp is recommended that a lamp characteristics may be set to 1 the desired angle, then press the foot adjuster release button. If this happens, turn off the ...
...the position. To adjust the horizontal angle, use .) • The DMDTM is pressed, the icon will appear dark, and the lamp could burn out. If used for extended periods, images will appear. 28 Please note that are not malfunctions. • Although this projector (XGA...With some models of computer having LCD displays or the like, displaying images simultaneously on how to fluctuate slightly. • A lamp is recommended that a lamp characteristics may be set to 1 the desired angle, then press the foot adjuster release button. If this happens, turn off the ...

User Manual
Page 30
... power cord is displayed. 2 Enter the password using numeric key of the remote control. If the entered password is turned back on the power. 2 The lamp lights and the password entry screen appears. 3 Enter the password using numeric key of the remote control. Note • The password entry screen appears when...
... power cord is displayed. 2 Enter the password using numeric key of the remote control. If the entered password is turned back on the power. 2 The lamp lights and the password entry screen appears. 3 Enter the password using numeric key of the remote control. Note • The password entry screen appears when...

User Manual
Page 34
...Ceiling) (Rear ceiling) Set whether the input with signals is plugged in (Auto). Power on Sets whether to turn on On Off Fan mode Lamp power Password Sets the cooling fan speed. Set this option to [Low], the screen becomes a little darker, but the cooling fan noise gets ...], the Password Setting screen is set to use for example, at high altitude (over 1,500 meters above sea level). [Lamp power] When [Lamp power] is displayed. Sets the lamp power. Operations 35 Using the menus (Continued) ■ The default setting menu This menu shows placement status and other settings...
...Ceiling) (Rear ceiling) Set whether the input with signals is plugged in (Auto). Power on Sets whether to turn on On Off Fan mode Lamp power Password Sets the cooling fan speed. Set this option to [Low], the screen becomes a little darker, but the cooling fan noise gets ...], the Password Setting screen is set to use for example, at high altitude (over 1,500 meters above sea level). [Lamp power] When [Lamp power] is displayed. Sets the lamp power. Operations 35 Using the menus (Continued) ■ The default setting menu This menu shows placement status and other settings...
User Manual
Page 35
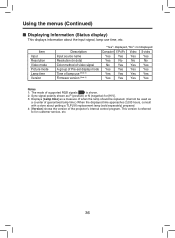
... Information (Status display) This displays information about getting a TLPLV6 replacement lamp (sold separately) prepared. 4: [Version] shows the version of guaranteed lamp time.) When the displayed time approaches 2,000 hours, consult with a store about the input signal, lamp use [Note 3] Firmware version [Note 4] "Yes": displayed, ...Yes Yes Yes Notes 1: The mode of supported RGB signals p.44 is referred to for [H/V]. 3: Displays [Lamp time] as a measure of when the lamp should be replaced. (Cannot be used as a counter of the projector's internal control program. Item Input ...
... Information (Status display) This displays information about getting a TLPLV6 replacement lamp (sold separately) prepared. 4: [Version] shows the version of guaranteed lamp time.) When the displayed time approaches 2,000 hours, consult with a store about the input signal, lamp use [Note 3] Firmware version [Note 4] "Yes": displayed, ...Yes Yes Yes Notes 1: The mode of supported RGB signals p.44 is referred to for [H/V]. 3: Displays [Lamp time] as a measure of when the lamp should be replaced. (Cannot be used as a counter of the projector's internal control program. Item Input ...

User Manual
Page 36
...product from the openings for ventilation. • When the lamp bursts, a slight amount of glass if the lamp is broken. WARNING • If the projector is mounted on the ceiling, it is recommended to use your Toshiba dealership when the lamp has to broken pieces and contact your dealer for longer ...than 1 hour) before the lamp bursts or the life expires may get inside the product or be released from falling pieces...
...product from the openings for ventilation. • When the lamp bursts, a slight amount of glass if the lamp is broken. WARNING • If the projector is mounted on the ceiling, it is recommended to use your Toshiba dealership when the lamp has to broken pieces and contact your dealer for longer ...than 1 hour) before the lamp bursts or the life expires may get inside the product or be released from falling pieces...

User Manual
Page 37
... care to avoid any other smaller tool for at least 1 hour. 3 Remove the lamp cover. 3 Loosen the two screws, raise the outer lamp cover with your fingers as shown to remove the outer lamp cover. Align the cover, and press it in, then tighten the screws loosened in step... removal, you can use a screwdriver or any damage to remove the lamp. 2 5 Mount the new lamp. 5 2 Align the orientation, press down the new lamp until lamp is sufficiently cooled. Lamp cover 1 4 Pull out the lamp. 4 1 Loosen the two lamp locking screws, pull up the handle to nails and/or tip of...
... care to avoid any other smaller tool for at least 1 hour. 3 Remove the lamp cover. 3 Loosen the two screws, raise the outer lamp cover with your fingers as shown to remove the outer lamp cover. Align the cover, and press it in, then tighten the screws loosened in step... removal, you can use a screwdriver or any damage to remove the lamp. 2 5 Mount the new lamp. 5 2 Align the orientation, press down the new lamp until lamp is sufficiently cooled. Lamp cover 1 4 Pull out the lamp. 4 1 Loosen the two lamp locking screws, pull up the handle to nails and/or tip of...

User Manual
Page 38
Notes and Precautions • It is recommended that it . (Dirt, jolts, scratches and the like could break the lamp.) Used Lamps This projector's lamps contain trace amounts of them in accordance with your bare hands, bang it, or scratch it is made out of glass. If it is ...rst time every 100 hours.) This display disappears when you press the button. • Attach the outer lamp cover correctly so that the lamp be powered on or the lamp may fail to break used lamps, and dispose of environmentally harmful inorganic mercury. Do not touch the glass surface with local regulations. 39 ...
Notes and Precautions • It is recommended that it . (Dirt, jolts, scratches and the like could break the lamp.) Used Lamps This projector's lamps contain trace amounts of them in accordance with your bare hands, bang it, or scratch it is made out of glass. If it is ...rst time every 100 hours.) This display disappears when you press the button. • Attach the outer lamp cover correctly so that the lamp be powered on or the lamp may fail to break used lamps, and dispose of environmentally harmful inorganic mercury. Do not touch the glass surface with local regulations. 39 ...

User Manual
Page 39
Attempting to clean/replace the lamp at a high site by yourself may cause you to get inside, resulting in an electric shock or failure. • Do not use benzene, thinner and ...
Attempting to clean/replace the lamp at a high site by yourself may cause you to get inside, resulting in an electric shock or failure. • Do not use benzene, thinner and ...
User Manual
Page 40
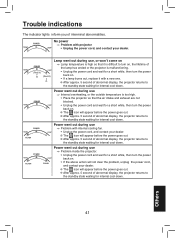
...fan. • Unplug the power cord, and contact your dealer. Others 41 POWER (Red lit) (Red lit) POWER POWER FLASH POWER FLASH FLASH Lamp went out during use ⇒ Internal overheating, or the outside temperature is malfunctioning. • Unplug the power cord and wait for a short while..., then turn the power back on . • If a lamp burns out, replace it with projector • Unplug the power cord, and contact your dealer. ❈ The icon will appear before the power goes...
...fan. • Unplug the power cord, and contact your dealer. Others 41 POWER (Red lit) (Red lit) POWER POWER FLASH POWER FLASH FLASH Lamp went out during use ⇒ Internal overheating, or the outside temperature is malfunctioning. • Unplug the power cord and wait for a short while..., then turn the power back on . • If a lamp burns out, replace it with projector • Unplug the power cord, and contact your dealer. ❈ The icon will appear before the power goes...
User Manual
Page 41
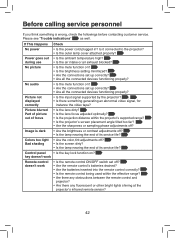
... p.24 • Are all the connected devices functioning properly? p.23 • Is the projector's screen placement angle tilted too far? p.33 • Is the lamp nearing the end of focus • Is the lens dirty? • Is the lens focus adjusted optimally? p.33 • Is the screen dirty? • Is... the lamp nearing the end of its service life? p.33 Control panel • Is the key lock function on? p.30 key doesn't work Remote control doesn't work...
... p.24 • Are all the connected devices functioning properly? p.23 • Is the projector's screen placement angle tilted too far? p.33 • Is the lamp nearing the end of focus • Is the lens dirty? • Is the lens focus adjusted optimally? p.33 • Is the screen dirty? • Is... the lamp nearing the end of its service life? p.33 Control panel • Is the key lock function on? p.30 key doesn't work Remote control doesn't work...

