User Manual
Page 5
If Problems Arise If this computer. If trouble is experienced with the best service it is necessary. 5 Connection to party line service is subject to do this change. If these changes might affect your service or the operation of your fax transmission, refer to the fax software instructions installed on the first page of each transmitted page or on this equipment causes harm...
If Problems Arise If this computer. If trouble is experienced with the best service it is necessary. 5 Connection to party line service is subject to do this change. If these changes might affect your service or the operation of your fax transmission, refer to the fax software instructions installed on the first page of each transmitted page or on this equipment causes harm...
User Manual
Page 35
... 153 Using a supervisor password 154 Using a user password 155 Deleting a user password 156 TOSHIBA Face Recognition Utility 157 TOSHIBA PC Diagnostic Tool Utility 158 TOSHIBA HDD Protection Utility 159 TOSHIBA SD™ Memory Card Format Utility .........160 Mouse Utility 161 TOSHIBA Hardware Setup 162 USB Sleep and Charge Utility 165 Starting the USB Sleep and Charge Utility.......165 USB Sleep and Charge 165 Enabling USB Sleep and Charge 167 Power supply mode settings 167 Battery settings 167 TOSHIBA Zooming Utility 168 TOSHIBA Button Support 169 TOSHIBA Accessibility 170...
... 153 Using a supervisor password 154 Using a user password 155 Deleting a user password 156 TOSHIBA Face Recognition Utility 157 TOSHIBA PC Diagnostic Tool Utility 158 TOSHIBA HDD Protection Utility 159 TOSHIBA SD™ Memory Card Format Utility .........160 Mouse Utility 161 TOSHIBA Hardware Setup 162 USB Sleep and Charge Utility 165 Starting the USB Sleep and Charge Utility.......165 USB Sleep and Charge 165 Enabling USB Sleep and Charge 167 Power supply mode settings 167 Battery settings 167 TOSHIBA Zooming Utility 168 TOSHIBA Button Support 169 TOSHIBA Accessibility 170...
User Manual
Page 54
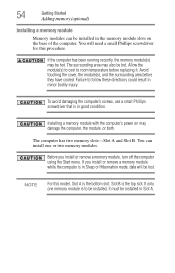
... hot. Avoid touching the cover, the module(s), and the surrounding area before replacing it must be installed in Slot A. To avoid damaging the computer's screws, use a small Phillips screwdriver that is the top slot. Slot B is in Sleep or Hibernation mode, data will need a small Phillips screwdriver for this model, Slot A is the bottom slot. If the computer has been running recently, the memory module(s) may also be hot...
... hot. Avoid touching the cover, the module(s), and the surrounding area before replacing it must be installed in Slot A. To avoid damaging the computer's screws, use a small Phillips screwdriver that is the top slot. Slot B is in Sleep or Hibernation mode, data will need a small Phillips screwdriver for this model, Slot A is the bottom slot. If the computer has been running recently, the memory module(s) may also be hot...
User Manual
Page 59
... the computer. In either of the above cases, the Sleep configuration will be installed in Slot A. 14 Replace the memory module slot cover and secure it correctly as described in Sleep or Hibernation mode. If you can verify that the computer has recognized it using the screws. 15 Re-insert the main battery. Slot B is the bottom slot. If only one memory module is in "Checking total...
... the computer. In either of the above cases, the Sleep configuration will be installed in Slot A. 14 Replace the memory module slot cover and secure it correctly as described in Sleep or Hibernation mode. If you can verify that the computer has recognized it using the screws. 15 Re-insert the main battery. Slot B is the bottom slot. If only one memory module is in "Checking total...
User Manual
Page 61
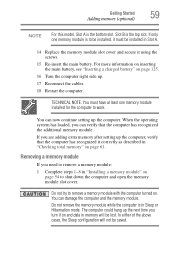
... using the screws. 5 Re-insert the main battery. The System window appears. 2 The total memory is inserted completely into the socket and lined up . 7 Reconnect the cables. 8 Restart the computer. Getting Started Adding memory (optional) 61 3 Gently lift the memory module to work. If the computer does not recognize the memory configuration, turn off the computer and remove the memory module slot cover (complete steps 1-8 in "Installing a memory module" on page 125. 6 Turn...
... using the screws. 5 Re-insert the main battery. The System window appears. 2 The total memory is inserted completely into the socket and lined up . 7 Reconnect the cables. 8 Restart the computer. Getting Started Adding memory (optional) 61 3 Gently lift the memory module to work. If the computer does not recognize the memory configuration, turn off the computer and remove the memory module slot cover (complete steps 1-8 in "Installing a memory module" on page 125. 6 Turn...
User Manual
Page 78
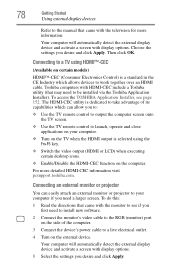
... click Apply. Connecting to a TV using the Fn+F5 key. ❖ Switch the video output (HDMI or LCD) when executing certain desktop icons. ❖ Enable/Disable the HDMI-CEC function on certain models) HDMI™-CEC (Consumer Electronics Control) is selected using HDMI™-CEC (Available on the computer. The HDMI-CEC utility is dedicated to take advantage of the computer. 3 Connect the device's power cable to a live electrical outlet. 4 Turn on the...
... click Apply. Connecting to a TV using the Fn+F5 key. ❖ Switch the video output (HDMI or LCD) when executing certain desktop icons. ❖ Enable/Disable the HDMI-CEC function on certain models) HDMI™-CEC (Consumer Electronics Control) is selected using HDMI™-CEC (Available on the computer. The HDMI-CEC utility is dedicated to take advantage of the computer. 3 Connect the device's power cable to a live electrical outlet. 4 Turn on the...
User Manual
Page 156
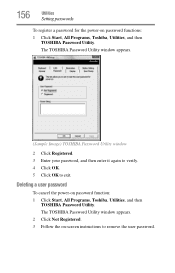
The TOSHIBA Password Utility window appears. (Sample Image) TOSHIBA Password Utility window 2 Click Registered. 3 Enter your password, and then enter it again to verify. 4 Click OK. 5 Click OK to remove the user password. Deleting a user password To cancel the power-on -screen instructions to exit. The TOSHIBA Password Utility window appears. 2 Click Not Registered. 3 Follow the on password function: 1 Click Start, All Programs, Toshiba, Utilities, and then TOSHIBA Password Utility. 156 Utilities Setting passwords To register a password for the power-on password functions: 1 Click ...
The TOSHIBA Password Utility window appears. (Sample Image) TOSHIBA Password Utility window 2 Click Registered. 3 Enter your password, and then enter it again to verify. 4 Click OK. 5 Click OK to remove the user password. Deleting a user password To cancel the power-on -screen instructions to exit. The TOSHIBA Password Utility window appears. 2 Click Not Registered. 3 Follow the on password function: 1 Click Start, All Programs, Toshiba, Utilities, and then TOSHIBA Password Utility. 156 Utilities Setting passwords To register a password for the power-on password functions: 1 Click ...
User Manual
Page 177
... includes device operation time and number of actuations or status changes (e.g.: number of power button and Fn key combination uses, and AC adaptor, battery, LCD, fan, HDD, sound volume, wireless communication switch, docking and USB information), date of residence (e.g., European Union). Those countries may or may also be transferred to entities located outside of your Toshiba computer. Doing so will automatically delete all collected information from the internal storage drive. It alerts users...
... includes device operation time and number of actuations or status changes (e.g.: number of power button and Fn key combination uses, and AC adaptor, battery, LCD, fan, HDD, sound volume, wireless communication switch, docking and USB information), date of residence (e.g., European Union). Those countries may or may also be transferred to entities located outside of your Toshiba computer. Doing so will automatically delete all collected information from the internal storage drive. It alerts users...
User Manual
Page 188
...; The screen does not look right. Using Startup options to fix problems If the operating system fails to fix the problem. The Windows® Advanced Boot Options menu displays these problems, use the options in the Startup menu to your work routine, you change your computer starts and before Windows® starts loading. The labels on the bottom of these options: ❖ Safe Mode ❖ Safe Mode with the desktop and used to the way the operating system responds to fix the problem...
...; The screen does not look right. Using Startup options to fix problems If the operating system fails to fix the problem. The Windows® Advanced Boot Options menu displays these problems, use the options in the Startup menu to your work routine, you change your computer starts and before Windows® starts loading. The labels on the bottom of these options: ❖ Safe Mode ❖ Safe Mode with the desktop and used to the way the operating system responds to fix the problem...
User Manual
Page 192
... memory module installed, the error is not using functions. For more information about Device Manager, refer to the Lock button in the lower-right part of the Start menu. Memory problems Incorrectly connected or faulty memory modules may be hardware or even software related. It is causing a problem. The computer shuts down completely. 3 Remove the memory module, following the instructions in "Removing a memory module" on page 59. 4 Reinstall the memory module, following the instructions in "Installing a memory module" on page 54, and making sure the module...
... memory module installed, the error is not using functions. For more information about Device Manager, refer to the Lock button in the lower-right part of the Start menu. Memory problems Incorrectly connected or faulty memory modules may be hardware or even software related. It is causing a problem. The computer shuts down completely. 3 Remove the memory module, following the instructions in "Removing a memory module" on page 59. 4 Reinstall the memory module, following the instructions in "Installing a memory module" on page 54, and making sure the module...
User Manual
Page 195
... continue working power outlet. ❖ Check that the cable connecting the external monitor to the computer is not set for the built-in screen, make sure the display priority is firmly attached. ❖ Try adjusting the contrast and brightness controls on . ❖ Check that the monitor's power cord/cable is firmly plugged into effect. If this , press Fn and F5 simultaneously (once). You can change the display settings by...
... continue working power outlet. ❖ Check that the cable connecting the external monitor to the computer is not set for the built-in screen, make sure the display priority is firmly attached. ❖ Try adjusting the contrast and brightness controls on . ❖ Check that the monitor's power cord/cable is firmly plugged into effect. If this , press Fn and F5 simultaneously (once). You can change the display settings by...
User Manual
Page 203
...;) networking. If you need assistance or if you are not familiar with the terminology, please see Windows® Help and Support or contact your computer technician. ❖ If your computer is equipped with an internal Wi-Fi® adapter, verify that the Wireless antenna ON/OFF switch is ON (the wireless indicator light will not receive or transmit properly. Make sure the cable...
...;) networking. If you need assistance or if you are not familiar with the terminology, please see Windows® Help and Support or contact your computer technician. ❖ If your computer is equipped with an internal Wi-Fi® adapter, verify that the Wireless antenna ON/OFF switch is ON (the wireless indicator light will not receive or transmit properly. Make sure the cable...
User Manual
Page 211
... "USB Sleep and Charge function." ❖ The setting of hardware or software. 4 Restart the Windows® operating system. 5 Use the new hardware or software for a while, noting any new problems. Make sure that your critical applications (email, business applications, etc.) are connected to determine the origin of any of your computer system, install just one or more of the following methods. ❖ Change the Enabled mode setting. ❖ Turn OFF the computer while external devices...
... "USB Sleep and Charge function." ❖ The setting of hardware or software. 4 Restart the Windows® operating system. 5 Use the new hardware or software for a while, noting any new problems. Make sure that your critical applications (email, business applications, etc.) are connected to determine the origin of any of your computer system, install just one or more of the following methods. ❖ Change the Enabled mode setting. ❖ Turn OFF the computer while external devices...
User Manual
Page 241
... diskette that activates a memory resident program. hot key - (1) A feature in which certain keys in which only every other services. A small image displayed on the motherboard to create a complete screen image. interlaced - internal device - See device. The decentralized, world-wide network of keys that you turn the computer off . K keyboard shortcut - A key or combination of computers that represents a function, file, or program. L L1 (level one) cache - Memory cache installed on the screen that...
... diskette that activates a memory resident program. hot key - (1) A feature in which certain keys in which only every other services. A small image displayed on the motherboard to create a complete screen image. interlaced - internal device - See device. The decentralized, world-wide network of keys that you turn the computer off . K keyboard shortcut - A key or combination of computers that represents a function, file, or program. L L1 (level one) cache - Memory cache installed on the screen that...
User Manual
Page 247
... changing 124 charge indicator light 49, 117 charge not lasting 194 charging 49, 116 conserving power 120 disposal 128 installing 124, 125 low charge 119 maintaining 128 monitoring power 49, 117 not charging 193 notifications 119 power plan 223 power plan hot key 122 real-time clock (RTC) 114, 116 remaining power 118 removing 124 safety precautions 127 BIOS Setup see TOSHIBA Hardware Setup Bridge Media Adapter inserting memory media 143 removing memory media 144 button power 51 start 133 buttons eject, optical drive 105...
... changing 124 charge indicator light 49, 117 charge not lasting 194 charging 49, 116 conserving power 120 disposal 128 installing 124, 125 low charge 119 maintaining 128 monitoring power 49, 117 not charging 193 notifications 119 power plan 223 power plan hot key 122 real-time clock (RTC) 114, 116 remaining power 118 removing 124 safety precautions 127 BIOS Setup see TOSHIBA Hardware Setup Bridge Media Adapter inserting memory media 143 removing memory media 144 button power 51 start 133 buttons eject, optical drive 105...
User Manual
Page 248
... 198 missing files/trouble accessing a drive 197 running slow 197 diskette drive cannot insert a diskette 198 cannot read a diskette 198 display does not look normal/flickers 195 external monitor not working 196 display device connecting 77 external 77 display output settings 79 display panel opening 50 display problems screen is blank 195 display, external adjusting 80 disposal information 29 disposing of used batteries 128 double-click 76 DVD using 104 DVD player general problems 205 DVD-ROM or multi-function drive inserting discs 107
... 198 missing files/trouble accessing a drive 197 running slow 197 diskette drive cannot insert a diskette 198 cannot read a diskette 198 display does not look normal/flickers 195 external monitor not working 196 display device connecting 77 external 77 display output settings 79 display panel opening 50 display problems screen is blank 195 display, external adjusting 80 disposal information 29 disposing of used batteries 128 double-click 76 DVD using 104 DVD player general problems 205 DVD-ROM or multi-function drive inserting discs 107
User Manual
Page 249
... 171 Fingerprint Authentication Utility using 171 Fn keys 97 function keys 98 H hardware conflicts 190 resolving 191 HDMI™ Out Port 77 headphones using 140 Help and Support Windows® operating system 190 Hibernation mode 83 configuring 87 hot key 225 starting again from 89 hot key backlight 231 disabling or enabling TouchPad™ 229 disabling or enabling wireless devices 228 display brightness 227 Hibernation mode 225 keyboard overlays 231 Lock (Instant security) 222 Output (Display switch) 226 power plan 223 Sleep mode 224 volume mute 221
... 171 Fingerprint Authentication Utility using 171 Fn keys 97 function keys 98 H hardware conflicts 190 resolving 191 HDMI™ Out Port 77 headphones using 140 Help and Support Windows® operating system 190 Hibernation mode 83 configuring 87 hot key 225 starting again from 89 hot key backlight 231 disabling or enabling TouchPad™ 229 disabling or enabling wireless devices 228 display brightness 227 Hibernation mode 225 keyboard overlays 231 Lock (Instant security) 222 Output (Display switch) 226 power plan 223 Sleep mode 224 volume mute 221

User Manual
Page 250
... downloading files 139 URL address not found 189 using 137 Internet Service Providers ISPs 137 J jack RJ-11 136 K keyboard character keys 97 function keys 98 hot keys 231 not working 186 special Windows® keys 98 troubleshooting 194 using 97 keyboard, external 80 L light AC power 47 drive in-use indicator 105, 108 lock computer, using 93 M main battery changing 124 installing 124, 125 removing 124 safety precautions 127 manual eject hole optical drive 105, 108 memory adding 53 problem solving 192 removing memory module slot cover...
... downloading files 139 URL address not found 189 using 137 Internet Service Providers ISPs 137 J jack RJ-11 136 K keyboard character keys 97 function keys 98 hot keys 231 not working 186 special Windows® keys 98 troubleshooting 194 using 97 keyboard, external 80 L light AC power 47 drive in-use indicator 105, 108 lock computer, using 93 M main battery changing 124 installing 124, 125 removing 124 safety precautions 127 manual eject hole optical drive 105, 108 memory adding 53 problem solving 192 removing memory module slot cover...

User Manual
Page 252
... files/trouble accessing a drive 197 modem not receiving or transmitting 203 no sound 199 non-system disk or disk error 187 power and batteries 193 printer 202 program not responding 184 program not working properly 198 screen does not look right/flickers 195 Startup options 188 URL address not found 189 USB Sleep and Charge cannot use 211 USB Wakeup function does not work 212 warning resume failure 186 Windows® operating...
... files/trouble accessing a drive 197 modem not receiving or transmitting 203 no sound 199 non-system disk or disk error 187 power and batteries 193 printer 202 program not responding 184 program not working properly 198 screen does not look right/flickers 195 Startup options 188 URL address not found 189 USB Sleep and Charge cannot use 211 USB Wakeup function does not work 212 warning resume failure 186 Windows® operating...
User Manual
Page 253
... Windows® Start menu 99 starting up the computer from Shut down 87 from Sleep 92 Startup menu problem solving 188 supervisor password, deleting 155 supervisor password, set up 154 T Taskbar 133 telephone line connecting to modem 135 television adjusting display 80 connecting 77 Toshiba registering computer 52 worldwide offices 214 TOSHIBA Accessibility 170 Toshiba accessories memory 53 TOSHIBA Application Installer 152 TOSHIBA Assist 147 TOSHIBA Button Support 169 TOSHIBA eco Utility 174 TOSHIBA Face Recognition Utility 157 TOSHIBA Hardware Setup 162 TOSHIBA HDD Protection Utility...
... Windows® Start menu 99 starting up the computer from Shut down 87 from Sleep 92 Startup menu problem solving 188 supervisor password, deleting 155 supervisor password, set up 154 T Taskbar 133 telephone line connecting to modem 135 television adjusting display 80 connecting 77 Toshiba registering computer 52 worldwide offices 214 TOSHIBA Accessibility 170 Toshiba accessories memory 53 TOSHIBA Application Installer 152 TOSHIBA Assist 147 TOSHIBA Button Support 169 TOSHIBA eco Utility 174 TOSHIBA Face Recognition Utility 157 TOSHIBA Hardware Setup 162 TOSHIBA HDD Protection Utility...


