
User Manual
Page 3
... the separation between the external devices and the computer's parallel port, monitor port, USB port, PS/2 port®, i.LINK® port, HDMI out port and microphone jack (Port availability depends on a circuit different from that to radio or... television reception, which can radiate radio frequency energy and, if not installed and used between the equipment and receiver. ❖ Connect the equipment to operate the equipment. Operation with noncompliant peripherals or peripherals not recommended by Toshiba...
... the separation between the external devices and the computer's parallel port, monitor port, USB port, PS/2 port®, i.LINK® port, HDMI out port and microphone jack (Port availability depends on a circuit different from that to radio or... television reception, which can radiate radio frequency energy and, if not installed and used between the equipment and receiver. ❖ Connect the equipment to operate the equipment. Operation with noncompliant peripherals or peripherals not recommended by Toshiba...
User Manual
Page 31
... Inserting memory media 137 Removing memory media 137 Using the i.LINK® port 138 Chapter 5: Toshiba Utilities 139 TOSHIBA Assist 140 Connect 141 Secure 142 Protect & Fix 143 Optimize 144 Toshiba Application Installer 145 Setting passwords 146 Using an instant password 146 Using a ... 147 Using a user password 148 Deleting a user password 149 TOSHIBA PC Diagnostic Tool Utility 150 TOSHIBA SD™ Memory Card Format Utility .........151 Mouse Utility 152 Toshiba Hardware Setup 153 TOSHIBA Zooming Utility 155 TOSHIBA Button Support 156 CD/DVD Drive Acoustic Silencer 157...
... Inserting memory media 137 Removing memory media 137 Using the i.LINK® port 138 Chapter 5: Toshiba Utilities 139 TOSHIBA Assist 140 Connect 141 Secure 142 Protect & Fix 143 Optimize 144 Toshiba Application Installer 145 Setting passwords 146 Using an instant password 146 Using a ... 147 Using a user password 148 Deleting a user password 149 TOSHIBA PC Diagnostic Tool Utility 150 TOSHIBA SD™ Memory Card Format Utility .........151 Mouse Utility 152 Toshiba Hardware Setup 153 TOSHIBA Zooming Utility 155 TOSHIBA Button Support 156 CD/DVD Drive Acoustic Silencer 157...
User Manual
Page 68
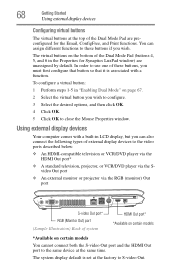
...so that it is associated with a built-in "Enabling Dual Mode" on certain models You cannot connect both the S-video Out port and the HDMI Out port to the same device at the top of these buttons if you wish to configure. 3 Select the desired options, and then click...; A standard television, projector, or VCR/DVD player via the Svideo Out port ❖ An external monitor or projector via the RGB (monitor) Out port S-video Out port* RGB (Monitor Out) port (Sample Illustration) Back of system HDMI Out port* *Available on certain models *Available on page 67. 2 Select the virtual button ...
...so that it is associated with a built-in "Enabling Dual Mode" on certain models You cannot connect both the S-video Out port and the HDMI Out port to the same device at the top of these buttons if you wish to configure. 3 Select the desired options, and then click...; A standard television, projector, or VCR/DVD player via the Svideo Out port ❖ An external monitor or projector via the RGB (monitor) Out port S-video Out port* RGB (Monitor Out) port (Sample Illustration) Back of system HDMI Out port* *Available on certain models *Available on page 67. 2 Select the virtual button ...
User Manual
Page 69
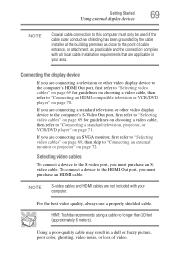
...for guidelines on choosing a video cable, then refer to "Connecting an HDMI-compatible television or VCR/DVD player" on page 71. HINT: Toshiba recommends using a cable no longer than 20 feet (approximately 6 meters). Connecting the display device If you are not included with all local ...cable installation requirements that are connecting a standard television or other video display device to the computer's HDMI Out port, first refer to "Selecting video cables" on page 69 for guidelines on choosing a video cable, then refer to "Connecting a standard ...
...for guidelines on choosing a video cable, then refer to "Connecting an HDMI-compatible television or VCR/DVD player" on page 71. HINT: Toshiba recommends using a cable no longer than 20 feet (approximately 6 meters). Connecting the display device If you are not included with all local ...cable installation requirements that are connecting a standard television or other video display device to the computer's HDMI Out port, first refer to "Selecting video cables" on page 69 for guidelines on choosing a video cable, then refer to "Connecting a standard ...
User Manual
Page 70
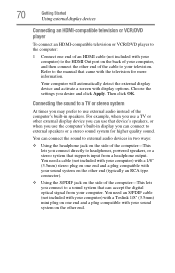
...-compatible television or VCR/DVD player to the computer: 1 Connect one end of an HDMI cable (not included with your computer) to the HDMI Out port on the other end. Refer to external speakers or a stereo sound system for more information. You need an S/PDIF cable (not included with your computer...
...-compatible television or VCR/DVD player to the computer: 1 Connect one end of an HDMI cable (not included with your computer) to the HDMI Out port on the other end. Refer to external speakers or a stereo sound system for more information. You need an S/PDIF cable (not included with your computer...

User Manual
Page 71
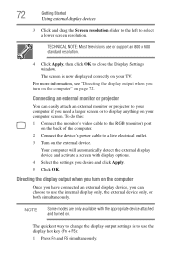
...a result, you desire and click Apply. To adjust the display properties 1 Right-click on your computer) to the S-video Out port on the back of the video cable to the external video device. Make sure the input to pan the display. Refer to the ... computer will automatically detect the external display device and activate a screen with display options. Adjusting the Display Properties When using the S-video display port, the desktop shown on the Windows® Desktop and click Personalize. 2 Click Display Settings. Getting Started 71 Using external display devices Connecting...
...a result, you desire and click Apply. To adjust the display properties 1 Right-click on your computer) to the S-video Out port on the back of the video cable to the external video device. Make sure the input to pan the display. Refer to the ... computer will automatically detect the external display device and activate a screen with display options. Adjusting the Display Properties When using the S-video display port, the desktop shown on the Windows® Desktop and click Personalize. 2 Click Display Settings. Getting Started 71 Using external display devices Connecting...
User Manual
Page 72
... televisions use the internal display only, the external device only, or both simultaneously. To do this: 1 Connect the monitor's video cable to the RGB (monitor) port on the back of the computer. 2 Connect the device's power cable to change the display output settings is now displayed correctly on the external device...
... televisions use the internal display only, the external device only, or both simultaneously. To do this: 1 Connect the monitor's video cable to the RGB (monitor) port on the back of the computer. 2 Connect the device's power cable to change the display output settings is now displayed correctly on the external device...
User Manual
Page 74
Using an external keyboard If you prefer to use a USB-compatible mouse. You can attach one to your computer through the USB ports. If a USB cable was not included with your printer, you can use a full-size keyboard, you can connect a USB-compatible printer to your computer. The ... from a computer or electronics store. See the video device documentation for additional configuration steps. Read the documentation that came with your printer. The computer's USB ports support any USB-compatible keyboard.
Using an external keyboard If you prefer to use a USB-compatible mouse. You can attach one to your computer through the USB ports. If a USB cable was not included with your printer, you can use a full-size keyboard, you can connect a USB-compatible printer to your computer. The ... from a computer or electronics store. See the video device documentation for additional configuration steps. Read the documentation that came with your printer. The computer's USB ports support any USB-compatible keyboard.
User Manual
Page 75
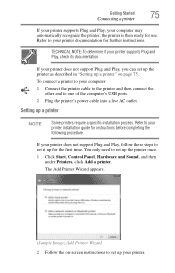
... other end to your printer documentation for the first time. If your computer may automatically recognize the printer; Refer to one of the computer's USB ports. 2 Plug the printer's power cable into a live AC outlet. You only need to your printer installation guide for use. Refer to set up a printer NOTE...
... other end to your printer documentation for the first time. If your computer may automatically recognize the printer; Refer to one of the computer's USB ports. 2 Plug the printer's power cable into a live AC outlet. You only need to your printer installation guide for use. Refer to set up a printer NOTE...
User Manual
Page 76
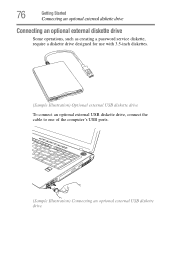
76 Getting Started Connecting an optional external diskette drive Connecting an optional external diskette drive Some operations, such as creating a password service diskette, require a diskette drive designed for use with 3.5-inch diskettes. (Sample Illustration) Optional external USB diskette drive To connect an optional external USB diskette drive, connect the cable to one of the computer's USB ports. (Sample Illustration) Connecting an optional external USB diskette drive
76 Getting Started Connecting an optional external diskette drive Connecting an optional external diskette drive Some operations, such as creating a password service diskette, require a diskette drive designed for use with 3.5-inch diskettes. (Sample Illustration) Optional external USB diskette drive To connect an optional external USB diskette drive, connect the cable to one of the computer's USB ports. (Sample Illustration) Connecting an optional external USB diskette drive
User Manual
Page 106
...on battery power at the time of individual components. For more than a month), the battery may fail to perform at accessories.toshiba.com. 106 Mobile Computing Running the computer on battery power Battery Notice Battery life may vary considerably from specifications depending on page ...174; power plans, see "Maintaining your computer or visit the Toshiba Web site at maximum capacity and will lose its maximum capacity, operate the computer on AC power, either through an AC adaptor or a port replicator (if applicable to fully discharge the battery periodically. This...
...on battery power at the time of individual components. For more than a month), the battery may fail to perform at accessories.toshiba.com. 106 Mobile Computing Running the computer on battery power Battery Notice Battery life may vary considerably from specifications depending on page ...174; power plans, see "Maintaining your computer or visit the Toshiba Web site at maximum capacity and will lose its maximum capacity, operate the computer on AC power, either through an AC adaptor or a port replicator (if applicable to fully discharge the battery periodically. This...
User Manual
Page 126
... connected to: 1 Click Start, Control Panel, and then Hardware and Sound. 2 Click Phone and Modem Options. To find out which port your modem and Windows® operating system documentation. If the Windows® operating system cannot communicate with the modem, it . Consult the... troubleshooting sections of the computer's COM (communications) ports. 126 Exploring Your Computer's Features Setting up for communications Setting up the dialog box with information specific to that the modem is set...
... connected to: 1 Click Start, Control Panel, and then Hardware and Sound. 2 Click Phone and Modem Options. To find out which port your modem and Windows® operating system documentation. If the Windows® operating system cannot communicate with the modem, it . Consult the... troubleshooting sections of the computer's COM (communications) ports. 126 Exploring Your Computer's Features Setting up for communications Setting up the dialog box with information specific to that the modem is set...

User Manual
Page 127
...your network administrator. ❖ Send a fax directly from your computer For more detailed information regarding your computer's modem, visit Toshiba's Web site at accessories.toshiba.com. Exploring Your Computer's Features Setting up for communications 127 7 Click OK to close the Phone and Modem Options dialog ...box. 9 Close the Control Panel. The modem allows you to: ❖ Access the Internet ❖ Communicate with a built-in modem port ...
...your network administrator. ❖ Send a fax directly from your computer For more detailed information regarding your computer's modem, visit Toshiba's Web site at accessories.toshiba.com. Exploring Your Computer's Features Setting up for communications 127 7 Click OK to close the Phone and Modem Options dialog ...box. 9 Close the Control Panel. The modem allows you to: ❖ Access the Internet ❖ Communicate with a built-in modem port ...
User Manual
Page 128
... network. If your network administrator. Connection to their Wi-Fi® network. ❖ While you need a dial-up for the telephone number of its communication ports. Accessing a network To access a network: ❖ At the office, connect an Ethernet cable to ordinary analog phone lines. 128 Exploring Your Computer's Features Setting up...
... network. If your network administrator. Connection to their Wi-Fi® network. ❖ While you need a dial-up for the telephone number of its communication ports. Accessing a network To access a network: ❖ At the office, connect an Ethernet cable to ordinary analog phone lines. 128 Exploring Your Computer's Features Setting up...
User Manual
Page 129
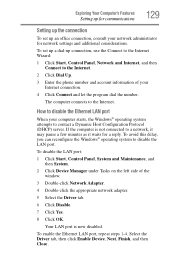
To disable the LAN port: 1 Click Start, Control Panel, System and Maintenance, and then System. 2 Click Device Manager under Tasks on the left ... click Enable Device, Next, Finish, and then Close. How to disable the Ethernet LAN port When your network administrator for a reply. Your LAN port is not connected to disable the LAN port. The computer connects to contact a Dynamic Host Configuration Protocol (DHCP) server. To set ... the appropriate network adapter. 5 Select the Driver tab. 6 Click Disable. 7 Click Yes. 8 Click OK. To enable the Ethernet LAN port, repeat steps 1-4.
To disable the LAN port: 1 Click Start, Control Panel, System and Maintenance, and then System. 2 Click Device Manager under Tasks on the left ... click Enable Device, Next, Finish, and then Close. How to disable the Ethernet LAN port When your network administrator for a reply. Your LAN port is not connected to disable the LAN port. The computer connects to contact a Dynamic Host Configuration Protocol (DHCP) server. To set ... the appropriate network adapter. 5 Select the Driver tab. 6 Click Disable. 7 Click Yes. 8 Click OK. To enable the Ethernet LAN port, repeat steps 1-4.
User Manual
Page 138
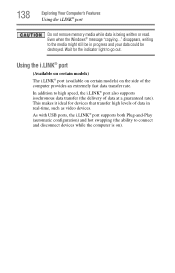
... memory media while data is on the side of data in progress and your data could be destroyed. Using the i.LINK® port (Available on certain models) The i.LINK® port (available on certain models) on ). disappears, writing to go out. Wait for devices that transfer high levels of the computer provides...rate. This makes it ideal for the indicator light to the media might still be in real-time, such as video devices. As with USB ports, the i.LINK® port supports both Plug-and-Play (automatic configuration) and hot swapping (the ability to high speed, the i.LINK®...
... memory media while data is on the side of data in progress and your data could be destroyed. Using the i.LINK® port (Available on certain models) The i.LINK® port (available on certain models) on ). disappears, writing to go out. Wait for devices that transfer high levels of the computer provides...rate. This makes it ideal for the indicator light to the media might still be in real-time, such as video devices. As with USB ports, the i.LINK® port supports both Plug-and-Play (automatic configuration) and hot swapping (the ability to high speed, the i.LINK®...
User Manual
Page 191
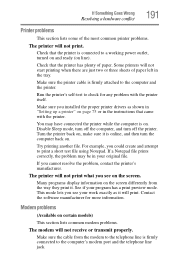
... file using Notepad. This mode lets you see your program has a print preview mode. For example, you could create and attempt to the computer's modem port and the telephone line jack. Some printers will not start printing when there are just two or three sheets of paper left in the instructions...
... file using Notepad. This mode lets you see your program has a print preview mode. For example, you could create and attempt to the computer's modem port and the telephone line jack. Some printers will not start printing when there are just two or three sheets of paper left in the instructions...
User Manual
Page 192
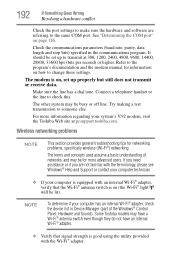
... be busy or off line. Wireless networking problems NOTE This section provides general troubleshooting tips for more information regarding your system's V.92 modem, visit the Toshiba Web site at 300, 1200, 2400, 4800, 9600, 14400, 28800, 33600 bps (bits per second) or higher. The terms and concepts used ... may be set up to transmit at pcsupport.toshiba.com. For more advanced users. NOTE To determine if your computer has an internal Wi-Fi® adapter, check the device list in the communications program. See "Determining the COM port" on (the Wi-Fi® light will be for ...
... be busy or off line. Wireless networking problems NOTE This section provides general troubleshooting tips for more information regarding your system's V.92 modem, visit the Toshiba Web site at 300, 1200, 2400, 4800, 9600, 14400, 28800, 33600 bps (bits per second) or higher. The terms and concepts used ... may be set up to transmit at pcsupport.toshiba.com. For more advanced users. NOTE To determine if your computer has an internal Wi-Fi® adapter, check the device list in the communications program. See "Determining the COM port" on (the Wi-Fi® light will be for ...
User Manual
Page 193
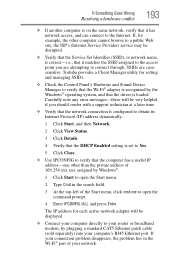
...Windows® operating system, and that the computer has a useful IP address-one other than the private address of your computer's RJ45 Ethernet port. If, for setting and managing SSIDs. ❖ Check the Control Panel's Hardware and Sound Device Manager to verify that the Wi-Fi...View Status. 3 Click Details. 4 Verify that the DHCP Enabled setting is set to Yes. 5 Click Close. ❖ Use IPCONFIG to connect through. Toshiba provides a Client Manager utility for example, the other computer cannot browse to a public Web site, the ISP's (Internet Service Provider) service may be very ...
...Windows® operating system, and that the computer has a useful IP address-one other than the private address of your computer's RJ45 Ethernet port. If, for setting and managing SSIDs. ❖ Check the Control Panel's Hardware and Sound Device Manager to verify that the Wi-Fi...View Status. 3 Click Details. 4 Verify that the DHCP Enabled setting is set to Yes. 5 Click Close. ❖ Use IPCONFIG to connect through. Toshiba provides a Client Manager utility for example, the other computer cannot browse to a public Web site, the ISP's (Internet Service Provider) service may be very ...
User Manual
Page 222
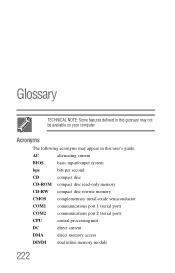
Acronyms The following acronyms may not be available on your computer. AC alternating current BIOS basic input/output system bps bits per second CD compact disc CD-ROM compact disc read-only memory CD-RW compact disc rewrite memory CMOS complementary metal-oxide semiconductor COM1 communications port 1 (serial port) COM2 communications port 2 (serial port) CPU central processing unit DC direct current DMA direct memory access DIMM dual inline memory module 222 Glossary TECHNICAL NOTE: Some features defined in this glossary may appear in this user's guide.
Acronyms The following acronyms may not be available on your computer. AC alternating current BIOS basic input/output system bps bits per second CD compact disc CD-ROM compact disc read-only memory CD-RW compact disc rewrite memory CMOS complementary metal-oxide semiconductor COM1 communications port 1 (serial port) COM2 communications port 2 (serial port) CPU central processing unit DC direct current DMA direct memory access DIMM dual inline memory module 222 Glossary TECHNICAL NOTE: Some features defined in this glossary may appear in this user's guide.


