
User Guide
Page 44
...Connecting the modem to a telephone line" on your computer, the Setup Wizard guides you through steps to set up your software. 1 From the welcome screen click Next to enter the Setup Wizard. 2 Confirm acceptance of windows displayed, and the order in modem to a telephone line or establish a Local ... your software NOTE The names of Microsoft's End User License Agreement and click Next. 3 Select the appropriate option from the Help protect your computer screen and click Next. 4 Enter the computer name and description and click Next or Skip. 5 Select how your computer will pause for a moment...
...Connecting the modem to a telephone line" on your computer, the Setup Wizard guides you through steps to set up your software. 1 From the welcome screen click Next to enter the Setup Wizard. 2 Confirm acceptance of windows displayed, and the order in modem to a telephone line or establish a Local ... your software NOTE The names of Microsoft's End User License Agreement and click Next. 3 Select the appropriate option from the Help protect your computer screen and click Next. 4 Enter the computer name and description and click Next or Skip. 5 Select how your computer will pause for a moment...

User Guide
Page 45
...Internet connection could not be found, a window will not diminish Customer rights under this limited Warranty. Registering your computer with Toshiba 45 If an Internet connection could not be chosen." NOTE If you are connecting your computer to a network, consult ... choose your computer name and network settings. 6 Follow the remaining screen prompts to complete the setup process. Getting Started Registering your computer with Toshiba Product registration is strongly recommended, and allows Toshiba to send the Customer periodic updates, announcements, and special offers applicable...
...Internet connection could not be found, a window will not diminish Customer rights under this limited Warranty. Registering your computer with Toshiba 45 If an Internet connection could not be chosen." NOTE If you are connecting your computer to a network, consult ... choose your computer name and network settings. 6 Follow the remaining screen prompts to complete the setup process. Getting Started Registering your computer with Toshiba Product registration is strongly recommended, and allows Toshiba to send the Customer periodic updates, announcements, and special offers applicable...
User Guide
Page 51
... by the display panel. Getting Started Using the computer for the first time 51 Using the computer for you to turn on battery power, the screen will deteriorate. Any small bright dots that may not be able to the right. 2 Lift the display panel. (Sample Illustration) Opening the display ...the usage of the computer, the brightness of the TFT manufacturing technology. This is operated on your display are an intrinsic characteristic of the screen will dim and you turn it on and begin using high-precision technology. When the computer is also an intrinsic characteristic of the...
... by the display panel. Getting Started Using the computer for the first time 51 Using the computer for you to turn on battery power, the screen will deteriorate. Any small bright dots that may not be able to the right. 2 Lift the display panel. (Sample Illustration) Opening the display ...the usage of the computer, the brightness of the TFT manufacturing technology. This is operated on your display are an intrinsic characteristic of the screen will dim and you turn it on and begin using high-precision technology. When the computer is also an intrinsic characteristic of the...

User Guide
Page 62
... any wheel device on a mouse or trackball. Once you have positioned your cursor, you can avoid this feature is much smaller than the display screen, moving when you lift your finger. The Dual Mode Pad also supports coasting, which helps you to scroll as you would with the Dual Mode...Pad is enabled, the cursor continues moving when your finger reaches the edge of the Dual Mode Pad, and stops moving your cursor across the screen often means having to move it into place by enabling EdgeMotion™. To scroll horizontally, run your finger along the right edge of the Dual...
... any wheel device on a mouse or trackball. Once you have positioned your cursor, you can avoid this feature is much smaller than the display screen, moving when you lift your finger. The Dual Mode Pad also supports coasting, which helps you to scroll as you would with the Dual Mode...Pad is enabled, the cursor continues moving when your finger reaches the edge of the Dual Mode Pad, and stops moving your cursor across the screen often means having to move it into place by enabling EdgeMotion™. To scroll horizontally, run your finger along the right edge of the Dual...

User Guide
Page 66
... DVI stands for Digital Visual Interface, and is a standard for connecting computers to a live electrical outlet. 3 Turn on the back of device you need a larger screen. To do this : 1 Connect the monitor's video cable to the RGB (monitor) port on the external device. 4 Set the display mode by pressing Fn + F5...
... DVI stands for Digital Visual Interface, and is a standard for connecting computers to a live electrical outlet. 3 Turn on the back of device you need a larger screen. To do this : 1 Connect the monitor's video cable to the RGB (monitor) port on the external device. 4 Set the display mode by pressing Fn + F5...

User Guide
Page 68
... quality from your computer. TECHNICAL NOTE: To use a USB-compatible mouse. You can attach one of the simultaneous modes, you must support a resolution of the screen.
... quality from your computer. TECHNICAL NOTE: To use a USB-compatible mouse. You can attach one of the simultaneous modes, you must support a resolution of the screen.

User Guide
Page 70
... Connecting a printer Setting up the printer once. 1 Click Start, Printers and Faxes. The Add Printer Wizard appears. (Sample Illustration) Add Printer Wizard 3 Follow the on-screen instructions to set it up your printer. If your printer does not support Plug and Play, follow these steps to set up your printer installation...
... Connecting a printer Setting up the printer once. 1 Click Start, Printers and Faxes. The Add Printer Wizard appears. (Sample Illustration) Add Printer Wizard 3 Follow the on-screen instructions to set it up your printer. If your printer does not support Plug and Play, follow these steps to set up your printer installation...

User Guide
Page 77
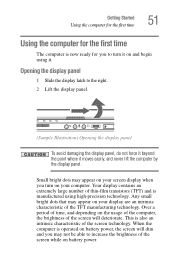
.... If you put the computer in Standby mode. Starting again from Hibernation mode To start it into a low-power mode. The computer returns to the screen(s) you were using the Standby command, click Start, Turn off computer, and select Stand By. (Sample Illustration) Turn off computer Windows® dialog box The...
.... If you put the computer in Standby mode. Starting again from Hibernation mode To start it into a low-power mode. The computer returns to the screen(s) you were using the Standby command, click Start, Turn off computer, and select Stand By. (Sample Illustration) Turn off computer Windows® dialog box The...
User Guide
Page 78
... into Standby mode by either pressing the power button or closing the display panel, depending on /off the computer, close the display panel to the screen(s) you have turned off light glows blue.
... into Standby mode by either pressing the power button or closing the display panel, depending on /off the computer, close the display panel to the screen(s) you have turned off light glows blue.

User Guide
Page 88
... Windows® program, click Save. If you turn off the computer, save feature. Saving files 1 On the File menu of saving frequently. When the Search screen displays, follow the displayed instructions. 3 Type WordPad in the habit of your program displays a Save As dialog box.
... Windows® program, click Save. If you turn off the computer, save feature. Saving files 1 On the File menu of saving frequently. When the Search screen displays, follow the displayed instructions. 3 Type WordPad in the habit of your program displays a Save As dialog box.
User Guide
Page 92
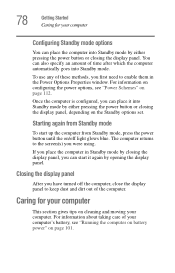
... try to your hard disk, use the Restore page in the online Help or your computer may come with a Optical Drive. These features include wide-screen movies, multiple language tracks, digital surround sound, multiple camera angles, and interactive menus. Digital versatile discs (DVDs) provide a significant increase in ." The drive will be...
... try to your hard disk, use the Restore page in the online Help or your computer may come with a Optical Drive. These features include wide-screen movies, multiple language tracks, digital surround sound, multiple camera angles, and interactive menus. Digital versatile discs (DVDs) provide a significant increase in ." The drive will be...

User Guide
Page 96
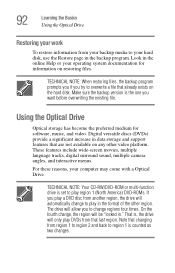
... the Windows Media Player program to control the CD. To prevent this from the taskbar. Stop button Play/pause button (Sample Illustration) Windows Media Player screen The Windows Media Player control panel works much like an ordinary compact disc player: ❖ To play . You can open it through the Start menu...
... the Windows Media Player program to control the CD. To prevent this from the taskbar. Stop button Play/pause button (Sample Illustration) Windows Media Player screen The Windows Media Player control panel works much like an ordinary compact disc player: ❖ To play . You can open it through the Start menu...

User Guide
Page 121
... not indicate any change in the Windows® XP operating system. Chapter 4 Exploring Your Computer's Features In this guide may appear slightly different from the screens displayed by your system.
... not indicate any change in the Windows® XP operating system. Chapter 4 Exploring Your Computer's Features In this guide may appear slightly different from the screens displayed by your system.

User Guide
Page 132
... up for information. Clicking a link automatically transfers your own, you sign up an email address at the same time you need a mailbox on their computer screens. ❖ Internet news groups A news group is similar to a chat room, but instead of using a dedicated site to converse about a specialized subject with others in...
... up for information. Clicking a link automatically transfers your own, you sign up an email address at the same time you need a mailbox on their computer screens. ❖ Internet news groups A news group is similar to a chat room, but instead of using a dedicated site to converse about a specialized subject with others in...

User Guide
Page 134
... be set to Mute. 134 Exploring Your Computer's Features Exploring audio features Positioning bar Record Stop Play Skip forward Skip backward (Sample Illustration) Sound Recorder screen 3 Click the Record button. 4 Speak normally into the microphone. 5 When you just recorded, click the Play button. 7 To save the file, select Save from the...
... be set to Mute. 134 Exploring Your Computer's Features Exploring audio features Positioning bar Record Stop Play Skip forward Skip backward (Sample Illustration) Sound Recorder screen 3 Click the Record button. 4 Speak normally into the microphone. 5 When you just recorded, click the Play button. 7 To save the file, select Save from the...

User Guide
Page 148
... progress is completed, click Close to exit the utility. To format an SD memory card using this utility: 1 Click Start, All Programs, Toshiba, Utilities, SD Memory Card Format utility, or double-click the SD Memory Card icon in the window. 5 When formatting is displayed in the... horizontal bar in the Optimize tab of TOSHIBA Assist. The SD Memory Card Format screen appears. (Sample Illustration) SD Memory Card Format screen 2 Select the drive corresponding to the SD memory card. 3 Select the formatting option: ❖ Quick ...
... progress is completed, click Close to exit the utility. To format an SD memory card using this utility: 1 Click Start, All Programs, Toshiba, Utilities, SD Memory Card Format utility, or double-click the SD Memory Card icon in the window. 5 When formatting is displayed in the... horizontal bar in the Optimize tab of TOSHIBA Assist. The SD Memory Card Format screen appears. (Sample Illustration) SD Memory Card Format screen 2 Select the drive corresponding to the SD memory card. 3 Select the formatting option: ❖ Quick ...

User Guide
Page 149
... you leave your system with a single keystroke. 149 Setting passwords Setting passwords Setting a password lets you walk away from accessing certain functions such as TOSHIBA HW Setup. To unlock your files. To use an instant password, press Fn, then press F1. Select your user name and enter your computer... keep the following in the knowledge that nobody can work on your password, if any key or the pointing device and the Windows Logon screen will appear. When you set before you must enter the password before the user password, or the user password must be deleted and then...
... you leave your system with a single keystroke. 149 Setting passwords Setting passwords Setting a password lets you walk away from accessing certain functions such as TOSHIBA HW Setup. To unlock your files. To use an instant password, press Fn, then press F1. Select your user name and enter your computer... keep the following in the knowledge that nobody can work on your password, if any key or the pointing device and the Windows Logon screen will appear. When you set before you must enter the password before the user password, or the user password must be deleted and then...
User Guide
Page 156
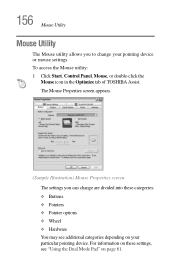
... or mouse settings. To access the Mouse utility: 1 Click Start, Control Panel, Mouse, or double-click the Mouse icon in the Optimize tab of TOSHIBA Assist. The Mouse Properties screen appears. (Sample Illustration) Mouse Properties screen The settings you to change are divided into these settings, see additional categories depending on page 61.
... or mouse settings. To access the Mouse utility: 1 Click Start, Control Panel, Mouse, or double-click the Mouse icon in the Optimize tab of TOSHIBA Assist. The Mouse Properties screen appears. (Sample Illustration) Mouse Properties screen The settings you to change are divided into these settings, see additional categories depending on page 61.

User Guide
Page 157
... click OK. To access it: ❖ Click Start, All Programs, Toshiba, Utilities, Assist, or double-click the TOSHIBA Hardware Settings icon in the Optimize tab of TOSHIBA Assist. The TOSHIBA HW Setup screen appears. (Sample Illustration) TOSHIBA HW Setup screen - General tab options The TOSHIBA HW Setup screen has the following tabs: ❖ General-Allows you to view the...
... click OK. To access it: ❖ Click Start, All Programs, Toshiba, Utilities, Assist, or double-click the TOSHIBA Hardware Settings icon in the Optimize tab of TOSHIBA Assist. The TOSHIBA HW Setup screen appears. (Sample Illustration) TOSHIBA HW Setup screen - General tab options The TOSHIBA HW Setup screen has the following tabs: ❖ General-Allows you to view the...

User Guide
Page 159
The TOSHIBA Zooming Utility Properties screen appears. (Sample Illustration) TOSHIBA Zooming Utility Properties screen You may select all applications or any subset of TOSHIBA Assist. 159 TOSHIBA Zooming Utility TOSHIBA Zooming Utility This utility allows you to select which applications will work with the zoom in/out hot keys (see "Zooming applications in/ out" on ...
The TOSHIBA Zooming Utility Properties screen appears. (Sample Illustration) TOSHIBA Zooming Utility Properties screen You may select all applications or any subset of TOSHIBA Assist. 159 TOSHIBA Zooming Utility TOSHIBA Zooming Utility This utility allows you to select which applications will work with the zoom in/out hot keys (see "Zooming applications in/ out" on ...


