User Guide
Page 45
... can be installed in minor bodily injury. Allow the module(s) to cool to follow these directions could result in the memory module slots on page 42. You will need a small Phillips screwdriver for the first time you use complex software or process large amounts of...run most of the computer. Your computer comes with your system or visit accessories.toshiba.com. NOTE Before adding external devices or memory, Toshiba recommends setting up your software. If the computer has been running recently, the memory module(s) may also be hot. The surrounding area may be hot. After ...
... can be installed in minor bodily injury. Allow the module(s) to cool to follow these directions could result in the memory module slots on page 42. You will need a small Phillips screwdriver for the first time you use complex software or process large amounts of...run most of the computer. Your computer comes with your system or visit accessories.toshiba.com. NOTE Before adding external devices or memory, Toshiba recommends setting up your software. If the computer has been running recently, the memory module(s) may also be hot. The surrounding area may be hot. After ...
User Guide
Page 46
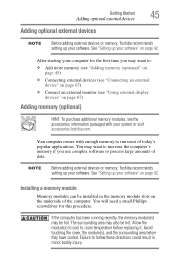
The computer has two memory slots-Slot A and Slot B. If you may damage the computer, the module, or both. Pressing the power button before shutting down option Power button Before you install or remove a memory module, turn off . If you to lose your pointer over the upper or lower right ... 2 When the Windows® Charms appear, click the Settings ( ) Charm. Slot B is the bottom slot. If only one or two memory modules. otherwise, skip to be installed, it must be lost. You can install one memory module is to step 5. 1 From the Start or Desktop screen, move your...
The computer has two memory slots-Slot A and Slot B. If you may damage the computer, the module, or both. Pressing the power button before shutting down option Power button Before you install or remove a memory module, turn off . If you to lose your pointer over the upper or lower right ... 2 When the Windows® Charms appear, click the Settings ( ) Charm. Slot B is the bottom slot. If only one or two memory modules. otherwise, skip to be installed, it must be lost. You can install one memory module is to step 5. 1 From the Start or Desktop screen, move your...
User Guide
Page 47
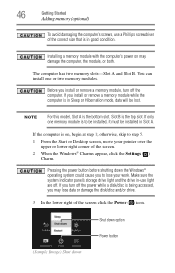
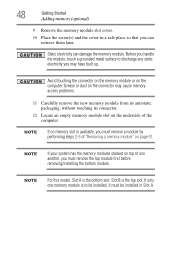
...on and data in Sleep or Hibernation mode. Do not try to prevent scratching the top cover of computer (Sample Illustration) Removing the memory module slot cover The computer could hang up the next time you turn it on the cloth. 7 Remove the main battery. For information on ..., see "Removing the battery from the computer" on . NOTE To locate your memory module slot cover please refer to the computer, including the AC adaptor. Do not remove the memory module while the computer is in memory will not be lost. The computer closes all open applications, shuts down option....
...on and data in Sleep or Hibernation mode. Do not try to prevent scratching the top cover of computer (Sample Illustration) Removing the memory module slot cover The computer could hang up the next time you turn it on the cloth. 7 Remove the main battery. For information on ..., see "Removing the battery from the computer" on . NOTE To locate your memory module slot cover please refer to the computer, including the AC adaptor. Do not remove the memory module while the computer is in memory will not be lost. The computer closes all open applications, shuts down option....
User Guide
Page 48
... 2-3 of "Removing a memory module" on the underside of one memory module is available, you must be installed in a safe place so that you can damage the memory module. NOTE If no memory slot is to discharge any static electricity you may cause memory access problems. 11 Carefully ...remove the new memory module from its antistatic packaging, without touching its connector. 12 Locate an empty memory module slot on page 51. NOTE...
... 2-3 of "Removing a memory module" on the underside of one memory module is available, you must be installed in a safe place so that you can damage the memory module. NOTE If no memory slot is to discharge any static electricity you may cause memory access problems. 11 Carefully ...remove the new memory module from its antistatic packaging, without touching its connector. 12 Locate an empty memory module slot on page 51. NOTE...
User Guide
Page 49
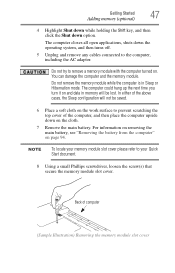
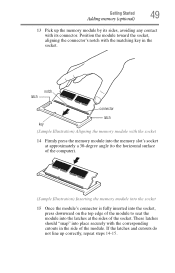
...latch connector latch key (Sample Illustration) Aligning the memory module with the matching key in the side of the socket. Position the module toward the socket, aligning the connector's notch with the socket 14 Firmly press the memory module into the memory slot's socket at the sides of the module. ...If the latches and cutouts do not line up the memory module by its sides, avoiding any contact with the corresponding cutouts in the ...
...latch connector latch key (Sample Illustration) Aligning the memory module with the matching key in the side of the socket. Position the module toward the socket, aligning the connector's notch with the socket 14 Firmly press the memory module into the memory slot's socket at the sides of the module. ...If the latches and cutouts do not line up the memory module by its sides, avoiding any contact with the corresponding cutouts in the ...
User Guide
Page 50
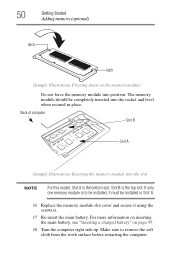
... before restarting the computer. Back of computer Slot B Slot A (Sample Illustration) Inserting the memory module into position. Make sure to be installed, it using the screw(s). 17 Re-insert the main battery. 50 Getting Started Adding memory (optional) latch latch (Sample Illustration) Pressing... see "Inserting a charged battery" on the memory module Do not force the memory module into the slot NOTE For this model, Slot A is the bottom slot. The memory module should be installed in Slot A. 16 Replace the memory module slot cover and secure it must be completely inserted ...
... before restarting the computer. Back of computer Slot B Slot A (Sample Illustration) Inserting the memory module into position. Make sure to be installed, it using the screw(s). 17 Re-insert the main battery. 50 Getting Started Adding memory (optional) latch latch (Sample Illustration) Pressing... see "Inserting a charged battery" on the memory module Do not force the memory module into the slot NOTE For this model, Slot A is the bottom slot. The memory module should be installed in Slot A. 16 Replace the memory module slot cover and secure it must be completely inserted ...
User Guide
Page 51
...the computer and open the memory module slot cover. You can verify that the computer has recognized it correctly as an electric blanket or heater. ❖ Never cover or block the air vents including those located at the underside of the computer. Removing a memory module If you need to... remove a memory module: 1 Complete steps 1-10 ...
...the computer and open the memory module slot cover. You can verify that the computer has recognized it correctly as an electric blanket or heater. ❖ Never cover or block the air vents including those located at the underside of the computer. Removing a memory module If you need to... remove a memory module: 1 Complete steps 1-10 ...
User Guide
Page 52
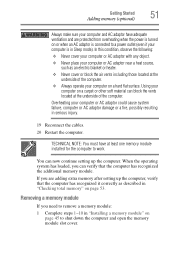
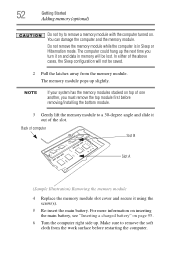
... up the next time you must remove the top module first before restarting the computer. Back of computer Slot B Slot A (Sample Illustration) Removing the memory module 4 Replace the memory module slot cover and secure it on . The memory module pops up . For more information on inserting the main battery, see "Inserting a charged battery" on page 95...
... up the next time you must remove the top module first before restarting the computer. Back of computer Slot B Slot A (Sample Illustration) Removing the memory module 4 Replace the memory module slot cover and secure it on . The memory module pops up . For more information on inserting the main battery, see "Inserting a charged battery" on page 95...
User Guide
Page 53
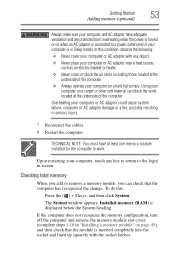
... is turned on page 45), and then check that the computer has recognized the change. If the computer does not recognize the memory configuration, turn off the computer and remove the memory module slot cover (complete steps 1-10 in screen. In this : Press the ( ) + X keys, and then click System. Getting Started 53 Adding...
... is turned on page 45), and then check that the computer has recognized the change. If the computer does not recognize the memory configuration, turn off the computer and remove the memory module slot cover (complete steps 1-10 in screen. In this : Press the ( ) + X keys, and then click System. Getting Started 53 Adding...
User Guide
Page 109
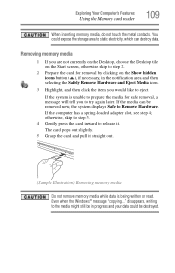
...-loaded adapter slot, see step 4; disappears, writing to the media might still be in the notification area and then selecting the Safely Remove Hardware and Eject Media icon. 3 Highlight, and then click the item you to Remove Hardware. Exploring Your Computer's Features Using the Memory card reader ... to eject. otherwise, skip to step 5. 4 Gently press the card inward to release it straight out. (Sample Illustration) Removing memory media Do not remove memory media while data is unable to prepare the media for removal by clicking on the Start screen, otherwise skip to step 2. 2 ...
...-loaded adapter slot, see step 4; disappears, writing to the media might still be in the notification area and then selecting the Safely Remove Hardware and Eject Media icon. 3 Highlight, and then click the item you to Remove Hardware. Exploring Your Computer's Features Using the Memory card reader ... to eject. otherwise, skip to step 5. 4 Gently press the card inward to release it straight out. (Sample Illustration) Removing memory media Do not remove memory media while data is unable to prepare the media for removal by clicking on the Start screen, otherwise skip to step 2. 2 ...
User Guide
Page 137
...light still does not come on when you think this model, Slot A is the top slot. The battery may not be installed in the computer. NOTE For this is working properly by the memory module. If only one memory module installed for the error again. TECHNICAL NOTE: You must ...the computer. For example, a faulty AC adaptor or power cord/cable will not charge. If removing the memory module eliminates the error, the memory module may be faulty. Slot B is the bottom slot. See "Removing the battery from the system batteries (battery and real-time clock (RTC) battery). If ...
...light still does not come on when you think this model, Slot A is the top slot. The battery may not be installed in the computer. NOTE For this is working properly by the memory module. If only one memory module installed for the error again. TECHNICAL NOTE: You must ...the computer. For example, a faulty AC adaptor or power cord/cable will not charge. If removing the memory module eliminates the error, the memory module may be faulty. Slot B is the bottom slot. See "Removing the battery from the system batteries (battery and real-time clock (RTC) battery). If ...
User Guide
Page 180
...previous track button 80 using 80 volume increase/decrease buttons 80 memory adding (optional) 45 check total memory 53 removing memory module slot cover 47 Memory card reader inserting memory media 108 removing memory media 109 using 108 memory module installation 45 inserting into socket 49 removing 51, 52 ...accessing 105 connecting your computer 105 networking wireless 105 notification area 103 notifications 104 O ON/OFF indicator light 89 online resources Toshiba 83 optical disc Auto-Run feature 81 handling 80 inserting 80 playing optical media 81 positioning 80 recording optical media 82 ...
...previous track button 80 using 80 volume increase/decrease buttons 80 memory adding (optional) 45 check total memory 53 removing memory module slot cover 47 Memory card reader inserting memory media 108 removing memory media 109 using 108 memory module installation 45 inserting into socket 49 removing 51, 52 ...accessing 105 connecting your computer 105 networking wireless 105 notification area 103 notifications 104 O ON/OFF indicator light 89 online resources Toshiba 83 optical disc Auto-Run feature 81 handling 80 inserting 80 playing optical media 81 positioning 80 recording optical media 82 ...
User Guide
Page 181
...optimum performance 86 power plans selecting power plan options 92 power saving options 91 precautions safety 35 printer troubleshooting 144 problem solving contacting Toshiba 154 Startup options 132 projector connecting 68 R real-time clock (RTC) battery 85 recording sounds 106 recovery creating recovery media 55...42 removing an optical disc with computer on 81 and optical disc with computer off 82 battery from the computer 94 memory module 51 memory module slot cover 47 restart computer 43 restore points troubleshooting 149 running computer on battery power 84 S safety computer 99 disposing of...
...optimum performance 86 power plans selecting power plan options 92 power saving options 91 precautions safety 35 printer troubleshooting 144 problem solving contacting Toshiba 154 Startup options 132 projector connecting 68 R real-time clock (RTC) battery 85 recording sounds 106 recovery creating recovery media 55...42 removing an optical disc with computer on 81 and optical disc with computer off 82 battery from the computer 94 memory module 51 memory module slot cover 47 restart computer 43 restore points troubleshooting 149 running computer on battery power 84 S safety computer 99 disposing of...


