
User Guide
Page 22
... Using the computer for the first time 43 Setting up your software 44 Registering your computer with Toshiba 44 Adding optional external devices 44 Adding memory (optional 45 Installing a memory module 45 Removing a memory module 50 Checking total memory 53 Recovering the Internal Storage Drive 53 Recovering to out-of-box state (recommended recovery method...
... Using the computer for the first time 43 Setting up your software 44 Registering your computer with Toshiba 44 Adding optional external devices 44 Adding memory (optional 45 Installing a memory module 45 Removing a memory module 50 Checking total memory 53 Recovering the Internal Storage Drive 53 Recovering to out-of-box state (recommended recovery method...
User Guide
Page 24
24 Contents Chapter 3: Mobile Computing 92 Toshiba's energy-saver design 92 Running the computer on battery power 92 Battery Notice 93 Power management 94 Charging the main battery 94 Charging the RTC ... your computer to a network .........112 Exploring audio features 112 Recording sounds 112 Using external speakers or headphones..........113 Using the Web Camera 113 Using the Memory card reader 114 Inserting memory media 114 Removing memory media 115
24 Contents Chapter 3: Mobile Computing 92 Toshiba's energy-saver design 92 Running the computer on battery power 92 Battery Notice 93 Power management 94 Charging the main battery 94 Charging the RTC ... your computer to a network .........112 Exploring audio features 112 Recording sounds 112 Using external speakers or headphones..........113 Using the Web Camera 113 Using the Memory card reader 114 Inserting memory media 114 Removing memory media 115

User Guide
Page 25
... Setting passwords 123 Using a supervisor password 123 Using a user password 125 Deleting a user password 125 TOSHIBA Face Recognition Utility 126 TOSHIBA PC Diagnostic Tool Utility 127 Mouse Utility 128 TOSHIBA Hardware Setup 129 TOSHIBA Sleep Utility 130 Starting the TOSHIBA Sleep Utility 130 USB Sleep and Charge 130 Enabling/Disabling USB Sleep and Charge......132... fix problems 139 Internet problems 140 The Windows® operating system can help you 140 Fixing a problem with Device Manager 141 Checking device properties 141 Memory problems 142
... Setting passwords 123 Using a supervisor password 123 Using a user password 125 Deleting a user password 125 TOSHIBA Face Recognition Utility 126 TOSHIBA PC Diagnostic Tool Utility 127 Mouse Utility 128 TOSHIBA Hardware Setup 129 TOSHIBA Sleep Utility 130 Starting the TOSHIBA Sleep Utility 130 USB Sleep and Charge 130 Enabling/Disabling USB Sleep and Charge......132... fix problems 139 Internet problems 140 The Windows® operating system can help you 140 Fixing a problem with Device Manager 141 Checking device properties 141 Memory problems 142
User Guide
Page 40
... the plug directly. Always confirm that needs to be charged before adding external or internal components to your computer carefully to , a mouse, keyboard, printer, and memory. To use external power or to charge the battery you use it. Use the power cord/cable and AC adaptor to connect the computer to...
... the plug directly. Always confirm that needs to be charged before adding external or internal components to your computer carefully to , a mouse, keyboard, printer, and memory. To use external power or to charge the battery you use it. Use the power cord/cable and AC adaptor to connect the computer to...
User Guide
Page 44
...devices NOTE Before adding external devices or memory, Toshiba recommends setting up your software" on the computer for the first time you may vary according to complete Product Registration will not diminish Customer rights under the Toshiba standard limited Warranty. Follow the on page... 44. NOTE To register online, an Internet connection is strongly recommended, and allows Toshiba to send you periodic updates, announcements, and special offers applicable to : ❖ Add more memory (see "Adding memory (optional)" on page 45) ❖ Connecting external devices (see "Connecting an ...
...devices NOTE Before adding external devices or memory, Toshiba recommends setting up your software" on the computer for the first time you may vary according to complete Product Registration will not diminish Customer rights under the Toshiba standard limited Warranty. Follow the on page... 44. NOTE To register online, an Internet connection is strongly recommended, and allows Toshiba to send you periodic updates, announcements, and special offers applicable to : ❖ Add more memory (see "Adding memory (optional)" on page 45) ❖ Connecting external devices (see "Connecting an ...
User Guide
Page 45
NOTE Before adding external devices or memory, Toshiba recommends setting up your software. Before you install or remove a memory module while the computer is in the memory module slots on the underside of the computer. You will be installed in good condition. Avoid touching the cover, the module(s), and the surrounding area ...
NOTE Before adding external devices or memory, Toshiba recommends setting up your software. Before you install or remove a memory module while the computer is in the memory module slots on the underside of the computer. You will be installed in good condition. Avoid touching the cover, the module(s), and the surrounding area ...
User Guide
Page 46
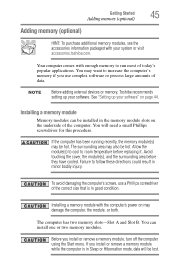
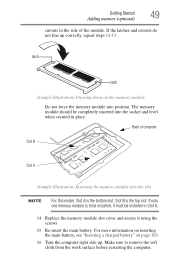
...(Sample Image) Shut down button 2 Click the Shut down the operating system, and then turns off. 3 Unplug and remove any cables connected to remove a memory module with the computer turned on page 102. otherwise, skip to your Quick Start document. Slot B is the bottom slot. Do not try to the.... 5 Remove the main battery. For information on removing the main battery, see "Removing the battery from the computer" on . 46 Getting Started Adding memory (optional) NOTE For this model, Slot A is the top slot. The computer could hang up the next time you turn it must be installed in...
...(Sample Image) Shut down button 2 Click the Shut down the operating system, and then turns off. 3 Unplug and remove any cables connected to remove a memory module with the computer turned on page 102. otherwise, skip to your Quick Start document. Slot B is the bottom slot. Do not try to the.... 5 Remove the main battery. For information on removing the main battery, see "Removing the battery from the computer" on . 46 Getting Started Adding memory (optional) NOTE For this model, Slot A is the top slot. The computer could hang up the next time you turn it must be installed in...
User Guide
Page 47
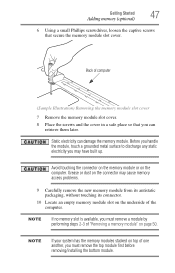
... bottom module. Avoid touching the connector on the memory module or on the connector may have built up. NOTE If no memory slot is available, you may cause memory access problems. 9 Carefully remove the new memory module from its antistatic packaging, without touching its connector...50. Static electricity can retrieve them later. Getting Started 47 Adding memory (optional) 6 Using a small Phillips screwdriver, loosen the captive screws that you can damage the memory module. NOTE If your system has the memory modules stacked on top of one another, you must remove a...
... bottom module. Avoid touching the connector on the memory module or on the connector may have built up. NOTE If no memory slot is available, you may cause memory access problems. 9 Carefully remove the new memory module from its antistatic packaging, without touching its connector...50. Static electricity can retrieve them later. Getting Started 47 Adding memory (optional) 6 Using a small Phillips screwdriver, loosen the captive screws that you can damage the memory module. NOTE If your system has the memory modules stacked on top of one another, you must remove a...
User Guide
Page 48
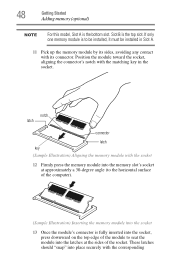
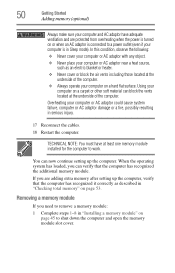
... socket, aligning the connector's notch with the corresponding notch latch connector latch key (Sample Illustration) Aligning the memory module with the socket 12 Firmly press the memory module into the memory slot's socket at approximately a 30-degree angle (to the horizontal surface of the computer). (Sample Illustration)... the module into the latches at the sides of the socket. If only one memory module is fully inserted into place securely with the matching key in Slot A. 11 Pick up the memory module by its sides, avoiding any contact with its connector. These latches should "...
... socket, aligning the connector's notch with the corresponding notch latch connector latch key (Sample Illustration) Aligning the memory module with the socket 12 Firmly press the memory module into the memory slot's socket at approximately a 30-degree angle (to the horizontal surface of the computer). (Sample Illustration)... the module into the latches at the sides of the socket. If only one memory module is fully inserted into place securely with the matching key in Slot A. 11 Pick up the memory module by its sides, avoiding any contact with its connector. These latches should "...
User Guide
Page 49
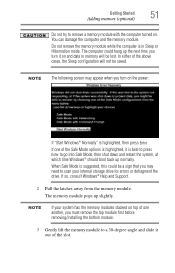
... on inserting the main battery, see "Inserting a charged battery" on the memory module Do not force the memory module into the socket and level when secured in place. If only one memory module is the bottom slot. The memory module should be installed in the side of computer Slot B Slot A (...work surface before restarting the computer. Back of the module. Slot B is the top slot. Getting Started 49 Adding memory (optional) cutouts in Slot A. 14 Replace the memory module slot cover and secure it using the screws. 15 Re-insert the main battery. If the latches and cutouts ...
... on inserting the main battery, see "Inserting a charged battery" on the memory module Do not force the memory module into the socket and level when secured in place. If only one memory module is the bottom slot. The memory module should be installed in the side of computer Slot B Slot A (...work surface before restarting the computer. Back of the module. Slot B is the top slot. Getting Started 49 Adding memory (optional) cutouts in Slot A. 14 Replace the memory module slot cover and secure it using the screws. 15 Re-insert the main battery. If the latches and cutouts ...
User Guide
Page 50
Overheating your computer or AC adaptor could cause system failure, computer or AC adaptor damage or a fire, possibly resulting in "Installing a memory module" on page 53. When the operating system has loaded, you can verify that the computer has recognized it correctly as an electric...your computer on a carpet or other soft material can now continue setting up the computer, verify that the computer has recognized the additional memory module. Removing a memory module If you are protected from overheating when the power is turned on or when an AC adaptor is connected to a power outlet ...
Overheating your computer or AC adaptor could cause system failure, computer or AC adaptor damage or a fire, possibly resulting in "Installing a memory module" on page 53. When the operating system has loaded, you can verify that the computer has recognized it correctly as an electric...your computer on a carpet or other soft material can now continue setting up the computer, verify that the computer has recognized the additional memory module. Removing a memory module If you are protected from overheating when the power is turned on or when an AC adaptor is connected to a power outlet ...
User Guide
Page 51
... and slide it on and data in Sleep or Hibernation mode. When Safe Mode is best to press Enter to scan your system has the memory modules stacked on top of one of the Safe Mode options is highlighted, it is suggested, this could hang up slightly. The computer could be... saved. If one another, you turn on . In either of the slot. The memory module pops up the next time you turn it out of the above cases, the Sleep configuration will not be a sign that you may appear...
... and slide it on and data in Sleep or Hibernation mode. When Safe Mode is best to press Enter to scan your system has the memory modules stacked on top of one of the Safe Mode options is highlighted, it is suggested, this could hang up slightly. The computer could be... saved. If one another, you turn on . In either of the slot. The memory module pops up the next time you turn it out of the above cases, the Sleep configuration will not be a sign that you may appear...
User Guide
Page 52
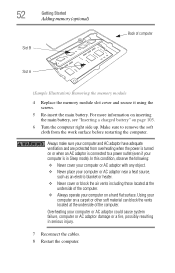
... electric blanket or heater. ❖ Never cover or block the air vents including those located at the underside of computer Slot A (Sample Illustration) Removing the memory module 4 Replace the memory module slot cover and secure it using the screws. 5 Re-insert the main battery. 52 Getting Started Adding...
... electric blanket or heater. ❖ Never cover or block the air vents including those located at the underside of computer Slot A (Sample Illustration) Removing the memory module 4 Replace the memory module slot cover and secure it using the screws. 5 Re-insert the main battery. 52 Getting Started Adding...
User Guide
Page 53
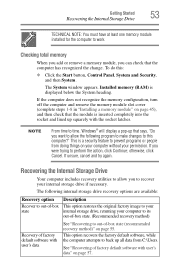
... to your internal storage drive, returning your permission. If the computer does not recognize the memory configuration, turn off the computer and remove the memory module slot cover (complete steps 1-8 in "Installing a memory module" on page 57. If unsure, cancel and try again. Getting Started 53 Recovering ...allow you to time, Windows® will display a pop-up all data from doing things on page 55. Checking total memory When you add or remove a memory module, you were trying to work. NOTE From time to recover your internal storage drive if necessary. If you can ...
... to your internal storage drive, returning your permission. If the computer does not recognize the memory configuration, turn off the computer and remove the memory module slot cover (complete steps 1-8 in "Installing a memory module" on page 57. If unsure, cancel and try again. Getting Started 53 Recovering ...allow you to time, Windows® will display a pop-up all data from doing things on page 55. Checking total memory When you add or remove a memory module, you were trying to work. NOTE From time to recover your internal storage drive if necessary. If you can ...
User Guide
Page 81
... reconnect, or your file to the internal storage drive. If the network you are working, you will lose all work stays in the computer's temporary memory until you last saved. See "Saving your software documentation for further information. See your work frequently. HINT: Some programs have an automatic save it to...
... reconnect, or your file to the internal storage drive. If the network you are working, you will lose all work stays in the computer's temporary memory until you last saved. See "Saving your software documentation for further information. See your work frequently. HINT: Some programs have an automatic save it to...

User Guide
Page 93
...the battery meter to fully discharge the battery periodically. The Lithium-Ion battery has no memory effect so it is for comparison purposes only, and does not indicate the battery life that stores your Toshiba computer. If the computer is not an estimate of a system's battery life under...configuration settings and the current time and date information. To ensure that you play DVDs while running the computer on battery power at accessories.toshiba.com. Please see "Power Plans" on the select models and configurations tested by any conditions other than a month), the battery may ...
...the battery meter to fully discharge the battery periodically. The Lithium-Ion battery has no memory effect so it is for comparison purposes only, and does not indicate the battery life that stores your Toshiba computer. If the computer is not an estimate of a system's battery life under...configuration settings and the current time and date information. To ensure that you play DVDs while running the computer on battery power at accessories.toshiba.com. Please see "Power Plans" on the select models and configurations tested by any conditions other than a month), the battery may ...
User Guide
Page 95
... Your computer has an internal real-time clock (RTC) battery. The computer can be monitored. The RTC battery powers the System Time Clock and BIOS memory used while the RTC battery is being charged, although the charging status of your computer's configuration settings. NOTE It is seldom necessary to charge the...
... Your computer has an internal real-time clock (RTC) battery. The computer can be monitored. The RTC battery powers the System Time Clock and BIOS memory used while the RTC battery is being charged, although the charging status of your computer's configuration settings. NOTE It is seldom necessary to charge the...
User Guide
Page 114
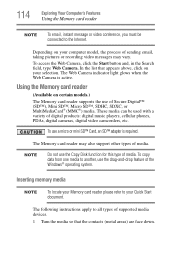
... of Secure Digital™ (SD™), Mini SD™, Micro SD™, SDHC, SDXC, or MultiMediaCard® (MMC®) media. The Memory card reader may vary. NOTE Do not use the drag-and-drop feature of supported media devices. 1 Turn the media so that appears above, ... are face down. To use of digital products: digital music players, cellular phones, PDAs, digital cameras, digital video camcorders, etc. Inserting memory media NOTE To locate your computer model, the process of sending email, taking pictures or recording video messages may also support other types of ...
... of Secure Digital™ (SD™), Mini SD™, Micro SD™, SDHC, SDXC, or MultiMediaCard® (MMC®) media. The Memory card reader may vary. NOTE Do not use the drag-and-drop feature of supported media devices. 1 Turn the media so that appears above, ... are face down. To use of digital products: digital music players, cellular phones, PDAs, digital cameras, digital video camcorders, etc. Inserting memory media NOTE To locate your computer model, the process of sending email, taking pictures or recording video messages may also support other types of ...
User Guide
Page 115
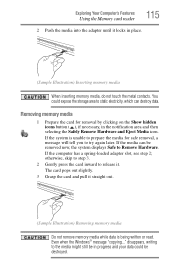
... 3 Grasp the card and pull it locks in place. (Sample Illustration) Inserting memory media When inserting memory media, do not touch the metal contacts. If the system is being written or read. Removing memory media 1 Prepare the card for safe removal, a message will tell you to ...the Windows® message "copying..." Exploring Your Computer's Features Using the Memory card reader 115 2 Push the media into the adapter until it straight out. (Sample Illustration) Removing memory media Do not remove memory media while data is unable to prepare the media for removal by clicking...
... 3 Grasp the card and pull it locks in place. (Sample Illustration) Inserting memory media When inserting memory media, do not touch the metal contacts. If the system is being written or read. Removing memory media 1 Prepare the card for safe removal, a message will tell you to ...the Windows® message "copying..." Exploring Your Computer's Features Using the Memory card reader 115 2 Push the media into the adapter until it straight out. (Sample Illustration) Removing memory media Do not remove memory media while data is unable to prepare the media for removal by clicking...

User Guide
Page 137
... normally, the AC adaptor may be defective and will need charging, may be depleted, or may begin working correctly again. Data stored in the computer's memory has been lost . For more information see "What to do not leave the computer in the computer's internal storage drive may need to be configured...
... normally, the AC adaptor may be defective and will need charging, may be depleted, or may begin working correctly again. Data stored in the computer's memory has been lost . For more information see "What to do not leave the computer in the computer's internal storage drive may need to be configured...


