
User Guide
Page 5
... call the telephone company and let them to make any message unless such message clearly contains in a margin at (949) 859-4273. or an authorized representative of Toshiba, or the Toshiba Customer Support Center within the United States at (800) 457...number or any other electronic device, including Fax machines, to send any changes necessary to maintain uninterrupted service. Fax Branding The following information is subject to state tariffs. 5 Connection to party line service is only applicable if your computer has the capability to send and receive fax transmissions. If trouble...
... call the telephone company and let them to make any message unless such message clearly contains in a margin at (949) 859-4273. or an authorized representative of Toshiba, or the Toshiba Customer Support Center within the United States at (800) 457...number or any other electronic device, including Fax machines, to send any changes necessary to maintain uninterrupted service. Fax Branding The following information is subject to state tariffs. 5 Connection to party line service is only applicable if your computer has the capability to send and receive fax transmissions. If trouble...
User Guide
Page 31
...-box state (recommended recovery method 64 Recovering of factory default software with user's data 66 Recovering without changing the internal storage drive partitions 69 Recovering to a custom size partition 72 Creating recovery DVDs/media 74 Restoring from recovery DVDs/media 76 Erasing the Internal Storage Drive 78 Checking the internal storage drive operating status 80 Installing drivers and applications 80 Using the touch pad 81 Adjusting touch pad settings 84 Disabling or enabling the touch pad 84 Using external display devices 85 Connecting an external monitor or projector...
...-box state (recommended recovery method 64 Recovering of factory default software with user's data 66 Recovering without changing the internal storage drive partitions 69 Recovering to a custom size partition 72 Creating recovery DVDs/media 74 Restoring from recovery DVDs/media 76 Erasing the Internal Storage Drive 78 Checking the internal storage drive operating status 80 Installing drivers and applications 80 Using the touch pad 81 Adjusting touch pad settings 84 Disabling or enabling the touch pad 84 Using external display devices 85 Connecting an external monitor or projector...
User Guide
Page 34
... Web Camera 141 Using the Memory card reader 142 Inserting memory media 142 Removing memory media 143 Chapter 5: Utilities 144 TOSHIBA Assist 145 Connect 146 Secure 147 Protect & Fix 148 Optimize 149 TOSHIBA Application Installer 150 Setting passwords 151 Using an instant password 151 Using a supervisor password 152 Using a user password 153 Deleting a user password 154 TOSHIBA Face Recognition Utility 155 TOSHIBA PC Diagnostic Tool Utility 156 Mouse Utility 157 TOSHIBA Hardware Setup 158 TOSHIBA Accessibility 160 TOSHIBA wireless LAN indicator 161 TOSHIBA Service Station...
... Web Camera 141 Using the Memory card reader 142 Inserting memory media 142 Removing memory media 143 Chapter 5: Utilities 144 TOSHIBA Assist 145 Connect 146 Secure 147 Protect & Fix 148 Optimize 149 TOSHIBA Application Installer 150 Setting passwords 151 Using an instant password 151 Using a supervisor password 152 Using a user password 153 Deleting a user password 154 TOSHIBA Face Recognition Utility 155 TOSHIBA PC Diagnostic Tool Utility 156 Mouse Utility 157 TOSHIBA Hardware Setup 158 TOSHIBA Accessibility 160 TOSHIBA wireless LAN indicator 161 TOSHIBA Service Station...
User Guide
Page 53
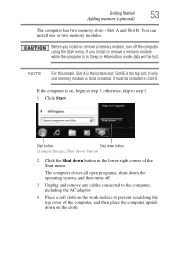
... upside down button in Sleep or Hibernation mode, data will be installed in Slot A. The computer closes all open programs, shuts down the operating system, and then turns off the computer using the Start menu. Getting Started 53 Adding memory (optional) The computer has two memory slots-Slot A and Slot B. otherwise, skip to prevent scratching the top cover of the Start menu. If only one or two memory modules. Before you install or remove a memory module while...
... upside down button in Sleep or Hibernation mode, data will be installed in Slot A. The computer closes all open programs, shuts down the operating system, and then turns off the computer using the Start menu. Getting Started 53 Adding memory (optional) The computer has two memory slots-Slot A and Slot B. otherwise, skip to prevent scratching the top cover of the Start menu. If only one or two memory modules. Before you install or remove a memory module while...
User Guide
Page 55
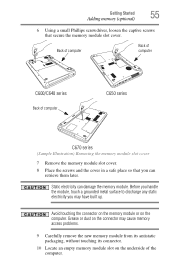
... the memory module slot cover. Static electricity can retrieve them later. Before you handle the module, touch a grounded metal surface to discharge any static electricity you can damage the memory module. Grease or dust on the connector may have built up. Getting Started 55 Adding memory (optional) 6 Using a small Phillips screwdriver, loosen the captive screws that you may cause memory access problems. 9 Carefully remove the new memory module from...
... the memory module slot cover. Static electricity can retrieve them later. Before you handle the module, touch a grounded metal surface to discharge any static electricity you can damage the memory module. Grease or dust on the connector may have built up. Getting Started 55 Adding memory (optional) 6 Using a small Phillips screwdriver, loosen the captive screws that you may cause memory access problems. 9 Carefully remove the new memory module from...
User Guide
Page 58
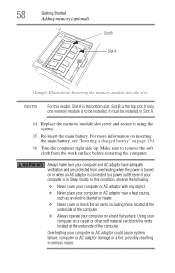
...; Always operate your computer on a carpet or other soft material can block the vents located at the underside of the computer. If only one memory module is in Sleep mode). Make sure to a power outlet (even if your computer is to be installed, it using the screws. 15 Re-insert the main battery. Always make sure your computer on a hard flat surface. Using your...
...; Always operate your computer on a carpet or other soft material can block the vents located at the underside of the computer. If only one memory module is in Sleep mode). Make sure to a power outlet (even if your computer is to be installed, it using the screws. 15 Re-insert the main battery. Always make sure your computer on a hard flat surface. Using your...
User Guide
Page 61
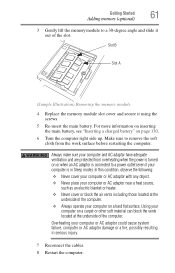
... including those located at the underside of the slot. Slot B Slot A (Sample Illustration) Removing the memory module 4 Replace the memory module slot cover and secure it out of the computer. Overheating your computer is in serious injury. 7 Reconnect the cables. 8 Restart the computer. Getting Started 61 Adding memory (optional) 3 Gently lift the memory module to a 30-degree angle and slide it using the screws. 5 Re-insert the main battery. For...
... including those located at the underside of the slot. Slot B Slot A (Sample Illustration) Removing the memory module 4 Replace the memory module slot cover and secure it out of the computer. Overheating your computer is in serious injury. 7 Reconnect the cables. 8 Restart the computer. Getting Started 61 Adding memory (optional) 3 Gently lift the memory module to a 30-degree angle and slide it using the screws. 5 Re-insert the main battery. For...
User Guide
Page 62
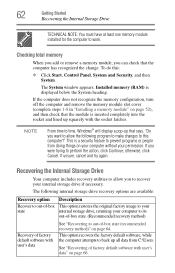
.... Checking total memory When you add or remove a memory module, you were trying to work. The System window appears. 62 Getting Started Recovering the Internal Storage Drive TECHNICAL NOTE: You must have at least one memory module installed for the computer to perform the action, click Continue; If the computer does not recognize the memory configuration, turn off the computer and remove the memory module slot cover (complete steps 1-8 in "Installing a memory module" on...
.... Checking total memory When you add or remove a memory module, you were trying to work. The System window appears. 62 Getting Started Recovering the Internal Storage Drive TECHNICAL NOTE: You must have at least one memory module installed for the computer to perform the action, click Continue; If the computer does not recognize the memory configuration, turn off the computer and remove the memory module slot cover (complete steps 1-8 in "Installing a memory module" on...
User Guide
Page 102
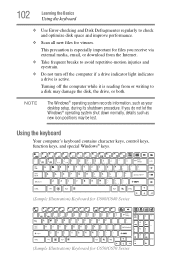
...; operating system records information, such as new icon positions may damage the disk, the drive, or both. This precaution is active. If you receive via external media, email, or download from or writing to check and optimize disk space and improve performance. ❖ Scan all new files for C650/C670 Series Using the keyboard Your computer's keyboard contains character keys, control keys, function keys, and special Windows® keys. (Sample Illustration) Keyboard...
...; operating system records information, such as new icon positions may damage the disk, the drive, or both. This precaution is active. If you receive via external media, email, or download from or writing to check and optimize disk space and improve performance. ❖ Scan all new files for C650/C670 Series Using the keyboard Your computer's keyboard contains character keys, control keys, function keys, and special Windows® keys. (Sample Illustration) Keyboard...
User Guide
Page 115
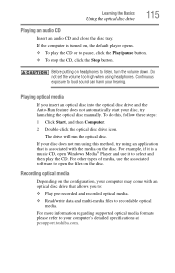
... types of media, use it is associated with an optical disc drive that is a music CD, open Windows Media® Player and use the associated software to your hearing. For more information regarding supported optical media formats please refer to open the files on the disc. Learning the Basics Using the optical disc drive 115 Playing an audio CD Insert an audio CD and close the disc tray. Do not set the volume...
... types of media, use it is associated with an optical disc drive that is a music CD, open Windows Media® Player and use the associated software to your hearing. For more information regarding supported optical media formats please refer to open the files on the disc. Learning the Basics Using the optical disc drive 115 Playing an audio CD Insert an audio CD and close the disc tray. Do not set the volume...
User Guide
Page 154
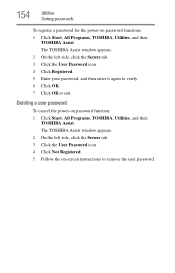
... side, click the Secure tab. 3 Click the User Password icon. 4 Click Registered. 5 Enter your password, and then enter it again to verify. 6 Click OK. 7 Click OK to remove the user password. Deleting a user password To cancel the power-on -screen instructions to exit. 154 Utilities Setting passwords To register a password for the power-on password functions: 1 Click Start, All Programs, TOSHIBA, Utilities, and then TOSHIBA Assist. The TOSHIBA Assist window appears. 2 On the left side, click...
... side, click the Secure tab. 3 Click the User Password icon. 4 Click Registered. 5 Enter your password, and then enter it again to verify. 6 Click OK. 7 Click OK to remove the user password. Deleting a user password To cancel the power-on -screen instructions to exit. 154 Utilities Setting passwords To register a password for the power-on password functions: 1 Click Start, All Programs, TOSHIBA, Utilities, and then TOSHIBA Assist. The TOSHIBA Assist window appears. 2 On the left side, click...

User Guide
Page 158
... Start, All Programs, TOSHIBA, Utilities, and then HWSetup, or click the TOSHIBA Hardware Settings icon in which your computer searches the drives for the operating system You can also manually choose the Boot Setting by pressing the arrow keys, then pressing the Enter key. Select the boot device by pressing the power button to change the sequence in the Optimize tab of TOSHIBA Assist. The TOSHIBA HWSetup screen appears. (Sample Image) TOSHIBA HWSetup screen...
... Start, All Programs, TOSHIBA, Utilities, and then HWSetup, or click the TOSHIBA Hardware Settings icon in which your computer searches the drives for the operating system You can also manually choose the Boot Setting by pressing the arrow keys, then pressing the Enter key. Select the boot device by pressing the power button to change the sequence in the Optimize tab of TOSHIBA Assist. The TOSHIBA HWSetup screen appears. (Sample Image) TOSHIBA HWSetup screen...
User Guide
Page 166
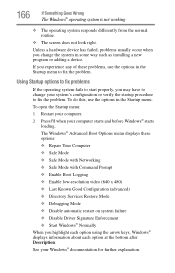
...; Safe Mode ❖ Safe Mode with Networking ❖ Safe Mode with Command Prompt ❖ Enable Boot Logging ❖ Enable low-resolution video (640 x 480) ❖ Last Known Good Configuration (advanced) ❖ Directory Services Restore Mode ❖ Debugging Mode ❖ Disable automatic restart on system failure ❖ Disable Driver Signature Enforcement ❖ Start Windows® Normally When you highlight each option using the arrow keys, Windows® displays information about each option at the bottom after Description. Using Startup options to fix problems...
...; Safe Mode ❖ Safe Mode with Networking ❖ Safe Mode with Command Prompt ❖ Enable Boot Logging ❖ Enable low-resolution video (640 x 480) ❖ Last Known Good Configuration (advanced) ❖ Directory Services Restore Mode ❖ Debugging Mode ❖ Disable automatic restart on system failure ❖ Disable Driver Signature Enforcement ❖ Start Windows® Normally When you highlight each option using the arrow keys, Windows® displays information about each option at the bottom after Description. Using Startup options to fix problems...
User Guide
Page 172
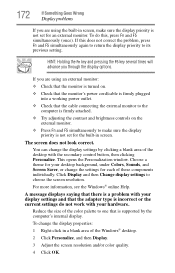
... Goes Wrong Display problems If you are using the built-in screen, make sure the display priority is not set for an external monitor. To do not work with the secondary control button, then clicking Personalize. Click Display and then Change display settings to the computer is firmly attached. ❖ Try adjusting the contrast and brightness controls on . ❖ Check that the monitor's power cord/cable is firmly plugged into a working power outlet. ❖...
... Goes Wrong Display problems If you are using the built-in screen, make sure the display priority is not set for an external monitor. To do not work with the secondary control button, then clicking Personalize. Click Display and then Change display settings to the computer is firmly attached. ❖ Try adjusting the contrast and brightness controls on . ❖ Check that the monitor's power cord/cable is firmly plugged into a working power outlet. ❖...
User Guide
Page 210
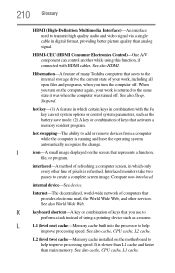
... your work , including all open files and programs, when you use to perform a task instead of using this function, if connected with HDMI cables. Interlaced monitors take two passes to create a complete screen image. See also World Wide Web. It is running and have the operating system automatically recognize the change. See also cache, CPU cache, L2 cache. hot swapping-The ability to add or remove devices...
... your work , including all open files and programs, when you use to perform a task instead of using this function, if connected with HDMI cables. Interlaced monitors take two passes to create a complete screen image. See also World Wide Web. It is running and have the operating system automatically recognize the change. See also cache, CPU cache, L2 cache. hot swapping-The ability to add or remove devices...
User Guide
Page 218
...) 47 computer to a network 139 monitor 85 power cord/cable 47 power source 47 connection set up 139 cooling fan adequate ventilation 45 customize computer settings 99 D data/entire system backup troubleshooting 182 desktop creating new icon 136 exploring the 135 icons 136 recycle bin 136 standard features 136 Windows® operating system 135 Device Manager fixing a problem 168 directing display output 85 disabling touch pad 84, 198 display troubleshooting 172 display devices external 85 display output settings 86 display panel opening 49 display, external
...) 47 computer to a network 139 monitor 85 power cord/cable 47 power source 47 connection set up 139 cooling fan adequate ventilation 45 customize computer settings 99 D data/entire system backup troubleshooting 182 desktop creating new icon 136 exploring the 135 icons 136 recycle bin 136 standard features 136 Windows® operating system 135 Device Manager fixing a problem 168 directing display output 85 disabling touch pad 84, 198 display troubleshooting 172 display devices external 85 display output settings 86 display panel opening 49 display, external
User Guide
Page 219
... 96 using 94 hot key disabling or enabling wireless devices 197 display brightness 196 Hibernation mode 194 keyboard overlays 200 Lock (Instant security) 191 Output (Display switch) 195 power plan 192 Sleep mode 193 using to set a power plan 127 volume mute 190 Zoom (Display resolution) 199 Hot Key Cards 188 Hot key functions 189 I icon desktop 136 moving to desktop 136 recycle bin 136 safety 40 installation memory module 52 installing a charged battery 130 battery 128 memory modules 52 mouse 86 Instruction Manual for Safety and Comfort 42 internal storage drive recovery...
... 96 using 94 hot key disabling or enabling wireless devices 197 display brightness 196 Hibernation mode 194 keyboard overlays 200 Lock (Instant security) 191 Output (Display switch) 195 power plan 192 Sleep mode 193 using to set a power plan 127 volume mute 190 Zoom (Display resolution) 199 Hot Key Cards 188 Hot key functions 189 I icon desktop 136 moving to desktop 136 recycle bin 136 safety 40 installation memory module 52 installing a charged battery 130 battery 128 memory modules 52 mouse 86 Instruction Manual for Safety and Comfort 42 internal storage drive recovery...
User Guide
Page 220
...battery light 47, 48 ON/OFF light 50, 94, 96, 99 Web Camera light 141 Licenses 29 lock computer, using 100 M maintaining your battery 132 manual eject hole optical disc drive 113 memory adding (optional) 52 check total memory 62 removing memory module slot cover 55 Memory card reader inserting memory media 142 removing memory media 143 using 142 memory module installation 52 inserting into socket 56 removing 59, 61 microphone using 140 monitor connecting 85 monitor problems troubleshooting 172 monitoring battery power 122 mouse installing 86 mouse utility 157 moving the computer 100 N network...
...battery light 47, 48 ON/OFF light 50, 94, 96, 99 Web Camera light 141 Licenses 29 lock computer, using 100 M maintaining your battery 132 manual eject hole optical disc drive 113 memory adding (optional) 52 check total memory 62 removing memory module slot cover 55 Memory card reader inserting memory media 142 removing memory media 143 using 142 memory module installation 52 inserting into socket 56 removing 59, 61 microphone using 140 monitor connecting 85 monitor problems troubleshooting 172 monitoring battery power 122 mouse installing 86 mouse utility 157 moving the computer 100 N network...
User Guide
Page 223
... TOSHIBA Accessibility 160 Toshiba accessories memory 52 TOSHIBA Application Installer 150 TOSHIBA Assist 145 Connect tab 146 Optimize tab 149 Protect & Fix tab 148 Secure tab 147 TOSHIBA Face Recognition Utility 155 TOSHIBA Hardware Setup 158 TOSHIBA PC Diagnostic Tool Utility 156 TOSHIBA Service Station 161 TOSHIBA wireless LAN indicator 161 touch pad using 81 traveling tips 134 troubleshooting 171 AC power light is blinking 164 battery light is blinking 165 bookmarked site not found 167 checking device properties 168 computer will not start...
... TOSHIBA Accessibility 160 Toshiba accessories memory 52 TOSHIBA Application Installer 150 TOSHIBA Assist 145 Connect tab 146 Optimize tab 149 Protect & Fix tab 148 Secure tab 147 TOSHIBA Face Recognition Utility 155 TOSHIBA Hardware Setup 158 TOSHIBA PC Diagnostic Tool Utility 156 TOSHIBA Service Station 161 TOSHIBA wireless LAN indicator 161 touch pad using 81 traveling tips 134 troubleshooting 171 AC power light is blinking 164 battery light is blinking 165 bookmarked site not found 167 checking device properties 168 computer will not start...
User Guide
Page 224
... Windows® operating system not working 165 wireless networking 177 turning off computer 89 computer more quickly 92 options 89 turning on power 50 U USB-compatible printer 87 user password, deleting 154 user password, setting 153 using a microphone 140 computer lock 100 DVDs 112 external display devices 85 Hibernation mode 94 hot key to set a power plan 127 Memory card reader 142 optical disc drive 112 Shut down command 91 Sleep mode 96 touch pad 81 Web Camera 141 using the keyboard 102 using the overlay for cursor control 106 Utilities 144 V video projector adjusting display...
... Windows® operating system not working 165 wireless networking 177 turning off computer 89 computer more quickly 92 options 89 turning on power 50 U USB-compatible printer 87 user password, deleting 154 user password, setting 153 using a microphone 140 computer lock 100 DVDs 112 external display devices 85 Hibernation mode 94 hot key to set a power plan 127 Memory card reader 142 optical disc drive 112 Shut down command 91 Sleep mode 96 touch pad 81 Web Camera 141 using the keyboard 102 using the overlay for cursor control 106 Utilities 144 V video projector adjusting display...


