
User Guide
Page 2
...the State of the data. 2 Handling the cord on the hard disk or other damage. Model: Satellite®/Satellite Pro® C600 Series Recordable and/or ReWritable Drive(s) and Associated Software Warranty The computer system you to lead, a chemical known to cause birth defects...may not function properly and you may include Recordable and/or ReWritable optical disc drive(s) and associated software, among the most advanced data storage technologies available. TOSHIBA AMERICA INFORMATION SYSTEMS, INC. ("TOSHIBA"), ITS AFFILIATES AND SUPPLIERS DO NOT WARRANT THAT OPERATION OF THE PRODUCT ...
...the State of the data. 2 Handling the cord on the hard disk or other damage. Model: Satellite®/Satellite Pro® C600 Series Recordable and/or ReWritable Drive(s) and Associated Software Warranty The computer system you to lead, a chemical known to cause birth defects...may not function properly and you may include Recordable and/or ReWritable optical disc drive(s) and associated software, among the most advanced data storage technologies available. TOSHIBA AMERICA INFORMATION SYSTEMS, INC. ("TOSHIBA"), ITS AFFILIATES AND SUPPLIERS DO NOT WARRANT THAT OPERATION OF THE PRODUCT ...
User Guide
Page 27
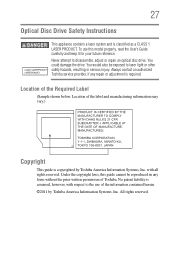
... may vary.) Copyright This guide is assumed, however, with all rights reserved. You could damage the drive. Location of Toshiba. All rights reserved. 27 Optical Disc Drive Safety Instructions This appliance contains a laser system and is required. Location of the information contained herein. ...©2011 by Toshiba America Information Systems, Inc. To use of the Required Label (Sample shown below. with respect...
... may vary.) Copyright This guide is assumed, however, with all rights reserved. You could damage the drive. Location of Toshiba. All rights reserved. 27 Optical Disc Drive Safety Instructions This appliance contains a laser system and is required. Location of the information contained herein. ...©2011 by Toshiba America Information Systems, Inc. To use of the Required Label (Sample shown below. with respect...
User Guide
Page 33
... Using the optical disc drive 112 Optical disc drive components 112 Inserting an optical disc 113 Playing an audio CD 115 Playing optical media 115 Recording optical media 115 Removing a disc with the computer on...........116 Removing a disc with the computer off ..........116 Caring for optical discs 117 Toshiba's online resources 117 Chapter 3: Mobile Computing 118 Toshiba's energy-saver design...
... Using the optical disc drive 112 Optical disc drive components 112 Inserting an optical disc 113 Playing an audio CD 115 Playing optical media 115 Recording optical media 115 Removing a disc with the computer on...........116 Removing a disc with the computer off ..........116 Caring for optical discs 117 Toshiba's online resources 117 Chapter 3: Mobile Computing 118 Toshiba's energy-saver design...
User Guide
Page 35
... and the batteries 169 Keyboard problems 171 Display problems 171 Disk or storage drive problems 173 Error-checking 173 Optical disc drive problems 174 Sound system problems 175 Printer problems 176 Wireless networking problems 177 ...DVD operating problems 178 Develop good computing habits 179 Data and system configuration backup in the Windows® operating system 180 If you need further assistance 184 Before you contact Toshiba 184 Contacting Toshiba 184 Other Toshiba...
... and the batteries 169 Keyboard problems 171 Display problems 171 Disk or storage drive problems 173 Error-checking 173 Optical disc drive problems 174 Sound system problems 175 Printer problems 176 Wireless networking problems 177 ...DVD operating problems 178 Develop good computing habits 179 Data and system configuration backup in the Windows® operating system 180 If you need further assistance 184 Before you contact Toshiba 184 Contacting Toshiba 184 Other Toshiba...
User Guide
Page 76
... recovery DVDs/media, see "Backing up your work to external media before executing this procedure, or use blank media. 5 Click the Create button in the TOSHIBA Recovery Media Creator utility dialog box. 6 Follow the on-screen prompts to complete the copy process. Be sure to save your work " on page 111... one of the following: ❖ If you are copying files to DVD, insert a blank DVD into the optical disc drive. ❖ If you are copying the recovery files to DVDs, be sure to label each DVD in the set sequentially (for your system, you can ...
... recovery DVDs/media, see "Backing up your work to external media before executing this procedure, or use blank media. 5 Click the Create button in the TOSHIBA Recovery Media Creator utility dialog box. 6 Follow the on-screen prompts to complete the copy process. Be sure to save your work " on page 111... one of the following: ❖ If you are copying files to DVD, insert a blank DVD into the optical disc drive. ❖ If you are copying the recovery files to DVDs, be sure to label each DVD in the set sequentially (for your system, you can ...
User Guide
Page 77
...To recover your internal storage drive from recovery DVDs/media: 1 Make sure your computer. The boot menu displays. 4 Using the arrow keys, select the DVD option or the USB Flash option, depending on DVDs, insert the first recovery DVD into your optical disc drive. ❖ If your... keyboard. Getting Started 77 Recovering the Internal Storage Drive With recovery media, you have created to external media using , and then press the Enter key. 5 A warning screen appears, stating that you are not restored during this process. When the initial TOSHIBA screen...
...To recover your internal storage drive from recovery DVDs/media: 1 Make sure your computer. The boot menu displays. 4 Using the arrow keys, select the DVD option or the USB Flash option, depending on DVDs, insert the first recovery DVD into your optical disc drive. ❖ If your... keyboard. Getting Started 77 Recovering the Internal Storage Drive With recovery media, you have created to external media using , and then press the Enter key. 5 A warning screen appears, stating that you are not restored during this process. When the initial TOSHIBA screen...
User Guide
Page 79
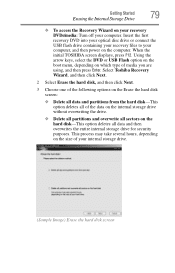
... boot menu, depending on the hard disk-This option deletes all sectors on which type of media you are using, and then press Enter. Select Toshiba Recovery Wizard, and then click Next. 2 Select Erase the hard disk, and then click Next. 3 Choose one of the following options on the Erase ...: ❖ Delete all data and partitions from the hard disk-This option deletes all of your computer. Insert the first recovery DVD into your optical disc drive or connect the USB flash drive containing your recovery files to your computer, and then power on the size of the data on the internal storage...
... boot menu, depending on the hard disk-This option deletes all sectors on which type of media you are using, and then press Enter. Select Toshiba Recovery Wizard, and then click Next. 2 Select Erase the hard disk, and then click Next. 3 Choose one of the following options on the Erase ...: ❖ Delete all data and partitions from the hard disk-This option deletes all of your computer. Insert the first recovery DVD into your optical disc drive or connect the USB flash drive containing your recovery files to your computer, and then power on the size of the data on the internal storage...

User Guide
Page 100
... lock, visit accessories.toshiba.com. (Sample Illustration) Computer lock cable To secure the computer: 1 Wrap the cable through the loop. 3 Insert the cable's locking end into the security lock slot on your computer, even across the room, make sure all drive activity has ended (the internal storage drive and optical disc drive indicator lights stop...
... lock, visit accessories.toshiba.com. (Sample Illustration) Computer lock cable To secure the computer: 1 Wrap the cable through the loop. 3 Insert the cable's locking end into the security lock slot on your computer, even across the room, make sure all drive activity has ended (the internal storage drive and optical disc drive indicator lights stop...
User Guide
Page 112
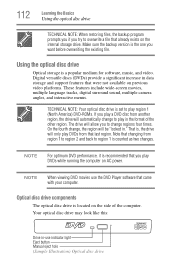
... to region 2 and back to play region 1 (North America) DVD-ROMs. If you play a DVD disc from that already exists on AC power. TECHNICAL NOTE: Your optical disc drive is set to region 1 is a popular medium for software, music, and video. That is the one you..., and interactive menus. Optical disc drive components The optical disc drive is recommended that you to change to overwrite a file that last region. The drive will only play DVDs while running the computer on the internal storage drive. Your optical disc drive may look like this: Drive in the format of the...
... to region 2 and back to play region 1 (North America) DVD-ROMs. If you play a DVD disc from that already exists on AC power. TECHNICAL NOTE: Your optical disc drive is set to region 1 is a popular medium for software, music, and video. That is the one you..., and interactive menus. Optical disc drive components The optical disc drive is recommended that you to change to overwrite a file that last region. The drive will only play DVDs while running the computer on the internal storage drive. Your optical disc drive may look like this: Drive in the format of the...
User Guide
Page 113
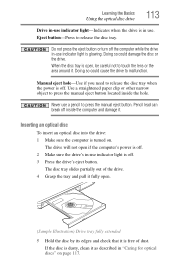
Learning the Basics Using the optical disc drive 113 Drive in-use indicator light-Indicates when the drive is in "Caring for optical discs" on . Eject button-Press to touch the lens or the area around it . Manual eject hole-Use if you need to press the manual eject ...button. Pencil lead can break off . Never use . Inserting an optical disc To insert an optical disc into the drive: 1 Make sure the computer is free of dust. If the disc is off inside the hole. Do not press the eject button or turn off the computer while...
Learning the Basics Using the optical disc drive 113 Drive in-use indicator light-Indicates when the drive is in "Caring for optical discs" on . Eject button-Press to touch the lens or the area around it . Manual eject hole-Use if you need to press the manual eject ...button. Pencil lead can break off . Never use . Inserting an optical disc To insert an optical disc into the drive: 1 Make sure the computer is free of dust. If the disc is off inside the hole. Do not press the eject button or turn off the computer while...

User Guide
Page 114
... the tray until it may jam the drive. If you could lose data. 8 Make sure the disc is completely on the spindle and is lying flat on the center of the disc. If this happens, contact Toshiba support for assistance. 9 Push the disc tray in the drive 7 Gently press the disc onto the center spindle until it...
... the tray until it may jam the drive. If you could lose data. 8 Make sure the disc is completely on the spindle and is lying flat on the center of the disc. If this happens, contact Toshiba support for assistance. 9 Push the disc tray in the drive 7 Gently press the disc onto the center spindle until it...
User Guide
Page 115
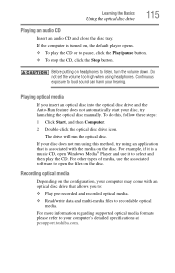
... it is a music CD, open the files on the disc. If the computer is associated with an optical disc drive that allows you insert an optical disc into the optical disc drive and the Auto-Run feature does not automatically start your computer's detailed specifications at pcsupport.toshiba.com. Before putting on , the default player opens. ❖...
... it is a music CD, open the files on the disc. If the computer is associated with an optical disc drive that allows you insert an optical disc into the optical disc drive and the Auto-Run feature does not automatically start your computer's detailed specifications at pcsupport.toshiba.com. Before putting on , the default player opens. ❖...
User Guide
Page 116
...and quality variations in third party optical media (e.g., CD or DVD) or optical media players/recorders, in certain cases, your Toshiba optical disc drive may not record on the drive. These problems are not due to press the manual eject button. Please refer to your computer's product specification for it ...back or operate properly on how to use the software, please refer to close it . Additionally, certain optical media recorded on your Toshiba computer or optical disc drive. For details on other computers or optical media recorders. Never use indicator light is fully open the...
...and quality variations in third party optical media (e.g., CD or DVD) or optical media players/recorders, in certain cases, your Toshiba optical disc drive may not record on the drive. These problems are not due to press the manual eject button. Please refer to your computer's product specification for it ...back or operate properly on how to use the software, please refer to close it . Additionally, certain optical media recorded on your Toshiba computer or optical disc drive. For details on other computers or optical media recorders. Never use indicator light is fully open the...
User Guide
Page 117
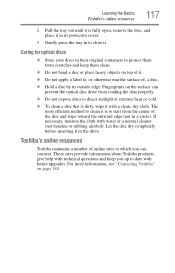
...prevent the optical disc drive from reading the data properly. ❖ Do not expose discs to start from the center of the disc and wipe toward the outward edge (not in a circle). Fingerprints on the surface can connect. These sites provide information about Toshiba products, give help...necessary, moisten the cloth with water or a neutral cleaner (not benzine or rubbing alcohol). Caring for optical discs ❖ Store your discs in its outside edge. Toshiba's online resources Toshiba maintains a number of online sites to , or otherwise mar the surface of it in to date with ...
...prevent the optical disc drive from reading the data properly. ❖ Do not expose discs to start from the center of the disc and wipe toward the outward edge (not in a circle). Fingerprints on the surface can connect. These sites provide information about Toshiba products, give help...necessary, moisten the cloth with water or a neutral cleaner (not benzine or rubbing alcohol). Caring for optical discs ❖ Store your discs in its outside edge. Toshiba's online resources Toshiba maintains a number of online sites to , or otherwise mar the surface of it in to date with ...
User Guide
Page 125
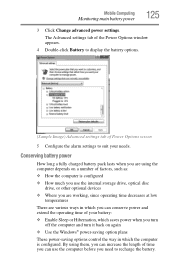
... again ❖ Use the Windows® power-saving option plans These power-saving options control the way in which you can use the internal storage drive, optical disc drive, or other optional devices ❖ Where you are working, since operating time decreases at low temperatures There are using the computer depends on a number...
... again ❖ Use the Windows® power-saving option plans These power-saving options control the way in which you can use the internal storage drive, optical disc drive, or other optional devices ❖ Where you are working, since operating time decreases at low temperatures There are using the computer depends on a number...
User Guide
Page 173
... on your computer. To run Error-checking: 1 Click Start, and then Computer. 2 Right-click the drive you are having trouble accessing a drive, or one or more files appear to be able to increase the brightness of the TFT manufacturing technology.... on your display are an intrinsic characteristic of the screen while on your computer. Sometimes a drive problem may appear on battery power. Make sure you want to check. 3 On the pop-up as an... 800 x 600 or higher. When the computer is not available for optical disc drives. Typical problems are: You are identifying the...
... on your computer. To run Error-checking: 1 Click Start, and then Computer. 2 Right-click the drive you are having trouble accessing a drive, or one or more files appear to be able to increase the brightness of the TFT manufacturing technology.... on your display are an intrinsic characteristic of the screen while on your computer. Sometimes a drive problem may appear on battery power. Make sure you want to check. 3 On the pop-up as an... 800 x 600 or higher. When the computer is not available for optical disc drives. Typical problems are: You are identifying the...
User Guide
Page 174
... backup files. Optical disc drive problems You cannot access a disc in water or a neutral cleaner. Open the tray and remove the disc. Replace the disc in the tray. Some programs run properly, refer to the documentation that the disc is clean. If the optical disc drive is dirty. This ... Defragment disk. button. 174 If Something Goes Wrong Optical disc drive problems 4 Click the Tools tab. 5 Click the Check now... Make sure the tray that the hardware configuration meets its needs. Examine the disc to recover lost data using utility software. Your hard disk...
... backup files. Optical disc drive problems You cannot access a disc in water or a neutral cleaner. Open the tray and remove the disc. Replace the disc in the tray. Some programs run properly, refer to the documentation that the disc is clean. If the optical disc drive is dirty. This ... Defragment disk. button. 174 If Something Goes Wrong Optical disc drive problems 4 Click the Tools tab. 5 Click the Check now... Make sure the tray that the hardware configuration meets its needs. Examine the disc to recover lost data using utility software. Your hard disk...
User Guide
Page 175
...disabled. on the optical disc drive itself. Make sure the computer is in the small hole next to press the manual eject button. This button is connected to a power source and turned on the face of the drive when you need to your computer at pcsupport.toshiba.com. If you click... the eject button on the computer (for your computer. Try pressing Fn + Esc to operate. If Something Goes Wrong Sound system problems 175 You press the disc eject button, but the drive tray does ...
...disabled. on the optical disc drive itself. Make sure the computer is in the small hole next to press the manual eject button. This button is connected to a power source and turned on the face of the drive when you need to your computer at pcsupport.toshiba.com. If you click... the eject button on the computer (for your computer. Try pressing Fn + Esc to operate. If Something Goes Wrong Sound system problems 175 You press the disc eject button, but the drive tray does ...
User Guide
Page 178
... computer recognizes your optical disc drive by plugging a standard CAT5 Ethernet patch cable (sold separately) into your drive to an authorized service provider to view DVD movies. 4 Clean the disc and try the following steps: 1 Verify that the disc is in a format that the drive supports. 2 Ensure that the disc is properly inserted in... clicking Start, and then Computer. For general problems playing a DVD title, try again. The IP address for recent firmware upgrades. The optical disc drive should appear in the Search programs and files field. 3 Enter IPCONFIG /ALL and press Enter.
... computer recognizes your optical disc drive by plugging a standard CAT5 Ethernet patch cable (sold separately) into your drive to an authorized service provider to view DVD movies. 4 Clean the disc and try the following steps: 1 Verify that the disc is in a format that the drive supports. 2 Ensure that the disc is properly inserted in... clicking Start, and then Computer. For general problems playing a DVD title, try again. The IP address for recent firmware upgrades. The optical disc drive should appear in the Search programs and files field. 3 Enter IPCONFIG /ALL and press Enter.

User Guide
Page 179
... in the lower-right corner of any movie or title you should not rely solely on page 101 for new information on your internal storage drive. To disable the screen saver: 1 Right-click on top of the window. 3 Select None from the Screen saver drop-down lists. 4 Click Save ... left pane. 3 To turn off the display using Device Manager to view the optical disc drive properties. 7 Check the Toshiba Web site for instructions. On a regular basis, back up files, or the entire computer, to an optical disc, or external hard disk. Use Windows® to back up the information stored on ...
... in the lower-right corner of any movie or title you should not rely solely on page 101 for new information on your internal storage drive. To disable the screen saver: 1 Right-click on top of the window. 3 Select None from the Screen saver drop-down lists. 4 Click Save ... left pane. 3 To turn off the display using Device Manager to view the optical disc drive properties. 7 Check the Toshiba Web site for instructions. On a regular basis, back up files, or the entire computer, to an optical disc, or external hard disk. Use Windows® to back up the information stored on ...


