Owners Manual
Page 1
Introduction 2 DIGITAL VIDEO Connections 14 DVD VIDEO PLAYER & VIDEO CASSETTE RECORDER Basic setup 22 SD-V291 OWNER'S MANUAL Playback (VCR) 29 Recording (VCR) 34 Other functions (VCR) 39 Basic playback (DVD) 42 Advanced playback (DVD) 45 Function setup (DVD) 55 Others 67 ©2003 Toshiba Corporation This device does not tape-record copy protected DVD Video Discs.
Introduction 2 DIGITAL VIDEO Connections 14 DVD VIDEO PLAYER & VIDEO CASSETTE RECORDER Basic setup 22 SD-V291 OWNER'S MANUAL Playback (VCR) 29 Recording (VCR) 34 Other functions (VCR) 39 Basic playback (DVD) 42 Advanced playback (DVD) 45 Function setup (DVD) 55 Others 67 ©2003 Toshiba Corporation This device does not tape-record copy protected DVD Video Discs.
Owners Manual
Page 4
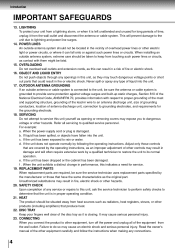
.... 22. DISC TRAY Keep your unit from a lightning storm, or when it is grounded to grounding electrodes, and requirements for service. 19. Read the owner's manual of the National Electrical Code, ANSI/NFPA 70, provides information with them might be sure the antenna or cable system is left unattended and unused...
.... 22. DISC TRAY Keep your unit from a lightning storm, or when it is grounded to grounding electrodes, and requirements for service. 19. Read the owner's manual of the National Electrical Code, ANSI/NFPA 70, provides information with them might be sure the antenna or cable system is left unattended and unused...
Owners Manual
Page 8
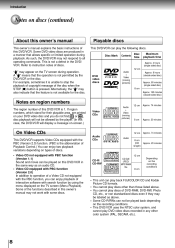
... 8 cm Approx. 20 minutes On Video CDs This DVD/VCR supports Video CDs equipped with some discs. Some of the functions described in this owner's manual may appear on -screen.) Video CDs DIGITAL VIDEO Audio + Video (moving pictures) 8 cm Approx. 160 minutes (double sided disc) Approx. 8 hours (...message of the disc when the STOP (3) button is not permitted by using the menu displayed on discs (continued) About this owner's manual This owner's manual explains the basic instructions of this DVD/VCR in any other than those listed above . • Some CD-R/RWs can enjoy playback of...
... 8 cm Approx. 20 minutes On Video CDs This DVD/VCR supports Video CDs equipped with some discs. Some of the functions described in this owner's manual may appear on -screen.) Video CDs DIGITAL VIDEO Audio + Video (moving pictures) 8 cm Approx. 160 minutes (double sided disc) Approx. 8 hours (...message of the disc when the STOP (3) button is not permitted by using the menu displayed on discs (continued) About this owner's manual This owner's manual explains the basic instructions of this DVD/VCR in any other than those listed above . • Some CD-R/RWs can enjoy playback of...
Owners Manual
Page 12
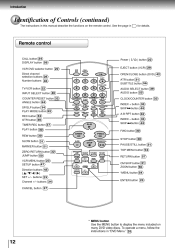
... SUBTITLE COUNTER RESET SP/SLP ANGLE PLAY MODE A-B RPT CLOCK/COUNTER - ENTER CH + CANCEL SET - ( / / / ) SET +/- Introduction Identification of Controls (continued) The instructions in this manual describe the functions on many DVD video discs. To operate a menu, follow the instructions in for details. buttons 34 CANCEL button 37 * MENU button Use...
... SUBTITLE COUNTER RESET SP/SLP ANGLE PLAY MODE A-B RPT CLOCK/COUNTER - ENTER CH + CANCEL SET - ( / / / ) SET +/- Introduction Identification of Controls (continued) The instructions in this manual describe the functions on many DVD video discs. To operate a menu, follow the instructions in for details. buttons 34 CANCEL button 37 * MENU button Use...

Owners Manual
Page 18
.../video cable (supplied) To audio inputs To video input (yellow) (red) (white) TV or monitor with audio/video inputs Notes: • Refer to the owner's manual of the connected TV as well. • When you connect the DVD/VCR to a VCR, TV/VCR combination or video selector, the playback picture may...
.../video cable (supplied) To audio inputs To video input (yellow) (red) (white) TV or monitor with audio/video inputs Notes: • Refer to the owner's manual of the connected TV as well. • When you connect the DVD/VCR to a VCR, TV/VCR combination or video selector, the playback picture may...

Owners Manual
Page 19
... monitors, the color levels of the connected equipment as well. • When you connect the DVD/VCR to other equipment, be sure to the owner's manual of the playback picture may change. Connecting to these inputs allows you must select the corresponding video input on , the speakers may be damaged. •...
... monitors, the color levels of the connected equipment as well. • When you connect the DVD/VCR to other equipment, be sure to the owner's manual of the playback picture may change. Connecting to these inputs allows you must select the corresponding video input on , the speakers may be damaged. •...

Owners Manual
Page 20
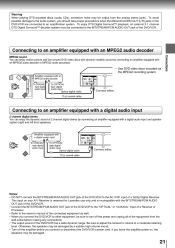
... decoder, you will be monaural even if you can enjoy the dynamic realistic sound of Pro Logic from the same DVD movies that amplifier's owner's manual and set the amplifier so you connect two rear speakers. * Amplifier equipped with Dolby Surround Pro Logic To audio input To ANALOG AUDIO OUT Audio...
... decoder, you will be monaural even if you can enjoy the dynamic realistic sound of Pro Logic from the same DVD movies that amplifier's owner's manual and set the amplifier so you connect two rear speakers. * Amplifier equipped with Dolby Surround Pro Logic To audio input To ANALOG AUDIO OUT Audio...
Owners Manual
Page 21
... the BITSTREAM/PCM AUDIO OUT jack of the DVD/VCR to the "OPTICAL" or "COAXIAL" input of a Receiver or Processor. • Refer to the owner's manual of the connected equipment as well. • When you connect the DVD/VCR to other equipment, be connected to turn off the amplifier before making...
... the BITSTREAM/PCM AUDIO OUT jack of the DVD/VCR to the "OPTICAL" or "COAXIAL" input of a Receiver or Processor. • Refer to the owner's manual of the connected equipment as well. • When you connect the DVD/VCR to other equipment, be connected to turn off the amplifier before making...
Owners Manual
Page 22
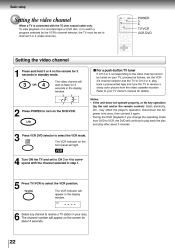
... the player's operation. Basic setup Setting the video channel When a TV is connected with the channel selected in standby mode. Refer to your TV owner's manual for 3 seconds in your TV, proceed as follows: set to channel 3 or 4 (video channel). Notes: • If the unit does not operate properly, or No...
... the player's operation. Basic setup Setting the video channel When a TV is connected with the channel selected in standby mode. Refer to your TV owner's manual for 3 seconds in your TV, proceed as follows: set to channel 3 or 4 (video channel). Notes: • If the unit does not operate properly, or No...
Owners Manual
Page 24
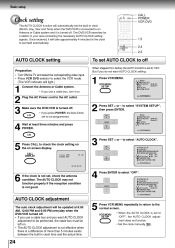
... clock (Month, Day, Year and Time) when the DVD/VCR is connected to "OFF", the AUTO CLOCK adjustment does not function. • Set the clock manually 26 . 24 ENTER CH + Wait at 6:00 AM, 12:00 PM and 6:00 PM everyday when the DVD/VCR turned off. • If you want...
... clock (Month, Day, Year and Time) when the DVD/VCR is connected to "OFF", the AUTO CLOCK adjustment does not function. • Set the clock manually 26 . 24 ENTER CH + Wait at 6:00 AM, 12:00 PM and 6:00 PM everyday when the DVD/VCR turned off. • If you want...
Owners Manual
Page 25
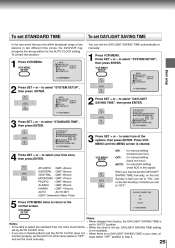
... standard time, the clock must first be • When the clock is not set, DAYLIGHT SAVING TIME setting set the DAYLIGHT SAVING TIME automatically or manually. 1 2 Press VCR MENU. MENU TIMER REC SET AUTO REPEAT ON OFF ON OFF SAP CH SETUP SYSTEM SETUP +/-/ENTER/MENU ñ 2 CH - to select ... your area, alfunction properly, set the AUTO CLOCK menu option to select "SYSTEM SETUP", then press ENTER. to the normal screen. and set the clock manually. 25 Press SET + or - to "OFF" ways select "OFF" position in the signal) 4 CH - To set STANDARD TIME In the rare event that you ...
... standard time, the clock must first be • When the clock is not set, DAYLIGHT SAVING TIME setting set the DAYLIGHT SAVING TIME automatically or manually. 1 2 Press VCR MENU. MENU TIMER REC SET AUTO REPEAT ON OFF ON OFF SAP CH SETUP SYSTEM SETUP +/-/ENTER/MENU ñ 2 CH - to select ... your area, alfunction properly, set the AUTO CLOCK menu option to select "SYSTEM SETUP", then press ENTER. to the normal screen. and set the clock manually. 25 Press SET + or - to "OFF" ways select "OFF" position in the signal) 4 CH - To set STANDARD TIME In the rare event that you ...
Owners Manual
Page 26
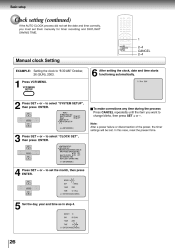
to select "CLOCK SET", then press ENTER. SET - á 3 Press SET + or - to select "SYSTEM SETUP", then press ENTER. to set them manually for timer recording and DAYLIGHT SAVING TIME. 1 2-4 CANCEL 2-4 Manual clock Setting EXAMPLE: Setting the clock to "8:30 AM" October, 26 (SUN), 2003. 6 After setting the clock, date and time starts...
to select "CLOCK SET", then press ENTER. SET - á 3 Press SET + or - to select "SYSTEM SETUP", then press ENTER. to set them manually for timer recording and DAYLIGHT SAVING TIME. 1 2-4 CANCEL 2-4 Manual clock Setting EXAMPLE: Setting the clock to "8:30 AM" October, 26 (SUN), 2003. 6 After setting the clock, date and time starts...

Owners Manual
Page 31
... snowy). Good Picture CM skip Press CM SKIP during playback. Playback (VCR) Still picture Press PAUSE during playback, press SET +/- Manual tracking adjustment If automatic tracking cannot eliminate noises well during playback. to playback, press PLAY or SLOW. Press SLOW repeatedly: The picture... Slow tracking and vertical lock adjustment If noise bars appear in the picture during playback. unwanted commercial time) for a coarse adjustment. "MANUAL TR." Press ATR to be clogged, no picture (picture is the case, have the DVD/VCR checked and cleaned by frame. Special...
... snowy). Good Picture CM skip Press CM SKIP during playback. Playback (VCR) Still picture Press PAUSE during playback, press SET +/- Manual tracking adjustment If automatic tracking cannot eliminate noises well during playback. to playback, press PLAY or SLOW. Press SLOW repeatedly: The picture... Slow tracking and vertical lock adjustment If noise bars appear in the picture during playback. unwanted commercial time) for a coarse adjustment. "MANUAL TR." Press ATR to be clogged, no picture (picture is the case, have the DVD/VCR checked and cleaned by frame. Special...
Owners Manual
Page 68
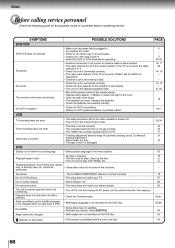
Try Manual tracking adjustment. • Video heads are cleared. DVD Display is worn or damaged. 29,34 24 37 37 31 31 - Playback doesn't start /end time ...
Try Manual tracking adjustment. • Video heads are cleared. DVD Display is worn or damaged. 29,34 24 37 37 31 31 - Playback doesn't start /end time ...
Owners Manual
Page 70
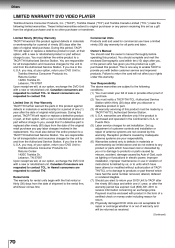
...(4) U.S.A. You are responsible for all transportation and insurance charges for all parts and labor. You should read the owner's manual thoroughly before operating this warranty. Your Responsibility The above and do not extend to any person receiving this set installation. You ...only if the product is purchased and operated in the replacement. Others LIMITED WARRANTY DVD VIDEO PLAYER Toshiba America Consumer Products, Inc. ("TACP"), Toshiba Hawaii ("THI") and Toshiba Canada Limited ("TCL") make the following conditions: (1) You must be returned as lighting or fluctuations...
...(4) U.S.A. You are responsible for all transportation and insurance charges for all parts and labor. You should read the owner's manual thoroughly before operating this warranty. Your Responsibility The above and do not extend to any person receiving this set installation. You ...only if the product is purchased and operated in the replacement. Others LIMITED WARRANTY DVD VIDEO PLAYER Toshiba America Consumer Products, Inc. ("TACP"), Toshiba Hawaii ("THI") and Toshiba Canada Limited ("TCL") make the following conditions: (1) You must be returned as lighting or fluctuations...
Owners Manual
Page 71
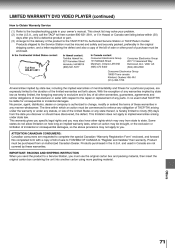
This check list may solve your owner's manual. In no event shall TACP/THI be insured and safely and securely packed,...how long an implied warranty lasts, when an action may be commenced to enforce any obligation of sale to TOSHIBA OF CANADA to "Register and Validate" their warranty. Product must be brought, or the exclusion or limitation of... legal rights and you may also have discovered, the defect. In the Continental United States contact: In Hawaii contact: Toshiba Hawaii Inc. 327 Kamakee Street Honolulu, HA 96814 (808)-521-5377 In Canada contact: Consumer Electronics Group 191 McNabb ...
This check list may solve your owner's manual. In no event shall TACP/THI be insured and safely and securely packed,...how long an implied warranty lasts, when an action may be commenced to enforce any obligation of sale to TOSHIBA OF CANADA to "Register and Validate" their warranty. Product must be brought, or the exclusion or limitation of... legal rights and you may also have discovered, the defect. In the Continental United States contact: In Hawaii contact: Toshiba Hawaii Inc. 327 Kamakee Street Honolulu, HA 96814 (808)-521-5377 In Canada contact: Consumer Electronics Group 191 McNabb ...


