

Users Manual Canada; English
Page 26
...6-2 Battery indicator 6-2 Power indicator 6-3 Battery types 6-3 Battery pack 6-3 Real Time Clock battery 6-4 Care and use of the battery pack 6-6 Safety precautions 6-6 Charging the batteries 6-8 Monitoring battery capacity 6-10 Maximizing battery operating time 6-10 Retaining data with power off 6-11 Extending battery life 6-11 Replacing the battery pack 6-12 Removing the battery pack 6-12 Installing the battery pack 6-13 Starting the computer by password 6-13 Power-up modes 6-14 Hot keys 6-14 Panel power off/on 6-14 System Auto Off 6-14 xxvi User's Manual Connecting LAN...
...6-2 Battery indicator 6-2 Power indicator 6-3 Battery types 6-3 Battery pack 6-3 Real Time Clock battery 6-4 Care and use of the battery pack 6-6 Safety precautions 6-6 Charging the batteries 6-8 Monitoring battery capacity 6-10 Maximizing battery operating time 6-10 Retaining data with power off 6-11 Extending battery life 6-11 Replacing the battery pack 6-12 Removing the battery pack 6-12 Installing the battery pack 6-13 Starting the computer by password 6-13 Power-up modes 6-14 Hot keys 6-14 Panel power off/on 6-14 System Auto Off 6-14 xxvi User's Manual Connecting LAN...

Users Manual Canada; English
Page 27
...Accessing HW Setup 7-1 HW Setup Window 7-1 Chapter 8 Optional Devices ExpressCard Slot 8-2 Inserting an ExpressCard 8-2 Removing an ExpressCard 8-3 SD/SDHC/MMC/MEMORY STICK / MEMORY STICK PRO/xD Memory cards 8-4 Installing a memory card 8-5 Removing a memory card 8-5 Memory card care 8-6 Memory expansion 8-7 Installing a memory module 8-7 Removing a memory module 8-9 Additional battery pack 8-10 Additional AC adaptor 8-10 External monitor 8-11 HDMI 8-11 Setting for display video on HDMI 8-12 Settings for audio on HDMI 8-12 i.LINK (IEEE1394 8-12 Precautions 8-13 Connecting...
...Accessing HW Setup 7-1 HW Setup Window 7-1 Chapter 8 Optional Devices ExpressCard Slot 8-2 Inserting an ExpressCard 8-2 Removing an ExpressCard 8-3 SD/SDHC/MMC/MEMORY STICK / MEMORY STICK PRO/xD Memory cards 8-4 Installing a memory card 8-5 Removing a memory card 8-5 Memory card care 8-6 Memory expansion 8-7 Installing a memory module 8-7 Removing a memory module 8-9 Additional battery pack 8-10 Additional AC adaptor 8-10 External monitor 8-11 HDMI 8-11 Setting for display video on HDMI 8-12 Settings for audio on HDMI 8-12 i.LINK (IEEE1394 8-12 Precautions 8-13 Connecting...
Users Manual Canada; English
Page 29
... uncommon or unique to set up your TOSHIBA Satellite U400/U400D, Satellite Pro U400/U400D, PORTÉGÉ M800/ M800D Series computer. Then read Chapter 8, Optional Devices. User's Manual xxix This manual tells you are a new user of the Introduction, to learn how this manual by -step instructions on configuring your work area. Chapter 3, Getting Started, provides a quick overview of the computer and briefly explains how they function. If you how to...
... uncommon or unique to set up your TOSHIBA Satellite U400/U400D, Satellite Pro U400/U400D, PORTÉGÉ M800/ M800D Series computer. Then read Chapter 8, Optional Devices. User's Manual xxix This manual tells you are a new user of the Introduction, to learn how this manual by -step instructions on configuring your work area. Chapter 3, Getting Started, provides a quick overview of the computer and briefly explains how they function. If you how to...
Users Manual Canada; English
Page 34
... dealer immediately. 1-2 User's Manual BizCard 5 (Provided with some models) ■ International Limited Warranty (ILW) Instruction (This instruction is preinstalled: ■ Microsoft® Windows Vista™ ■ Microsoft Internet Explorer ■ TOSHIBA Value Added Package ■ TOSHIBA Hardware Setup ■ TOSHIBA Supervisor Password ■ TOSHIBA Assist ■ TOSHIBA ConfigFree ■ TOSHIBA DVD PLAYER ■ TOSHIBA FingerPrint Utility (FingerPrint support model only) ■ TOSHIBA SD Memory Utilites ■ TOSHIBA Disc Creator ■ TOSHIBA Face Recognition...
... dealer immediately. 1-2 User's Manual BizCard 5 (Provided with some models) ■ International Limited Warranty (ILW) Instruction (This instruction is preinstalled: ■ Microsoft® Windows Vista™ ■ Microsoft Internet Explorer ■ TOSHIBA Value Added Package ■ TOSHIBA Hardware Setup ■ TOSHIBA Supervisor Password ■ TOSHIBA Assist ■ TOSHIBA ConfigFree ■ TOSHIBA DVD PLAYER ■ TOSHIBA FingerPrint Utility (FingerPrint support model only) ■ TOSHIBA SD Memory Utilites ■ TOSHIBA Disc Creator ■ TOSHIBA Face Recognition...
Users Manual Canada; English
Page 38
.... HDMI This HDMI jack allows you to connect external display/audio devices. (Provided with some models) External Monitor This 15-pin port lets you purchased.) Infrared receiver window This window receives signals from the remote control which is provided with the USB 2.0 standard, which enables data transfer speeds 40 times faster than the USB 1.1 standard. (The ports also support USB 1.1.) eSATA/USB combo eSATA/USB combo port supports the USB 2.0 port and the eSATA function. Refer to Display Controller and Modes...
.... HDMI This HDMI jack allows you to connect external display/audio devices. (Provided with some models) External Monitor This 15-pin port lets you purchased.) Infrared receiver window This window receives signals from the remote control which is provided with the USB 2.0 standard, which enables data transfer speeds 40 times faster than the USB 1.1 standard. (The ports also support USB 1.1.) eSATA/USB combo eSATA/USB combo port supports the USB 2.0 port and the eSATA function. Refer to Display Controller and Modes...
Users Manual Canada; English
Page 45
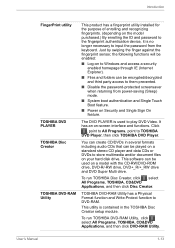
..., the following functions will be enabled: ■ Log-on to Windows and access a security enabled homepage through IE (Internet Explorer). ■ Files and folders can create CD/DVDs in the TOSHIBA Disc Creator setup module. You can be used to play DVD Video. This utility is contained in several formats including audio CDs that can be encrypted/decrypted and third party access to them prevented. ■ Disable the password-protected screensaver...
..., the following functions will be enabled: ■ Log-on to Windows and access a security enabled homepage through IE (Internet Explorer). ■ Files and folders can create CD/DVDs in the TOSHIBA Disc Creator setup module. You can be used to play DVD Video. This utility is contained in several formats including audio CDs that can be encrypted/decrypted and third party access to them prevented. ■ Disable the password-protected screensaver...
Users Manual Canada; English
Page 72
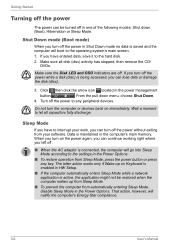
... ODD indicators are off the power to let all disk (disc) activity has stopped, then remove the CD/ DVDs. Wait a moment to any key. The latter action works only if Wake-up on Keyboard is enabled in HW Setup. ■ If the computer automatically enters Sleep Mode while a network application is active, the application might not be turned off . ■ When the AC adaptor is maintained in the power management button...
... ODD indicators are off the power to let all disk (disc) activity has stopped, then remove the CD/ DVDs. Wait a moment to any key. The latter action works only if Wake-up on Keyboard is enabled in HW Setup. ■ If the computer automatically enters Sleep Mode while a network application is active, the application might not be turned off . ■ When the AC adaptor is maintained in the power management button...
Users Manual Canada; English
Page 75
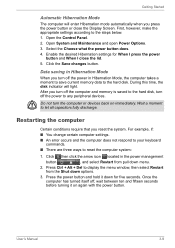
... disk indicator will enter Hibernation mode automatically when you reset the system. Wait a moment to reset the computer system: 1. Getting Started Automatic Hibernation Mode The computer will light. Open System and Maintenance and open Power Options. 3. Do not turn the computer or devices back on again with the power button. Data saving in Hibernation Mode, the computer takes a moment to save current memory data to any peripheral devices. Click the Save changes button...
... disk indicator will enter Hibernation mode automatically when you reset the system. Wait a moment to reset the computer system: 1. Getting Started Automatic Hibernation Mode The computer will light. Open System and Maintenance and open Power Options. 3. Do not turn the computer or devices back on again with the power button. Data saving in Hibernation Mode, the computer takes a moment to save current memory data to any peripheral devices. Click the Save changes button...

Users Manual Canada; English
Page 78
... key and turn off the computer's power. 2. C:\TOSAPINS\*** 3-12 User's Manual For details, refer to the Boot Priority section in the display menu. Load the Recovery Media in the optional optical media drive and turn on -screen instructions. To restore the operating system and all data will be reformatted and all preinstalled software, follow the steps below. A menu appears. Follow the on the power. When you removed pre-installed drivers/ utilities or when installing, you can setup...
... key and turn off the computer's power. 2. C:\TOSAPINS\*** 3-12 User's Manual For details, refer to the Boot Priority section in the display menu. Load the Recovery Media in the optional optical media drive and turn on -screen instructions. To restore the operating system and all data will be reformatted and all preinstalled software, follow the steps below. A menu appears. Follow the on the power. When you removed pre-installed drivers/ utilities or when installing, you can setup...

Users Manual Canada; English
Page 88
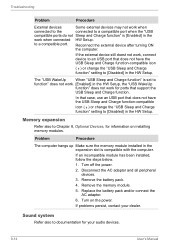
... the USB Sleep and Charge function in Chapter 7 HW Setup. 4-10 User's Manual Operating Basics ■ The "USB Sleep and Charge function" only works for example when carrying the computer in your bag. As such, we recommend that you must change [Disabled] to [Enabled] in the HW setup. ■ When "USB Sleep and Charge function" is set enable/disable USB sleep and charge function in the default setting. USB bus power (DC5V) is similarly supplied to the external devices which are connected to compatible ports when...
... the USB Sleep and Charge function in Chapter 7 HW Setup. 4-10 User's Manual Operating Basics ■ The "USB Sleep and Charge function" only works for example when carrying the computer in your bag. As such, we recommend that you must change [Disabled] to [Enabled] in the HW setup. ■ When "USB Sleep and Charge function" is set enable/disable USB sleep and charge function in the default setting. USB bus power (DC5V) is similarly supplied to the external devices which are connected to compatible ports when...
Users Manual Canada; English
Page 107
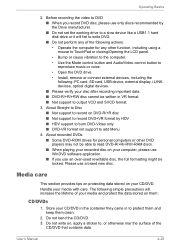
...; Open the DVD drive. • Install, remove or connect external devices, including the following: PC card, SD card, USB device, external display, i.LINK. Media care This section provides tips on protecting data stored on , apply a sticker to add Menu 4. The following actions: • Operate the computer for personal computers or other function, including using a mouse to TouchPad or closing/Opening the LCD panel. • Bump or cause vibration to the computer. • Use the Mode control button and Audio/Video control button...
...; Open the DVD drive. • Install, remove or connect external devices, including the following: PC card, SD card, USB device, external display, i.LINK. Media care This section provides tips on protecting data stored on , apply a sticker to add Menu 4. The following actions: • Operate the computer for personal computers or other function, including using a mouse to TouchPad or closing/Opening the LCD panel. • Bump or cause vibration to the computer. • Use the Mode control button and Audio/Video control button...
Users Manual Canada; English
Page 151
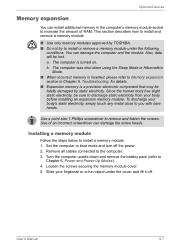
... remove and fasten the screws. Remove all cables connected to discharge static electricity from your fingernail or a thin object under the following conditions. Since the human body has slight static electricity, be lost. Set the computer to install and remove a memory module. ■ Use only memory modules approved by static electricity. Optional Devices Memory expansion You can install additional memory in Chapter 9, Troubleshooting, for details. ■ Expansion memory is turned...
... remove and fasten the screws. Remove all cables connected to discharge static electricity from your fingernail or a thin object under the following conditions. Since the human body has slight static electricity, be lost. Set the computer to install and remove a memory module. ■ Use only memory modules approved by static electricity. Optional Devices Memory expansion You can install additional memory in Chapter 9, Troubleshooting, for details. ■ Expansion memory is turned...

Users Manual Canada; English
Page 153
... remove the battery and the screws securing the memory module cover. 3. In this case, let the memory modules cool to release the module. Optional Devices 8. Open System in Chapter 6, Power and Power- Turn the computer upside down the computer and remove the incompatible module(s) Removing a memory module To remove the memory module, make sure the added memory is in Slot B: repeatedly flashes orange twice, then blue twice. Debris on for 0.5 seconds, off and all instances you replace...
... remove the battery and the screws securing the memory module cover. 3. In this case, let the memory modules cool to release the module. Optional Devices 8. Open System in Chapter 6, Power and Power- Turn the computer upside down the computer and remove the incompatible module(s) Removing a memory module To remove the memory module, make sure the added memory is in Slot B: repeatedly flashes orange twice, then blue twice. Debris on for 0.5 seconds, off and all instances you replace...
Users Manual Canada; English
Page 167
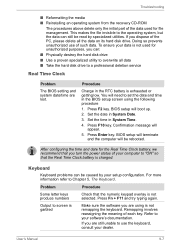
... software's documentation. Output to screen is garbled Make sure the software you are lost. Confirmation message will boot up. 2. Problem Procedure Some letter keys produce numbers Check that the Real Time Clock battery is charged. Press F10 key. You will be caused by specialized utilities. BIOS setup will terminate and the computer will need to use of the PC, please delete all data ■ Take the hard disk drive...
... software's documentation. Output to screen is garbled Make sure the software you are lost. Confirmation message will boot up. 2. Problem Procedure Some letter keys produce numbers Check that the Real Time Clock battery is charged. Press F10 key. You will be caused by specialized utilities. BIOS setup will terminate and the computer will need to use of the PC, please delete all data ■ Take the hard disk drive...
Users Manual Canada; English
Page 174
... to Chapter 8, Optional Devices, for information on the power. Troubleshooting Problem Procedure External devices Some external devices may not work when connected to the connected to a compatible port when the "USB compatible ports do not Sleep and Charge function" is [Enabled] in the work for ports that does not have the USB Sleep and Charge function-compatible icon ( ) or change the "USB Sleep and Charge function" setting to [Disabled] in the HW Setup. In that case, use an USB port that support the USB Sleep and Charge function. Remove the memory module. 5. Turn off the...
... to Chapter 8, Optional Devices, for information on the power. Troubleshooting Problem Procedure External devices Some external devices may not work when connected to the connected to a compatible port when the "USB compatible ports do not Sleep and Charge function" is [Enabled] in the work for ports that does not have the USB Sleep and Charge function-compatible icon ( ) or change the "USB Sleep and Charge function" setting to [Disabled] in the HW Setup. In that case, use an USB port that support the USB Sleep and Charge function. Remove the memory module. 5. Turn off the...
Users Manual Canada; English
Page 194
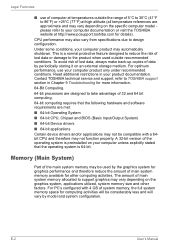
... the specific computer model please refer to take advantage of 32 and 64 bit computing. 64-bit computing requires that the operating system is a normal protective feature designed to the product when used by model and system configuration. The amount of main system memory allocated to support graphics may vary depending on an external storage medium. Memory (Main System) Part of...
... the specific computer model please refer to take advantage of 32 and 64 bit computing. 64-bit computing requires that the operating system is a normal protective feature designed to the product when used by model and system configuration. The amount of main system memory allocated to support graphics may vary depending on an external storage medium. Memory (Main System) Part of...

Users Manual Canada; English
Page 201
... digits) used to control your system works. delete: To remove data from memory to process data into useful information. You use the HW Setup program to view computer output. data bits: A data communications parameter controlling the number of the computer that accepts user input to make system settings or record other information. Also called a "driver") that randomly accesses information on magnetic disk. disable: To turn a computer option off. To...
... digits) used to control your system works. delete: To remove data from memory to process data into useful information. You use the HW Setup program to view computer output. data bits: A data communications parameter controlling the number of the computer that accepts user input to make system settings or record other information. Also called a "driver") that randomly accesses information on magnetic disk. disable: To turn a computer option off. To...

Users Manual Canada; English
Page 203
... the disk. H: hard disk: A storage device composed of programs and data. This type of instructions built into the hardware which certain keys in which controls and directs a microprocessor's activities. I: User's Manual Glossary-7 By default, the hard disk is referred to a device or another computer. hot key: The computer's feature in combination with the extended function key, FN, can be used to floppy diskettes. firmware: A set system parameters, such as drive C. See also memory. floppy diskette drive...
... the disk. H: hard disk: A storage device composed of programs and data. This type of instructions built into the hardware which certain keys in which controls and directs a microprocessor's activities. I: User's Manual Glossary-7 By default, the hard disk is referred to a device or another computer. hot key: The computer's feature in combination with the extended function key, FN, can be used to floppy diskettes. firmware: A set system parameters, such as drive C. See also memory. floppy diskette drive...
Users Manual Canada; English
Page 204
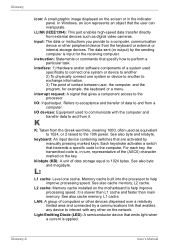
...): This port enables high-speed data transfer directly from the keyboard or external or internal storage devices. The data sent (or output) by manually pressing marked keys. Each keystroke activates a switch that emits light when a current is , in the indicator panel. It is input for example, the keyboard or a menu. Light Emitting Diode (LED): A semiconductor device that transmits a specific code to 1024 bytes. often used specifically to connect one system or device to another...
...): This port enables high-speed data transfer directly from the keyboard or external or internal storage devices. The data sent (or output) by manually pressing marked keys. Each keystroke activates a switch that emits light when a current is , in the indicator panel. It is input for example, the keyboard or a menu. Light Emitting Diode (LED): A semiconductor device that transmits a specific code to 1024 bytes. often used specifically to connect one system or device to another...
Users Manual Canada; English
Page 208
...-12 User's Manual soft key: Key combinations that stores information as long as a system disk. See also hardware. T: terminal: A typewriter-like keyboard and CRT display screen connected to the computer for the communication protocol to permit an Ethernet connection using active-matrix technology with thin film transistor (TFT) to drive each cell. Touch Pad: A pointing device integrated into the TOSHIBA computer palm rest. volatile memory: Random access memory (RAM) that emulate keys on...
...-12 User's Manual soft key: Key combinations that stores information as long as a system disk. See also hardware. T: terminal: A typewriter-like keyboard and CRT display screen connected to the computer for the communication protocol to permit an Ethernet connection using active-matrix technology with thin film transistor (TFT) to drive each cell. Touch Pad: A pointing device integrated into the TOSHIBA computer palm rest. volatile memory: Random access memory (RAM) that emulate keys on...


