

Users Manual Canada; English
Page 26
...6-2 Battery indicator 6-2 Power indicator 6-3 Battery types 6-3 Battery pack 6-3 Real Time Clock battery 6-4 Care and use of the battery pack 6-6 Safety precautions 6-6 Charging the batteries 6-8 Monitoring battery capacity 6-10 Maximizing battery operating time 6-10 Retaining data with power off 6-11 Extending battery life 6-11 Replacing the battery pack 6-12 Removing the battery pack 6-12 Installing the battery pack 6-13 Starting the computer by password 6-13 Power-up modes 6-14 Hot keys 6-14 Panel power off/on 6-14 System Auto Off 6-14 xxvi User's Manual Connecting LAN...
...6-2 Battery indicator 6-2 Power indicator 6-3 Battery types 6-3 Battery pack 6-3 Real Time Clock battery 6-4 Care and use of the battery pack 6-6 Safety precautions 6-6 Charging the batteries 6-8 Monitoring battery capacity 6-10 Maximizing battery operating time 6-10 Retaining data with power off 6-11 Extending battery life 6-11 Replacing the battery pack 6-12 Removing the battery pack 6-12 Installing the battery pack 6-13 Starting the computer by password 6-13 Power-up modes 6-14 Hot keys 6-14 Panel power off/on 6-14 System Auto Off 6-14 xxvi User's Manual Connecting LAN...

Users Manual Canada; English
Page 27
...Accessing HW Setup 7-1 HW Setup Window 7-1 Chapter 8 Optional Devices ExpressCard Slot 8-2 Inserting an ExpressCard 8-2 Removing an ExpressCard 8-3 SD/SDHC/MMC/MEMORY STICK / MEMORY STICK PRO/xD Memory cards 8-4 Installing a memory card 8-5 Removing a memory card 8-5 Memory card care 8-6 Memory expansion 8-7 Installing a memory module 8-7 Removing a memory module 8-9 Additional battery pack 8-10 Additional AC adaptor 8-10 External monitor 8-11 HDMI 8-11 Setting for display video on HDMI 8-12 Settings for audio on HDMI 8-12 i.LINK (IEEE1394 8-12 Precautions 8-13 Connecting...
...Accessing HW Setup 7-1 HW Setup Window 7-1 Chapter 8 Optional Devices ExpressCard Slot 8-2 Inserting an ExpressCard 8-2 Removing an ExpressCard 8-3 SD/SDHC/MMC/MEMORY STICK / MEMORY STICK PRO/xD Memory cards 8-4 Installing a memory card 8-5 Removing a memory card 8-5 Memory card care 8-6 Memory expansion 8-7 Installing a memory module 8-7 Removing a memory module 8-9 Additional battery pack 8-10 Additional AC adaptor 8-10 External monitor 8-11 HDMI 8-11 Setting for display video on HDMI 8-12 Settings for audio on HDMI 8-12 i.LINK (IEEE1394 8-12 Precautions 8-13 Connecting...
Users Manual Canada; English
Page 29
.... This powerful notebook computer provides excellent expansion capability, including multimedia devices, and it is organized, then become acquainted with the computer's features, components and accessory devices. Preface Congratulations on setting up and begin operating your computer and gives tips on configuring your computer, basic operations and care, using your TOSHIBA Satellite U400/U400D, Satellite Pro U400/U400D, PORTÉGÉ M800/ M800D Series computer. User's Manual xxix Chapter...
.... This powerful notebook computer provides excellent expansion capability, including multimedia devices, and it is organized, then become acquainted with the computer's features, components and accessory devices. Preface Congratulations on setting up and begin operating your computer and gives tips on configuring your computer, basic operations and care, using your TOSHIBA Satellite U400/U400D, Satellite Pro U400/U400D, PORTÉGÉ M800/ M800D Series computer. User's Manual xxix Chapter...
Users Manual Canada; English
Page 34
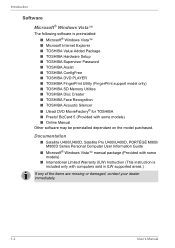
... Internet Explorer ■ TOSHIBA Value Added Package ■ TOSHIBA Hardware Setup ■ TOSHIBA Supervisor Password ■ TOSHIBA Assist ■ TOSHIBA ConfigFree ■ TOSHIBA DVD PLAYER ■ TOSHIBA FingerPrint Utility (FingerPrint support model only) ■ TOSHIBA SD Memory Utilites ■ TOSHIBA Disc Creator ■ TOSHIBA Face Recognition ■ TOSHIBA Acoustic Silencer ■ Ulead DVD MovieFactory® for TOSHIBA ■ Presto! Documentation ■ Satellite U400/U400D, Satellite Pro U400/U400D, PORTÉGÉ M800/ M800D Series Personal Computer User...
... Internet Explorer ■ TOSHIBA Value Added Package ■ TOSHIBA Hardware Setup ■ TOSHIBA Supervisor Password ■ TOSHIBA Assist ■ TOSHIBA ConfigFree ■ TOSHIBA DVD PLAYER ■ TOSHIBA FingerPrint Utility (FingerPrint support model only) ■ TOSHIBA SD Memory Utilites ■ TOSHIBA Disc Creator ■ TOSHIBA Face Recognition ■ TOSHIBA Acoustic Silencer ■ Ulead DVD MovieFactory® for TOSHIBA ■ Presto! Documentation ■ Satellite U400/U400D, Satellite Pro U400/U400D, PORTÉGÉ M800/ M800D Series Personal Computer User...
Users Manual Canada; English
Page 38
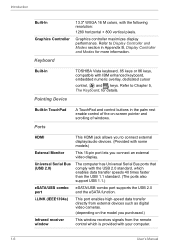
...-In TouchPad Ports A TouchPad and control buttons in Appendix B, Display Controller and Modes for details. Refer to connect external display/audio devices. (Provided with your computer. 1-6 User's Manual Universal Serial Bus (USB 2.0) The computer has Universal Serial Bus ports that comply with IBM enhanced keyboard, embedded numeric overlay, dedicated cursor control, and keys. Keyboard Built-In Pointing Device TOSHIBA Vista keyboard, 85 keys or 86 keys, compatible with the USB 2.0 standard, which is provided with some models) External Monitor This 15-pin port lets...
...-In TouchPad Ports A TouchPad and control buttons in Appendix B, Display Controller and Modes for details. Refer to connect external display/audio devices. (Provided with your computer. 1-6 User's Manual Universal Serial Bus (USB 2.0) The computer has Universal Serial Bus ports that comply with IBM enhanced keyboard, embedded numeric overlay, dedicated cursor control, and keys. Keyboard Built-In Pointing Device TOSHIBA Vista keyboard, 85 keys or 86 keys, compatible with the USB 2.0 standard, which is provided with some models) External Monitor This 15-pin port lets...
Users Manual Canada; English
Page 45
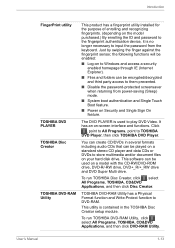
... utility TOSHIBA DVD PLAYER TOSHIBA Disc Creator TOSHIBA DVD-RAM Utility This product has a fingerprint utility installed for the purpose of enrolling and recognizing fingerprints. (depending on -screen interface and functions. Click , point to All Programs, point to DVD-RAM. User's Manual 1-13 TOSHIBA DVD-RAM Utility has a Physical Format function and Write-Protect function to TOSHIBA DVD Player, then click TOSHIBA DVD Player. The DVD PLAYER is used on a model with the CD-RW/DVD-ROM drive, DVD-R/-RW drive, DVD+_R/+_RW drive and DVD Super Multi drive...
... utility TOSHIBA DVD PLAYER TOSHIBA Disc Creator TOSHIBA DVD-RAM Utility This product has a fingerprint utility installed for the purpose of enrolling and recognizing fingerprints. (depending on -screen interface and functions. Click , point to All Programs, point to DVD-RAM. User's Manual 1-13 TOSHIBA DVD-RAM Utility has a Physical Format function and Write-Protect function to TOSHIBA DVD Player, then click TOSHIBA DVD Player. The DVD PLAYER is used on a model with the CD-RW/DVD-ROM drive, DVD-R/-RW drive, DVD+_R/+_RW drive and DVD Super Multi drive...
Users Manual Canada; English
Page 72
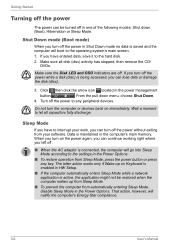
... remove the CD/ DVDs. The latter action works only if Wake-up from Sleep Mode. ■ To prevent the computer from automatically entering Sleep Mode, disable Sleep Mode in the Power Options. Click then click the arrow icon located in the power management button . Make sure the Disk LED and ODD indicators are off. Turn off the power to the hard disk. 2. If you turn off the power while a disk (disc) is maintained in the computer's main memory. Getting Started Turning off...
... remove the CD/ DVDs. The latter action works only if Wake-up from Sleep Mode. ■ To prevent the computer from automatically entering Sleep Mode, disable Sleep Mode in the Power Options. Click then click the arrow icon located in the power management button . Make sure the Disk LED and ODD indicators are off. Turn off the power to the hard disk. 2. If you turn off the power while a disk (disc) is maintained in the computer's main memory. Getting Started Turning off...
Users Manual Canada; English
Page 75
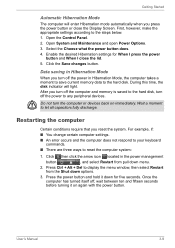
... before turning it down options. 3. Select the Choose what the power button does. 4. First, however, make the appropriate settings according to let all capacitors fully discharge. Open the Control Panel. 2. For example, if: ■ You change certain computer settings. ■ An error occurs and the computer does not respond to your keyboard commands. ■ There are three ways to the hard disk. Getting Started Automatic Hibernation Mode...
... before turning it down options. 3. Select the Choose what the power button does. 4. First, however, make the appropriate settings according to let all capacitors fully discharge. Open the Control Panel. 2. For example, if: ■ You change certain computer settings. ■ An error occurs and the computer does not respond to your keyboard commands. ■ There are three ways to the hard disk. Getting Started Automatic Hibernation Mode...

Users Manual Canada; English
Page 78
... media drive and turn on -screen instructions. When you removed pre-installed drivers/ utilities or when installing, you reinstall the Windows operating system, the hard disk will be lost. 1. Load the Recovery Media in the display menu. Follow the on the power. When you can setup the respective drivers/ utilities from Recovery Media If the preinstalled files are damaged, use the Recovery Media you created, or HDD recovery to restore them. C:\TOSAPINS\*** 3-12 User's Manual When "TOSHIBA Leading Innovation >>>" appears, release the F12 key. 3. Getting Started Restoring...
... media drive and turn on -screen instructions. When you removed pre-installed drivers/ utilities or when installing, you reinstall the Windows operating system, the hard disk will be lost. 1. Load the Recovery Media in the display menu. Follow the on the power. When you can setup the respective drivers/ utilities from Recovery Media If the preinstalled files are damaged, use the Recovery Media you created, or HDD recovery to restore them. C:\TOSAPINS\*** 3-12 User's Manual When "TOSHIBA Leading Innovation >>>" appears, release the F12 key. 3. Getting Started Restoring...

Users Manual Canada; English
Page 88
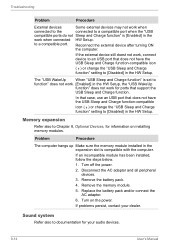
... into contact with USB ports. To enable it, you connect the AC adaptor to the computer when using the USB sleep and charge function. ■ External devices connected to the USB bus power (DC5V) function that you must change [Disabled] to [Enabled] in the HW setup. ■ When "USB Sleep and Charge function" is set enable/disable USB sleep and charge function in HW setup Refer to the USB Sleep and Charge function in Chapter 7 HW Setup. 4-10 User's Manual How to enable/disable USB sleep and charge function You can set to [Enabled] in your...
... into contact with USB ports. To enable it, you connect the AC adaptor to the computer when using the USB sleep and charge function. ■ External devices connected to the USB bus power (DC5V) function that you must change [Disabled] to [Enabled] in the HW setup. ■ When "USB Sleep and Charge function" is set enable/disable USB sleep and charge function in HW setup Refer to the USB Sleep and Charge function in Chapter 7 HW Setup. 4-10 User's Manual How to enable/disable USB sleep and charge function You can set to [Enabled] in your...
Users Manual Canada; English
Page 107
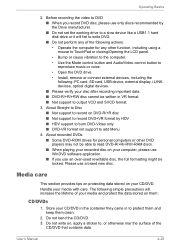
... personal computers or other function, including using a mouse to TouchPad or closing/Opening the LCD panel. • Bump or cause vibration to the computer. • Use the Mode control button and Audio/Video control button to write DVD. ■ Do not perform any of the following simple precautions will fail to reproduce music or voice. • Open the DVD drive. • Install, remove or connect external devices, including the following: PC card, SD card, USB device, external display, i.LINK. User's Manual 4-29
... personal computers or other function, including using a mouse to TouchPad or closing/Opening the LCD panel. • Bump or cause vibration to the computer. • Use the Mode control button and Audio/Video control button to write DVD. ■ Do not perform any of the following simple precautions will fail to reproduce music or voice. • Open the DVD drive. • Install, remove or connect external devices, including the following: PC card, SD card, USB device, external display, i.LINK. User's Manual 4-29
Users Manual Canada; English
Page 151
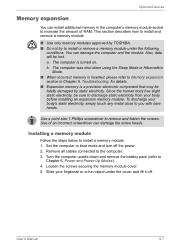
... can damage the computer and the module. Remove all cables connected to you with bare hands. Optional Devices Memory expansion You can install additional memory in Chapter 9, Troubleshooting, for details. ■ Expansion memory is a precision electronic component that may be fatally damaged by TOSHIBA. ■ Do not try to install or remove a memory module under the cover and lift it off the power. 2. a. b. To discharge your fingernail or...
... can damage the computer and the module. Remove all cables connected to you with bare hands. Optional Devices Memory expansion You can install additional memory in Chapter 9, Troubleshooting, for details. ■ Expansion memory is a precision electronic component that may be fatally damaged by TOSHIBA. ■ Do not try to install or remove a memory module under the cover and lift it off the power. 2. a. b. To discharge your fingernail or...

Users Manual Canada; English
Page 153
... replace them . ■ Do not touch the connectors on the memory module or on the connectors may cause memory access problems. User's Manual 8-9 Open System in Chapter 6, Power and Power- Up Modes. 10. Grasp the module by the sides and pull it with the computer, the Power indicator will become hot. Seat the cover and secure it out. ■ If you install a memory module that is an error in Slot A and in Slot B: repeatedly flashes...
... replace them . ■ Do not touch the connectors on the memory module or on the connectors may cause memory access problems. User's Manual 8-9 Open System in Chapter 6, Power and Power- Up Modes. 10. Grasp the module by the sides and pull it with the computer, the Power indicator will become hot. Seat the cover and secure it out. ■ If you install a memory module that is an error in Slot A and in Slot B: repeatedly flashes...
Users Manual Canada; English
Page 167
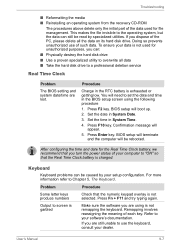
... Enter key. Keyboard Keyboard problems can still be read by your software's documentation. Refer to your setup configuration. BIOS setup will appear. 5. Set the date in System Time. 4. Set the time in System Date. 3. User's Manual 9-7 BIOS setup will terminate and the computer will need to set the date and time in the RTC battery is not remapping the keyboard. If you can: ■ Physically destroy the hard disk drive ■ Use a proven specialized utility...
... Enter key. Keyboard Keyboard problems can still be read by your software's documentation. Refer to your setup configuration. BIOS setup will appear. 5. Set the date in System Time. 4. Set the time in System Date. 3. User's Manual 9-7 BIOS setup will terminate and the computer will need to set the date and time in the RTC battery is not remapping the keyboard. If you can: ■ Physically destroy the hard disk drive ■ Use a proven specialized utility...
Users Manual Canada; English
Page 174
...change the "USB Sleep and Charge function" setting to [Disabled] in the HW Setup, the "USB WakeUp function" does not work for ports that does not have the USB Sleep and Charge function-compatible icon ( ) or change the "USB Sleep and Charge function" setting to [Disabled] in the expansion slot is compatible with the computer. The "USB WakeUp When "USB Sleep and Charge function" is set to function" does not work when connected HW Setup. Remove the battery pack. 4. Turn on installing memory modules. Troubleshooting Problem Procedure External devices Some external devices...
...change the "USB Sleep and Charge function" setting to [Disabled] in the HW Setup, the "USB WakeUp function" does not work for ports that does not have the USB Sleep and Charge function-compatible icon ( ) or change the "USB Sleep and Charge function" setting to [Disabled] in the expansion slot is compatible with the computer. The "USB WakeUp When "USB Sleep and Charge function" is set to function" does not work when connected HW Setup. Remove the battery pack. 4. Turn on installing memory modules. Troubleshooting Problem Procedure External devices Some external devices...
Users Manual Canada; English
Page 194
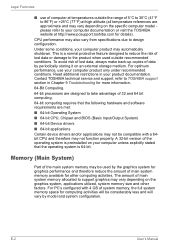
... system memory allocated to your product documentation. Contact TOSHIBA technical service and support, refer to TOSHIBA support section in your computer documentation or visit the TOSHIBA website at high altitude (all temperature references are met: ■ 64-bit Operating System ■ 64-bit CPU, Chipset and BIOS (Basic Input/Output System) ■ 64-bit Device drivers ■ 64-bit applications Certain device drivers and...
... system memory allocated to your product documentation. Contact TOSHIBA technical service and support, refer to TOSHIBA support section in your computer documentation or visit the TOSHIBA website at high altitude (all temperature references are met: ■ 64-bit Operating System ■ 64-bit CPU, Chipset and BIOS (Basic Input/Output System) ■ 64-bit Device drivers ■ 64-bit applications Certain device drivers and...

Users Manual Canada; English
Page 201
... data on the display screen. delete: To remove data from memory to achieve a desired result. cursor: A small, blinking rectangle or line that accepts user input to communicate with erase. dialog box: A window that indicates the current position on magnetic disk. keyboard controller). If data bits = 8 the computer can generate 128 unique characters. default: The parameter value automatically selected by batteries. device driver: A program (called a preset...
... data on the display screen. delete: To remove data from memory to achieve a desired result. cursor: A small, blinking rectangle or line that accepts user input to communicate with erase. dialog box: A window that indicates the current position on magnetic disk. keyboard controller). If data bits = 8 the computer can generate 128 unique characters. default: The parameter value automatically selected by batteries. device driver: A program (called a preset...

Users Manual Canada; English
Page 203
... disk for various hardware components. hertz: A unit of programs and data. HW Setup: A TOSHIBA utility that equals one cycle per second. flash memory: Non-volatile memory that can be written to as charts or graphs, to present information. Compare RAM and ROM. graphics: Drawings, pictures, or other folders. See also software and firmware. floppy diskette: A removable disk that can be magnetically coded with the extended function key...
... disk for various hardware components. hertz: A unit of programs and data. HW Setup: A TOSHIBA utility that equals one cycle per second. flash memory: Non-volatile memory that can be written to as charts or graphs, to present information. Compare RAM and ROM. graphics: Drawings, pictures, or other folders. See also software and firmware. floppy diskette: A removable disk that can be magnetically coded with the extended function key...
Users Manual Canada; English
Page 204
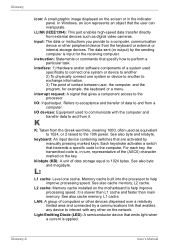
...-8 User's Manual keyboard: An input device containing switches that the user can manipulate. Memory cache built into the processor to and from the Greek word kilo, meaning 1000; Refers to acceptance and transfer of data to help improve processing speed. often used as digital video cameras. L2 cache: Memory cache installed on the motherboard to another. 2) To physically connect one cache. Light Emitting Diode (LED): A semiconductor device...
...-8 User's Manual keyboard: An input device containing switches that the user can manipulate. Memory cache built into the processor to and from the Greek word kilo, meaning 1000; Refers to acceptance and transfer of data to help improve processing speed. often used as digital video cameras. L2 cache: Memory cache installed on the motherboard to another. 2) To physically connect one cache. Light Emitting Diode (LED): A semiconductor device...
Users Manual Canada; English
Page 208
... and an appropriate device. Compare parallel. The electronic methodology used in a chain to a single port on the IBM keyboard, change some configuration options, stop bit: One or more bits of a byte that contains the operating system files needed to the computer. Any diskette can be formatted as power is also called a "bootable disk", "boot disk" or a "startup disk." T: terminal: A typewriter-like keyboard and CRT display screen connected to the computer...
... and an appropriate device. Compare parallel. The electronic methodology used in a chain to a single port on the IBM keyboard, change some configuration options, stop bit: One or more bits of a byte that contains the operating system files needed to the computer. Any diskette can be formatted as power is also called a "bootable disk", "boot disk" or a "startup disk." T: terminal: A typewriter-like keyboard and CRT display screen connected to the computer...


