

User Guide 1
Page 7
...(Waste from Electrical and Electronic Equipment) Directive is already working with a black bar symbol. Although the initial emphasis is in Europe, Toshiba is intended to trade-in European Union (EU) member countries after August 2005 to discard this product. This Directive requires producers of ... the disposal of electrical and electronic products put on recycling and reuse. Please contact your product, visit www.reuse.toshiba.com. If the product's battery or accumulator contains more than the specified values of waste management strategies that when the last end user wishes to...
...(Waste from Electrical and Electronic Equipment) Directive is already working with a black bar symbol. Although the initial emphasis is in Europe, Toshiba is intended to trade-in European Union (EU) member countries after August 2005 to discard this product. This Directive requires producers of ... the disposal of electrical and electronic products put on recycling and reuse. Please contact your product, visit www.reuse.toshiba.com. If the product's battery or accumulator contains more than the specified values of waste management strategies that when the last end user wishes to...

User Guide 1
Page 18
Contents Introduction 24 This guide 26 Safety icons 27 Other icons used 27 Your computer's features and specifications ....28 Other documentation 28 Service options 28 Chapter 1: Getting Started 29 Getting comfortable with your computer 29 Keeping yourself comfortable 30 Precautions 30 Important information on your computer's cooling fan 32 Setting up your computer 32 Connecting to a power source 33 Charging the main battery 35 Using the computer for the first time 36 Opening the display panel 36 Turning on the power 37 18
Contents Introduction 24 This guide 26 Safety icons 27 Other icons used 27 Your computer's features and specifications ....28 Other documentation 28 Service options 28 Chapter 1: Getting Started 29 Getting comfortable with your computer 29 Keeping yourself comfortable 30 Precautions 30 Important information on your computer's cooling fan 32 Setting up your computer 32 Connecting to a power source 33 Charging the main battery 35 Using the computer for the first time 36 Opening the display panel 36 Turning on the power 37 18
User Guide 1
Page 20
... 82 Restoring your work 83 Toshiba's online resources 83 Chapter 3: Mobile Computing 84 Toshiba's energy-saver design 84 Running the computer on battery power 84 Battery Notice 85 Power management 86 Using additional batteries 86 Charging batteries 86 Charging the main battery 87 Charging the RTC battery 87 Monitoring main battery power 88 Determining remaining battery power 90 What to...
... 82 Restoring your work 83 Toshiba's online resources 83 Chapter 3: Mobile Computing 84 Toshiba's energy-saver design 84 Running the computer on battery power 84 Battery Notice 85 Power management 86 Using additional batteries 86 Charging batteries 86 Charging the main battery 87 Charging the RTC battery 87 Monitoring main battery power 88 Determining remaining battery power 90 What to...
User Guide 1
Page 21
Contents 21 Changing the main battery 93 Removing the battery from the computer .........94 Inserting a charged battery 95 Taking care of your battery 96 Safety precautions 96 Maintaining your battery 97 Disposing of used batteries 98 Traveling tips 99 Chapter 4: Exploring Your Computer's Features 100 Exploring the desktop 100 Finding ... Using the Bridge Media Adapter Slot 109 Inserting memory media 110 Removing memory media 110 Chapter 5: Utilities 112 TOSHIBA Recovery Disc Creator 113 TOSHIBA Application Installer 113 TOSHIBA Password Utility 114 Deleting a user password 115
Contents 21 Changing the main battery 93 Removing the battery from the computer .........94 Inserting a charged battery 95 Taking care of your battery 96 Safety precautions 96 Maintaining your battery 97 Disposing of used batteries 98 Traveling tips 99 Chapter 4: Exploring Your Computer's Features 100 Exploring the desktop 100 Finding ... Using the Bridge Media Adapter Slot 109 Inserting memory media 110 Removing memory media 110 Chapter 5: Utilities 112 TOSHIBA Recovery Disc Creator 113 TOSHIBA Application Installer 113 TOSHIBA Password Utility 114 Deleting a user password 115
User Guide 1
Page 22
...Preset Power Profiles 121 Quickly creating a new power profile 121 Customizing a power profile 121 Mouse Utility 122 TOSHIBA Hardware Setup 123 TOSHIBA Zooming Utility 127 TOSHIBA Accessibility 128 Chapter 6: If Something Goes Wrong 129 Problems that are easy to fix 129 Problems when ... 136 Resolving hardware conflicts on your own .....136 Fixing a problem with Device Manager ...........137 Memory problems 139 Power and the batteries 139 Keyboard problems 141 Display problems 141 Disk, diskette, or storage drive problems........143 Sound system problems 145 Printer problems 146 ...
...Preset Power Profiles 121 Quickly creating a new power profile 121 Customizing a power profile 121 Mouse Utility 122 TOSHIBA Hardware Setup 123 TOSHIBA Zooming Utility 127 TOSHIBA Accessibility 128 Chapter 6: If Something Goes Wrong 129 Problems that are easy to fix 129 Problems when ... 136 Resolving hardware conflicts on your own .....136 Fixing a problem with Device Manager ...........137 Memory problems 139 Power and the batteries 139 Keyboard problems 141 Display problems 141 Disk, diskette, or storage drive problems........143 Sound system problems 145 Printer problems 146 ...

User Guide 1
Page 24
... leave this computer to meet the latest ENERGY STAR® guidelines for both AC power and battery modes. Introduction Welcome to the world of the Toshiba User's 24 With your Toshiba computer, your computer will provide the most stable operating environment and optimum system performance for energy ...efficiency. Your computer ships with the ENERGY STAR® logo on the computer and the following information applies. Toshiba is set to enter the low-power Standby mode which shuts down the system and display within 15 minutes of inactivity in the...
... leave this computer to meet the latest ENERGY STAR® guidelines for both AC power and battery modes. Introduction Welcome to the world of the Toshiba User's 24 With your Toshiba computer, your computer will provide the most stable operating environment and optimum system performance for energy ...efficiency. Your computer ships with the ENERGY STAR® logo on the computer and the following information applies. Toshiba is set to enter the low-power Standby mode which shuts down the system and display within 15 minutes of inactivity in the...
User Guide 1
Page 30
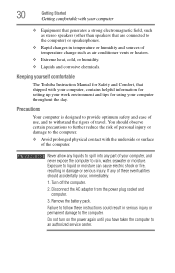
Disconnect the AC adaptor from the power plug socket and computer. 3. Remove the battery pack. Do not turn on the power again until you have taken the computer to the computer. You should accidentally occur, immediately: 1. Turn off the ... serious injury or permanent damage to an authorized service center. Never allow any liquids to spill into any of the computer. Keeping yourself comfortable The Toshiba Instruction Manual for using your computer throughout the day. Precautions Your computer is designed to provide optimum safety and ease of use, and to withstand...
Disconnect the AC adaptor from the power plug socket and computer. 3. Remove the battery pack. Do not turn on the power again until you have taken the computer to the computer. You should accidentally occur, immediately: 1. Turn off the ... serious injury or permanent damage to an authorized service center. Never allow any liquids to spill into any of the computer. Keeping yourself comfortable The Toshiba Instruction Manual for using your computer throughout the day. Precautions Your computer is designed to provide optimum safety and ease of use, and to withstand...
User Guide 1
Page 32
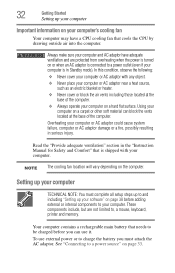
Your computer contains a rechargeable main battery that needs to be charged before you can block the vents located at the base of the computer. In this condition, observe the following: ❖ ... into the computer. NOTE The cooling fan location will vary depending on a carpet or other soft material can use external power or to charge the battery you must complete all setup steps up to and including "Setting up your software" on page 38 before adding external or internal components to , a mouse...
Your computer contains a rechargeable main battery that needs to be charged before you can block the vents located at the base of the computer. In this condition, observe the following: ❖ ... into the computer. NOTE The cooling fan location will vary depending on a carpet or other soft material can use external power or to charge the battery you must complete all setup steps up to and including "Setting up your software" on page 38 before adding external or internal components to , a mouse...

User Guide 1
Page 33
...was provided with your computer and the TOSHIBA Battery Charger (that the power plug (and extension cable plug if used) has been fully inserted into the socket, to do so may have been provided with your computer carefully to charge the computer's battery. TOSHIBA assumes no liability for any damage ...caused by TOSHIBA to avoid any risk of fire or other damage to the computer. Power cord/cable AC adaptor AC adaptor cord...
...was provided with your computer and the TOSHIBA Battery Charger (that the power plug (and extension cable plug if used) has been fully inserted into the socket, to do so may have been provided with your computer carefully to charge the computer's battery. TOSHIBA assumes no liability for any damage ...caused by TOSHIBA to avoid any risk of fire or other damage to the computer. Power cord/cable AC adaptor AC adaptor cord...

User Guide 1
Page 35
... computer's Power Saver utility can damage the battery. Disconnect the AC power cord/cable and remove the main battery pack. Getting Started Charging the main battery 35 The computer's main battery light gives you must charge the battery. See "Changing the main battery" on page 93 for the first time...the AC adaptor NOTE If the AC power light flashes amber during charging, either the main battery is malfunctioning, or it is charged for information on replacing the main battery. After that reduces the power required for system operation and will be completely charged and ...
... computer's Power Saver utility can damage the battery. Disconnect the AC power cord/cable and remove the main battery pack. Getting Started Charging the main battery 35 The computer's main battery light gives you must charge the battery. See "Changing the main battery" on page 93 for the first time...the AC adaptor NOTE If the AC power light flashes amber during charging, either the main battery is malfunctioning, or it is charged for information on replacing the main battery. After that reduces the power required for system operation and will be completely charged and ...
User Guide 1
Page 36
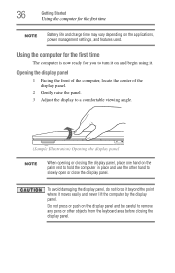
... not force it beyond the point where it . Using the computer for the first time The computer is now ready for the first time NOTE Battery life and charge time may vary depending on and begin using it moves easily and never lift the computer by the display panel. Opening the...
... not force it beyond the point where it . Using the computer for the first time The computer is now ready for the first time NOTE Battery life and charge time may vary depending on and begin using it moves easily and never lift the computer by the display panel. Opening the...

User Guide 1
Page 37
...-film transistors (TFT) and is also an intrinsic characteristic of the TFT manufacturing technology. When you plan to use AC power rather than battery power) are empty. 3 Press the power button in until the operating system has loaded completely. Getting Started Using the computer for the ...(Sample Illustration) Turning on the usage of the computer, the brightness of the screen while on battery power. NOTE The power button is disabled when the display panel is operated on battery power, the screen will deteriorate. Any small bright dots that may not be able to ensure...
...-film transistors (TFT) and is also an intrinsic characteristic of the TFT manufacturing technology. When you plan to use AC power rather than battery power) are empty. 3 Press the power button in until the operating system has loaded completely. Getting Started Using the computer for the ...(Sample Illustration) Turning on the usage of the computer, the brightness of the screen while on battery power. NOTE The power button is disabled when the display panel is operated on battery power, the screen will deteriorate. Any small bright dots that may not be able to ensure...

User Guide 1
Page 41
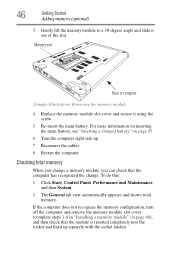
The operating system turns off computer window appears. 2 Click Turn Off. For information on removing the main battery, see "Removing the battery from the computer" on , begin at step 1; Memory module slot cover Front of computer (Sample Illustration) Locating the memory module slot cover The Turn off .... Getting Started Adding memory (optional) 41 If the computer is on page 94. otherwise, skip to locate the memory module slot cover. 5 Remove the main battery.
The operating system turns off computer window appears. 2 Click Turn Off. For information on removing the main battery, see "Removing the battery from the computer" on , begin at step 1; Memory module slot cover Front of computer (Sample Illustration) Locating the memory module slot cover The Turn off .... Getting Started Adding memory (optional) 41 If the computer is on page 94. otherwise, skip to locate the memory module slot cover. 5 Remove the main battery.

User Guide 1
Page 45
...memory after setting up . 17 Reconnect the cables. 18 Restart the computer. Getting Started Adding memory (optional) 45 15 Re-insert the main battery. You can verify that the computer has recognized it on again. 2 Pull the latches away from the memory module. If you turn off ... or Hibernation mode. In either of the above cases, the Standby configuration will be saved. For more information on inserting the main battery, see "Inserting a charged battery" on page 40 to remove a memory module with the computer turned on page 46. Removing a memory module If you can damage...
...memory after setting up . 17 Reconnect the cables. 18 Restart the computer. Getting Started Adding memory (optional) 45 15 Re-insert the main battery. You can verify that the computer has recognized it on again. 2 Pull the latches away from the memory module. If you turn off ... or Hibernation mode. In either of the above cases, the Standby configuration will be saved. For more information on inserting the main battery, see "Inserting a charged battery" on page 40 to remove a memory module with the computer turned on page 46. Removing a memory module If you can damage...
User Guide 1
Page 46
...Maintenance, and then System. 2 The General tab view automatically appears and shows total memory. For more information on inserting the main battery, see "Inserting a charged battery" on page 40), and then check that the computer has recognized the change. If the computer does not recognize the memory ...Sample Illustration) Removing the memory module 4 Replace the memory module slot cover and secure it using the screw. 5 Re-insert the main battery. Memory slot Back of the slot. Checking total memory When you change a memory module, you can check that the module is inserted completely...
...Maintenance, and then System. 2 The General tab view automatically appears and shows total memory. For more information on inserting the main battery, see "Inserting a charged battery" on page 40), and then check that the computer has recognized the change. If the computer does not recognize the memory ...Sample Illustration) Removing the memory module 4 Replace the memory module slot cover and secure it using the screw. 5 Re-insert the main battery. Memory slot Back of the slot. Checking total memory When you change a memory module, you can check that the module is inserted completely...

User Guide 1
Page 62
... connected to a network, use light are off your system settings so that, when you are using any of these options to fully charge the main battery. If you turn off . If you left off the power while a disk/disc is a good idea to save your desktop setup, during its advantages. TECHNICAL...
... connected to a network, use light are off your system settings so that, when you are using any of these options to fully charge the main battery. If you turn off . If you left off the power while a disk/disc is a good idea to save your desktop setup, during its advantages. TECHNICAL...

User Guide 1
Page 63
...For information on how to use and configure Hibernation mode see "Using and configuring Hibernation mode" on the internal storage drive, no main battery power. ❖ Because the state of the system is being retrieved from the internal storage drive rather than from memory, restarting from ...Hibernation takes a little more time and consumes more main battery power than when restarting from Standby. ❖ When starting up again, the computer returns to start up than restarting from where you...
...For information on how to use and configure Hibernation mode see "Using and configuring Hibernation mode" on the internal storage drive, no main battery power. ❖ Because the state of the system is being retrieved from the internal storage drive rather than from memory, restarting from ...Hibernation takes a little more time and consumes more main battery power than when restarting from Standby. ❖ When starting up again, the computer returns to start up than restarting from where you...

User Guide 1
Page 64
64 Getting Started Turning off the computer If you first need to activate it using Toshiba's Power Saver utility. 1 Click Start, Control Panel, and then Performance and Maintenance. 2 Click the TOSHIBA Power Saver icon. Using the Turn Off Computer command Use the following steps to turn off your ...computer. Turning off the computer more quickly You can also turn off the computer by pressing the power button. For information on using the Standby command and the main battery discharges...
64 Getting Started Turning off the computer If you first need to activate it using Toshiba's Power Saver utility. 1 Click Start, Control Panel, and then Performance and Maintenance. 2 Click the TOSHIBA Power Saver icon. Using the Turn Off Computer command Use the following steps to turn off your ...computer. Turning off the computer more quickly You can also turn off the computer by pressing the power button. For information on using the Standby command and the main battery discharges...
User Guide 1
Page 65
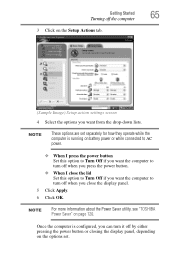
Once the computer is running on battery power or while connected to AC power. ❖ When I press the power button Set this option to Turn Off if you want the computer to ... lid Set this option to Turn Off if you want from the drop-down lists. NOTE For more information about the Power Saver utility, see "TOSHIBA Power Saver" on the options set. NOTE These options are set separately for how they operate while the computer is configured, you can turn it...
Once the computer is running on battery power or while connected to AC power. ❖ When I press the power button Set this option to Turn Off if you want the computer to ... lid Set this option to Turn Off if you want from the drop-down lists. NOTE For more information about the Power Saver utility, see "TOSHIBA Power Saver" on the options set. NOTE These options are set separately for how they operate while the computer is configured, you can turn it...

User Guide 1
Page 67
.... Once the computer is running on page 120. NOTE These options are set . NOTE For more information about the Power Saver utility, see "TOSHIBA Power Saver" on battery power or while connected to AC power. ❖ When I press the power button Set this option to Hibernate if you want the computer to...
.... Once the computer is running on page 120. NOTE These options are set . NOTE For more information about the Power Saver utility, see "TOSHIBA Power Saver" on battery power or while connected to AC power. ❖ When I press the power button Set this option to Hibernate if you want the computer to...


