Satellite M505 Resource Guide
Page 39
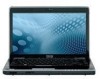
... side up slightly. If so, consult Windows® Help and Support. 2 Pull the latches away from the memory module. Adding memory (optional) 39 The following screen may need to scan your system has the memory modules stacked on top of the Safe Mode options is highlighted, then press Enter. When Safe...
... side up slightly. If so, consult Windows® Help and Support. 2 Pull the latches away from the memory module. Adding memory (optional) 39 The following screen may need to scan your system has the memory modules stacked on top of the Safe Mode options is highlighted, then press Enter. When Safe...
Satellite M505 Resource Guide
Page 40
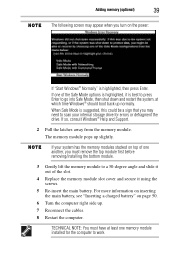
...slot until it . Removing an ExpressCard® 1 Prepare the card for safe removal, a message will tell you to increase the brightness of the screen while on battery power. Any small bright dots that comes with the card to see if you need to remove the card slot protector before...may appear on the side of the computer. 40 Your computer's TFT display Your computer's TFT display Small bright dots may appear on your screen display when you turn on your display are an intrinsic characteristic of the TFT manufacturing technology. Inserting an ExpressCard® Before you insert an ...
...slot until it . Removing an ExpressCard® 1 Prepare the card for safe removal, a message will tell you to increase the brightness of the screen while on battery power. Any small bright dots that comes with the card to see if you need to remove the card slot protector before...may appear on the side of the computer. 40 Your computer's TFT display Your computer's TFT display Small bright dots may appear on your screen display when you turn on your display are an intrinsic characteristic of the TFT manufacturing technology. Inserting an ExpressCard® Before you insert an ...
Satellite M505 Resource Guide
Page 42
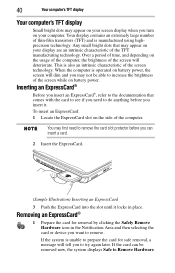
... edge of the secondary (right-hand) button depends on the program you would with any wheel device on previous video platforms. These features include wide-screen movies, multiple language tracks, digital surround sound, multiple camera angles, and interactive menus. Note that last region. Control buttons When a step instructs you ...-ROMs. If you to the right mouse button ("right-clicking"). 42 Using the optical drive Because the TouchPad is much smaller than the display screen, moving your cursor across the TouchPad in the preferred direction. Scrolling with an optical drive.
... edge of the secondary (right-hand) button depends on the program you would with any wheel device on previous video platforms. These features include wide-screen movies, multiple language tracks, digital surround sound, multiple camera angles, and interactive menus. Note that last region. Control buttons When a step instructs you ...-ROMs. If you to the right mouse button ("right-clicking"). 42 Using the optical drive Because the TouchPad is much smaller than the display screen, moving your cursor across the TouchPad in the preferred direction. Scrolling with an optical drive.
Satellite M505 Resource Guide
Page 55
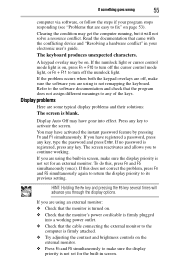
...contrast and brightness controls on page 53). Press any key. Read the documentation that the program does not assign different meanings to activate the screen. Refer to the computer is not remapping the keyboard. If you are off the numlock light. If the problem occurs when both the ...keypad overlays are using the built-in screen, make sure the display priority is not set for the built-in your program stops responding (see "Problems that are using an external monitor...
...contrast and brightness controls on page 53). Press any key. Read the documentation that the program does not assign different meanings to activate the screen. Refer to the computer is not remapping the keyboard. If you are off the numlock light. If the problem occurs when both the ...keypad overlays are using the built-in screen, make sure the display priority is not set for the built-in your program stops responding (see "Problems that are using an external monitor...
Satellite M505 Resource Guide
Page 56
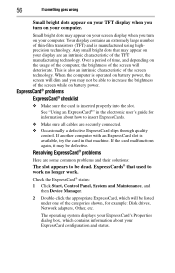
... Small bright dots appear on your TFT display when you turn on battery power. Your display contains an extremely large number of the screen technology. ExpressCard® problems ExpressCard® checklist ❖ Make sure the card is available, try the card in the electronic user...'s guide for example: Disk drives, Network adapters, Other, etc. Small bright dots may not be listed under one of the screen while on your computer. Check the ExpressCard® status: 1 Click Start, Control Panel, System and Maintenance, and then Device Manager. 2 Double...
... Small bright dots appear on your TFT display when you turn on battery power. Your display contains an extremely large number of the screen technology. ExpressCard® problems ExpressCard® checklist ❖ Make sure the card is available, try the card in the electronic user...'s guide for example: Disk drives, Network adapters, Other, etc. Small bright dots may not be listed under one of the screen while on your computer. Check the ExpressCard® status: 1 Click Start, Control Panel, System and Maintenance, and then Device Manager. 2 Double...
Satellite M505 Resource Guide
Page 59
... drive) removing 45 computer moving 47 setting up 34 59 computing tips 41 connecting AC adaptor 31 power cord/cable 32 printer 33 D display problems screen is blank 55 disposing of used batteries 52 double-click 42 DVD using 42 DVD-ROM or multi-function drive inserting discs 44 removing 45...
... drive) removing 45 computer moving 47 setting up 34 59 computing tips 41 connecting AC adaptor 31 power cord/cable 32 printer 33 D display problems screen is blank 55 disposing of used batteries 52 double-click 42 DVD using 42 DVD-ROM or multi-function drive inserting discs 44 removing 45...
Satellite M505 Resource Guide
Page 61
61 with computer on 46 ExpressCards® 40 main battery 49 memory module 38 S safety disposing of batteries 52 precautions 29 safety precautions main battery 51 saving files 41 screen problems blank screen 55 setting battery notification 49 setting up AC adaptor 31 computer 34 work environment 29 specifications Features and specifications 58 T tips on computing 41 Toshiba accessories memory 33 TouchPad™ control buttons 42 ON/OFF button 42 primary button 42 secondary button 42 using 41 U USB-compatible printer 33 W Web sites 57
61 with computer on 46 ExpressCards® 40 main battery 49 memory module 38 S safety disposing of batteries 52 precautions 29 safety precautions main battery 51 saving files 41 screen problems blank screen 55 setting battery notification 49 setting up AC adaptor 31 computer 34 work environment 29 specifications Features and specifications 58 T tips on computing 41 Toshiba accessories memory 33 TouchPad™ control buttons 42 ON/OFF button 42 primary button 42 secondary button 42 using 41 U USB-compatible printer 33 W Web sites 57

User Guide
Page 55
...of the TFT manufacturing technology. The ON/OFF light glows white. (Sample Illustration) Turning on battery power, the screen will load automatically. Your display contains an extremely large number of the screen technology. When the computer is manufactured using highprecision technology. Any small bright dots that all drives and slots are... deteriorate. When you turn on the computer for the first time Small bright dots may appear on your screen display when you plan to use AC power rather than battery power) are empty. 3 Press and release the power button. Turning on the ...
...of the TFT manufacturing technology. The ON/OFF light glows white. (Sample Illustration) Turning on battery power, the screen will load automatically. Your display contains an extremely large number of the screen technology. When the computer is manufactured using highprecision technology. Any small bright dots that all drives and slots are... deteriorate. When you turn on the computer for the first time Small bright dots may appear on your screen display when you plan to use AC power rather than battery power) are empty. 3 Press and release the power button. Turning on the ...
User Guide
Page 56
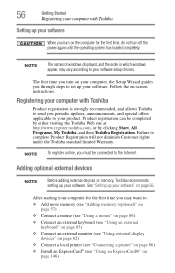
... offers applicable to your product. Follow the on page 146) Failure to the Internet. Adding optional external devices NOTE Before adding external devices or memory, Toshiba recommends setting up your software" on your computer, the Setup Wizard guides you through steps to set up your software. NOTE To register online, you... devices" on page 82) ❖ Connect a local printer (see "Connecting a printer" on page 86) ❖ Install an ExpressCard® (see "Using an ExpressCard®" on -screen instructions.
... offers applicable to your product. Follow the on page 146) Failure to the Internet. Adding optional external devices NOTE Before adding external devices or memory, Toshiba recommends setting up your software" on your computer, the Setup Wizard guides you through steps to set up your software. NOTE To register online, you... devices" on page 82) ❖ Connect a local printer (see "Connecting a printer" on page 86) ❖ Install an ExpressCard® (see "Using an ExpressCard®" on -screen instructions.

User Guide
Page 63
... Mode options is highlighted, it on . The computer could be saved. If one another, you turn it is highlighted, then press Enter. NOTE The following screen may need to scan your system has the memory modules stacked on top of one of the above cases, the Sleep configuration will be lost...
... Mode options is highlighted, it on . The computer could be saved. If one another, you turn it is highlighted, then press Enter. NOTE The following screen may need to scan your system has the memory modules stacked on top of one of the above cases, the Sleep configuration will be lost...
User Guide
Page 67
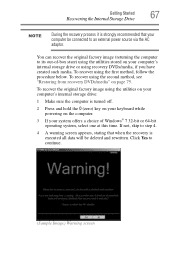
You can recover the original factory image (returning the computer to step 4. 4 A warning screen appears, stating that your computer's internal storage drive or using recovery DVDs/media, if you have created such media. To recover using the second method, ... using the utilities on your computer's internal storage drive: 1 Make sure the computer is executed all data will be connected to continue. (Sample Image) Warning screen To recover using the first method, follow the procedure below.
You can recover the original factory image (returning the computer to step 4. 4 A warning screen appears, stating that your computer's internal storage drive or using recovery DVDs/media, if you have created such media. To recover using the second method, ... using the utilities on your computer's internal storage drive: 1 Make sure the computer is executed all data will be connected to continue. (Sample Image) Warning screen To recover using the first method, follow the procedure below.

User Guide
Page 68
68 Getting Started Recovering the Internal Storage Drive 5 When the Toshiba Recovery Wizard opens and the Selecting a process screen displays, select Recovery of Factory Default Software and then click Next. (Sample Image) Selecting a Process screen 6 The Recovery of Factory Default Software screen Select Recover to out-of-box state. (Sample Image) Recovery of Factory Default Software screen appears.
68 Getting Started Recovering the Internal Storage Drive 5 When the Toshiba Recovery Wizard opens and the Selecting a process screen displays, select Recovery of Factory Default Software and then click Next. (Sample Image) Selecting a Process screen 6 The Recovery of Factory Default Software screen Select Recover to out-of-box state. (Sample Image) Recovery of Factory Default Software screen appears.

User Guide
Page 70
Click Yes to continue. (Sample Image) Warning screen 5 When the Toshiba Recovery Wizard opens and the Selecting a process screen displays, select Recovery of Factory Default Software and then click Next. (Sample Image) Selecting a Process screen 70 Getting Started Recovering the Internal Storage Drive 4 A warning screen appears, stating that when the recovery is executed all data will be deleted and rewritten.
Click Yes to continue. (Sample Image) Warning screen 5 When the Toshiba Recovery Wizard opens and the Selecting a process screen displays, select Recovery of Factory Default Software and then click Next. (Sample Image) Selecting a Process screen 70 Getting Started Recovering the Internal Storage Drive 4 A warning screen appears, stating that when the recovery is executed all data will be deleted and rewritten.

User Guide
Page 71
...have created other partitions (for example, a D: drive), those partitions will remain intact and any key on -screen arrow buttons in The size of Factory Default Software screen appears. Getting Started 71 Recovering the Internal Storage Drive 6 The Recovery of drive C: field to restart the... computer. Select Recover to a custom size portion. (Sample Image) Recovery of Factory Default Software screen 7 Use the on the keyboard ...
...have created other partitions (for example, a D: drive), those partitions will remain intact and any key on -screen arrow buttons in The size of Factory Default Software screen appears. Getting Started 71 Recovering the Internal Storage Drive 6 The Recovery of drive C: field to restart the... computer. Select Recover to a custom size portion. (Sample Image) Recovery of Factory Default Software screen 7 Use the on the keyboard ...

User Guide
Page 72
... Windows® 7 32-bit or 64-bit operating system, select one at this time. If not, skip to continue. (Sample Image) Warning screen Click Yes to step 4. 4 A warning screen appears stating that when the recovery is turned off. 2 Press and hold the 0 (zero) key on your keyboard while powering on the computer...
... Windows® 7 32-bit or 64-bit operating system, select one at this time. If not, skip to continue. (Sample Image) Warning screen Click Yes to step 4. 4 A warning screen appears stating that when the recovery is turned off. 2 Press and hold the 0 (zero) key on your keyboard while powering on the computer...

User Guide
Page 73
... proceeding. Getting Started 73 Recovering the Internal Storage Drive 5 When the Toshiba Recovery Wizard opens and the Selecting a process screen displays, select Recovery of Factory Default Software and then click Next. (Sample Image) Selecting a Process screen 6 The Recovery of Factory Default Software screen 7 Click Next. Select Recover without changing the hard drive partitions. (Sample...
... proceeding. Getting Started 73 Recovering the Internal Storage Drive 5 When the Toshiba Recovery Wizard opens and the Selecting a process screen displays, select Recovery of Factory Default Software and then click Next. (Sample Image) Selecting a Process screen 6 The Recovery of Factory Default Software screen 7 Click Next. Select Recover without changing the hard drive partitions. (Sample...
User Guide
Page 74
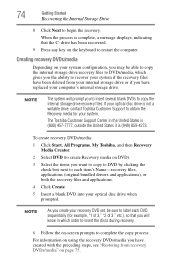
.... NOTE As you to insert several blank DVDs to complete the copy process. To create recovery DVDs/media: 1 Click Start, All Programs, My Toshiba, and then Recovery Media Creator. 2 Select DVD (to create Recovery media on your computer's internal storage drive. Creating recovery DVDs/media Depending on ...drive recovery files to DVDs/media, which order to insert the discs during recovery. 6 Follow the on-screen prompts to copy the internal storage drive recovery files. The Toshiba Customer Support Center in which gives you want to copy to DVD by clicking the check box next to...
.... NOTE As you to insert several blank DVDs to complete the copy process. To create recovery DVDs/media: 1 Click Start, All Programs, My Toshiba, and then Recovery Media Creator. 2 Select DVD (to create Recovery media on your computer's internal storage drive. Creating recovery DVDs/media Depending on ...drive recovery files to DVDs/media, which order to insert the discs during recovery. 6 Follow the on-screen prompts to copy the internal storage drive recovery files. The Toshiba Customer Support Center in which gives you want to copy to DVD by clicking the check box next to...
User Guide
Page 75
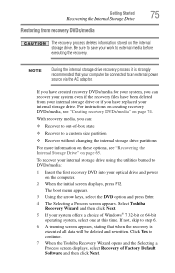
... your system even if the recovery files have been deleted from recovery DVDs/media The recovery process deletes information stored on page 74. Select Toshiba Recovery Wizard and then click Next. 5 If your internal storage drive. The boot menu appears. 3 Using the arrow keys, select the... for your system, you can : ❖ Recover to out-of-box state ❖ Recover to continue. 7 When the Toshiba Recovery Wizard opens and the Selecting a Process screen displays, select Recovery of Windows® 7 32-bit or 64-bit operating system, select one at this time. For instructions ...
... your system even if the recovery files have been deleted from recovery DVDs/media The recovery process deletes information stored on page 74. Select Toshiba Recovery Wizard and then click Next. 5 If your internal storage drive. The boot menu appears. 3 Using the arrow keys, select the... for your system, you can : ❖ Recover to out-of-box state ❖ Recover to continue. 7 When the Toshiba Recovery Wizard opens and the Selecting a Process screen displays, select Recovery of Windows® 7 32-bit or 64-bit operating system, select one at this time. For instructions ...
User Guide
Page 76
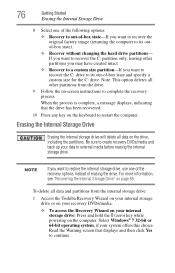
.... 10 Press any key on the keyboard to recover the C: partition only, leaving other partitions from the internal storage drive: 1 Access the Toshiba Recovery Wizard on your internal storage drive or on your recovery DVDs/media. ❖ To access the Recovery Wizard on your internal storage drive:...options instead of -box state and specify a custom size for the C: drive. For more information, see "Recovering the Internal Storage Drive" on -screen instructions to its out-of erasing the drive. NOTE If you want to restore the internal storage drive, use one of the following options: &#...
.... 10 Press any key on the keyboard to recover the C: partition only, leaving other partitions from the internal storage drive: 1 Access the Toshiba Recovery Wizard on your internal storage drive or on your recovery DVDs/media. ❖ To access the Recovery Wizard on your internal storage drive:...options instead of -box state and specify a custom size for the C: drive. For more information, see "Recovering the Internal Storage Drive" on -screen instructions to its out-of erasing the drive. NOTE If you want to restore the internal storage drive, use one of the following options: &#...
User Guide
Page 77
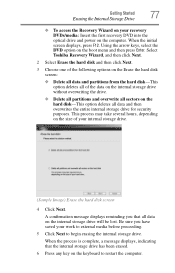
...all data and partitions from the hard disk-This option deletes all of your internal storage drive. (Sample Image) Erase the hard disk screen 4 Click Next. Select Toshiba Recovery Wizard, and then click Next. 2 Select Erase the hard disk and then click Next. 3 Choose one of the following options ...on the hard disk-This option deletes all data on the computer. When the initial screen displays, press F12. When the process is complete, a ...
...all data and partitions from the hard disk-This option deletes all of your internal storage drive. (Sample Image) Erase the hard disk screen 4 Click Next. Select Toshiba Recovery Wizard, and then click Next. 2 Select Erase the hard disk and then click Next. 3 Choose one of the following options ...on the hard disk-This option deletes all data on the computer. When the initial screen displays, press F12. When the process is complete, a ...


