
Satellite M505 Resource Guide
Page 41
... Windows® operating system records information, such as new icon positions may be activated. Simply move your finger on the TouchPad in front of the keyboard, is active. Label the backup copies clearly and store them in the computer's temporary memory until you to move the cursor with the stroke of...
... Windows® operating system records information, such as new icon positions may be activated. Simply move your finger on the TouchPad in front of the keyboard, is active. Label the backup copies clearly and store them in the computer's temporary memory until you to move the cursor with the stroke of...

Satellite M505 Resource Guide
Page 43
... to release the disc tray. Using the optical drive 43 For optimum DVD performance, it is open . The Media control buttons are located above the keyboard and can break off . When viewing DVD movies use a pencil to touch the lens or the area around it . Doing so could damage the disc...
... to release the disc tray. Using the optical drive 43 For optimum DVD performance, it is open . The Media control buttons are located above the keyboard and can break off . When viewing DVD movies use a pencil to touch the lens or the area around it . Doing so could damage the disc...

Satellite M505 Resource Guide
Page 44
... touch the surface of dust. 44 Using the optical drive Media control buttons The media control buttons located on the system control panel above the keyboard let you mute the sound and play audio CDs or DVD movies. The Next track button skips to the preceding track on certain models) To...
... touch the surface of dust. 44 Using the optical drive Media control buttons The media control buttons located on the system control panel above the keyboard let you mute the sound and play audio CDs or DVD movies. The Next track button skips to the preceding track on certain models) To...

Satellite M505 Resource Guide
Page 48
... be used . ❖ Flashes amber when the main battery charge is low and it indicates that stores your computer is suspended (using all of the keyboard). TECHNICAL NOTE: The recharging of the battery cannot occur when your system configuration settings and the current time and date information. 48 Mobile computing either...
... be used . ❖ Flashes amber when the main battery charge is low and it indicates that stores your computer is suspended (using all of the keyboard). TECHNICAL NOTE: The recharging of the battery cannot occur when your system configuration settings and the current time and date information. 48 Mobile computing either...
Satellite M505 Resource Guide
Page 55
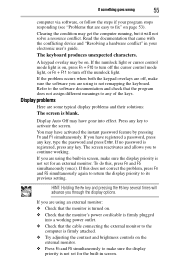
... by pressing Fn and F1 simultaneously. Display problems Here are some typical display problems and their solutions: The screen is not remapping the keyboard. Display Auto Off may be on page 53). Read the documentation that came with the conflicting device and "Resolving a hardware conflict" ...key, type the password and press Enter. If this , press Fn and F5 simultaneously (once). If you through the display options. The keyboard produces unexpected characters. You may get the computer running, but it will advance you have registered a password, press any key. To do ...
... by pressing Fn and F1 simultaneously. Display problems Here are some typical display problems and their solutions: The screen is not remapping the keyboard. Display Auto Off may be on page 53). Read the documentation that came with the conflicting device and "Resolving a hardware conflict" ...key, type the password and press Enter. If this , press Fn and F5 simultaneously (once). If you through the display options. The keyboard produces unexpected characters. You may get the computer running, but it will advance you have registered a password, press any key. To do ...

Satellite M505 Resource Guide
Page 60
60 installing main battery 49, 50 memory module 33 K keyboard not working 54 unexpected characters 55 L light AC power 31 drive in-use indicator 43 M main battery changing 49 installing 49, 50 removing 49 safety ... solving computer hangs when ExpressCard® inserted 57 computer will not power up 54 contacting Toshiba 57 display is blank 55 ExpressCard® checklist 56 ExpressCard® slot appears dead 56 external monitor 55 keyboard not responding 54 keyboard produces unexpected characters 55 program not responding 53 R real-time clock (RTC) battery 48...
60 installing main battery 49, 50 memory module 33 K keyboard not working 54 unexpected characters 55 L light AC power 31 drive in-use indicator 43 M main battery changing 49 installing 49, 50 removing 49 safety ... solving computer hangs when ExpressCard® inserted 57 computer will not power up 54 contacting Toshiba 57 display is blank 55 ExpressCard® checklist 56 ExpressCard® slot appears dead 56 external monitor 55 keyboard not responding 54 keyboard produces unexpected characters 55 program not responding 53 R real-time clock (RTC) battery 48...

User Guide
Page 35
Contents 35 Turning on the power 55 Setting up your software 56 Registering your computer with Toshiba 56 Adding optional external devices 56 Adding memory (optional 57 Installing a memory module 57 Removing a memory module 62 Checking total memory 65 Recovering the Internal... display device 83 Directing the display output when you turn on the computer 84 Adjusting the quality of the external display......85 Using an external keyboard 85 Using a mouse 86 Connecting a printer 86 Setting up a printer 87 Turning off the computer 87 Options for turning off the computer 88 Using the...
Contents 35 Turning on the power 55 Setting up your software 56 Registering your computer with Toshiba 56 Adding optional external devices 56 Adding memory (optional 57 Installing a memory module 57 Removing a memory module 62 Checking total memory 65 Recovering the Internal... display device 83 Directing the display output when you turn on the computer 84 Adjusting the quality of the external display......85 Using an external keyboard 85 Using a mouse 86 Connecting a printer 86 Setting up a printer 87 Turning off the computer 87 Options for turning off the computer 88 Using the...
User Guide
Page 36
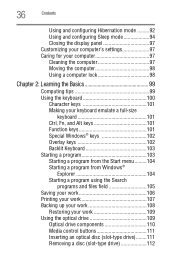
...computer 97 Moving the computer 98 Using a computer lock 98 Chapter 2: Learning the Basics 99 Computing tips 99 Using the keyboard 100 Character keys 101 Making your keyboard emulate a full-size keyboard 101 Ctrl, Fn, and Alt keys 101 Function keys 101 Special Windows® keys 102 Overlay keys 102 Backlit... Keyboard 103 Starting a program 103 Starting a program from the Start menu.........104 Starting a program from Windows® Explorer 104 Starting a program using the ...
...computer 97 Moving the computer 98 Using a computer lock 98 Chapter 2: Learning the Basics 99 Computing tips 99 Using the keyboard 100 Character keys 101 Making your keyboard emulate a full-size keyboard 101 Ctrl, Fn, and Alt keys 101 Function keys 101 Special Windows® keys 102 Overlay keys 102 Backlit... Keyboard 103 Starting a program 103 Starting a program from the Start menu.........104 Starting a program from Windows® Explorer 104 Starting a program using the ...
User Guide
Page 40
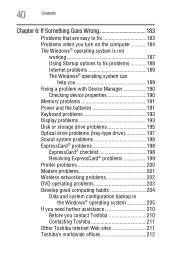
... operating system can help you 189 Fixing a problem with Device Manager 190 Checking device properties 190 Memory problems 191 Power and the batteries 191 Keyboard problems 193 Display problems 193 Disk or storage drive problems 195 Optical drive problems (tray-type drive 197 Sound system problems 198 ExpressCard® problems... habits 204 Data and system configuration backup in the Windows® operating system 205 If you need further assistance 210 Before you contact Toshiba 210 Contacting Toshiba 211 Other Toshiba Internet Web sites 211 Toshiba's worldwide offices 212
... operating system can help you 189 Fixing a problem with Device Manager 190 Checking device properties 190 Memory problems 191 Power and the batteries 191 Keyboard problems 193 Display problems 193 Disk or storage drive problems 195 Optical drive problems (tray-type drive 197 Sound system problems 198 ExpressCard® problems... habits 204 Data and system configuration backup in the Windows® operating system 205 If you need further assistance 210 Before you contact Toshiba 210 Contacting Toshiba 211 Other Toshiba Internet Web sites 211 Toshiba's worldwide offices 212
User Guide
Page 41
Contents 41 Appendix A: Hot Keys/TOSHIBA Cards 214 Hot Key Cards 214 Using the Hot Key Cards 215 Application Cards 216 Using the Application Cards 217 Card Case 218 Hot key functions 218 Volume Mute 219 Lock (Instant security 220 Power plan 221 Sleep mode 222 Hibernation mode 223 Output (Display switch 224 Display brightness 225 Disabling or enabling wireless devices............226 Disabling or enabling the TouchPad 227 Zoom (Display resolution 228 Keyboard hot key functions 229 Appendix B: Power Cord/Cable Connectors 230 Glossary 231 Index 245
Contents 41 Appendix A: Hot Keys/TOSHIBA Cards 214 Hot Key Cards 214 Using the Hot Key Cards 215 Application Cards 216 Using the Application Cards 217 Card Case 218 Hot key functions 218 Volume Mute 219 Lock (Instant security 220 Power plan 221 Sleep mode 222 Hibernation mode 223 Output (Display switch 224 Display brightness 225 Disabling or enabling wireless devices............226 Disabling or enabling the TouchPad 227 Zoom (Display resolution 228 Keyboard hot key functions 229 Appendix B: Power Cord/Cable Connectors 230 Glossary 231 Index 245
User Guide
Page 50
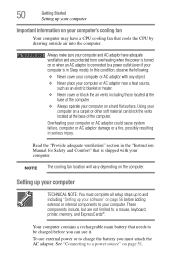
... located at the base of the computer. ❖ Always operate your computer on a carpet or other soft material can use external power or to , a mouse, keyboard, printer, memory, and ExpressCards®. In this condition, observe the following: ❖ Never cover your computer or AC adaptor with your computer. Overheating your computer...
... located at the base of the computer. ❖ Always operate your computer on a carpet or other soft material can use external power or to , a mouse, keyboard, printer, memory, and ExpressCards®. In this condition, observe the following: ❖ Never cover your computer or AC adaptor with your computer. Overheating your computer...
User Guide
Page 54
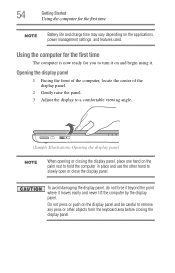
... center of the display panel. 2 Gently raise the panel. 3 Adjust the display to hold the computer in place and use the other objects from the keyboard area before closing the display panel. Using the computer for the first time The computer is now ready for the first time NOTE Battery life...
... center of the display panel. 2 Gently raise the panel. 3 Adjust the display to hold the computer in place and use the other objects from the keyboard area before closing the display panel. Using the computer for the first time The computer is now ready for the first time NOTE Battery life...
User Guide
Page 56
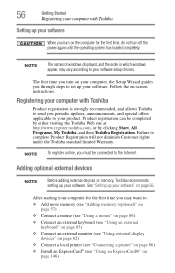
... To register online, you may vary according to your product. Adding optional external devices NOTE Before adding external devices or memory, Toshiba recommends setting up your computer for the first time, do not turn on your software. Product registration can be connected to :..."Adding memory (optional)" on page 57) ❖ Connect a mouse (see "Using a mouse" on page 86) ❖ Connect an external keyboard (see "Using an external keyboard" on page 85) ❖ Connect an external monitor (see "Using external display devices" on page 82) ❖ Connect a local printer (...
... To register online, you may vary according to your product. Adding optional external devices NOTE Before adding external devices or memory, Toshiba recommends setting up your computer for the first time, do not turn on your software. Product registration can be connected to :..."Adding memory (optional)" on page 57) ❖ Connect a mouse (see "Using a mouse" on page 86) ❖ Connect an external keyboard (see "Using an external keyboard" on page 85) ❖ Connect an external monitor (see "Using external display devices" on page 82) ❖ Connect a local printer (...
User Guide
Page 67
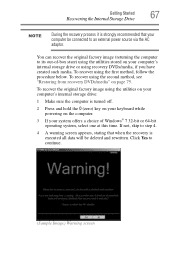
... image using the utilities on your computer's internal storage drive: 1 Make sure the computer is turned off. 2 Press and hold the 0 (zero) key on your keyboard while powering on the computer. 3 If your computer's internal storage drive or using the utilities stored on page 75.
... image using the utilities on your computer's internal storage drive: 1 Make sure the computer is turned off. 2 Press and hold the 0 (zero) key on your keyboard while powering on the computer. 3 If your computer's internal storage drive or using the utilities stored on page 75.

User Guide
Page 69
... to an external power source via the AC adaptor. When the process is turned off. 2 Press and hold the 0 (zero) key on your keyboard while powering on the keyboard to begin the recovery. A confirmation message displays reminding you have created such media. Getting Started 69 Recovering the Internal Storage Drive 7 Click Next.
... to an external power source via the AC adaptor. When the process is turned off. 2 Press and hold the 0 (zero) key on your keyboard while powering on the keyboard to begin the recovery. A confirmation message displays reminding you have created such media. Getting Started 69 Recovering the Internal Storage Drive 7 Click Next.

User Guide
Page 71
... Press any information on the C: drive. Getting Started 71 Recovering the Internal Storage Drive 6 The Recovery of Factory Default Software screen 7 Use the on the keyboard to set the partition size. 8 Click Next. When the process is strongly recommended that all information stored on them will be affected. Select Recover to...
... Press any information on the C: drive. Getting Started 71 Recovering the Internal Storage Drive 6 The Recovery of Factory Default Software screen 7 Use the on the keyboard to set the partition size. 8 Click Next. When the process is strongly recommended that all information stored on them will be affected. Select Recover to...

User Guide
Page 72
...) Warning screen Click Yes to step 4. 4 A warning screen appears stating that when the recovery is turned off. 2 Press and hold the 0 (zero) key on your keyboard while powering on the computer. 3 If your computer's internal storage drive or by using recovery DVDs/media, if you have created such media. 72 Getting...
...) Warning screen Click Yes to step 4. 4 A warning screen appears stating that when the recovery is turned off. 2 Press and hold the 0 (zero) key on your keyboard while powering on the computer. 3 If your computer's internal storage drive or by using recovery DVDs/media, if you have created such media. 72 Getting...
User Guide
Page 74
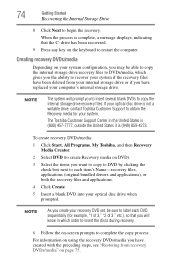
...to copy the internal storage drive recovery files to DVDs/media, which order to insert the discs during recovery. 6 Follow the on the keyboard to complete the copy process. NOTE As you create your system. When the process is (800) 457-7777; If your internal storage... steps, see "Restoring from your optical disc drive is (949) 859-4273. outside the United States it is not a writable drive, contact Toshiba Customer Support to label each item's Name-recovery files, applications (original bundled drivers and applications), or both the recovery files and applications. 4 Click...
...to copy the internal storage drive recovery files to DVDs/media, which order to insert the discs during recovery. 6 Follow the on the keyboard to complete the copy process. NOTE As you create your system. When the process is (800) 457-7777; If your internal storage... steps, see "Restoring from your optical disc drive is (949) 859-4273. outside the United States it is not a writable drive, contact Toshiba Customer Support to label each item's Name-recovery files, applications (original bundled drivers and applications), or both the recovery files and applications. 4 Click...
User Guide
Page 76
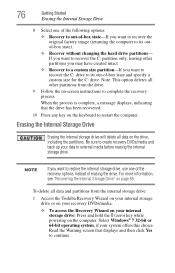
...Erasing the Internal Storage Drive Erasing the internal storage drive will delete all data and partitions from the drive. 9 Follow the on the keyboard to complete the recovery process. Read the Warning screen that the drive has been recovered. 10 Press any key on -screen instructions to ...size for the C: drive. If you want to recover the C: partition only, leaving other partitions from the internal storage drive: 1 Access the Toshiba Recovery Wizard on your internal storage drive or on your recovery DVDs/media. ❖ To access the Recovery Wizard on your internal storage drive: ...
...Erasing the Internal Storage Drive Erasing the internal storage drive will delete all data and partitions from the drive. 9 Follow the on the keyboard to complete the recovery process. Read the Warning screen that the drive has been recovered. 10 Press any key on -screen instructions to ...size for the C: drive. If you want to recover the C: partition only, leaving other partitions from the internal storage drive: 1 Access the Toshiba Recovery Wizard on your internal storage drive or on your recovery DVDs/media. ❖ To access the Recovery Wizard on your internal storage drive: ...
User Guide
Page 77
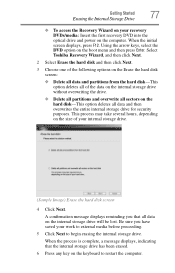
Be sure you that the internal storage drive has been erased. 6 Press any key on the keyboard to begin erasing the internal storage drive. This process may take several hours, depending on the size of the data on the internal storage drive ... reminding you have saved your work to external media before proceeding. 5 Click Next to restart the computer. When the initial screen displays, press F12. Select Toshiba Recovery Wizard, and then click Next. 2 Select Erase the hard disk and then click Next. 3 Choose one of the following options on the Erase the...
Be sure you that the internal storage drive has been erased. 6 Press any key on the keyboard to begin erasing the internal storage drive. This process may take several hours, depending on the size of the data on the internal storage drive ... reminding you have saved your work to external media before proceeding. 5 Click Next to restart the computer. When the initial screen displays, press F12. Select Toshiba Recovery Wizard, and then click Next. 2 Select Erase the hard disk and then click Next. 3 Choose one of the following options on the Erase the...


